You Can Now Have Zoom Meetings on an Apple TV

When Apple introduced tvOS 17 last September, an eagerly awaited feature was its support for FaceTime calls, using Continuity Camera on an iPhone or iPad to equip an Apple TV with the necessary camera and microphone. FaceTime on the Apple TV requires a second-generation Apple TV 4K or later and an iPhone running iOS 17 or an iPad running iPadOS 17.

The feature works pretty well. Setting up Continuity Camera is simple—you launch the FaceTime app on the Apple TV, select your user profile, confirm on the iPhone or iPad, and then position the iPhone or iPad in landscape orientation so the rear camera faces you. You can start FaceTime calls from the Apple TV or move a call in progress from an iPhone or iPad to the Apple TV. The video quality is excellent, the audio is surprisingly good even across the room, and Center Stage zooms and pans to keep you in the picture. You can also add reactions like hearts and fireworks with hand gestures. Or not.

But that’s not what we’re here to talk about today. Apple also said that other videoconferencing apps like Zoom and Webex would be coming to the Apple TV, which could make the Apple TV a compelling addition to offices and conference rooms everywhere. It’s also perfect for joining Zoom-based exercise classes or community meetings from the comfort of your living room. In December 2023, Zoom was the first out of the gate, shipping its Zoom for Home TV app for tvOS 17.

With Zoom available, the Apple TV becomes an interesting option for businesses and organizations that want to display video meetings on a large screen. In the past, it was possible to use AirPlay to share an iPhone or iPad screen to an Apple TV, but it was difficult to position the iPhone or iPad effectively, and there was no way to use the higher-quality rear-facing camera.

To get started, launch the Zoom app on the Apple TV. It first prompts you to connect your iPhone via Continuity Camera. Select the Apple ID account that matches the one logged in on the iPhone, bring the iPhone close, tap the notification that appears, and tap Accept. Then, turn the iPhone around and set it down on the base of the TV with the rear camera facing you.

Next, you’ll be prompted to pair it with your account, which you can do most easily by navigating to https://zoom.us/pair on another device and entering a code.

Once you’re connected to your account, you can create a new meeting or join an existing meeting.

Here’s where things get tricky. It’s easy to start a meeting—select New Meeting on the main screen—but inviting people is more arduous. Starting from the Contacts screen or choosing Invite from the More pop-up menu requires that you laboriously enter an email address to invite someone via email. Instead, we recommend that you first add people on the Personal Contacts screen in your account on the Zoom website. After that, you can select several people and invite them to the meeting. Unfortunately, in our testing, the email invitations didn’t always arrive.

The remaining option is to swipe up on the clickpad during a meeting to select the green shield button in the upper-left corner. That displays the meeting details, and a Join by Laptop button (the second screenshot below) shows the necessary URL, meeting ID, and passcode to share in another channel, like Messages or the phone. There’s no other way to share a link to a meeting that we could find.

Joining someone else’s meeting is difficult. Most Zoom meetings are shared via a link, and once you click or tap it in email, Messages, a calendar event, or on a website, the meeting starts. The Apple TV breaks that model—there’s no apparent way to load a Zoom link. FaceTime sidesteps this limitation by making it easy to move a call from the iPhone to the Apple TV—just put the iPhone close to the Apple TV, and a notification will suggest the move. Zoom offers no such option.

Instead, to join a Zoom call, you must manually enter the meeting ID and passcode. If you’ve been sent only the link, you’ll have to request the passcode separately (the numeric meeting ID can be extracted from the URL). Entering characters with the Siri Remote is slow and awkward, so we recommend using Siri, which recognizes spoken numbers well (hold down the Siri button on the side of the remote). You could also use an iPhone or iPad as a remote control for the Apple TV since you can type more effectively or use copy and paste on those devices. But if you’re already using your iPhone for Continuity Camera, for instance, you’ll need another device. Zoom does provide a Meeting History, which is helpful for recurring meetings, but you must still enter the passcode each time.

Once you start a call, touch the clickpad on the Siri Remote to display the Zoom menu at the bottom of the screen. You can then navigate using the clickpad (press the center to activate the selected command) and the Back button. Available options let you mute yourself, turn your video off and on, switch between the usual Zoom views, display Zoom reactions, manage participants, invite more people, turn on captions, and control the Continuity Camera video effects (Center Stage, Portrait Mode, and Apple’s gestural Reactions). Center Stage does an excellent job of following you around as you move. Portrait Mode just makes the background a little fuzzy; it’s not a strong effect. If you press the Back button to leave the Zoom app, your video pauses for others on the call.

Two common Zoom actions don’t translate fully to the Apple TV: chat and screen sharing. Incoming chat messages appear on the Apple TV in the corner, but only for 6 seconds, and longer messages are truncated after a handful of lines. There’s no way to keep them onscreen longer or get back to them. There’s no way to reply to chat messages. Zoom on the Apple TV does provide an option to share the screen, but that’s the screen of another device—there’s no app or desktop to share on the Apple TV, and no, you can’t share video.

Overall, the Zoom app for Apple TV feels like a 1.0. Most of the features that make sense are present, but fully adapting to a platform that lacks a keyboard or any way to follow links will take Zoom some time. If the company could add the capability to move an in-progress call from an iPhone or iPad to an Apple TV as FaceTime can, that would help a lot. Another possible concern is the need to have the Apple ID on the Apple TV match the one on the iPhone—all the possible logins could get confusing in a larger office.

Regardless, Zoom on the Apple TV works well enough to try out. Just make sure to run through the initial setup well before your meeting is due to start.

(Featured image based on an original by iStock.com/gorodenkoff)

Help! My Account Has Been Hacked—What Should I Do?

How would you realize that one or more of your Internet accounts—email, social media, financial—have been hacked? (Some prefer the terms “compromised” or “breached”—you may hear them from support techs.) Unfortunately, there’s no telltale warning sign because “hacked” could mean any number of things. Here are some possible indications:

  • People you trust report receiving email that you didn’t send.
  • Social media friend requests are made to people you don’t know, or messages you don’t recognize are sent from your account.
  • Although you’re certain you have the correct password, you can’t log in to an account.
  • You become aware of your personal data appearing in places it shouldn’t.
  • Unknown charges or transfers appear in a bank or credit card account.

However, attackers will also try to fool you into thinking an account has been compromised to get you to enter passwords or financial information on a website designed to steal data. Don’t assume you’ve been hacked just because you received a phishing email saying so or because you see unexpected notifications claiming your computer is infected. No legitimate entity will ever send such email, and the only notification about malware you should ever see would come from anti-malware software you installed.

(Speaking of malware, dealing with that is a topic for another day—we’re focusing on online accounts in this article. Nonetheless, if one of your accounts has been compromised, it’s also worth scanning your Mac with the free version of Malwarebytes or VirusBarrier Scanner, just in case.)

First off, don’t panic. It’s important to take a deep breath, document everything you see with screenshots (press Command-Shift-5), and move quickly to regain control over whatever accounts were hacked and prevent others from falling prey to the attacker.

When you suspect an account has been compromised, try to verify the problem. Do the following:

  • Alert techs: If the account in question is for work, immediately alert your IT department and follow their instructions. If it’s a personal account, contact us. Tell whoever is helping you that you have screenshots you can send and be ready to forward any suspicious messages you have as well.
  • Gather evidence: Ask the person who told you about the problem to forward the message they received to another of your email addresses, or to a close friend or family member so you can see what’s being said in your name. Scrutiny of the fake message may reveal information about what has happened, though you may need help from someone with more technical experience.
  • Examine email: Since email account breaches are the most concerning (because they can be used to reset passwords elsewhere), scan your email for messages you didn’t send or replies to such messages. Along with the Inbox, look in the Sent mailbox and the Trash. Also, check your settings and filters to ensure incoming messages aren’t being forwarded elsewhere and then deleted.
  • Check social media: Connect to all your social media accounts—even those you don’t use regularly—and look for posts, friend requests, messages, or anything else that suggests an attacker has been impersonating you.
  • Audit accounts: Log in to important accounts and look for suspicious activity, such as login attempts from unfamiliar locations or IP addresses or changes to account settings.

If you find evidence to suggest that one or more of your accounts have been compromised, follow these steps:

  • Immediately change the passwords for any affected accounts. We always recommend using a password manager like 1Password to generate strong, random passwords.
  • Whenever possible, turn on two-factor authentication.
  • If available for the account in question, follow advice from the service. Apple, Facebook, Google, Instagram, Microsoft, and Twitter all have advice on how to respond, as will many other companies.
  • Review account settings for unauthorized changes, especially recovery options like backup phone numbers and email addresses.
  • Look through your accounts in your password manager and change the passwords for the most important ones and any that might be related.
  • If you can’t get into an account because the password has been changed, make sure you have sole control of your email account and then trigger a password reset.
  • For affected financial accounts, along with changing the password, immediately call the institution and ask for their help locking the account to prevent any transfers.
  • If your email account was used to send phishing messages to contacts, you should alert any friends, family, and colleagues who might have received the messages that your account was hacked and that the previous message wasn’t from you.

Security breaches are stressful, we know, but it’s imperative that you deal with them right away. The longer you wait, the more damage the attacker can cause, including stealing your money, impersonating you, scamming your friends and family, and compromising your employer’s systems. We’re here to help.

(Featured image by iStock.com/PUGUN SJ)

How to Search Directly in Your Favorite Websites from Safari’s Search Bar

We’re all accustomed to searching the Web generally in Safari by typing in the search field and pressing Return or tapping Go. Most of us are also familiar with the search suggestions that Safari shows below the search field as we type.

But did you know that Safari has a feature that lets you use the search field to search directly within your favorite websites, so you don’t have to wade through unnecessary search engine results or navigate somewhere manually before searching? It’s called Quick Website Search and is available for the Mac, iPhone, and iPad. It’s helpful for websites within which you search often. For example, we often search for technical information on Apple’s website. You might find the feature helpful for searching Amazon or another shopping site, a help center, or an events calendar.

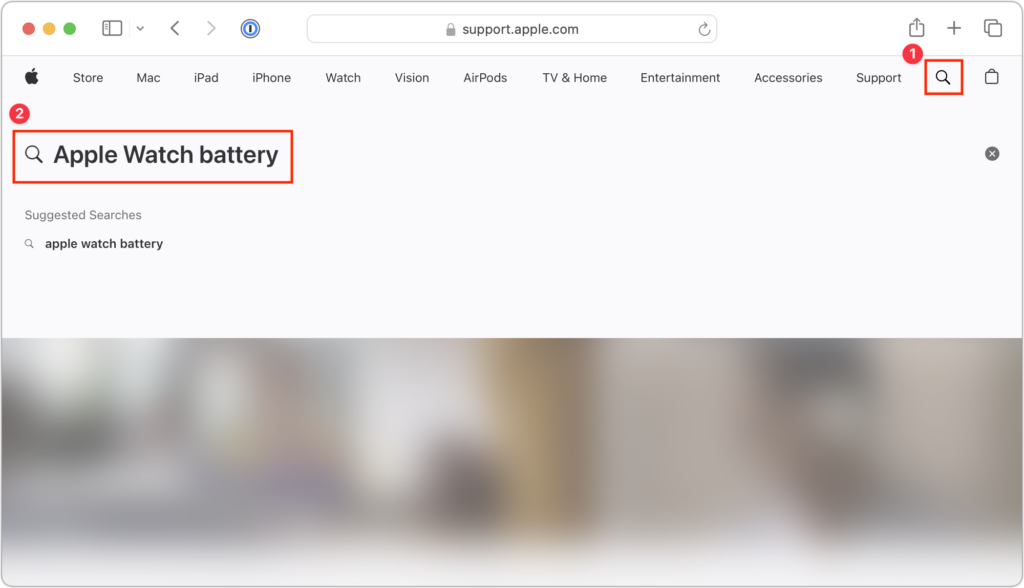
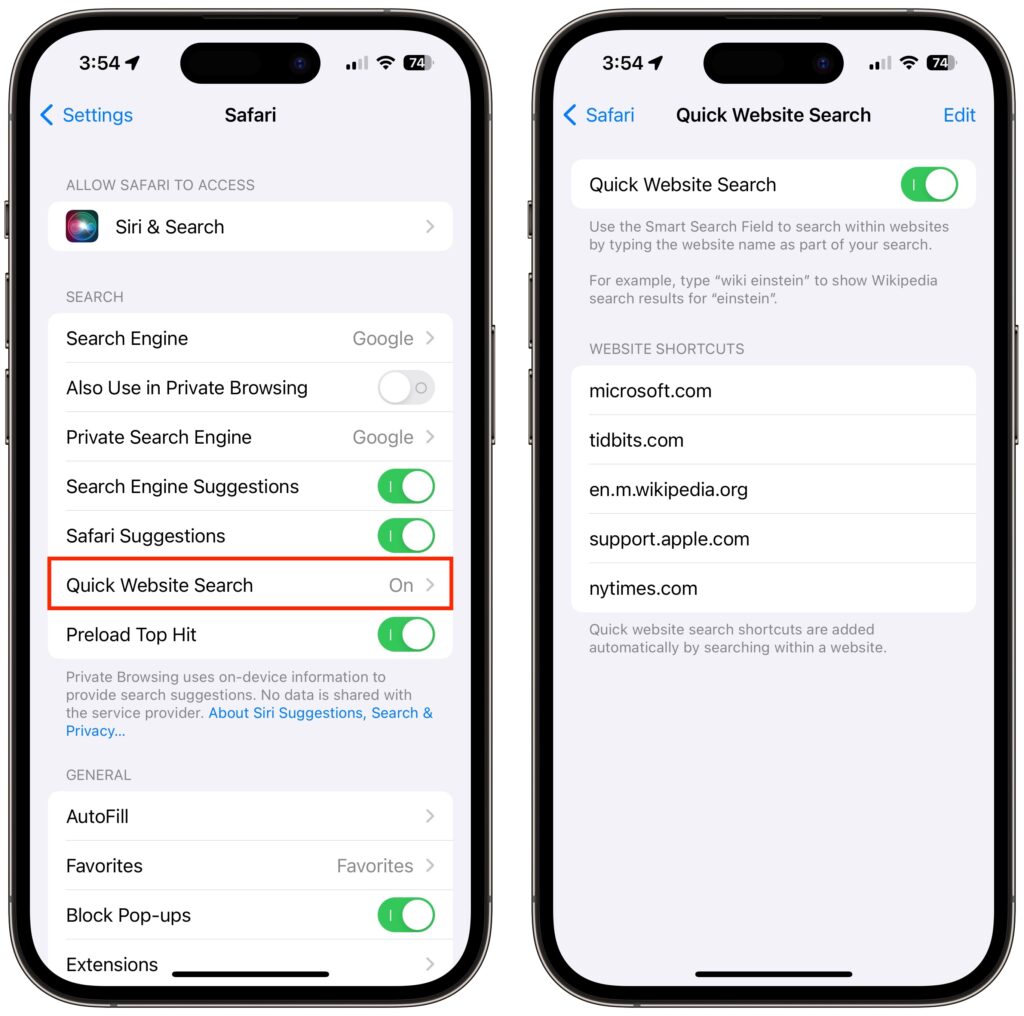
All you have to do to prime Quick Website Search’s pump is search a website using its internal search option. Look for a magnifying glass or Search option, enter a term in the search field, and submit the search. It doesn’t matter what you search for—all you’re doing is teaching Safari how to search on that site, and it will remember the site from then on.

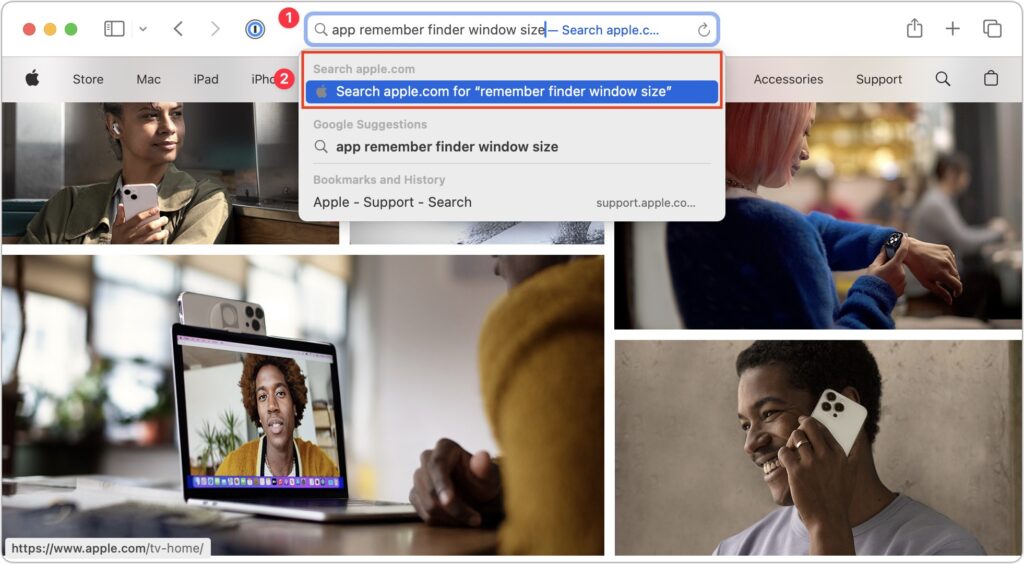
Later, to look for pages only from that site, enter three or four characters from its name (don’t accept any auto-completions!), a space, and then your search term. Don’t press Return or tap Go, however. Instead, pick the suggestion from the suggestion list under the “Search sitename” heading.

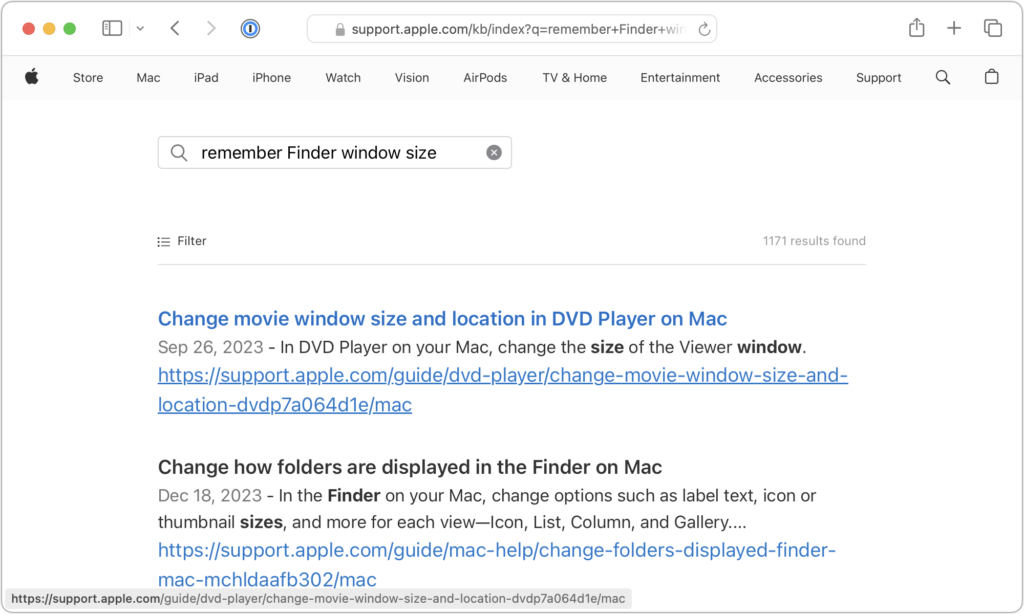
Safari then sends the search directly to the site in question, so instead of results from Google or your default search engine, you’ll see the results on the desired site.

The process is the same on the iPhone and iPad, although Safari on those platforms doesn’t remember websites you’ve searched as reliably.

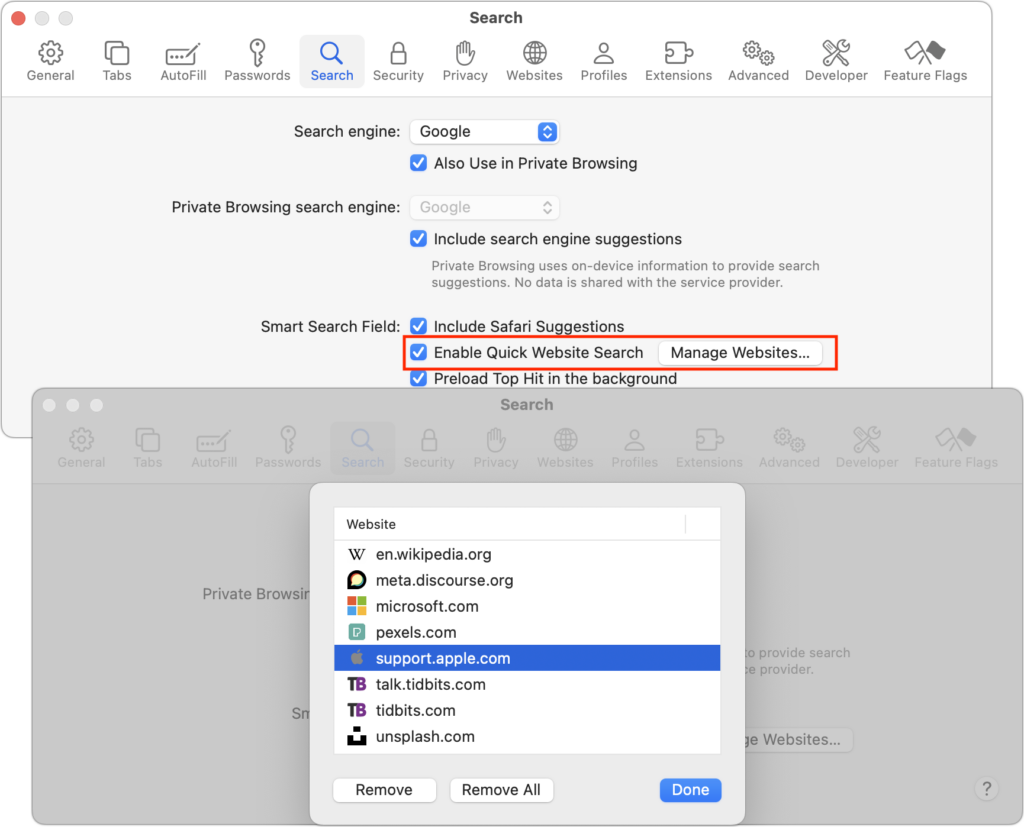
On the Mac, you can see which sites Quick Website Search has remembered and remove them by opening Safari > Settings > Search and clicking Manage Websites next to Enable Quick Website Search.

On the iPhone and iPad, open Settings > Safari > Quick Website Search to see and remove the remembered sites.

This way of searching within a website can be a big productivity win, so it probably won’t take long to get used to this new way of jumping into your most used websites’ internal search engines.

(Featured image based on an original by iStock.com/YiuCheung)

Open the Mac’s Control Center with This Obscure Keyboard Shortcut

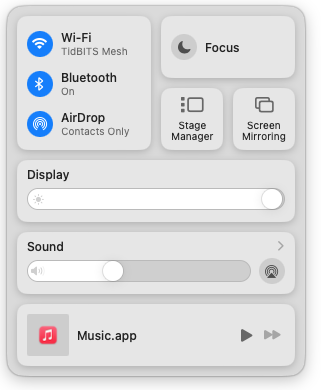
With macOS 13 Ventura, Apple brought Control Center from iOS to the Mac, providing a unified interface for features that users need to turn on and off regularly or that receive frequent adjustments, like screen brightness and audio volume. Clicking the Control Center icon in the menu bar brings it up, but it’s a small, hard-to-hit target. For faster and easier access to Control Center from within any app, press fn-C. (All current Apple keyboards have an fn key, but if you’re using a third-party keyboard that lacks one, you’re out of luck.)

(Featured image by Adam Engst)

The “Hey” Part of “Hey Siri” Is Now Optional

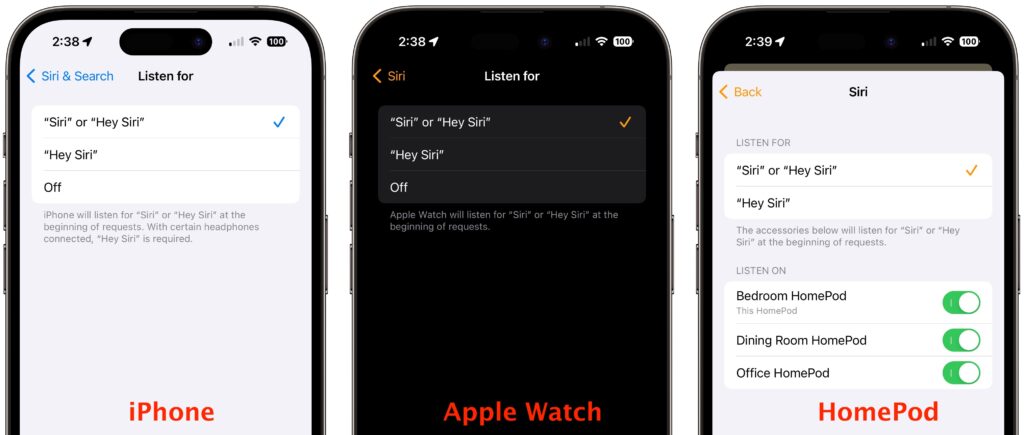
If you use Siri, particularly on a HomePod, you’re probably accustomed to saying “Hey Siri” as the trigger phrase before your requests. In Apple’s new operating systems for 2023, you can now choose to invoke Siri using the traditional “Hey Siri” or just “Siri” (at least in Australia, Canada, the UK, and the US). You might appreciate being able to stop saying “Hey” every time, or you might find that using just “Siri” generates incorrect activations. (And if someone in your family’s name sounds like Siri, you may want to turn the feature off entirely!) There are four places to look:

  • iOS 17 and iPadOS 17: Settings > Siri & Search > Listen For
  • macOS 14 Sonoma: System Settings > Siri & Spotlight > Listen For
  • watchOS 10: Watch app > My Watch > Siri > Listen For
  • HomePod Software 17: Home app > long-press HomePod > Accessory Settings > Listen For “Siri” or “Hey Siri”

(Featured image based on an original by Apple)