Is Your Photos Library Too Big? Here’s How to Move It to an External Hard Drive

SSDs are essential for ensuring optimal performance on a Mac, but because they’re expensive, many people don’t have as much built-in storage space as they would like. If your Photos library has grown to the point where your SSD is nearly full, it might be time to think about offloading it to an external hard drive. (Don’t put it on a drive that you’re using as a Time Machine destination because there could be permissions conflicts, and note that Apple doesn’t recommend storing a Photos library on a drive shared over a network.)

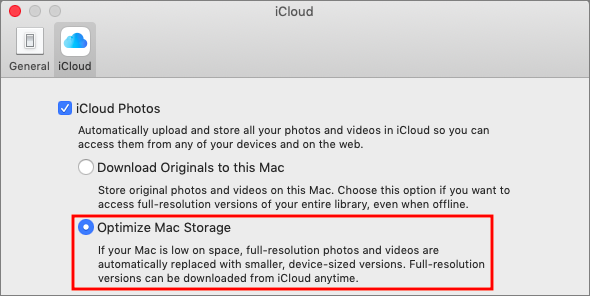
Before we explain how to offload your photos, we want to mention another way of reducing the Photos footprint on your drive. If you’re using iCloud Photos (previously called iCloud Photo Library) to sync photos and videos between your devices, the originals are all stored in iCloud. In Photos > Preferences > iCloud, you can enable Optimize Mac Storage, which swaps the full-resolution images for smaller versions, saving a boatload of space. However, you may find Photos somewhat slower to use, as it has to download full-resolution versions of images you work with, and you won’t have a local backup of the original images. So it’s an option, but it has tradeoffs.
For most people with burgeoning Photos libraries, a better approach is to offload the entire library to an external hard drive. This approach comes with tradeoffs too; accessing images from a hard drive is slower than getting them from an internal SSD, and you have to figure out how you’re going to back up that drive as well. Plus, the drive has to be available, connected, and turned on (so you have to listen to it) for you to use Photos at all, which might be especially annoying if you regularly work remotely on a notebook Mac.

To move your Photos library to an external drive, follow these steps:

  1. If it’s running, quit Photos.
  2. In the Finder, drag Photos Library, which is stored in your Pictures folder by default, to the external drive. A few answers to common questions:
    • Where on the external drive should I put it? It doesn’t matter, but we recommend putting it at the top level so you are less likely to lose track of it in the future.
    • I got an error—what should I do? If you see an error telling you that you don’t have permission to copy to that drive, select the drive’s icon in the Finder and choose File > Get Info to open the Info window. If necessary click the triangle next to Sharing & Permissions, and make sure “Ignore ownership on this volume” is selected. If it’s not, click the lock icon, enter an administrator name and password, and select the checkbox.
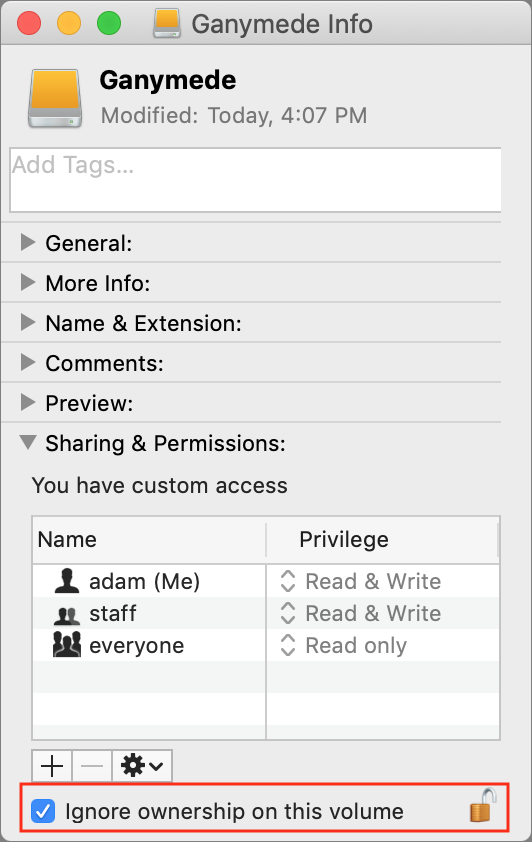
    • How long will it take to copy? Quite some time, depending on how many photos you have. It’s best to do overnight or when you don’t need to use Photos.
  3. When it’s done copying, double-click the new Photos Library icon on the external hard drive to launch Photos and set it to open that new copy on future launches.
  4. If you use iCloud Photos, designate this new library as the System Photo Library by choosing Photos > Preferences > General and clicking the “Use as System Photo Library” button.
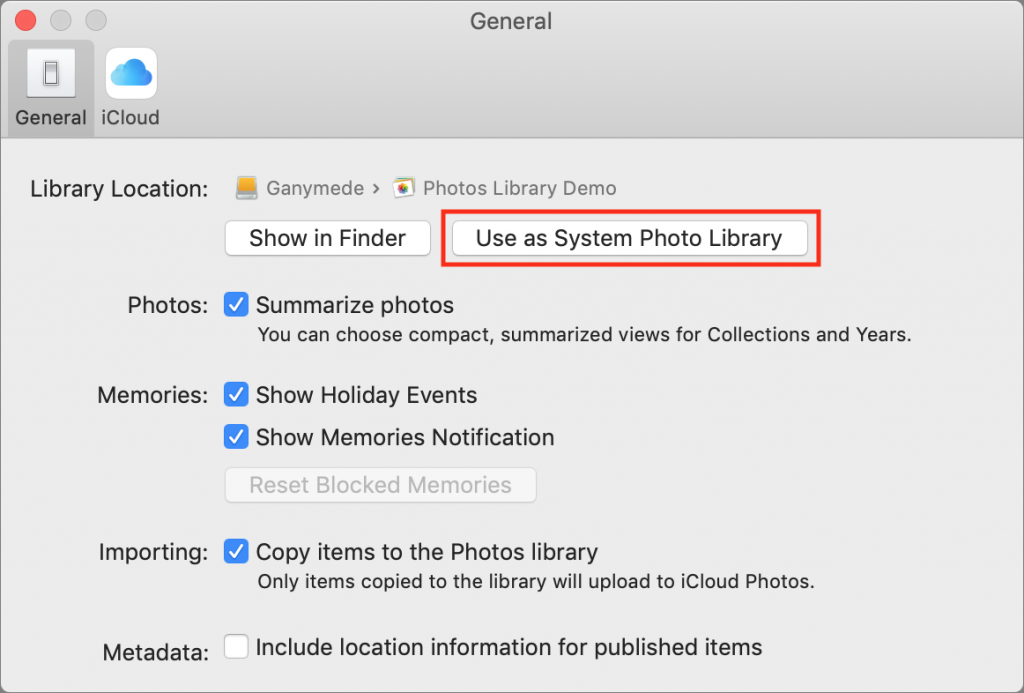
  5. Scroll through your photo collection and make sure all your photos are present—double-click a few of them to spot check that the actual images open properly.

Obviously, your original Photos library is still taking up space on your SSD, but it’s best to use the new version for a little while before deleting the old one, just in case. When you’re ready to do that, drag it from the Pictures folder to the trash and choose Finder > Empty Trash to reclaim the space.

Easier Ways to Move the Cursor When Editing Text on an iPad or iPhone

In theory, it should be easy to move the cursor in text on an iPad or iPhone—just tap where you want the cursor to go, or press and hold until the magnifying circle appears over the cursor and then slide it around. In reality, it’s often fussy and annoying because our fingers are a lot wider than the cursor itself. Starting in iOS 9, Apple came up with a better solution—trackpad mode—and in iOS 12, the company extended it to devices that lack 3D Touch.

In trackpad mode, you turn the onscreen keyboard into a virtual trackpad. Just as on a Mac laptop, moving your finger around the virtual trackpad moves the cursor in the text above. How you invoke trackpad mode differs slightly between the iPad and iPhone.

Trackpad Mode on the iPad

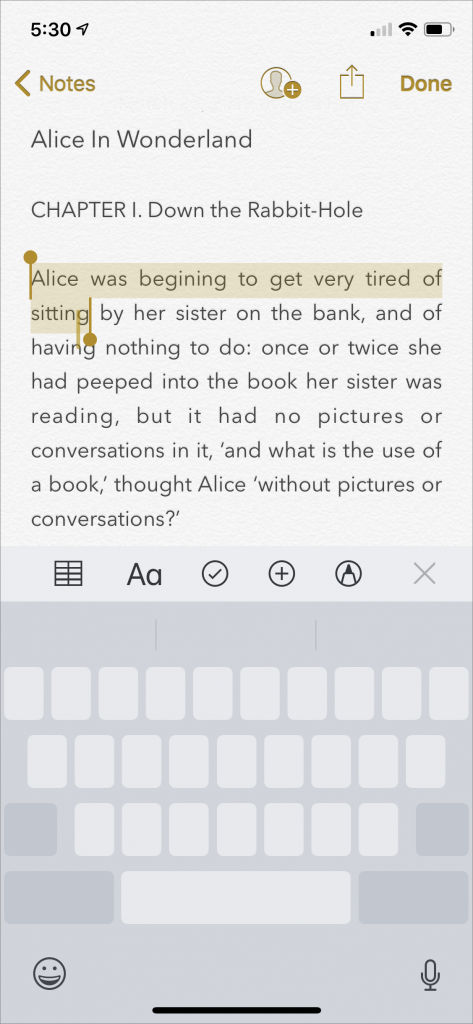
On an iPad, open any app that allows text input, like Notes, and bring up the keyboard. Touch the keyboard with two fingers, and you see the letters disappear from the keyboard as it switches to trackpad mode. Immediately swipe your fingers (or just one, you can lift the other up) around to move the cursor within the text. Or, for the new approach, touch the Spacebar and pause briefly to switch to trackpad mode.

You can also select text in trackpad mode. If you start with two fingers, instead of swiping immediately after entering trackpad mode, pause with your two fingers down briefly, which causes iOS to switch to selecting text. Then move your fingers around to change the colored selection. If you start with one finger on the Spacebar, position the cursor where you want it and then tap anywhere on the grayed-out keyboard to start selecting.

For easier selection of chunks of text, put the cursor in a word, let up, and then tap once with two fingers to select the word around the cursor, twice to select the sentence, and three times to select the entire paragraph. To expand or contract the selection, keep your fingers down and drag the selection cursor. To deselect text, tap once on the keyboard with two fingers.

You can use trackpad mode even if you have an external keyboard attached. Tap in a text input area, place two fingers anywhere in it to engage trackpad mode, and then move your fingers to reposition the cursor (again, you can lift one finger up after you start). To select text, put the cursor inside a word, release your fingers, and tap once to select the word, twice for the sentence, and three times for the paragraph.

Trackpad Mode on the iPhone

Before iOS 12, trackpad mode on the iPhone worked only on models that supported 3D Touch, which eliminated the iPhone 5s and earlier and the iPhone SE. iOS 12 added another approach, which is good because 2018’s iPhone XR also lacks 3D Touch.

To engage trackpad mode on an iPhone that supports 3D Touch, press firmly on the keyboard with one finger—you’ll feel the iPhone’s Taptic Engine simulate the feel of a click. Keep your finger down to move the cursor around. Apple’s new approach to invoking trackpad mode works on all iPhone models—touch the Spacebar and pause briefly to switch to trackpad mode. In either case, if you need more room, you can move your finger off the keyboard image right onto the text.

On 3D Touch iPhones, to select a word, relax your finger pressure slightly without removing it from the screen, and then press again. It’s quite similar to the feel of clicking on a MacBook trackpad. You can even double-press—again, with a slight relaxing of the finger first—to select the current sentence and triple-press to select the entire paragraph. Keep dragging after selecting to select more text by the word, sentence, or paragraph.

When using the Spacebar approach to invoking trackpad mode, you can still select text. As on the iPad, position the cursor where you want it and then tap anywhere on the grayed-out keyboard to start selecting. The two-fingered tapping on the normal keyboard that works on the iPad doesn’t work on the iPhone, unfortunately.

Trackpad mode takes a little getting used to, but it’s so much better than the previous selection methods that it’s worth making yourself practice until it becomes second nature.

Considering a New iMac? Wait No Longer—Updates Are Here!

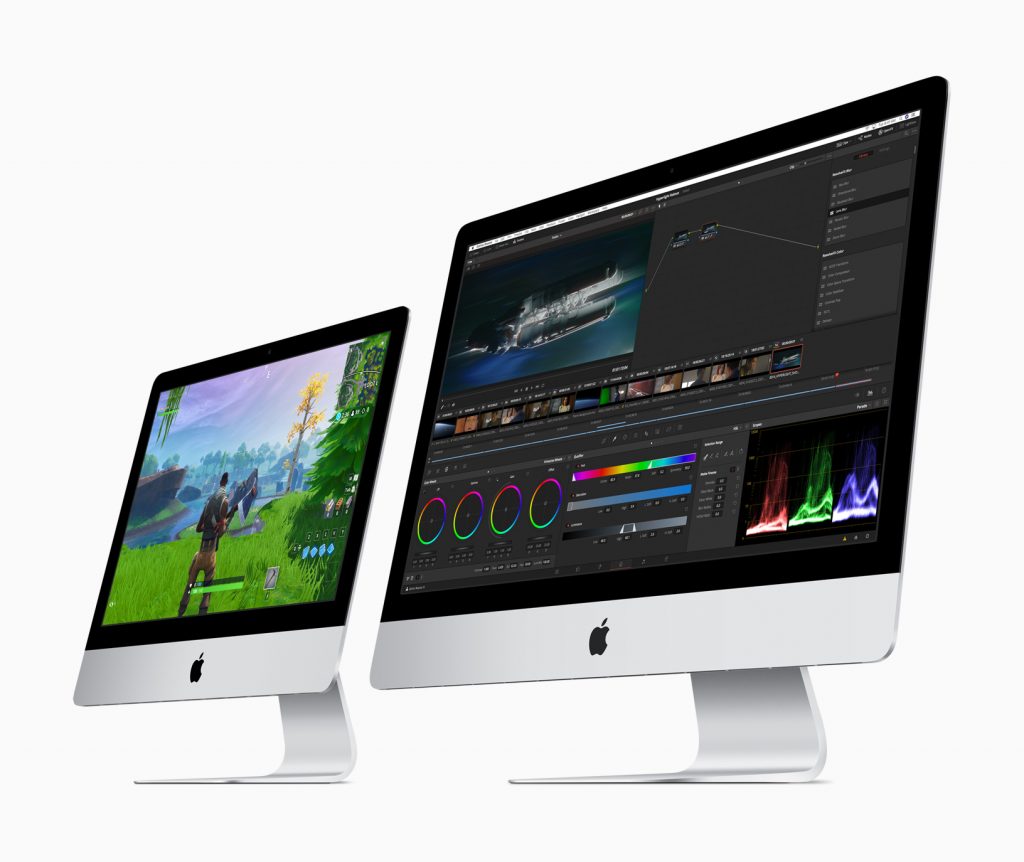
The iMac has long been the core of Apple’s desktop lineup, but it hasn’t received any updates since June 2017. Now, however, Apple has quietly updated the 21.5-inch iMac with Retina 4K display and the 27-inch iMac with 5K Retina display while keeping prices the same. The bargain-basement non-Retina 21.5-inch iMac remains for sale, but received no changes.

These updates are targeted at improving performance, so you won’t see any changes to the case, screen, or even networking capabilities. But if faster CPUs, GPUs, and memory are what you want, now’s a good time to buy.

The new 21.5-inch iMac boasts speedier 8th-generation Intel quad-core processors and an optional 6-core processor at the top of the line that deliver up to 60% faster performance than previous models. For even greater speed boosts—Apple claims up to 2.4 times faster performance—look to the 27-inch iMac, which now offers 9th-generation 6-core Intel Core i5 processors running at 3.0, 3.1, or 3.7 GHz. If that’s not enough, you can choose an 8-core 3.6 GHz Intel Core i9 processor for the best performance short of an iMac Pro.

Modern computers rely heavily on graphics processors for both silky smooth screen drawing and computationally intensive tasks. By default, both new iMac models have updated versions the previous Radeon Pro graphics chips, but anyone who needs more power can instead choose a blazingly fast Radeon Pro Vega. For the 21.5-inch model, Apple says the Radeon Pro Vega is up to 80% faster; for the 27-inch iMac, it’s up to 50% faster.

Note that both iMacs now use 2666 MHz RAM instead of the previous 2400 MHz RAM. It probably won’t make much of a performance difference, but it’s worth keeping the speed in mind if you’re buying RAM separately from the iMac.

For those ordering an iMac from the online Apple store, if the options you want are in the top-level configuration, start there rather than in the next configuration down. It’s possible to configure two Macs to have the same options for the same price but get a better Radeon Pro graphics processor if you start from the top-level configuration.

For storage, we generally recommend SSDs over Fusion Drives—add external storage if you need more space. Whatever you do, don’t buy an iMac with an internal hard drive because it will destroy the performance.

For those looking for the ultimate power in an iMac Pro, Apple also quietly added options for 256 GB of RAM (for a whopping $5200) and a Radeon Pro Vega 64X GPU ($700) while simultaneously dropping the prices on some other RAM and storage options.

Did You Know Families Can Share Mac and iOS Apps Purchased from the App Store?

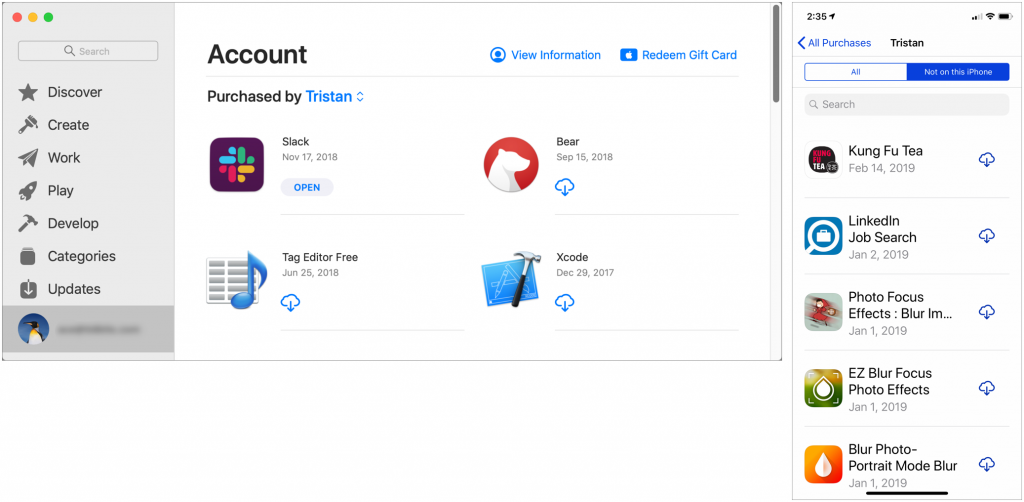
Have you ever looked over your spouse’s shoulder and thought, “Hey, that’s a cool app.”? If you set up Family Sharing (in System Preferences > iCloud on the Mac, and in Settings > Your Name in iOS), you can download almost any app that someone else in your family has purchased on either the Mac App Store or the iOS App Store. How you find these shared apps depends on the platform. On a Mac running macOS 10.14 Mojave, open the App Store app, click your email address at the bottom of the sidebar, and then click the name next to “Purchased by” to see another family member’s purchases. In iOS 12’s App Store app, tap your icon at the upper right, tap Purchased, and then tap a family member to see their purchases (note that you can select Not on this iPhone/iPad to narrow the choices). Click or tap the cloud icon to download a purchased app.

Ever Wanted to Get a Custom Email Address? Here’s How (and Why)

Some facts about ourselves are difficult or impossible to change, but your email address doesn’t have to be one of them. Switching to a custom email address might seem overwhelming, and it will take some time, but it’s not that hard or expensive (and we’re always happy to help if you get stuck).

Why Consider Switching to a Custom Address?

Why would you want to take on such a task? Independence. If you’re using the email address that came from your Internet service provider, you could end up in an awkward situation if you have to move and switch ISPs. Any address that ends in @comcast.net, @anything.rr.com, @verizon.net, @earthlink.net, or the like could be problematic. You also don’t want to rely entirely on a work email address—there’s no guarantee that your employer will forward email for you indefinitely if you take a different job.

Also, an email address says something about you, much as a postal address does—there’s a difference between an address on Central Park versus one in the Bronx. If you’re not happy with what your email address implies, you might want to switch.

What can an email address reveal? Those with a free Juno, Hotmail, or Yahoo account likely signed up years ago and don’t take email very seriously. People who use an @icloud.com, @me.com, or @mac.com address are clearly Apple users, and those with an address ending in @live.com, @msn.com, or @outlook.com are probably Windows users. .edu addresses identify students, teachers, and school employees—but if you’re not one anymore, your email looks like you’re wearing a varsity jacket in your 40s. The big kahuna of email is Gmail, which boasts about 1.5 billion users worldwide now—as a result, using a Gmail address is fairly generic.

The ultimate in independence comes when you register your own domain name, which usually costs less than $20 per year at sites like 1&1 Ionos, Domain.com, easyDNS, Directnic, and Register.com. Then your address can be anything you want at your new custom domain, and you never again have to worry about being tied to your ISP or associated with a free email host.

How to Change to a Custom Address

Step 1: Register a new domain name. The hard part here is thinking of a name that hasn’t already been taken. It’s best to stick with the traditional top-level domains like .com, .net, and .org—if you get into the new ones like .beer (yes, that’s available), your email is a bit more likely to be marked as spam. Most domain registrars will also host your email for you, and if you go this route, you can skip Step 2.

Step 2: If you’re already using Gmail or another independent email provider that isn’t tied to your ISP, log in to your account at your domain registrar and configure it to forward all email to your existing email address. In this case, you can skip Steps 3 and 4.

However, if you aren’t happy with your current email provider, you’ll need to set up an account with a new one. There are lots, but many people use a paid email provider like FastMail or easyMail that usually charges less than $50 per year and supports multiple mailboxes. When you set up the account, you’ll need to create one or more new email addresses at the provider and configure MX (mail exchange) records with your domain registrar—the service will provide instructions for this.

Step 3: If you’re changing email providers as part of this process, you’ll need to configure Mail—or whatever email client you’re using—to connect to your new email account with the login credentials you set up. That’s not hard, but being able to send email that comes from your custom address can require some effort with the free email providers. Gmail provides instructions, and others that support this feature will as well. Unfortunately, iCloud won’t let you send email using a custom address.

Step 4: If you’re moving to a new email provider, you’ll need to forward your mail from your old provider to your new custom address. Most email providers and ISPs have a screen somewhere in the account settings of their Web sites that lets you enter a forwarding address.

Step 5: Tell your family, friends, and colleagues about your new email address, and update mailing lists and accounts at sites like Amazon that send you email. The forwarding you set up in the previous step will ensure you don’t miss anything during the transition, but remember that if you cancel your old ISP account, that forwarding may end immediately, so it’s important to start the process well in advance.

The details will vary depending on your choice of domain registrar and email provider, so again, if you would like additional recommendations or assistance in setting all this up, just let us know.