Need to Clear Space on an iPhone or iPad? Here’s How to Do It in iOS 12
Little is more frustrating than running out of space your iPhone or iPad. You can’t take new photos, you can’t download new apps, some things may not work at all, and iOS will nag you repeatedly about how you can “manage” your storage in Settings. Luckily, over the past few versions of iOS, Apple has significantly improved the options for clearing unnecessary data from your device.
![]()
Storage Graph
To get started clearing space, go to Settings > iPhone/iPad Storage. At the top of the screen, a graph reveals where your space is going, such as Apps, Photos, Media, Messages, Mail, Books, iCloud Drive, and Other. You can’t do anything with the graph, but it will likely reveal the main culprits.
![]()
Recommendations
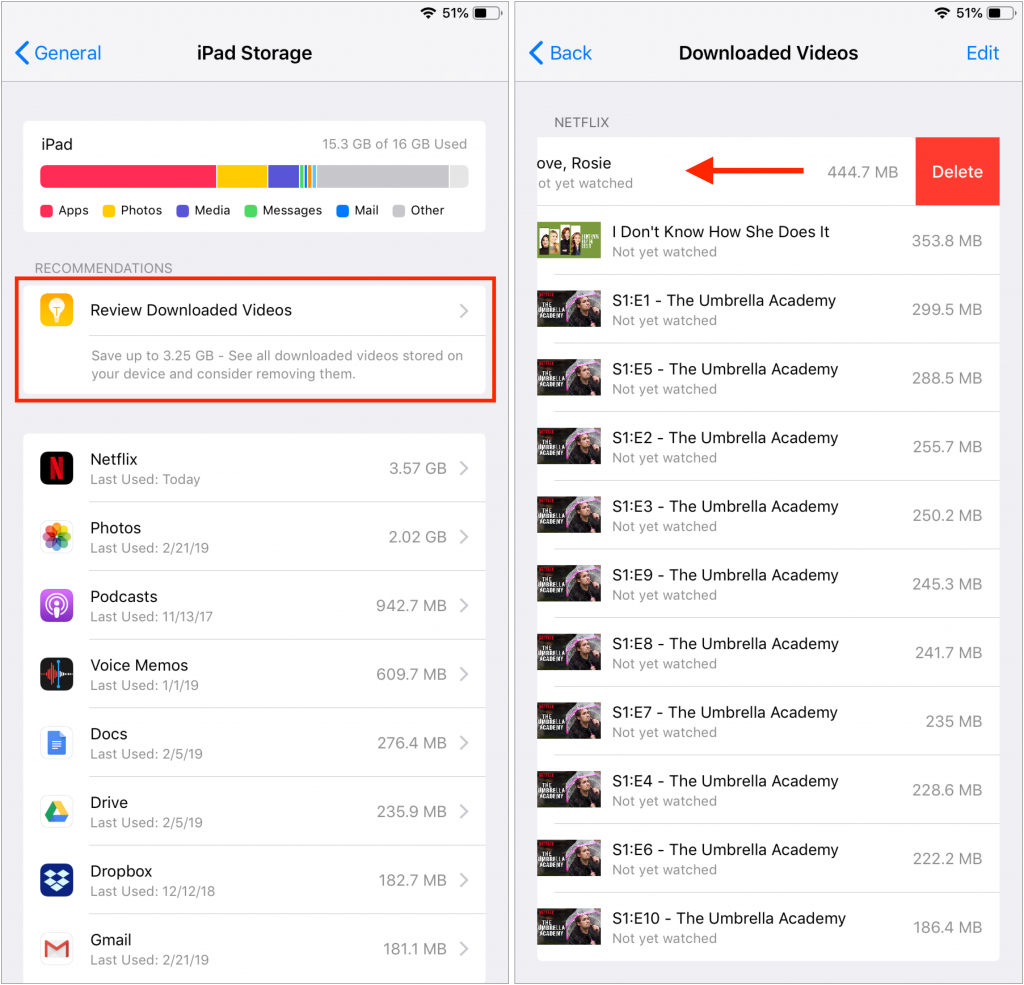
Next, iOS shows recommendations for quick ways to recover space. These vary based on how you use your device, so you will likely see other options here.
![]()
Some of the possibilities include:
 Offload Unused Apps: This choice is particularly helpful if you download a lot of apps that you later stop using. Enable it, and iOS automatically recovers space from unused apps when you’re low on storage. Each of these apps remains on your Home screen with a little cloud icon next to it, and when you next tap the app to open it, iOS re-downloads the app from the App Store. You won’t lose any documents, data, or settings associated with an offloaded app.
- Review Downloaded Videos: Some apps, like Netflix, can download videos for offline watching. That’s great for when you’re on a long flight, but if you forget to delete the videos, they can consume a lot of space. This option shows them to you and lets you swipe left on any one to delete it.
- Review Large Attachments: Photos, videos, and other files sent to you in Messages can take up a lot of space. This recommendation reveals them and lets you swipe left to delete those you don’t need to keep.
- “Recently Deleted” Album: When you delete photos in the Photos app, they go into the Recently Deleted album, where they’ll be deleted automatically after up to 40 days. This recommendation lets you remove those images right away.
- Review Personal Videos: Shooting videos with your iPhone or iPad can guzzle storage, so this recommendation shows you the videos you’ve taken in case you don’t want to keep them.
iOS’s recommendations are quite good and may be all you need to clear space quickly. However, if you need to dig deeper, you can look at the usage of individual apps.
Individual App Usage
The third and final section of the iPhone/iPad Storage screen lists every app on your device, sorted by how much space it takes up. Along with the app’s name and how much space it consumes, iOS helpfully tells you the last time you used the app. You may even see “Never Used” for older apps that you’ve carried over from previous devices but haven’t opened on this one.
When you tap an app, iOS shows more information about how much space the app and its documents occupy, and lets you tap Offload App or Delete App to recover its space. For some apps, mostly those from Apple, like Music and Podcasts, iOS also shows the data stored by the app and lets you delete any individual item (swipe left).
![]()
Focus on the apps at the top of the list—the list is sorted by size—since it will be a lot easier to realize, for instance, that you’ve never used GarageBand and recover its 1.59 GB of space than to sort through a long list of apps and their data.
With all these the tools from Apple, you should have no trouble making space on your device for more photos, videos, and apps that you actually want to use.
Social Media: Struggling with too little space on your iPhone or iPad? In iOS 12, Apple provides highly effective tools for clearing more space—read on for details!