As you upgrade to iOS 15, iPadOS 15 (and macOS 12 Monterey by the end of the year), you’re going to see references to iCloud+. You might even already be an iCloud+ subscriber! That’s because iCloud+ is Apple’s new name for what you get if you pay for additional iCloud storage for yourself and up to five family members, which has been possible for a long time.
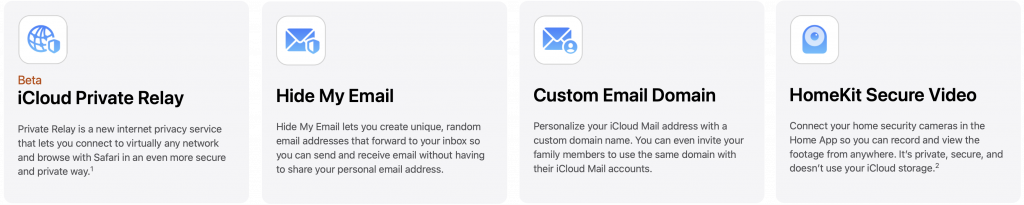
iCloud+ comes with some new features as well, namely iCloud Private Relay (still in beta), Hide My Email, and Custom Email Domain, along with expanded HomeKit Secure Video support. Three tiers of iCloud+ match up with the previous storage tiers:
- 50 GB for $0.99 per month gets you all the iCloud+ features plus HomeKit Secure Video support for one camera
- 200 GB for $2.99 per month gets you all the iCloud+ features plus HomeKit Secure Video support for five cameras
- 2 TB for $9.99 per month gets you all the iCloud+ features plus HomeKit Secure Video support for unlimited cameras
We expect that most people will subscribe to iCloud+ largely for the extra storage—Apple provides only 5 GB of iCloud storage for free—but once you’re paying for more storage, the other new features are welcome. Let’s look at each.
iCloud Private Relay
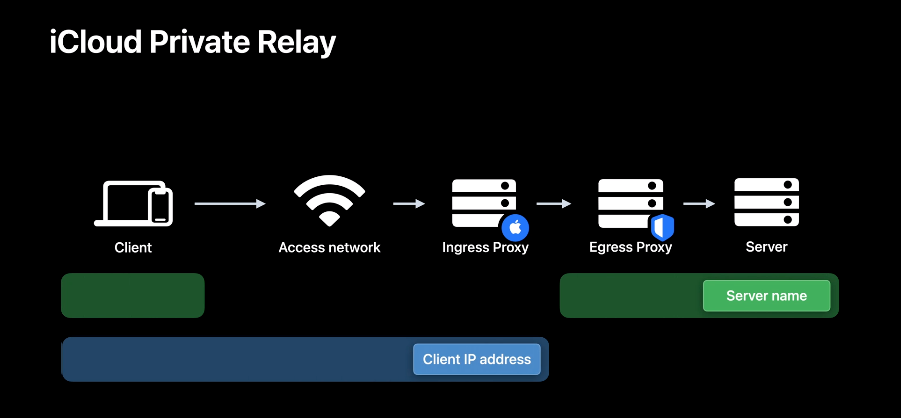
Whenever you browse the Internet, your privacy can be compromised in two ways. First, anyone on your local network can see the names of the websites you access based on your DNS lookups. Second, the websites you visit record the IP address of your computer, which makes it easier for advertisers to track you across multiple sites.
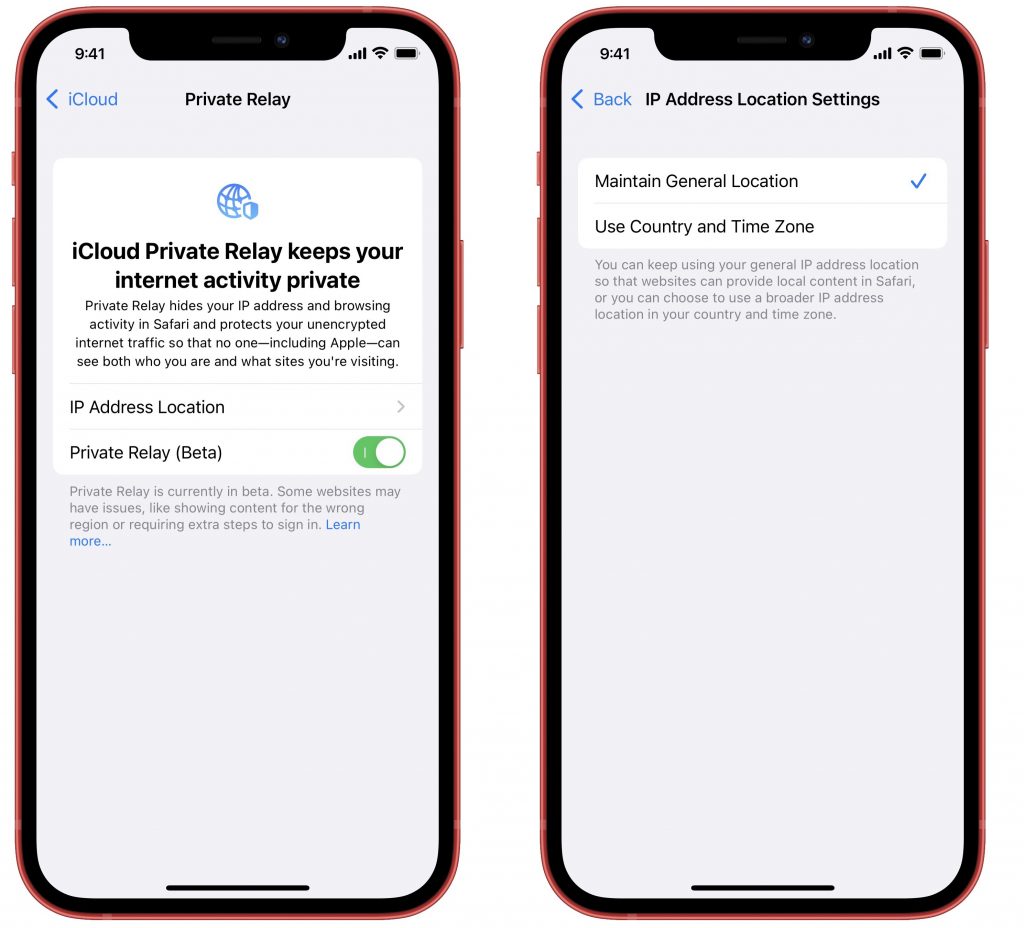
iCloud Private Relay, which Apple says will come out of beta by the end of the year, attempts to block such tracking by encrypting your Safari traffic (plus DNS queries and most non-HTTPS Web queries), sending it through two proxy servers, and associating it with a geographically reasonable but otherwise anonymous IP address. That way, the first proxy server (which Apple runs) knows who you are but not what site you’re visiting. The second proxy server (run by companies other than Apple) knows what site you’re visiting, but not who you are.
Although Apple’s technique appeared to work well and early reports suggest that it didn’t slow down traffic noticeably, networking is notoriously complex. Apple wanted more time to ensure that iCloud Private Relay works as promised with all network traffic, which is why the feature remains in beta. However, nothing prevents you from trying it out now. After you turn it on, you shouldn’t notice any difference when using the Internet. Just make sure that if you have network-related troubles, you remember to turn off iCloud Private Relay to remove it from the troubleshooting equation.
To enable the feature, go to Settings > Your Name > iCloud > Private Relay (Beta) and turn on the switch for Private Relay (Beta). In the IP Address Location Settings screen, you can choose whether iCloud Private Relay should try to maintain your general location or just make sure it gets your country and time zone correct.
Hide My Email
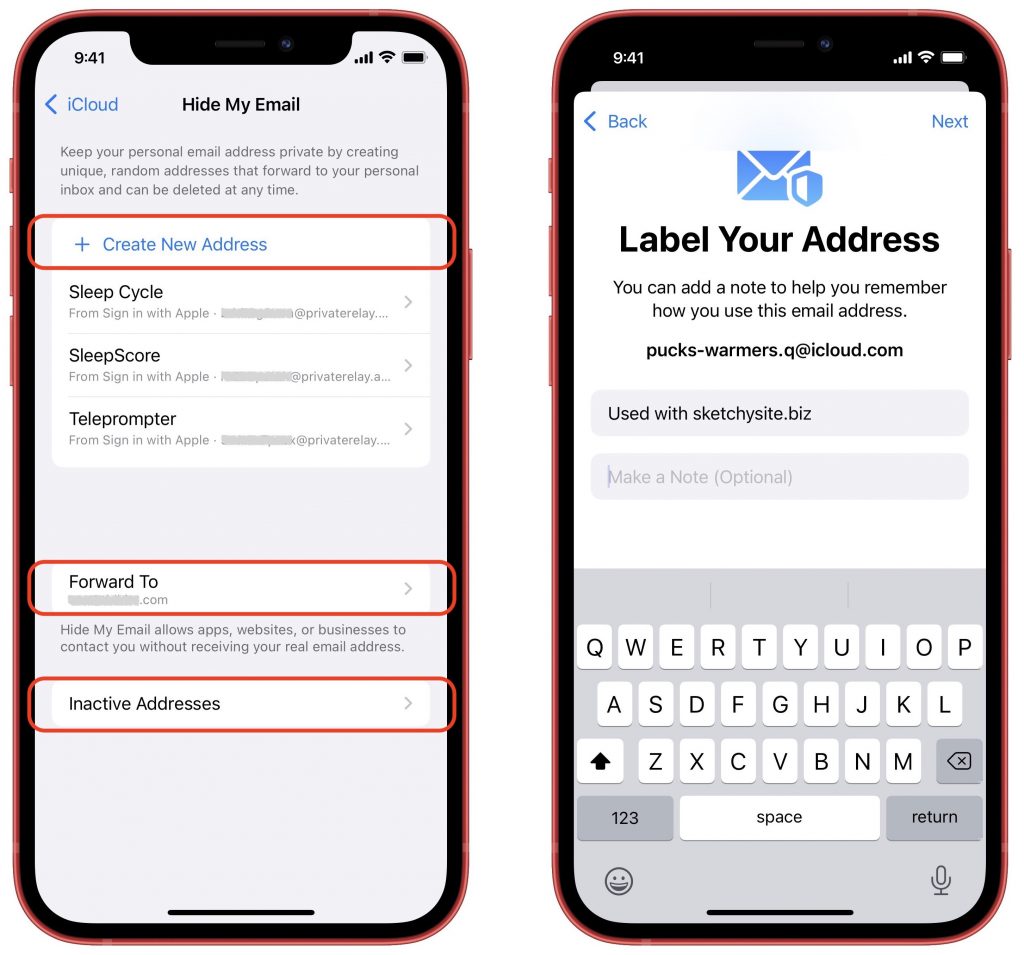
Have you ever felt icky giving your email address to a questionable website, knowing that it’s probably going to spam you with unwanted solicitations? The new Hide My Email service that’s part of iCloud+ creates random, unique email addresses that automatically forward to your inbox, either your Apple ID address or another address associated with an email account configured on your device. In fact, Apple has provided this option for some time with apps that use the Sign in with Apple service—you can opt to give them a random address instead of your real address.
To use Hide My Email, go to Settings > Your Name > iCloud > Hide My Email. Make sure the Forward To address is the one you want, and then tap Create New Address at the top. Either accept the address provided or ask for a different one, give it a label and optional note so you know where you used it, tap Next, and tap Done.
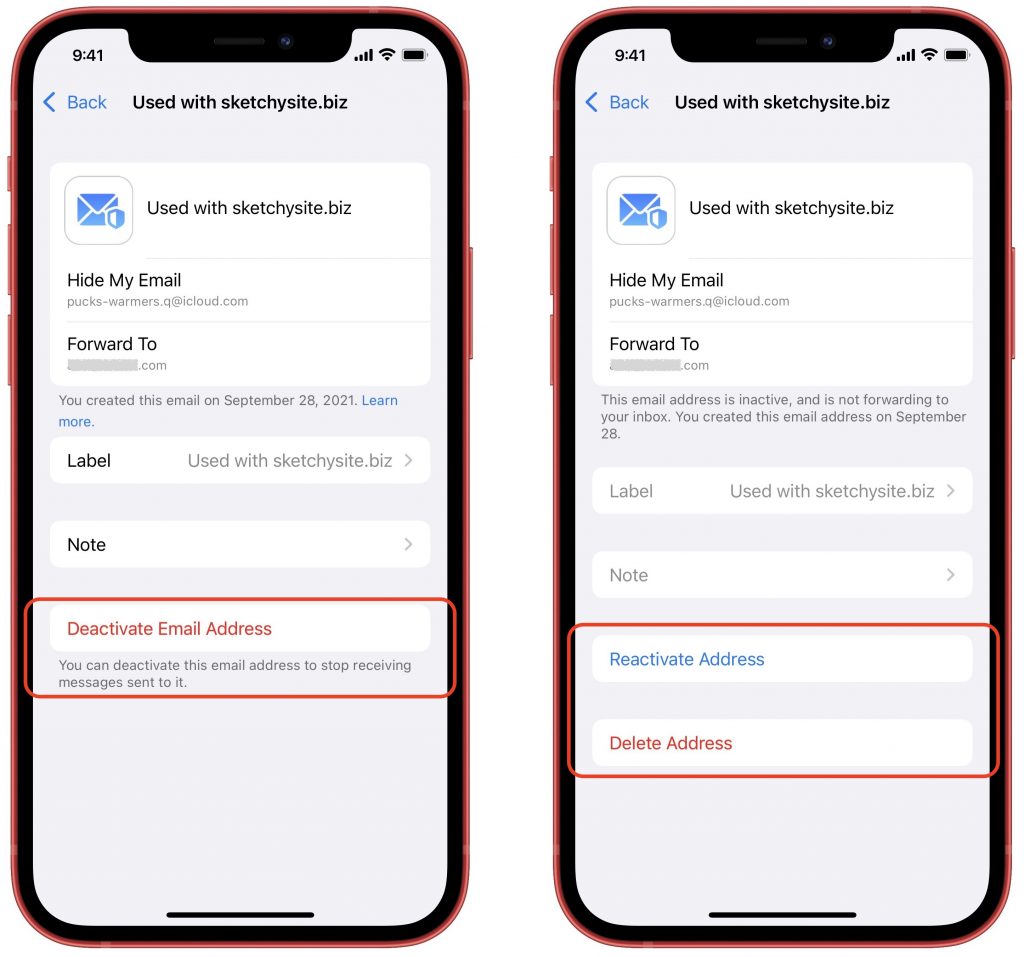
To stop receiving email from an address, tap it in the list and tap Deactivate Email Address. In the Inactive Addresses list, you can see such addresses and leave them for reference, reactivate them, or delete them.
Custom Email Domain
Throughout the history of iCloud (including its predecessors iTools, Mac.com, and MobileMe), users have received email addresses that end with the mac.com, me.com, and icloud.com domains. If you wanted to register your own custom email domain (like hoopyfroodemail.com, for instance) and use that in a personalized email address, you had to rely on another service like Gmail or Fastmail.
With iCloud+, it is at long last possible to connect up to five custom domains and use them in addition to the standard domains. You (and each person in your Family Sharing group) can have up to three addresses for each domain. Note that you must have a primary iCloud Mail email address set up and have two-factor authentication enabled for your Apple ID.
Although the process for setting up a custom email domain isn’t that difficult, it’s beyond the scope of this article. You need to have a domain registered, update DNS records with your domain registrar, associate email addresses with the custom domain, and verify your settings. Apple provides instructions, and you should also read How to Set Up Custom Email Domains with iCloud Mail from TidBITS for more real-world coverage. Reach out if you need help.
Our take is that this feature is welcome, but it’s just for hobbyists and families. If you’re running a business of any sort, you should have a custom email domain with a full-fledged email service. Contact us for advice on the best solution for your particular situation—this is very much not a “one size fits all” scenario.
HomeKit Secure Video
The final iCloud+ feature is HomeKit Secure Video, previously a free bonus with the higher-level iCloud storage plans. It requires a compatible third-party security camera and takes over from the manufacturer’s app to ensure that no one can access your video, including the camera maker and Apple. That’s a big deal—one of the main problems with many third-party security cameras is that they transmit and store video in insecure ways, making it possible for evildoers to capture video from inside your house. (Yeah, it happens.)
All that seems to have changed with iCloud+ is that Apple has added HomeKit Secure Video to the 50 GB plan with support for one camera, increased the number of supported cameras on the 200 GB plan to five, and allowed an unlimited number of cameras for 2 TB plans.
As with custom email domains, the steps necessary to set up a security camera in the Home app and work with HomeKit Secure Video are beyond the scope of this article. Apple provides basic instructions, and the year-old article Apple’s HomeKit Secure Video Leverages iCloud Storage and Preserves Privacy from TidBITS explains more and provides context.
Welcome as these features may be, they’re unlikely to compel upgrades for those who don’t need more than the 5 GB of free iCloud storage. However, it’s so common to need more iCloud space for photos, backups, and files that we anticipate lots of people taking advantage of the iCloud+ features that come along for the ride.
(Featured image based on an original by iStock.com/AlSimonov)