When Migrating to a New iPhone or iPad, Try Quick Start First

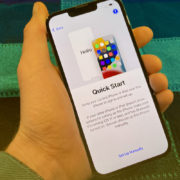
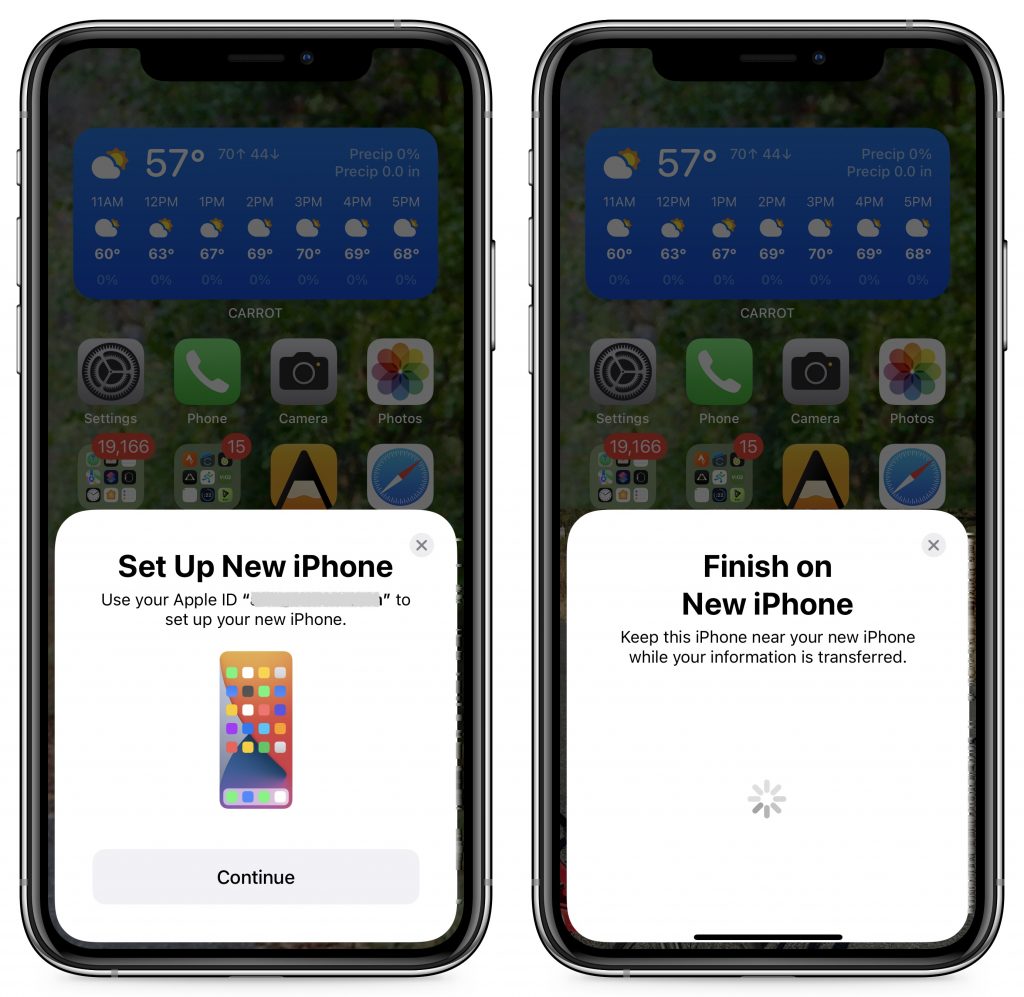
You have a new iPhone or iPad—congratulations! When transferring your data to the new device, you have three options: Quick Start, an iCloud backup, or a Mac backup. All will work, but they don’t quite provide the same end result (particularly if you didn’t encrypt your Mac backup). Our advice—backed by this post from Apple expert John Gruber—is to try Quick Start first because it transfers everything directly from your old device to your new one, maintaining app logins in most cases and allowing you to transfer your Apple Watch pairing. It may seem like it’s taking a long time before you can use the device, but it’s worth it to avoid logging in to numerous apps and unpairing and repairing your Apple Watch.

(Featured image by Adam Engst)

New Features to Try (Or Not) in Safari 15

Along with a new version of Safari in iOS 15 and iPadOS 15, Apple has released Safari 15 for macOS 11 Big Sur and macOS 10.15 Catalina. Why do this before macOS 12 Monterey ships? Some of the browser’s new capabilities—notably the Tab Groups feature—integrate it more deeply into your Apple device experience by syncing across devices. So, assuming you have Safari 15 on at least some of your devices, what’s new, and is it any good?

New Tab Bar Interface

For Safari 15, Apple tried to minimize the tab bar interface to occupy less screen real estate and stand out less from the content of Web pages by co-opting the color of each page. Early betas were met with a litany of complaints from testers, and Apple pulled back in the eventual releases, offering settings that let you retain the old interface. How that plays out varies between the iPhone, iPad, and Mac:

  • iPhone: Apple combined the address bar and tab bar into a single set of controls at the bottom of the screen, where they’re easier to reach with your thumb while working one-handed and where you can swipe left and right to switch tabs. Plus, the status bar area at the top of the screen takes on the color from the current site, which isn’t necessarily a visual win. This is a huge change from the controls appearing at the top, so if you don’t like it, go to Settings > Safari and switch from Tab Bar (below left) to Single Tab (below right). Turn off Allow Website Tinting (also below right) if you don’t like the colorizing.
  • iPad: Displays on the iPad are relatively small, so saving some vertical space with the new Compact Tab Bar could be helpful. However, since the tab bar automatically minimizes when you scroll down a page, reducing its size when it’s visible isn’t as much of a win as it might seem. And the colorized tab bar can be shockingly bright. In Settings > Safari, you can choose between Compact Tab Bar (below top) and Separate Tab Bar (below bottom); either way, consider disabling Show Color in Tab Bar.
  • Mac: Laptop screens aren’t huge, and Safari doesn’t minimize its tab bar when you scroll, as it does on the iPhone and iPad, so saving some vertical space might be welcome on a smaller screen. But the way the Compact layout embeds the address field inside a tab and reduces the number of buttons you can see may perturb you (below top). Once again, the colorized tab bar can be glaring. To revert to something closer to the old look, in Safari > Preferences > Tabs, select Separate for the tab layout (below bottom), and disable Show Color in Tab Bar to keep the controls gray regardless of the site color.

Voice Search

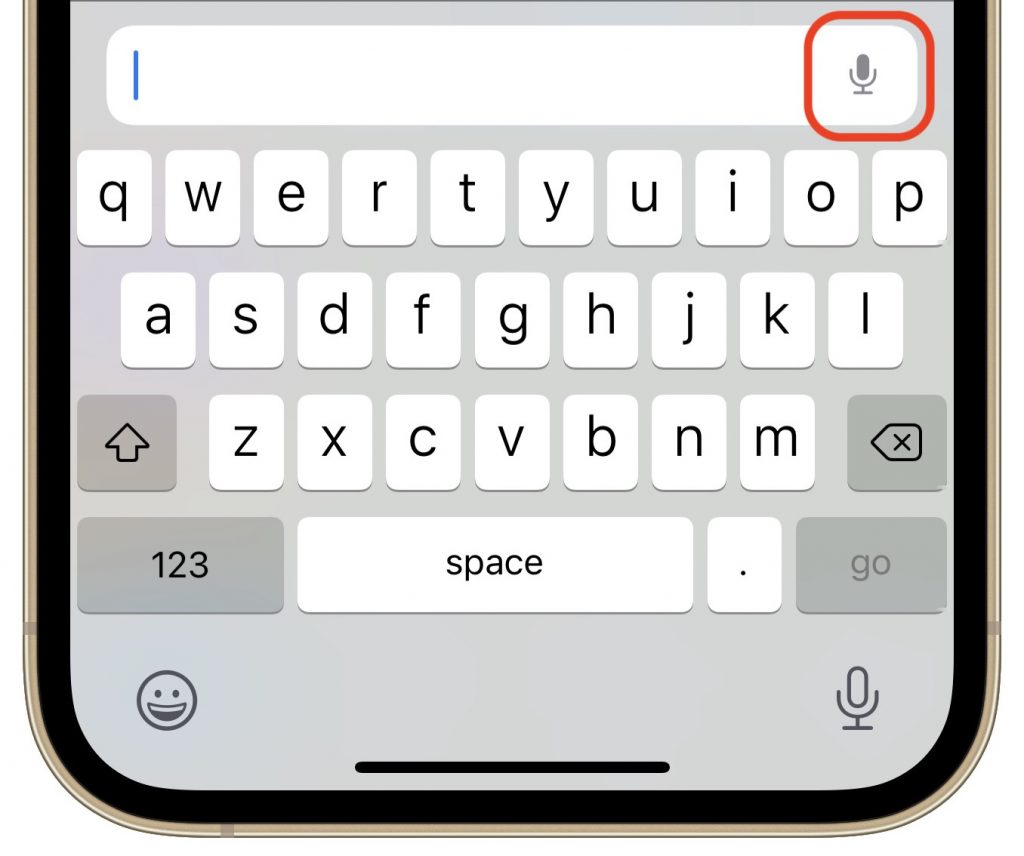
For many searches, it’s easier to speak than type, and Apple has made doing that even faster with Voice Search on the iPhone and iPad. Tap the current tab to display the address field, tap the microphone button, and speak instead of typing. As soon as you stop, Safari performs the search. You can even navigate directly to a site by speaking its URL, like “apple dot com.” Sadly, Apple didn’t extend this feature to the Mac version of Safari 15.

Tab Switcher

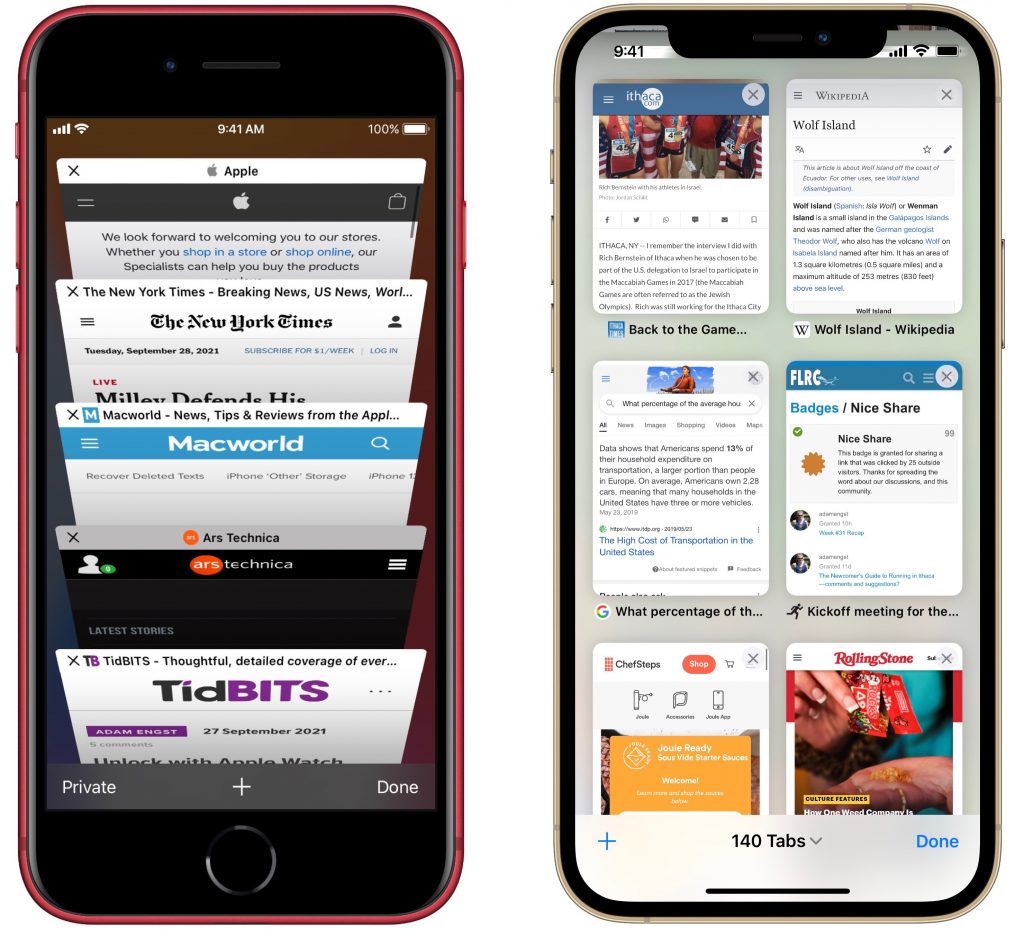
In iOS 14 and earlier, Safari used a card stack metaphor for its tab switcher (below left), which could make it hard to see what each tab contained. In Safari in iOS 15, Apple took a cue from the iPad and Mac versions of the app and moved to a grid interface for the tab switcher (below right). You can drag the tab thumbnails around to organize them and remove them by tapping an X button (weirdly located in the upper-right corner) or swiping them left off-screen. You can also bring up the option to close all open tabs by pressing and holding Done at the lower right corner of the screen.

Tab Groups

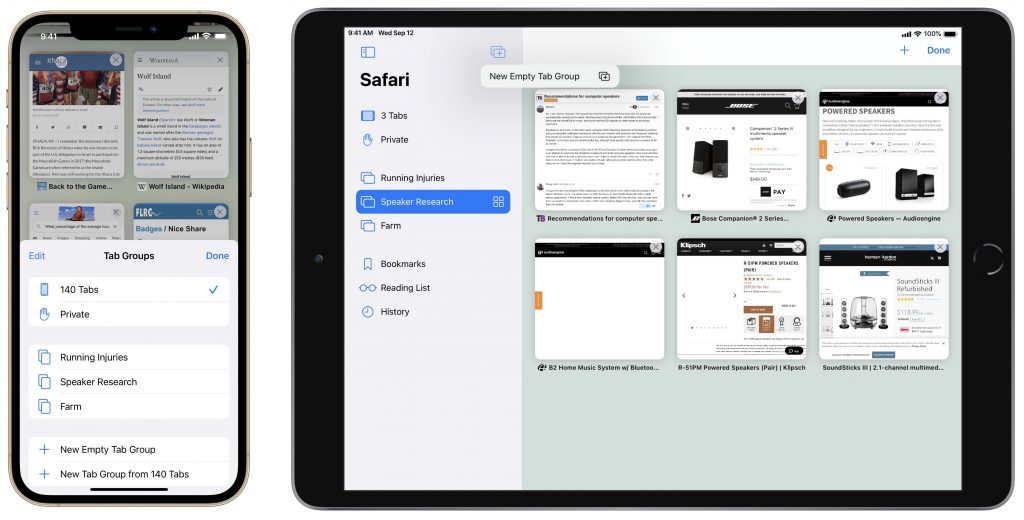
If you struggle under the cognitive load of dozens of unrelated tabs, the new Tab Groups feature might help. With it, you can collect tabs into as many groups as you like and switch among them. You work with tab groups in either the tab switcher interface (iPhone and iPad with the Separate Tab Bar) or the sidebar (Mac and iPad with the Compact Tab Bar).

To open the tab switcher on the iPhone, tap the tab button in the lower-right corner of the screen; on the iPad, tap the different-looking tab button in the upper-right corner. Once you have the tab switcher open, tap X Tabs to reveal the Tab Groups menu. To show the sidebar on either the iPad or the Mac, tap or click the sidebar button in the upper-left corner of the tab bar.

Once you have the Tab Groups menu or sidebar showing:

  • To create a new tab group on the iPhone’s or iPad’s Tab Groups menu, tap New Empty Tab Group, name it, and tap Save. In the sidebar on a Mac or iPad, use the New Tab Group button at the top (or choose File > New Empty Tab Group on the Mac). You can also use New Tab Group from X Tabs to create a tab group from currently open tabs.
  • To switch to a different tab group, tap it in the Tab Groups menu on an iPhone or iPad, or access it from the sidebar on a Mac or iPad.
  • To delete a tab group, swipe left on it in the Tab Groups menu or sidebar to reveal a delete icon on an iPhone or iPad; on the Mac, Control-click it and choose Delete.

Shared with You

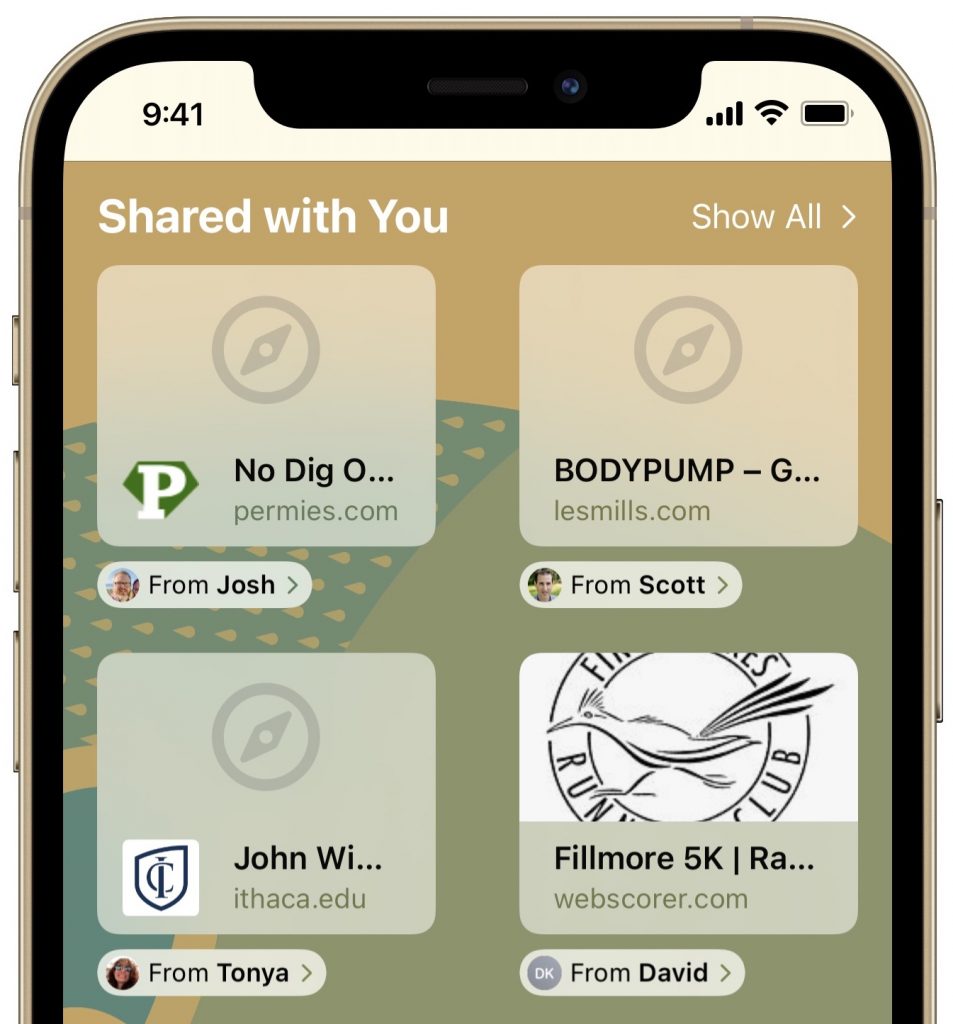
Ever gone spelunking through Messages to find a link someone sent you? Safari 15’s new Shared with You feature should help. It automatically collects all Web pages you receive in Messages into a new Shared with You section of the Safari start page. On the iPad and Mac, there’s also a Shared with You item in the sidebar.

Customizable Start Page

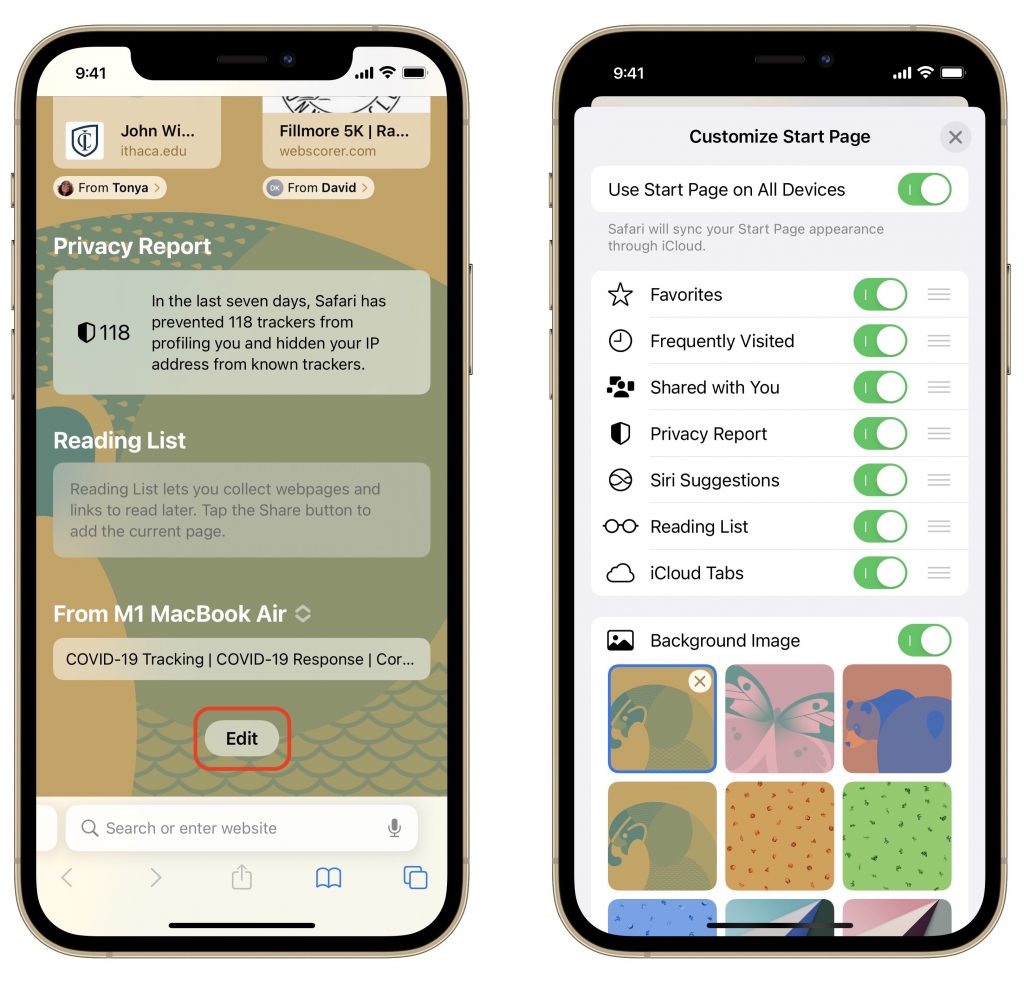
Speaking of the start page, if you want to customize which headings appear and in what order, you can now do that on the iPhone and iPad. (Choosing which headings appear has long been possible on the Mac by clicking the little settings button in the lower-right corner, but reordering isn’t possible there.)

Create a new tab to view the start page, scroll to the bottom, and tap Edit. Then disable any headings you don’t want to see and drag the remaining ones into your desired order. You can also choose among several Apple-provided background images and have your start page settings sync to your other devices.

Other Stuff

Two final new features may be welcome but probably won’t rock your world:

  • Pull to refresh: If you need to reload a Web page on the iPhone or iPad, either you can tap the reload button in the address field if it’s visible with your tab bar settings, or you can now just pull down with your finger from the top of a page.
  • HTTPS upgrade: If you visit a website that supports encrypted HTTPS but is also loading insecure content over unencrypted HTTP, Safari will now ensure that you connect to it over HTTPS so your entire connection is secure.

There you have it! Check out the new features in Safari 15 and let them improve your browsing experience.

(Featured image based on an original by iStock.com/Evgenii Mitroshin)

What Is iCloud+ and What Can You Do With It?

As you upgrade to iOS 15, iPadOS 15 (and macOS 12 Monterey by the end of the year), you’re going to see references to iCloud+. You might even already be an iCloud+ subscriber! That’s because iCloud+ is Apple’s new name for what you get if you pay for additional iCloud storage for yourself and up to five family members, which has been possible for a long time.

iCloud+ comes with some new features as well, namely iCloud Private Relay (still in beta), Hide My Email, and Custom Email Domain, along with expanded HomeKit Secure Video support. Three tiers of iCloud+ match up with the previous storage tiers:

  • 50 GB for $0.99 per month gets you all the iCloud+ features plus HomeKit Secure Video support for one camera
  • 200 GB for $2.99 per month gets you all the iCloud+ features plus HomeKit Secure Video support for five cameras
  • 2 TB for $9.99 per month gets you all the iCloud+ features plus HomeKit Secure Video support for unlimited cameras

We expect that most people will subscribe to iCloud+ largely for the extra storage—Apple provides only 5 GB of iCloud storage for free—but once you’re paying for more storage, the other new features are welcome. Let’s look at each.

iCloud Private Relay

Whenever you browse the Internet, your privacy can be compromised in two ways. First, anyone on your local network can see the names of the websites you access based on your DNS lookups. Second, the websites you visit record the IP address of your computer, which makes it easier for advertisers to track you across multiple sites.

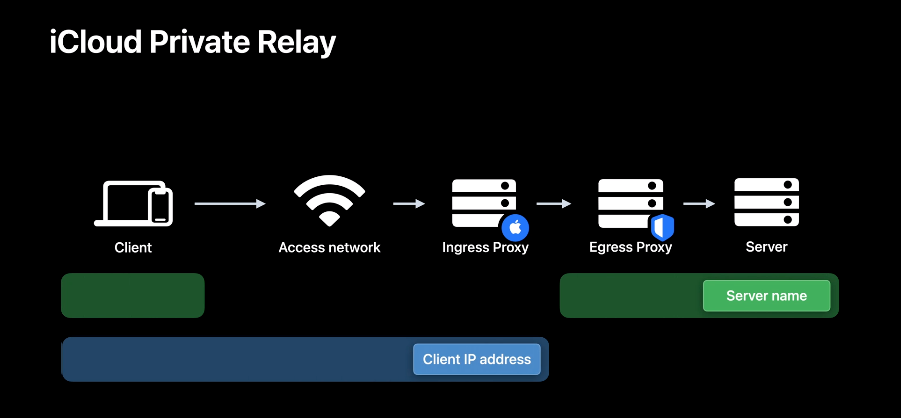
iCloud Private Relay, which Apple says will come out of beta by the end of the year, attempts to block such tracking by encrypting your Safari traffic (plus DNS queries and most non-HTTPS Web queries), sending it through two proxy servers, and associating it with a geographically reasonable but otherwise anonymous IP address. That way, the first proxy server (which Apple runs) knows who you are but not what site you’re visiting. The second proxy server (run by companies other than Apple) knows what site you’re visiting, but not who you are.
Although Apple’s technique appeared to work well and early reports suggest that it didn’t slow down traffic noticeably, networking is notoriously complex. Apple wanted more time to ensure that iCloud Private Relay works as promised with all network traffic, which is why the feature remains in beta. However, nothing prevents you from trying it out now. After you turn it on, you shouldn’t notice any difference when using the Internet. Just make sure that if you have network-related troubles, you remember to turn off iCloud Private Relay to remove it from the troubleshooting equation.

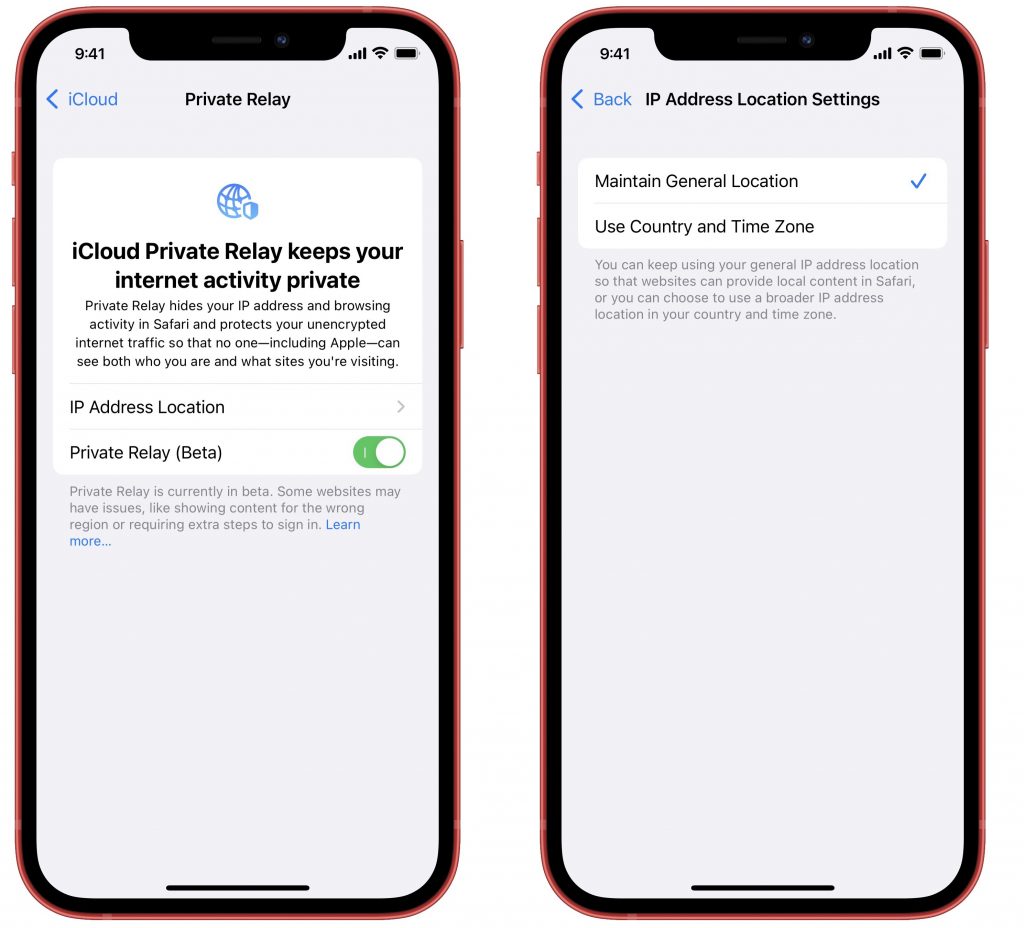
To enable the feature, go to Settings > Your Name > iCloud > Private Relay (Beta) and turn on the switch for Private Relay (Beta). In the IP Address Location Settings screen, you can choose whether iCloud Private Relay should try to maintain your general location or just make sure it gets your country and time zone correct.
Hide My Email

Have you ever felt icky giving your email address to a questionable website, knowing that it’s probably going to spam you with unwanted solicitations? The new Hide My Email service that’s part of iCloud+ creates random, unique email addresses that automatically forward to your inbox, either your Apple ID address or another address associated with an email account configured on your device. In fact, Apple has provided this option for some time with apps that use the Sign in with Apple service—you can opt to give them a random address instead of your real address.

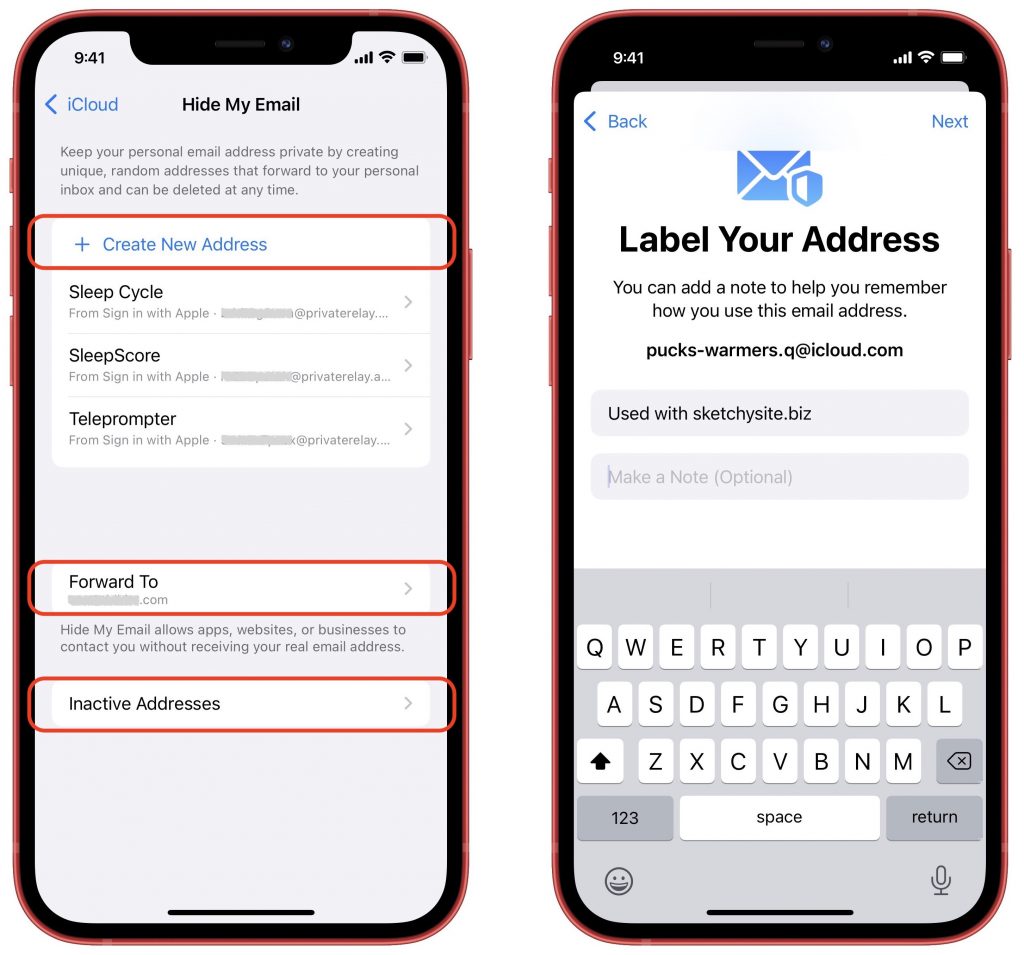
To use Hide My Email, go to Settings > Your Name > iCloud > Hide My Email. Make sure the Forward To address is the one you want, and then tap Create New Address at the top. Either accept the address provided or ask for a different one, give it a label and optional note so you know where you used it, tap Next, and tap Done.
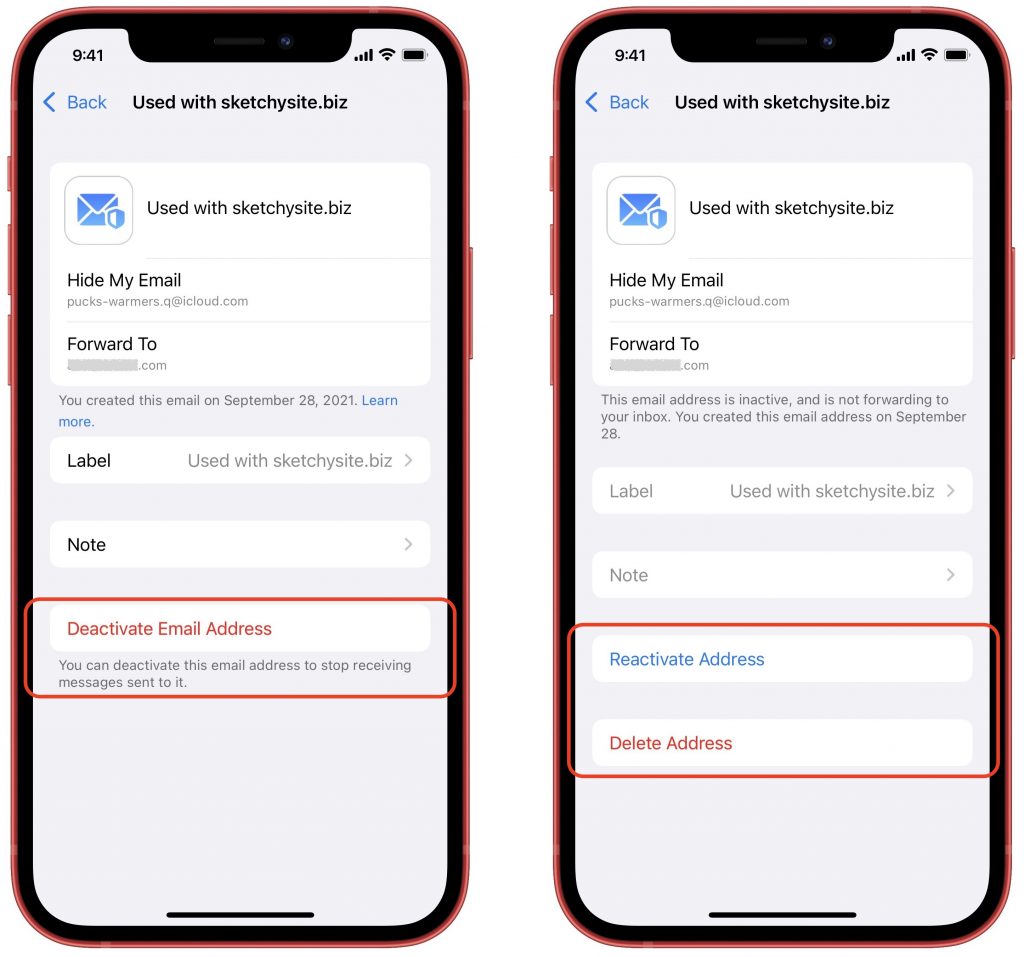
To stop receiving email from an address, tap it in the list and tap Deactivate Email Address. In the Inactive Addresses list, you can see such addresses and leave them for reference, reactivate them, or delete them.
Custom Email Domain

Throughout the history of iCloud (including its predecessors iTools, Mac.com, and MobileMe), users have received email addresses that end with the mac.com, me.com, and icloud.com domains. If you wanted to register your own custom email domain (like hoopyfroodemail.com, for instance) and use that in a personalized email address, you had to rely on another service like Gmail or Fastmail.

With iCloud+, it is at long last possible to connect up to five custom domains and use them in addition to the standard domains. You (and each person in your Family Sharing group) can have up to three addresses for each domain. Note that you must have a primary iCloud Mail email address set up and have two-factor authentication enabled for your Apple ID.

Although the process for setting up a custom email domain isn’t that difficult, it’s beyond the scope of this article. You need to have a domain registered, update DNS records with your domain registrar, associate email addresses with the custom domain, and verify your settings. Apple provides instructions, and you should also read How to Set Up Custom Email Domains with iCloud Mail from TidBITS for more real-world coverage. Reach out if you need help.

Our take is that this feature is welcome, but it’s just for hobbyists and families. If you’re running a business of any sort, you should have a custom email domain with a full-fledged email service. Contact us for advice on the best solution for your particular situation—this is very much not a “one size fits all” scenario.

HomeKit Secure Video

The final iCloud+ feature is HomeKit Secure Video, previously a free bonus with the higher-level iCloud storage plans. It requires a compatible third-party security camera and takes over from the manufacturer’s app to ensure that no one can access your video, including the camera maker and Apple. That’s a big deal—one of the main problems with many third-party security cameras is that they transmit and store video in insecure ways, making it possible for evildoers to capture video from inside your house. (Yeah, it happens.)

All that seems to have changed with iCloud+ is that Apple has added HomeKit Secure Video to the 50 GB plan with support for one camera, increased the number of supported cameras on the 200 GB plan to five, and allowed an unlimited number of cameras for 2 TB plans.

As with custom email domains, the steps necessary to set up a security camera in the Home app and work with HomeKit Secure Video are beyond the scope of this article. Apple provides basic instructions, and the year-old article Apple’s HomeKit Secure Video Leverages iCloud Storage and Preserves Privacy from TidBITS explains more and provides context.

Welcome as these features may be, they’re unlikely to compel upgrades for those who don’t need more than the 5 GB of free iCloud storage. However, it’s so common to need more iCloud space for photos, backups, and files that we anticipate lots of people taking advantage of the iCloud+ features that come along for the ride.

(Featured image based on an original by iStock.com/AlSimonov)
Apple Radically Improved Multitasking in iPadOS 15. Here’s How to Use It

Multitasking has long been a mess on the iPad, not so much because it didn’t work but because it was tough to memorize the secret swipes necessary to put multiple apps into Split View, work with multiple windows in apps that supported them, and hide and show what you wanted in Slide Over. In iPadOS 15, Apple hasn’t changed the underlying multitasking capabilities much, but it has made them far more discoverable with onscreen controls and tips that supplement the previous gestures.

Use the Multitasking Menu

Most important is the new multitasking menu button that appears in the top center of every app, represented by •••. Tap it to reveal a control with three options—Full Screen, Split View, and Slide Over—and then tap one of those to put the current app into that mode. From left:

  • Full Screen: When only a single app is showing, the leftmost button is selected. When you have an app in Split View or Slide Over, tap the Full Screen button to make that app the only one onscreen.
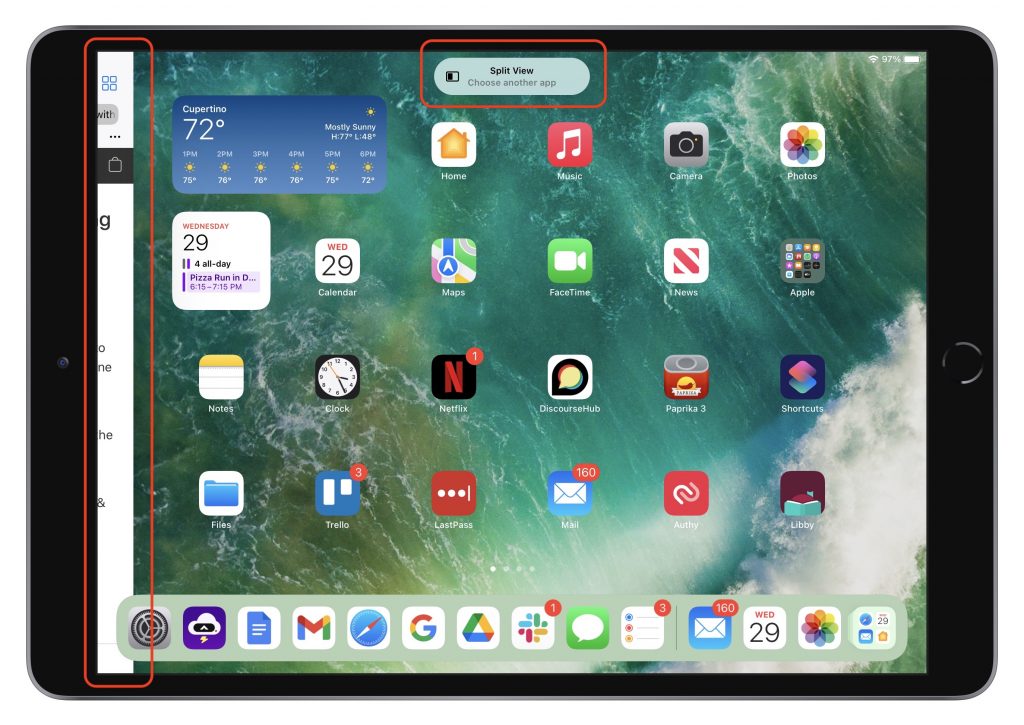
  • Split View: Tap the middle button to shove the current app to the left edge of the screen, revealing the Home screen and the Dock. A little lozenge replaces the multitasking menu, telling you that you’re working with Split View and to choose another app. Tap any other app to open it (on the right side) with the current app (on the left side), and remember that you can resize each app using the handle on the black bar in the middle.
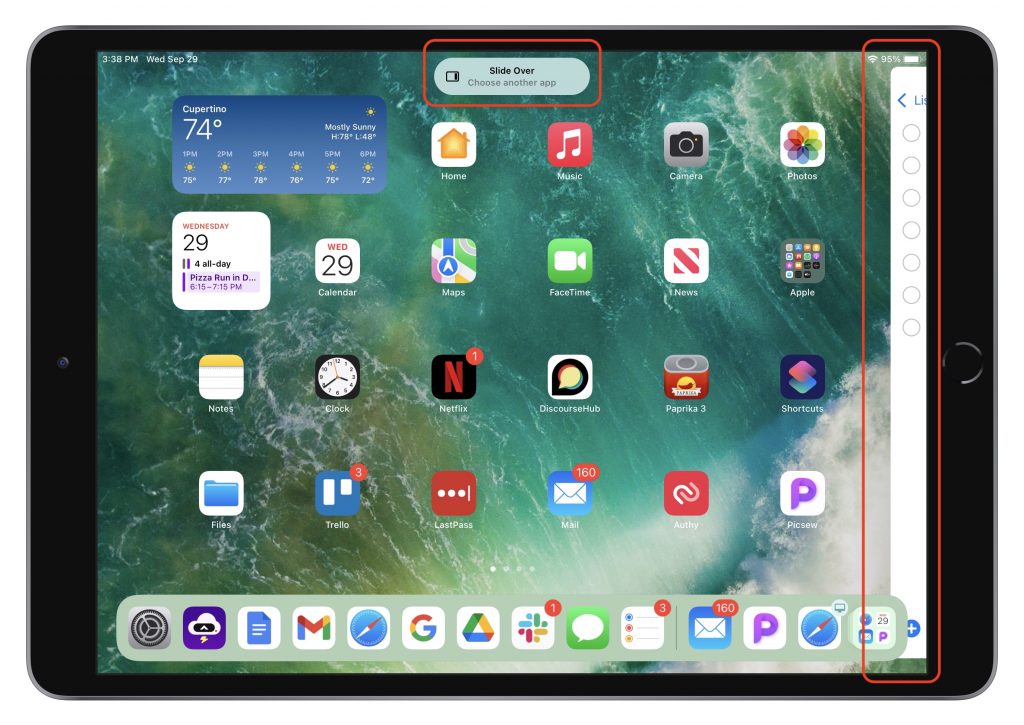
  • Slide Over: In the current app window, tap the rightmost button to push the app to the side of the screen, again revealing the Home screen and the Dock and showing a lozenge that tells you that you’re working with Slide Over and to choose another app. Tap any other to open it full screen but with the current app floating above it in Slide Over mode, and remember that you can hide the Slide Over app easily by swiping it to the right.

Use the App Switcher

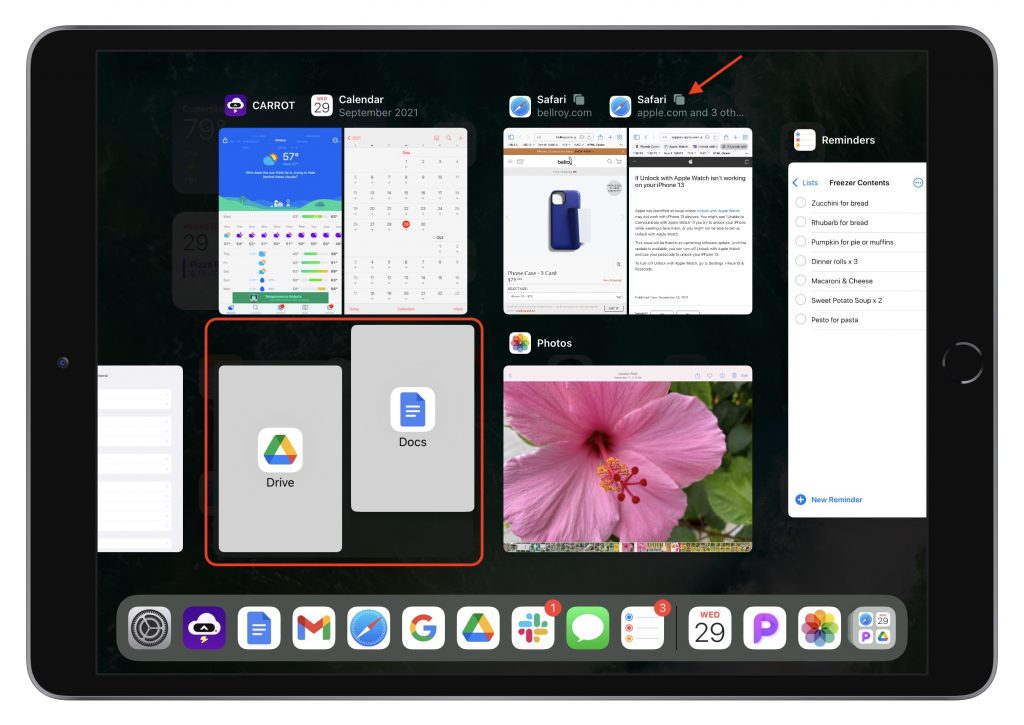
Apple also made it much easier to see and manage your Split View combinations by using the App Switcher. Once you go into it by swiping up from the bottom of the screen (or double-pressing the Home button, if your iPad has one), you have several multitasking-related options:

  • Switch among apps: Tap any app, Split View combination, or Slide Over app (located on the right side of the App Switcher) to switch to it.
  • Make a Split View: Drag any app or window onto another one to combine them into a Split View (as is shown with Drive and Docs below). Before you start to drag, pause for a moment to pick up the app; drag until the items turn into icon-emblazoned gray rectangles.
  • Replace a Split View app: Drag any app or window onto the left or right side of a Split View combination to replace that app or window.
  • Break a Split View combination: Drag the left or right side of a Split View combination off until it displays as a full-screen thumbnail.

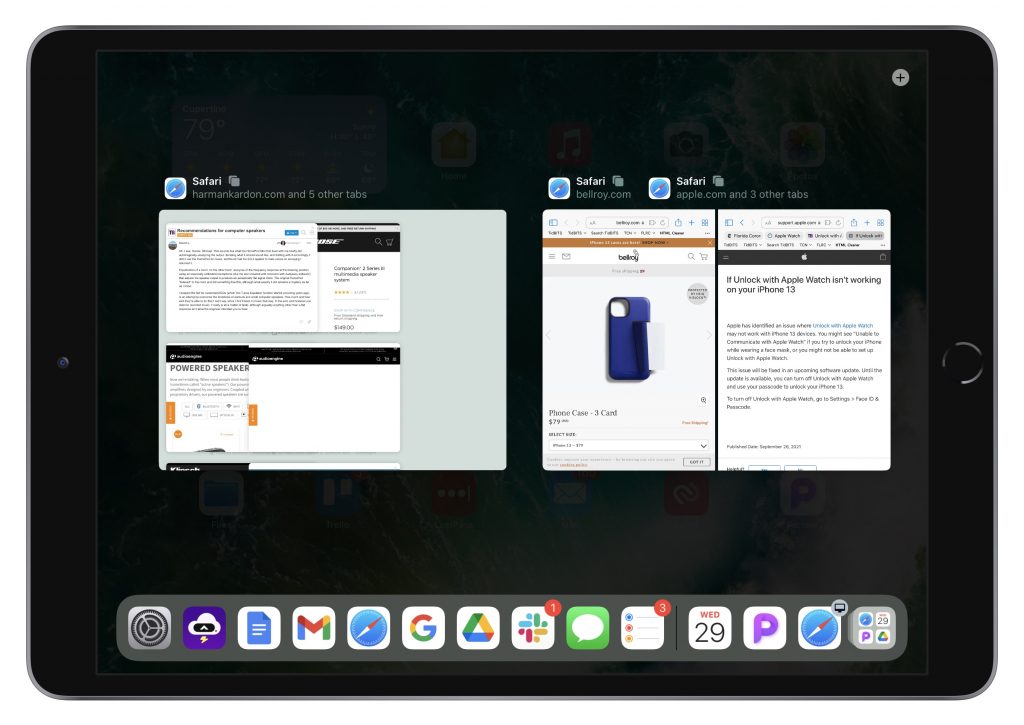
In the screenshot above, note the red arrow pointing to the little stacked square icons above the Safari Split View windows. Those indicate that the app in question has multiple windows. Tap the icon to display just that app’s windows in the App Switcher.

Use the Shelf

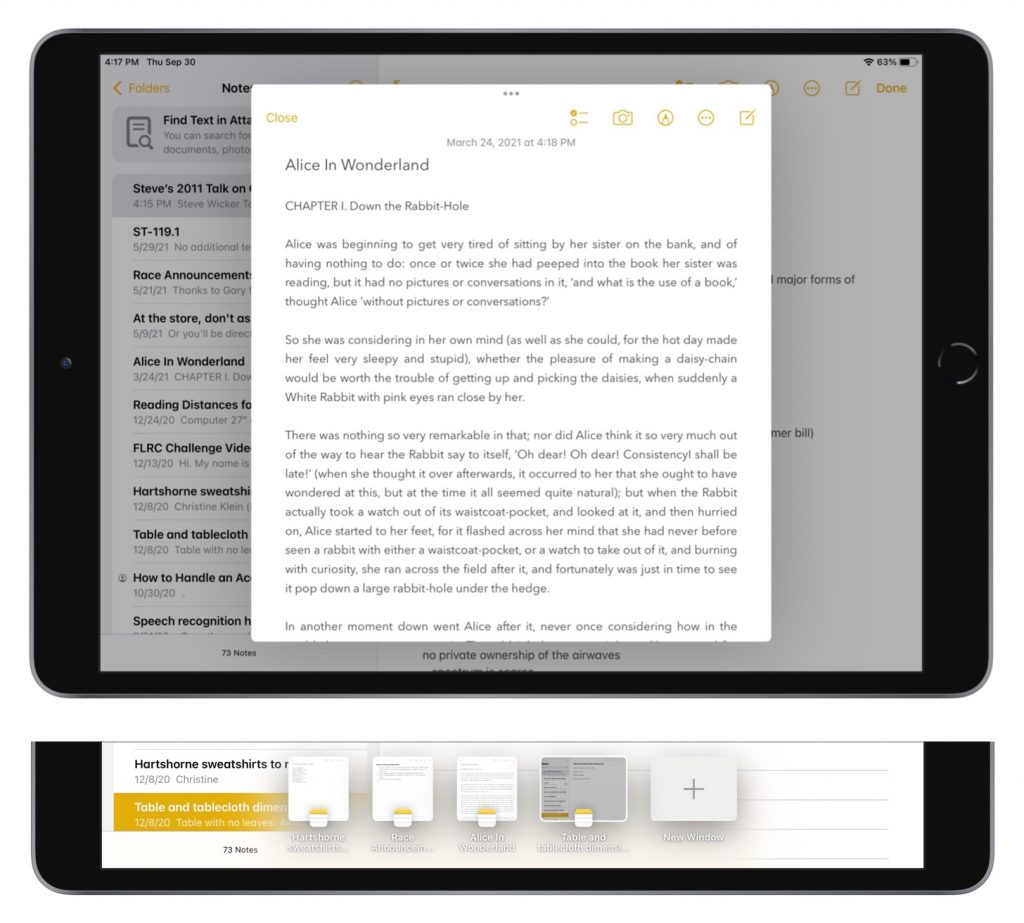
The App Switcher may make it easier to see and switch among multiple windows in apps, but another new multitasking feature, the Shelf, is even more useful. When you use the Dock or a search to open an app with multiple windows available, the Shelf displays them all at the bottom of the screen. The Shelf doesn’t appear when you switch to an app using the App Switcher or four-finger swipe, but you can bring it up at any time by tapping the multitasking menu button at the top of the screen.

When you’re looking at items on the Shelf, tap one to switch to it. You can also swipe up on windows on the Shelf to close them. As soon as you tap anywhere else in the app to start working, the Shelf disappears.

Use Center Windows

In at least some apps with sidebars, such as Mail and Notes, you can now open an item like a message or a note in its own window in the center of the screen. That’s useful for previewing the full content of the item, and you can swipe down on the multitasking menu button to put the window on the Shelf, which keeps it available for quick reference while you work on something else. To create a center window, touch and hold the item in the sidebar and then tap Open in New Window. To close it, tap Close or swipe up on its Shelf thumbnail.

Use the Multitasking Keyboard Shortcuts

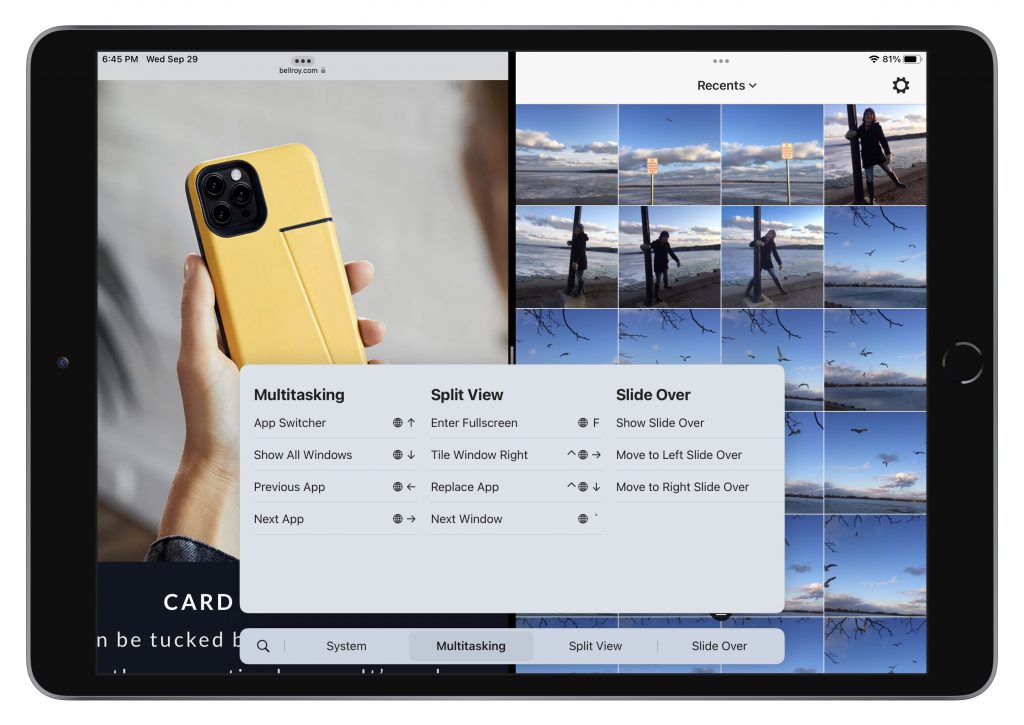
If you’re seriously interested in using multitasking on an iPad, you’re probably also working with a physical keyboard much of the time. In iPadOS 15, Apple added a useful set of keyboard shortcuts that you can learn about by pressing and holding the Globe key and then tapping the Multitasking tab at the bottom. It may take a little while to internalize the shortcuts, but if you do most of your work on an iPad, you will probably find the effort worthwhile.

If you like the idea of multitasking on the iPad but have never been able to remember all the necessary gestures, iPadOS 15’s changes will be welcome. Give them a try—we think they finally make multitasking obvious enough for everyone.

(Featured image by iStock.com/metamorworks)

Beware the Bulging Battery! (And What to Do If Yours Expands)

We’ve been seeing a spate of bulging batteries of late, both in Mac laptops and iPhones. A bulging battery is a Very Bad Thing™ and must be dealt with immediately because it could catch fire or even explode. As lithium-ion batteries age, the chemical reactions that produce power no longer complete fully, resulting in the creation of gasses that can cause the battery to swell. Additionally, manufacturing errors or damage to the membranes that separate the internal layers of the battery can also lead to swelling.

What to Look For

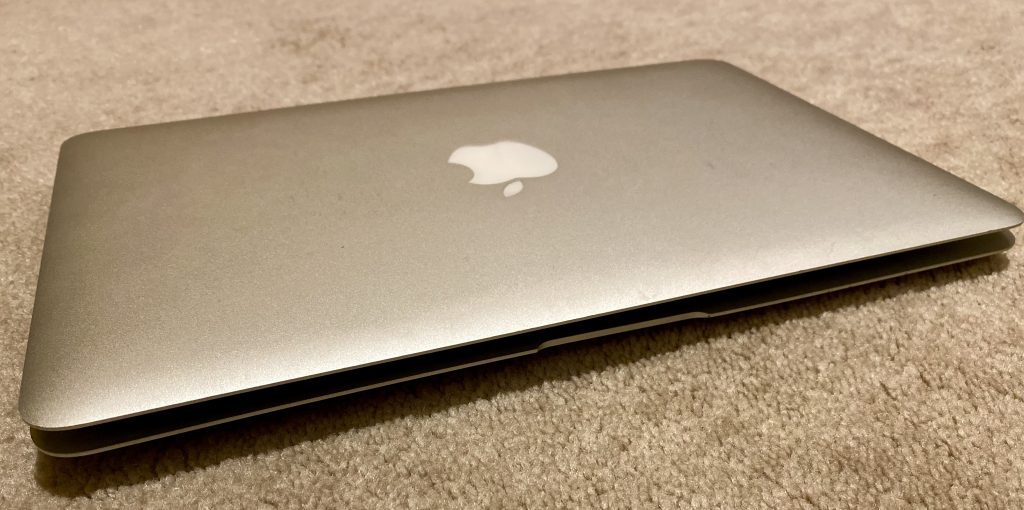
With Mac laptops, a variety of problems—some rather subtle—can indicate that the internal battery is swelling, including the screen not closing properly, a gap between the upper and lower parts of the case, a failure to sit perfectly flat, problems clicking the trackpad, or keyboard keys malfunctioning.

With an iPhone or iPad, a swollen battery is usually obvious because it starts to warp the case and can even crack the screen—it all depends on where the swelling takes place and what part of the device gives way first.

What to Do

When you discover a bulging battery, unplug the device immediately and turn it off as soon as you can. Continued charging or use could lead to a fire or explosion. However, if the device is still functional and you need to copy data off or let a final backup run, try to put it in a place where it’s less likely to cause problems—on a concrete, stone, or tile surface, for instance, and preferably outside as long as it’s not wet, hot, or in the sun.

In some cases, as with older MacBooks, it’s relatively easy to disassemble the case and remove the battery. If you feel comfortable doing that, you may be able to reduce the chances of further damage. It’s much harder to work on iPhones and iPads.

Make sure you’re somewhere well-ventilated and safe, with easy access to outside and preferably a foam-based fire extinguisher at hand. If a fire does start, water will also put it out—make sure to have plenty on hand. Be sure to wear eye protection and gloves. Also, make sure you have somewhere safe to store the battery once removed, such as a metal can with a lid or with sand in it. Finally, be super careful around the battery, and whatever you do, do not puncture the swollen cell—some of the gases could be harmful.

Once you’ve removed the battery from the device, you must take it somewhere for recycling. Under no circumstances should you send it via the mail or put it in the regular garbage. Although various companies—including Apple, Best Buy, Home Depot, and Lowes—recycle batteries, call your local store first to see if they take swollen batteries (they may not be equipped to do so safely). Better yet, check with your county or municipality to see where you should take hazardous waste.

For additional details and advice, see iFixit’s guide and the many comments.

Getting Your Device Fixed

The best-case scenario is that you have AppleCare+ on the device such that Apple will fix it for you. However, that’s a bit unlikely because batteries usually bulge only on older devices. Regardless of AppleCare status, Apple offers battery service and recycling, and if you have an Apple Store or Apple Authorized Service Provider nearby, that’s a good option. Independent repair shops can also likely do this work; make sure they have plenty of experience with your device and offer a warranty for their parts and labor.

Although it’s possible to replace batteries yourself—refer to the iFixit site for instructions and links to replacement batteries—it can be finicky work, particularly in iPhones and iPads, and you may not save that much money in the end.

Sadly, particularly with an older iPhone, the damage from the bulging battery may prevent a repair from being worthwhile. The iPhone X pictured above still worked fine even though the swollen battery broke its screen, but it wasn’t worth the money to replace the battery and the screen for a 4-year-old iPhone. In such cases, recycle the entire unit with the appropriate hazardous waste facility.

(Featured image by Adam Engst)