Learn to Use the Color Picker: Put Some Color in Your Mac
If you’re over 40, you probably remember the point in The Wizard of Oz where the movie switches from black-and-white to Technicolor (and if not, go see it!). It wasn’t the first color film, but the vibrant images of Dorothy’s ruby slippers, the yellow brick road, and the Emerald City helped make the movie an instant classic.
On the Mac, whenever you want to fill a drawing with color, colorize some text, or format spreadsheet cells in color, you need to use the Colors window, more generally called the color picker. Like many long-standing elements of the Mac experience, most people have seen and used it, but don’t realize how much it can do. How you bring it up varies by app but usually entails clicking a color button associated with styles or formats.

The Colors window has three sections: buttons for the color pickers at the top, their individual controls in the middle, and the color wells at the bottom. Click the buttons at the top to switch between these pickers:
- Color Wheel: This picker is useful for exploring a wide range of colors. Don’t miss the brightness slider at the bottom, which changes the colors in the wheel above.
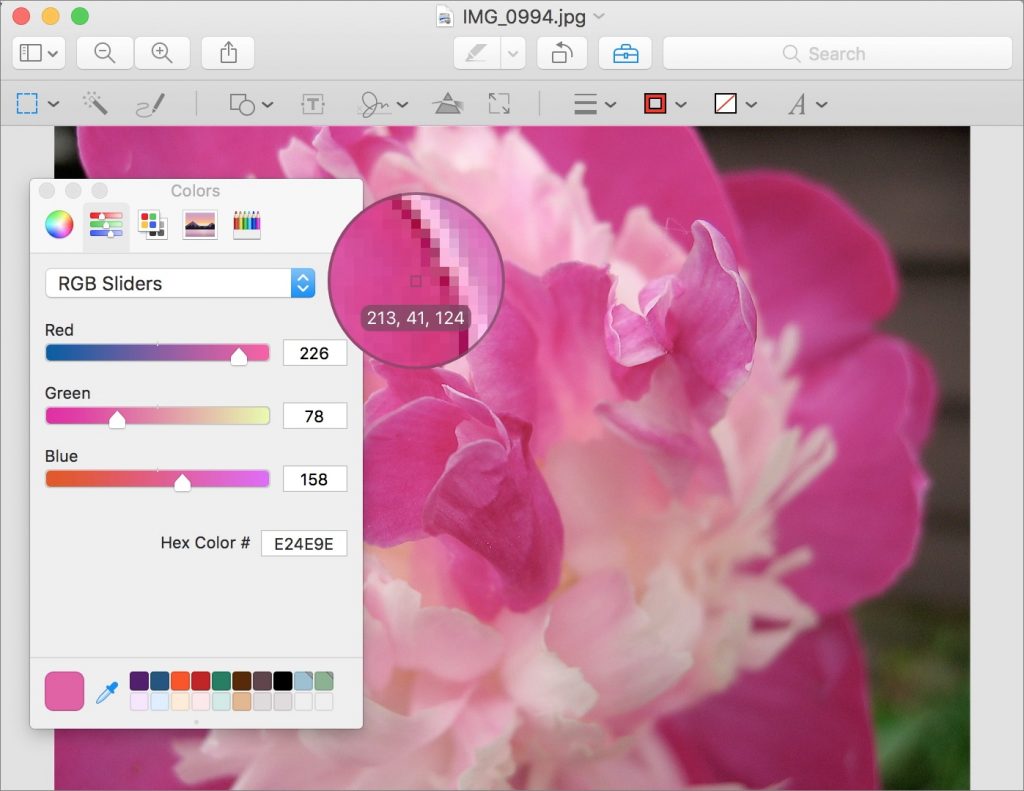
- Color Sliders: Use these sliders to replicate specific grayscale brightnesses or RGB, CMYK, or HSB color by number. Or, you can find a color with another picker and then look up its exact values here. Desktop publishers use this feature a lot. When matching colors with outside sources, click the gear button to choose the appropriate industry standard color palette before picking a color.
- Color Palettes: This picker shows color swatches from different custom palettes. Use the gear button to make, add, rename, and delete palettes. (Find them in ~/Library/Colors.) The utility of these palettes is that you can share your own color collections, enabling coworkers to use identical colors easily, or even download and import palettes for different uses, such as land-use categories for maps.
- Image Palettes: Click the gear here to load a new image, after which you can select any color in that image by clicking it.
- Pencils: They used to be crayons, but then Apple got sophisticated. Or stopped licensing the names from Crayola.
Within each color picker, it’s usually obvious how to select different colors. Click the wheel, move the sliders, enter cyan-magenta-yellow-black percentages, and so on. The selected color, which will be applied to your drawing or text, appears in the large square color well at the bottom left.
However, there is one other extremely useful way to select a color: the eyedropper. Find it in the bottom portion of the Color window, and click it to see a circular loupe that magnifies anything under it. Move the loupe until the single pixel in the middle is over the color you want, and then click. If you press the Space bar while the loupe is showing, the loupe displays the RGB values of that pixel.
What are those little squares to the right of the eyedropper? That area is called the swatch drawer, and it’s where you store particular color swatches that you want to use repeatedly. Just drag the color from the color well to the left into a swatch square. You can even pick a color swatch up and move it around, so you can arrange your swatches in a way that you’ll remember. Swatches you store here become available in all Mac apps, so it’s a great way to ensure you’re using the same colors everywhere.
To remove a swatch, drag it to the right of the swatch squares and let go just inside the right edge of the Colors window (if this doesn’t work, expand the window to the right as much as possible before another column of squares appears, then try again).
By default, you see 20 swatch squares in 2 rows, but the swatch drawer has room for 230 swatches! Expand just the drawer vertically by dragging the tiny round dot at the bottom, or expand the entire window vertically or horizontally by dragging any edge or corner.
Now that we’ve looked into the heart of the color picker to provide you more knowledge, we hope you’ll find the courage to use colors more confidently in your everyday Mac work!