Taking Out the Garbage: Tips for Working with the Trash on the Mac

One of the great innovations of the Mac, way back when, was the concept of the Trash. Instead of deleting files immediately, you’d put them in the Trash, where they’d sit until you either took them out or removed them for good by emptying the Trash. You undoubtedly know the basics of working with the Trash: drag files in, drag mistakenly trashed files out, and choose Finder > Empty Trash to delete the files and recover the disk space.

But instead of just dragging files to and from the Trash, you can take advantage of a few special techniques that make working with the Trash faster and easier.

Move Files to the Trash

The most obvious method of trashing a file is to drop it on the Trash icon in the Dock, but on a large screen that can be fussy. Once you’ve selected one or more files in the Finder, try one of these alternatives:

  • Press Command-Delete. This is our favorite!
  • Control- or right-click on one of them, and choose Move to Trash.
  • Choose File > Move to Trash.

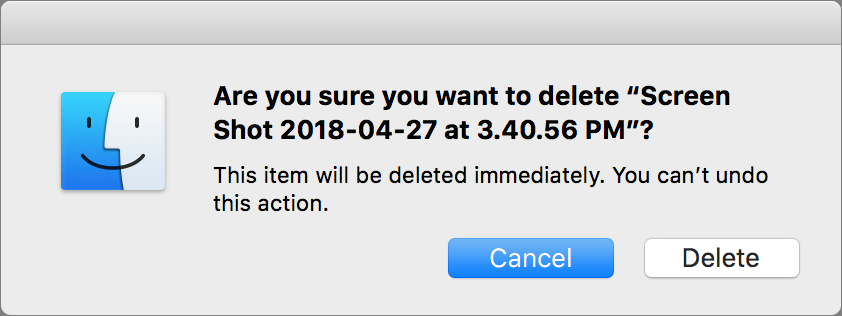
What if you want to live dangerously and delete a file immediately, perhaps because you need to recover the disk space right away? Hold down Option and choose File > Delete Immediately, or press Command-Option-Delete. The Finder always asks whether you want to do this.
Remove Files from the Trash

We all make mistakes and trash files by accident, or sometimes realize later that a file we put in the Trash is still needed. Taking something out is easy: click the Trash icon on the Dock to open its window, and then drag the file out of the window. But, there is more to know about the best ways to remove files from the Trash.

First, if you trash a file and immediately realize it was the wrong thing to do, press Command-Z or choose Edit > Undo Move to Trash to put it back where it started

We like viewing the Trash window in Cover Flow view (open it, and then choose View > as Cover Flow) because of the document preview at the top of the window. We also like to sort by Date Added so that we can see the items we’ve trashed most recently (if the Date Added column isn’t showing, choose View > Show View Options and select the Date Added checkbox).
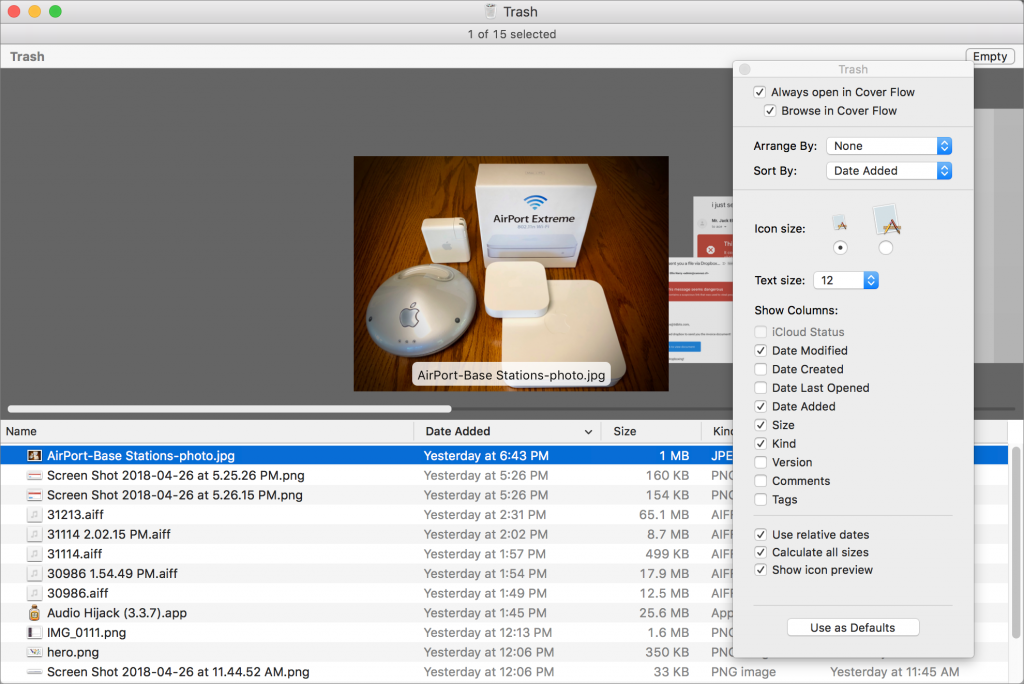
In the Trash window, you can select an item and use the Put Back command to return it to its original location. Try one of these techniques:

  • Press Command-Delete. It’s the same shortcut as for Move to Trash, but does the reverse when the selection is in the Trash window.
  • Control- or right-click on one of them, and choose Put Back.
  • Choose File > Put Back.

Empty the Trash

The main reason to empty the Trash is if you need to reclaim the disk space its contents occupy. You can do that at any time, as we’ll explain momentarily, but in macOS 10.12 Sierra and later, you can have the Mac automatically remove items from the Trash after they’ve been in there for 30 days. Just choose Finder > Preferences > Advanced, and select the “Remove items from the Trash after 30 days” checkbox.
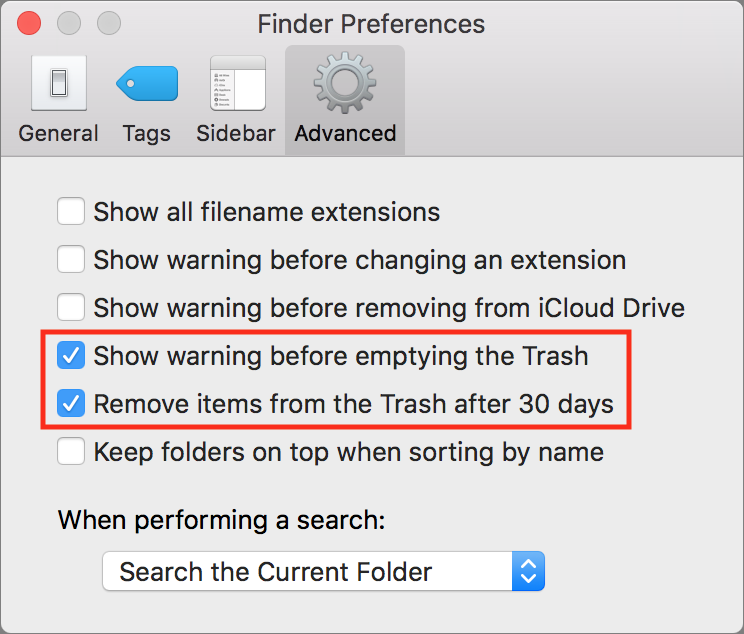
To empty the Trash manually, choose Finder > Empty Trash. If “Show warning before emptying the Trash” is selected in the window shown above, you’ll be prompted to confirm the deletion. If you don’t like the prompt, deselect that checkbox. Other shortcuts include:

  • Click and hold the Trash icon on the Dock, and choose Empty Trash.
  • Press Command-Shift-Delete.
  • To avoid the warning even when it’s enabled, press Command-Shift-Option-Delete.

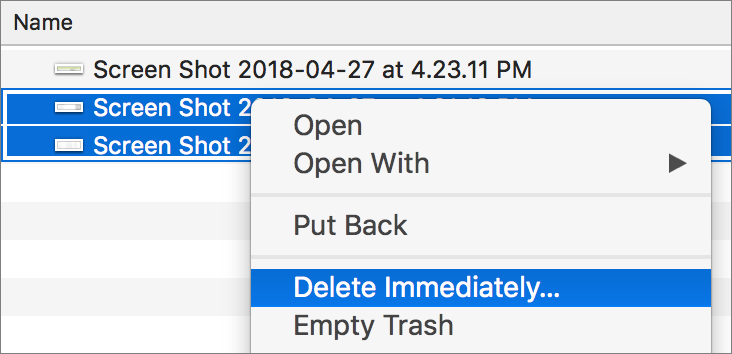
Emptying the Trash doesn’t have to be an all or nothing action. Imagine that you’ve just trashed a few huge files and want to recover their disk space without tossing every other file in the Trash. Just select them, Control- or right-click one, and choose Delete Immediately. You can also press Command-Option-Delete.
Files in your Mac’s Trash smell better than the inside of a typical garbage can, but that doesn’t mean you want to spend a lot of time fussing with them. With these tips, you can trash files, recover from mistakes, and clear disk space quickly and confidently.

Who Should Buy the New iMac Pro?

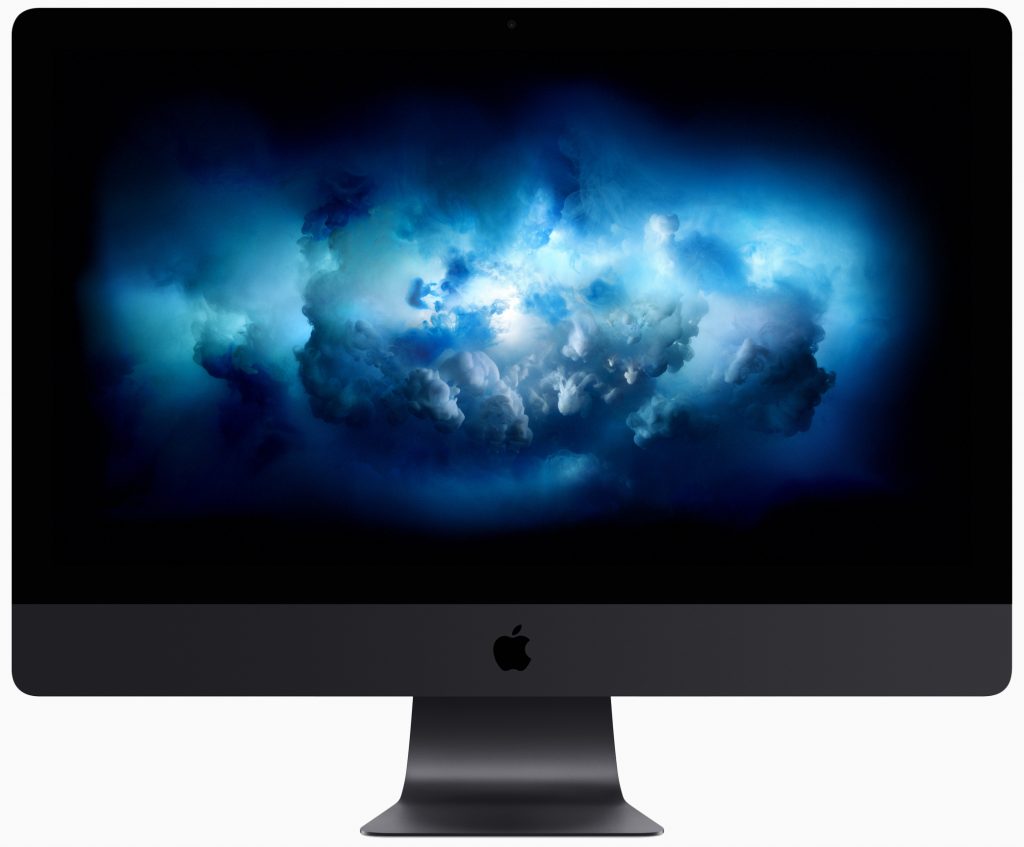
Apple’s new iMac Pro has started shipping, and it’s an astonishing machine. Put simply, it’s the most powerful Mac ever, a title it will likely retain until Apple releases a new version of the Mac Pro, promised for sometime in 2018. But for now, what’s special about the iMac Pro, and should you buy one?

The main thing to know about the space gray iMac Pro is that it’s aimed at high-end professionals, and as a result, it gets pricey fast. The base configuration starts at $4999, and if you max out all its options, you’ll spend over $13,000. That’s a lot of money, but you get a lot of bang for your buck.

The power starts with the processor, an 8-core Intel Xeon W. If that’s not enough performance for you, there are also 10-core, 14-core, and 18-core options. Apple didn’t skimp on RAM either—32 GB comes standard, and you can bump it to either 64 GB or 128 GB. The default storage is a 1 TB solid-state drive, but you can increase that to 2 TB or 4 TB. You can’t upgrade the iMac Pro in any way yourself, but you can take it to an Apple Store or Apple Authorized Service Provider to have more RAM installed after the fact.

The screen is a stunning 27-inch Retina 5K 5120-by-2880 P3 display, and the iMac Pro drives all those pixels with a Radeon Pro Vega 56 graphics card with 8 GB of memory, though you can get even more graphics processing power from an optional Radeon Pro Vega 64 card with 16 GB.

Most of the iMac Pro’s other specs are similar to the existing 27-inch iMac with Retina display—a 1080p FaceTime camera, 802.11ac Wi-Fi, Bluetooth 4.2, an SDXC card slot, four USB 3 ports, and a headphone jack—but it also boasts four Thunderbolt 3 ports for driving external displays and large storage arrays, along with 10 Gb Ethernet for lightning-fast network access.

It comes with a space gray Magic Keyboard with Numeric Keypad and a space gray Magic Mouse 2. You can switch to a space gray Magic Trackpad for $50 or buy both input devices for $149, which you might want to do because the space gray peripherals aren’t sold separately.

Many of the iMac Pro’s options come with eye-watering price tags—$2400 for the 18-core processor and another $2400 for 128 GB of RAM—but those stratospheric costs make the purchasing decision fairly easy. If you’re in a line of work where increased performance translates directly to increased productivity, you’ll want an iMac Pro as soon as you can get one. It’s ideal for video editors who need to work with 8K video, engineers using complex modeling software, and developers suffering through long compile times. Put simply, if time is money for you, you’ll want an iMac Pro.

And if you’re a professional whose needs aren’t nearly so rarefied, you can rest easy knowing that the regular 27-inch iMac can give you more than enough performance for a lot less money.

Learn How You Can Adjust Web Site Behavior with Safari’s Site-Specific Settings

Although macOS 10.13 High Sierra was light on new features, it did bring one welcome addition to Safari—site-specific settings. Imagine that you regularly visit a blog that you prefer to read using Safari’s Reader view. Rather than invoke it each time you visit, you can now set Safari to use Reader automatically on that site. Similarly, if there’s a site whose text is too small, Safari can remember your page zoom setting for that site. Neat, eh?

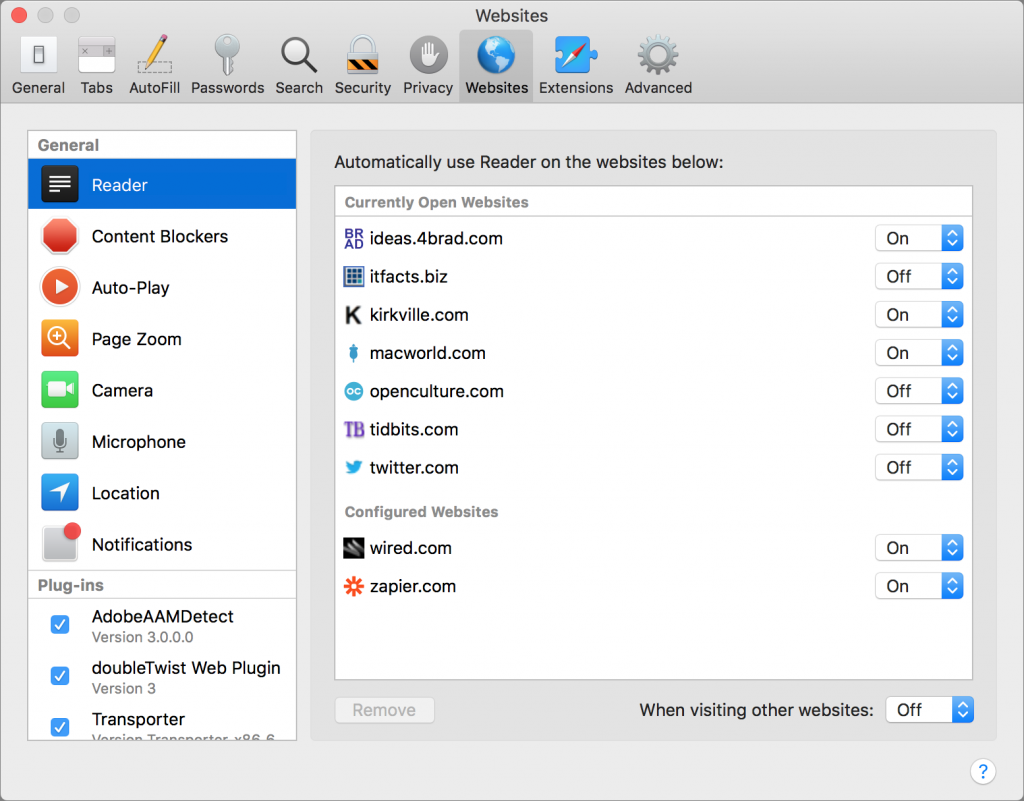
Here’s how to make the most of Safari’s site-specific settings. First, load a site whose settings you’d like to customize. Then, choose Safari > Preferences and click Websites in the toolbar. You see a list of general settings in the sidebar at the left, followed by any plug-ins you’ve installed. For each setting or plug-in, you can set what happens when you visit the site you just loaded—or, if you have a bunch of sites open in different tabs, you can customize the behavior for any open site. Here are your options.

Reader

Reader view displays an article as a single page that’s formatted for easy reading, without ads, navigation, or other distractions. It’s such a significant change that it’s off by default—you enable it by clicking the Reader button to the left of the URL in the address bar. To turn it on for all of a site’s articles, in Safari’s Websites preferences, select Reader and choose On from the pop-up menu next to the site name.

Content Blockers

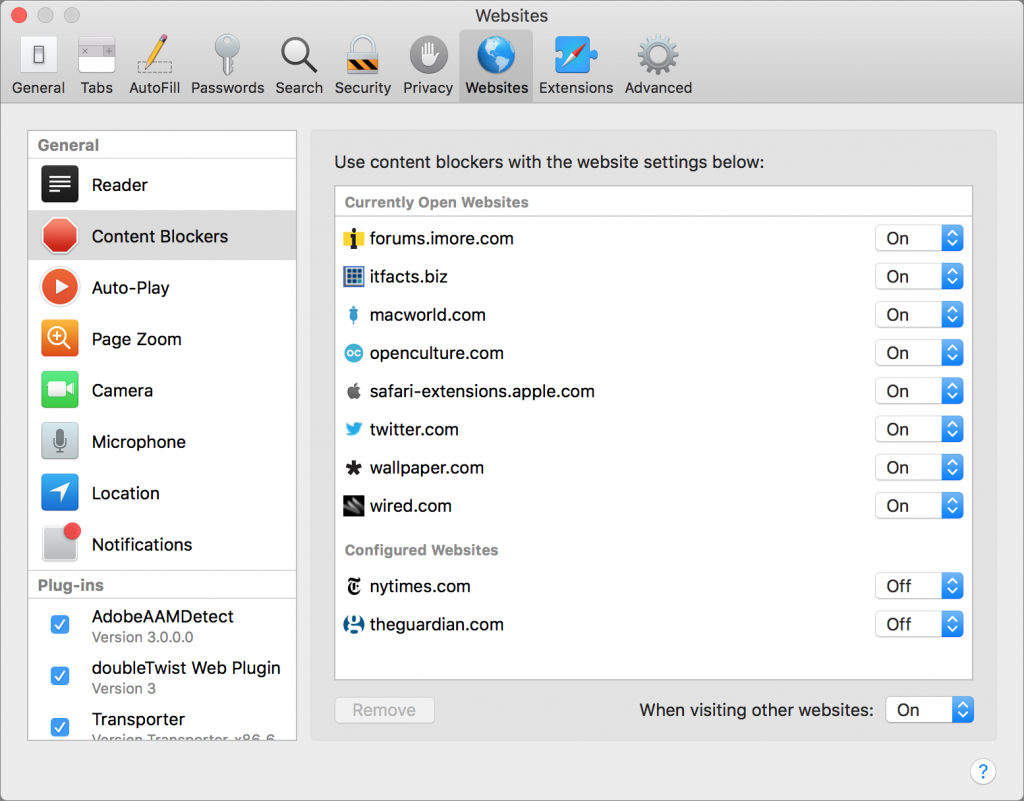
Another way of seeing fewer Web ads is to install a Safari content blocker. Choose Safari > Safari Extensions to open Safari’s Extension Gallery, and then scroll down slightly to find the page’s Search field, where you can search for blocker. There are lots—look for one like Adguard AdBlocker that supports Safari’s content blocking API. Once you’ve installed one, select Content Blockers in the Websites preferences. By default, Safari blocks ads on all sites, so choose Off from the pop-up menus for sites whose ad content you want to see.

Auto-Play

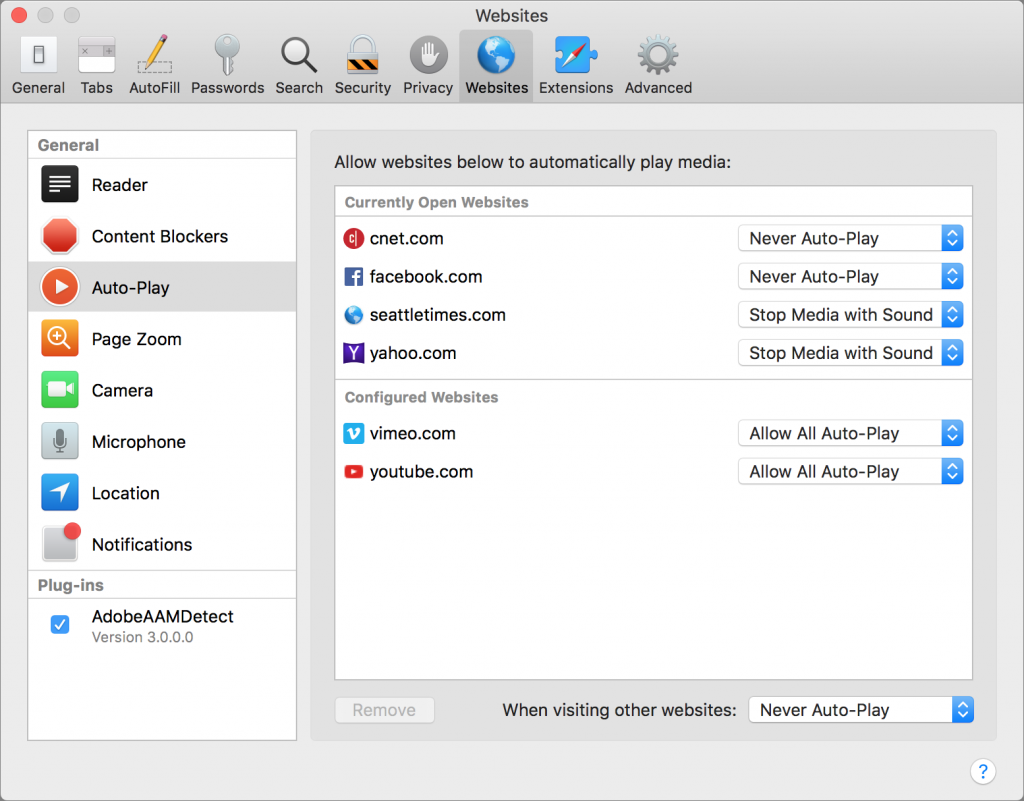
Little is more annoying than sites that play a video when a page loads, distracting you from the text you want to read. Even worse are those sites—Macworld, we’re looking at you—that auto-play videos that aren’t even related to the page. Safari squelches auto-playing videos by default, but for sites like YouTube, you might want to allow videos to play. You can also choose to stop only videos that have sound.

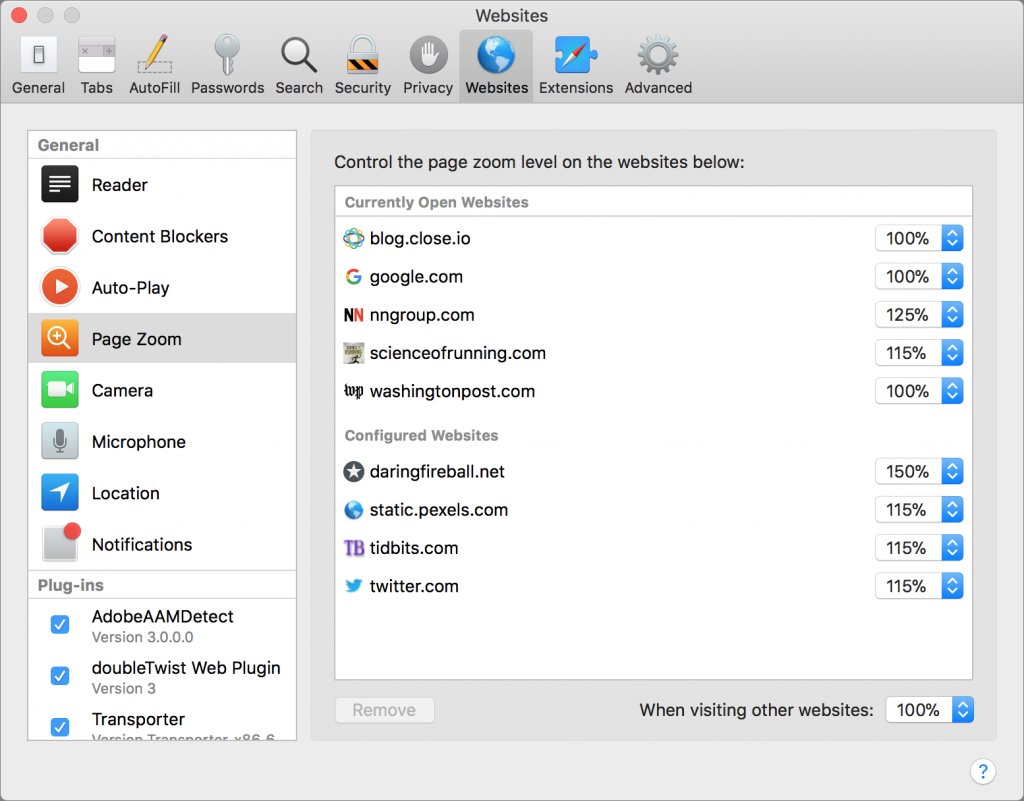
Page Zoom

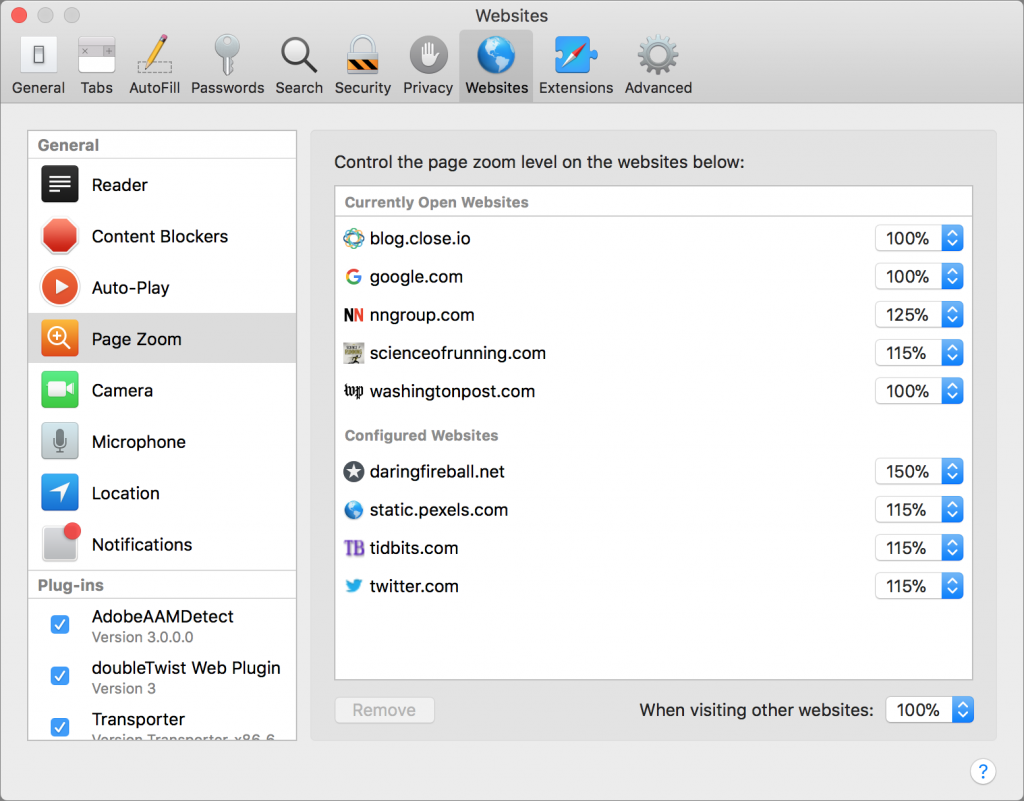
It’s easy to hit Command-Plus to zoom in on a page, increasing the text and graphics proportionally, but who wants to do that every time you visit a page sporting barely readable words? With the Page Zoom setting, Safari will use your preferred zoom every time you visit a particular site. In fact, you don’t have to do anything other than set a zoom level with Command-Plus when you’re viewing a site because Safari remembers it automatically, as you can see in the Configured Websites section for Page Zoom. To tweak it manually, choose a zoom level from the site’s pop-up menu.

Camera & Microphone

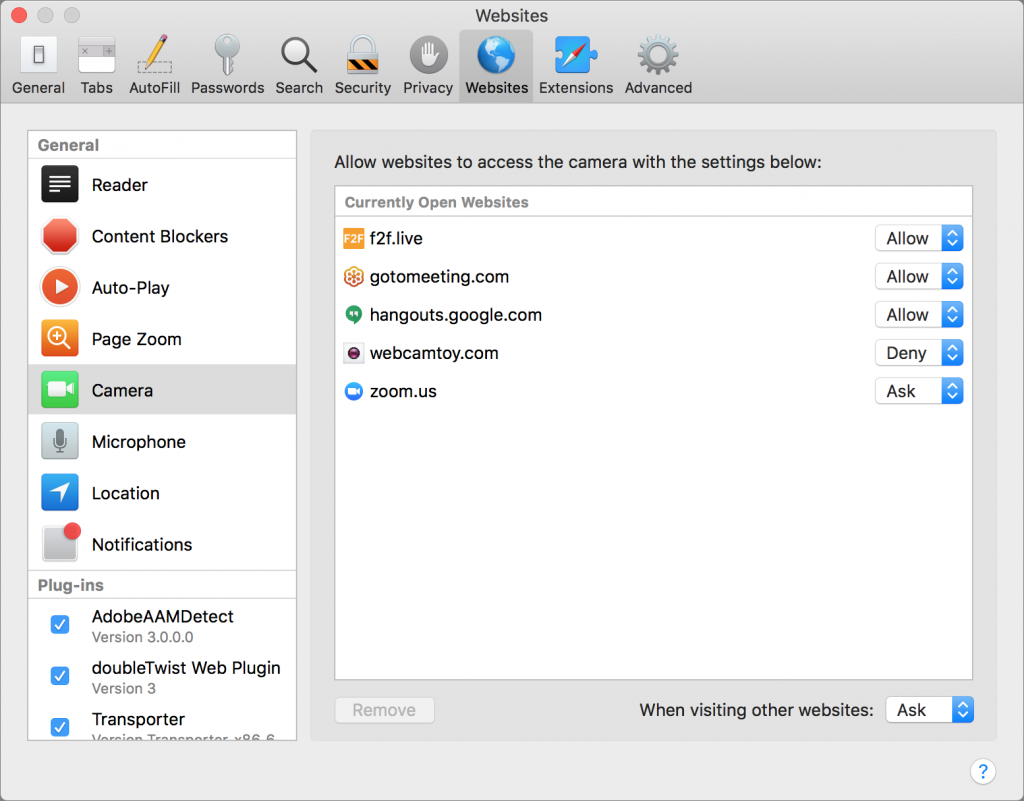
Apart from Web conferencing services, you’re unlikely to run across many sites that want to access your Mac’s camera and microphone. That’s why the Camera and Microphone settings default to asking you whenever a site wants permission to record you. If you find it irritating to be asked constantly by a site you use often, choose Allow from the pop-up menu for that site. And if a site asks repeatedly but you never want to allow it, choose Deny to stop the prompts.

Location

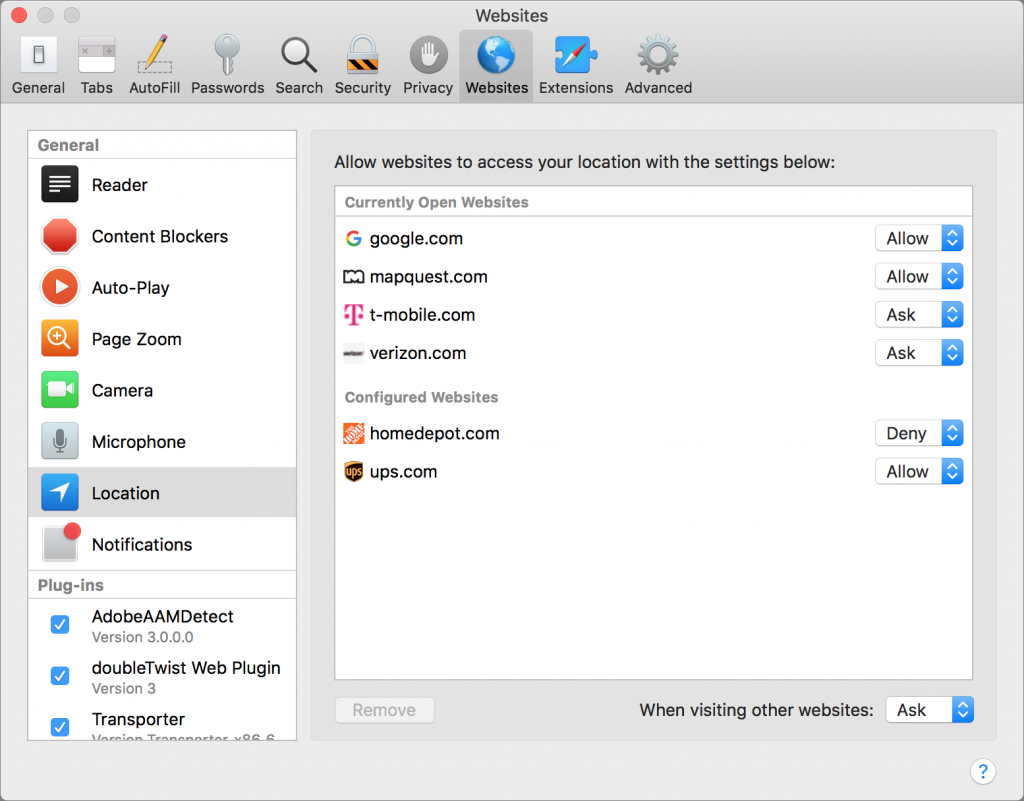
Most Web sites that ask for your location want to determine how close you are to particular stores. If that’s information you’re interested in sharing, let them see where you are, by all means. And if you’re using a mapping service that wants your location, it’s entirely reasonable to set its pop-up menu to Allow. But if a site keeps asking and it feels creepy, set it to Deny.

Notifications

Are there sites whose new posts you’d like to know about right away? If they support Web notifications and you give them permission, they can post push notifications that appear on-screen and in Notification Center, just your other notifications.

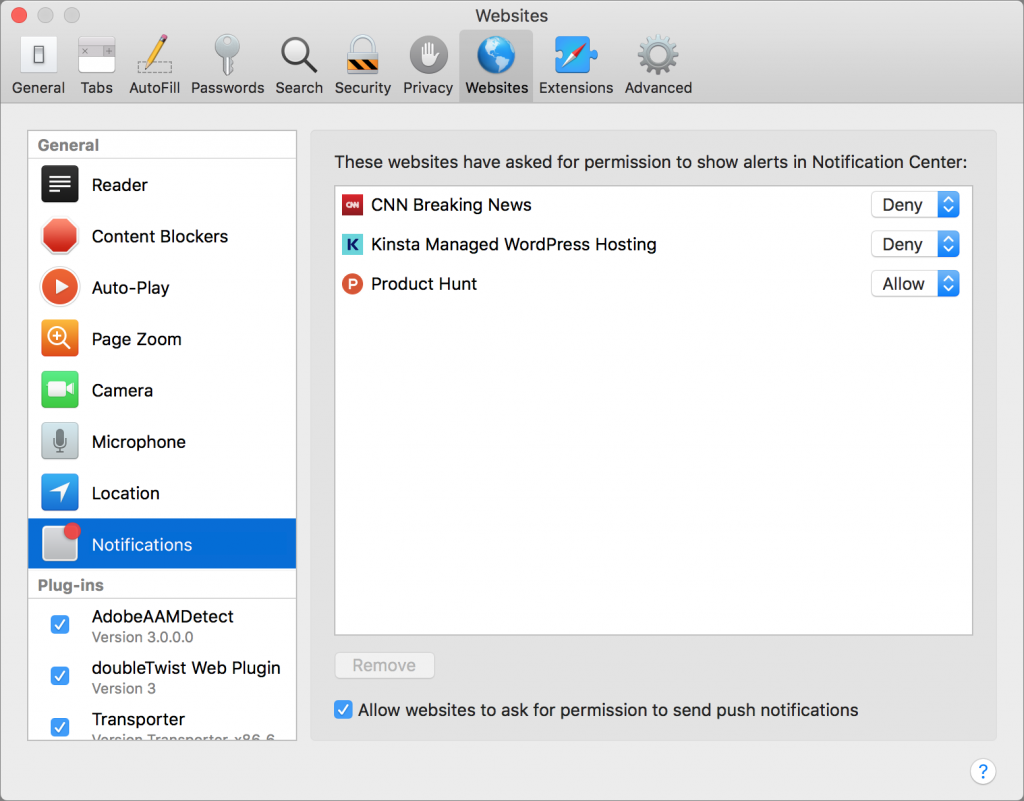
The Notifications preferences look different from the others because they show only sites that have asked for permission in the past. Safari remembers your choice, and if the site gets annoying later, you can always take back permission by changing the Allow pop-up menu to Deny. And if you never want to be prompted for push notifications—they can be distracting—uncheck the “Allow websites to ask for permission to send push notifications” checkbox at the bottom of the pane.

Plug-ins

It’s impossible to know what plug-ins you’ve installed, but Safari is configured to make sites ask for permission to use a plug-in each time you visit. That’s the safest setting, but for any given site and plug-in, you can use the pop-up menu to give the site access (choose On) or not (choose Off). And if you can’t even remember what a plug-in does, you can deselect its checkbox to disable it.

That’s it! Some of Safari’s site-specific settings work without any interaction from you, such as your page zoom and notification preferences. Others require a tiny bit of configuration, but that’s a small price to pay for the Web working more the way you want.

Having Trouble Switching Apps on the iPhone X? Try This.

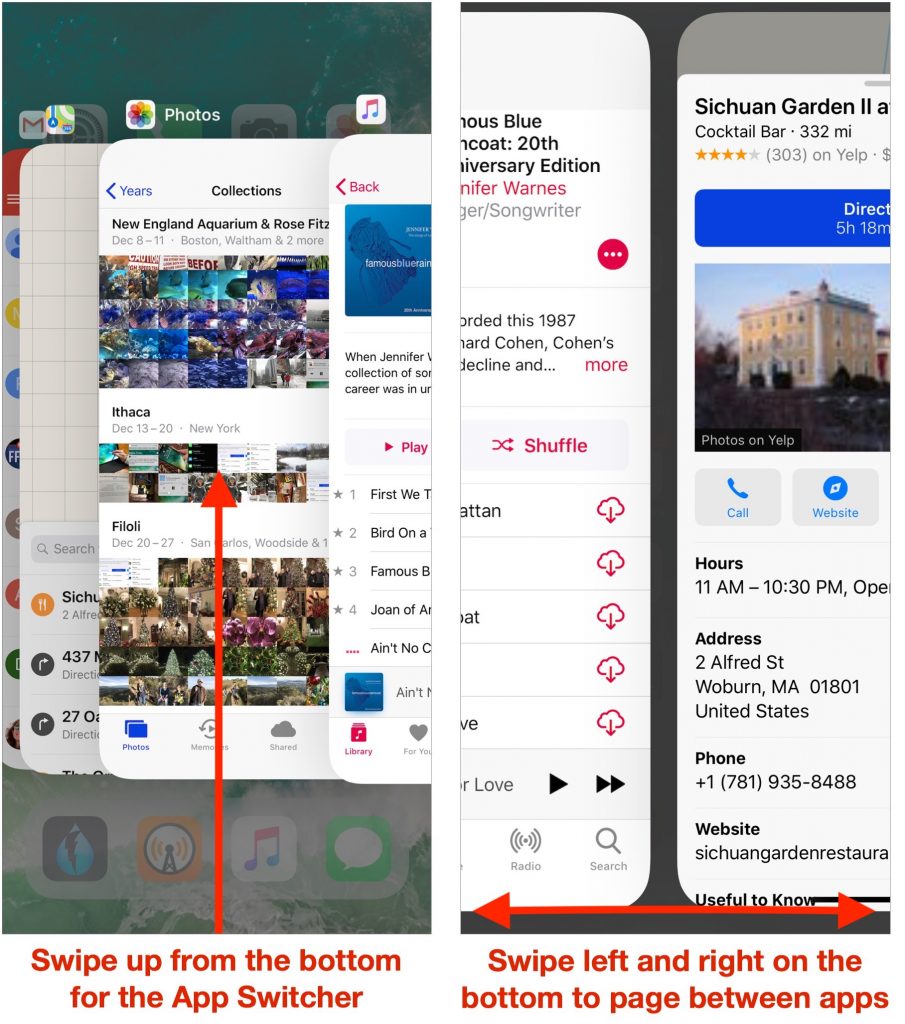
Since the iPhone X lacks a Home button to press twice for the app switcher, you’ll need to switch apps in a new way. To bring up the app switcher, swipe up from the bottom of the screen to about halfway, and then pause until the app thumbnails appear. Then you can scroll through your launched apps by swiping horizontally and switch to an app by tapping its thumbnail. While in the app switcher, you can also force-quit a frozen app: press a thumbnail to get a red minus button and tap that button. Alternatively, you can skip the app switcher entirely. Instead, swipe right on the very bottom of the screen to switch to the previous app—swiping left switches to the next app.

Ransomware: Should You Be Worried, and What Protective Steps Should You Take?

Malware makes headlines regularly these days, and although Macs are targeted far less than Windows PCs, Mac users still need to remain vigilant. A particularly serious type of malware is called “ransomware” because once it infects your computer, it encrypts all your files and holds them for ransom.

Luckily, despite the virulence of ransomware in the Windows world, where there have been major infections of CryptoWall and WannaCry, only a few pieces of ransomware have been directed at Mac users:

  • The first, called FileCoder, was discovered in 2014. When security researchers looked into its code, they discovered that it was incomplete, and posed no threat at the time. 
  • The first fully functional ransomware for the Mac appeared in 2016, a bit of nastiness called KeRanger. It hid inside an infected version of the open source Transmission BitTorrent client and was properly signed so it could circumvent Apple’s Gatekeeper protections. As many as 6500 people may have been infected by KeRanger before Apple revoked the relevant certificate and updated macOS’s XProtect anti-malware technology to block it.


  • In 2017, researchers discovered another piece of ransomware, called Patcher, which purported to help users download pirated copies of Adobe Premiere and Microsoft Office 2016. According to its Bitcoin wallet, no one had paid the ransom, which was good, since it had no way of decrypting the files it had encrypted.

Realistically, don’t worry too much. But it’s likely that malware authors will unleash additional Mac ransomware packages in the future, so we encourage you to be aware, informed, and prepared.

First, let’s explain a few key terms and technologies. Apple’s Gatekeeper technology protects your Mac from malware by letting you launch only apps downloaded from the Mac App Store, or those that are signed by developers who have a Developer ID from Apple. Since malware won’t come from legitimate developers (and Apple can revoke stolen signatures), Gatekeeper protects you from most malware. However, you can override Gatekeeper’s protections to run an unsigned app. Do this only for apps from trusted developers. Even if you never override Gatekeeper, be careful what you download.

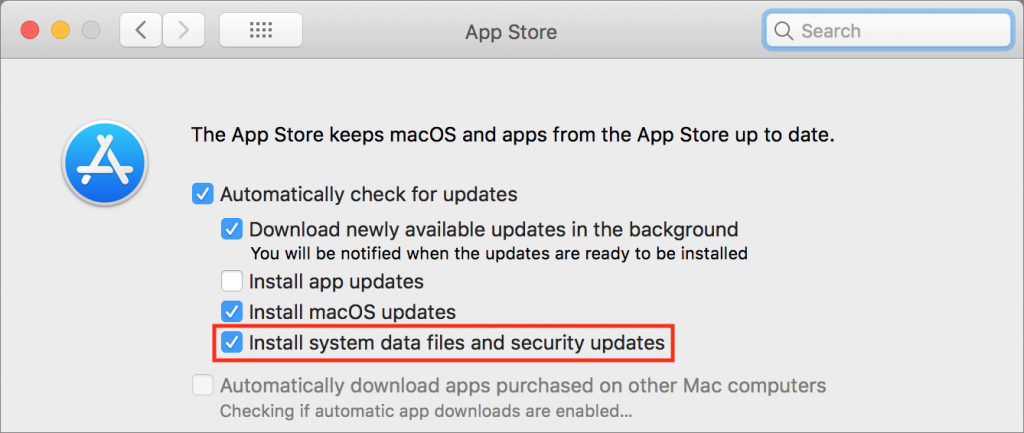
Apple’s XProtect technology takes a more focused approach, checking every new app against a relatively short list of known malware and preventing apps on that list from launching. Make sure to leave the “Install system data files and security updates” checkbox selected in System Preferences > App Store. That ensures that you’ll get XProtect updates. Similarly, install macOS updates and security updates soon after they’re released to make sure you’re protected against newly discovered vulnerabilities that malware could exploit.

Also consider running anti-malware software like Malwarebytes Premium or Mac Internet Security X9. That’s not absolutely necessary, like anti-malware solutions are for Windows, but doing so can provide peace of mind, particularly if you regularly visit sketchy parts of the Internet or download dodgy software.

Although regular backups with Time Machine are usually helpful, KeRanger tried to encrypt Time Machine backup files to prevent users from recovering their data that way. Similarly, a bootable duplicate updated automatically by SuperDuper or Carbon Copy Cloner could end up replacing good files with encrypted ones from a ransomware-infected Mac, or a future piece of ransomware could try to encrypt other mounted backup disks as well.

The best protection against ransomware is a versioned backup made to a destination that can be accessed only through the backup app, such as an Internet backup service like Backblaze (home and business) or CrashPlan (business only). The beauty of such backups is that you can restore files from before the ransomware encrypted them. Of course, that assumes you’ve been backing up all along.

If you ever are infected with ransomware, don’t panic, and don’t pay the ransom right away. Contact us so we can help you work through your options, which might entail restoring from a backup or bringing files back from older cloud storage versions. There are even descriptors for some Windows ransomware packages, and such utilities might appear for hypothetical Mac ransomware as well.

To reiterate, there’s no reason to worry too much about ransomware on the Mac, but letting Apple’s XProtect keep itself up to date, staying current with macOS updates, and using an Internet backup service will likely protect you from what may come.