Use Spotlight on the Mac to Convert Units, Track Flights, Find Movies, and More!

Most Mac users probably think of searching on the Mac in relation to finding files on their drives. That may be the most common use of Apple’s Spotlight search technology, but over the years, Apple has continually enhanced Spotlight’s capabilities, turning it into a veritable Swiss Army Knife that you can invoke with a quick press of Command-Space bar or a click on the magnifying glass at the right side of the menu bar.

Here are a few of our favorite uses for Spotlight that you may not have been aware of.

Launch Apps and Open System Preference Panes

We recommend putting apps you use all the time in the Dock for quick access, but what about apps you need only occasionally? You can always root around in the Applications folder for them, but for quicker access, invoke Spotlight and type the first few characters of the app’s name (Spotlight will guess at what you want; if it’s wrong, keep typing). Then double-click the app in the results list or if it’s already selected, press Return. It’s a great way to bring up Activity Monitor to see what’s happening when your Mac feels slow. This trick also works wonders for opening panes in System Preferences.
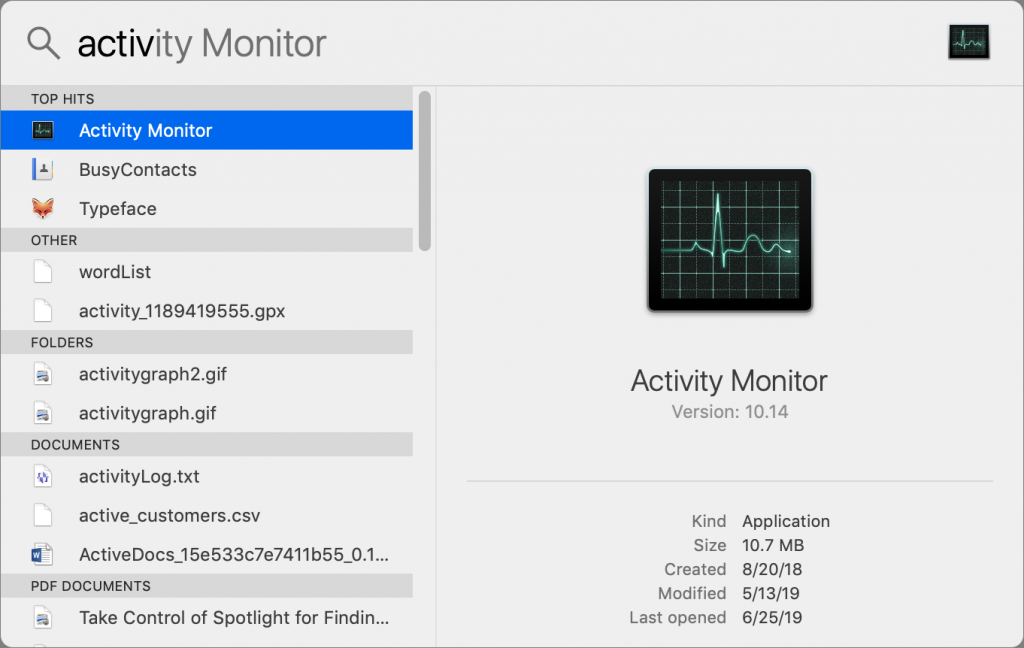
For apps and preference panes whose names have multiple words, you can also try typing the first letter of each word, like ug to find and open the Users & Groups pane of System Preferences.

Convert Units and Currency

Need to figure out what 72º F is in Celsius? Or precisely how many quarts are in a 2-liter bottle? Spotlight can do all sorts of conversions for you. Just start typing your starting number, like 72, and then follow it with something that indicates your starting unit, such as “F” or “degrees.” Spotlight displays the conversion instantly, so you can tell if you’ve guessed wrong about the unit (K is degrees Kelvin, so you’d use km to figure out how many miles in a 24-kilometer race).

Particularly useful is Spotlight’s capability to do real-time currency conversions, since exchange rates fluctuate. It can’t do every currency on the planet, so you’re on your own if you need to check on Burundi francs, but you’ll find all the major currencies. The trick is knowing their abbreviations: the British pound is abbreviated GBP, the Canadian dollar is CAD, the Japanese yen is JPY, and so on. To convert from US dollars into another currency add the phrase “in GBP” or the like after the dollar amount.
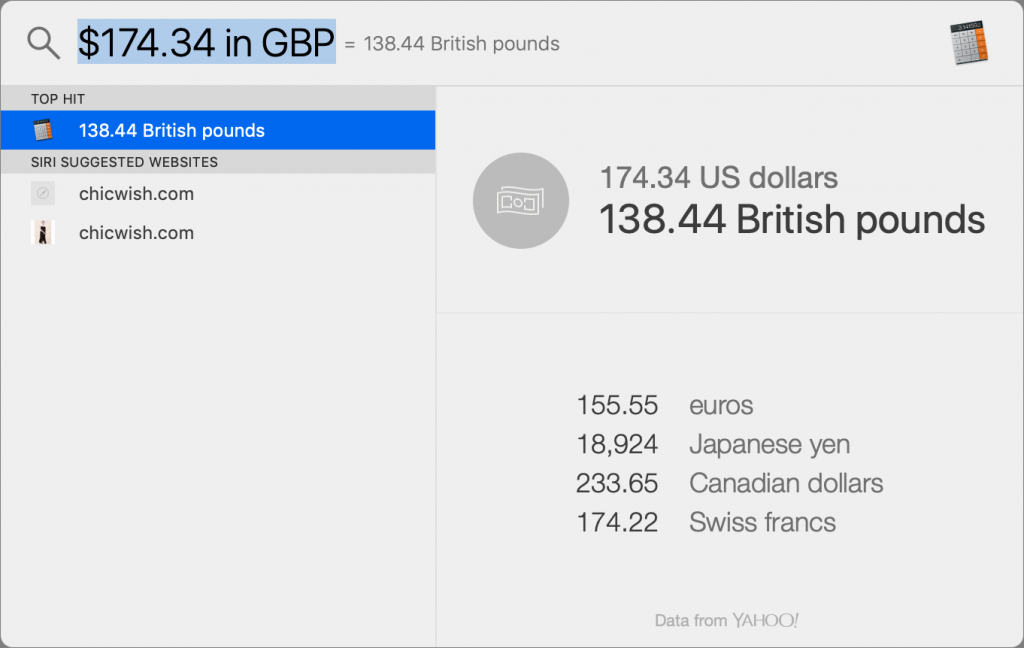
Perform Calculations

We’ve come a long way from thinking that calculator watches are the height of geek chic, but a calculator is still handy now and then. When you want to perform a simple calculation for which a spreadsheet would be overkill, you could use Spotlight to launch the Calculator app, but it’s faster to type your calculation into Spotlight itself. It even supports parentheses for specifying an order of operations. The screenshot is just for illustration; we mostly use this feature to add up a series of numbers.

Look Up Words

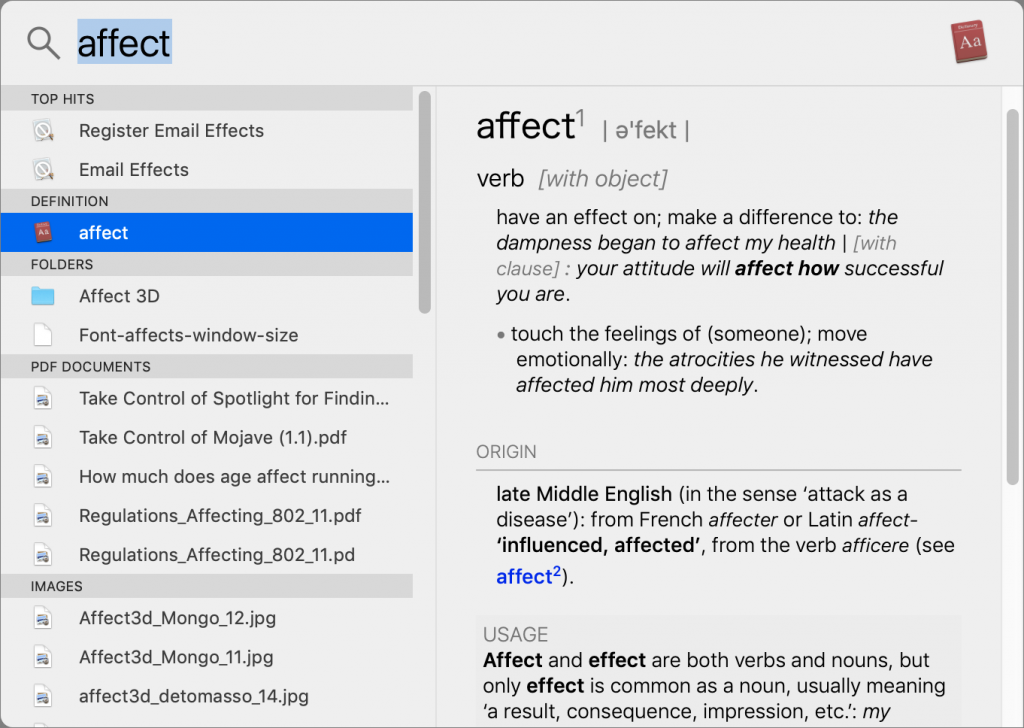
Can’t remember the difference between “affect” and “effect”? macOS’s Dictionary app has all the help you need, but as with Calculator, Spotlight is a fast substitute. Type the word and click the entry under Definition to see the dictionary entry over on the side. If you want to look for synonyms in the thesaurus or explore other aspects of the word, press Return to open the word in the Dictionary app.
Track Airline Flights

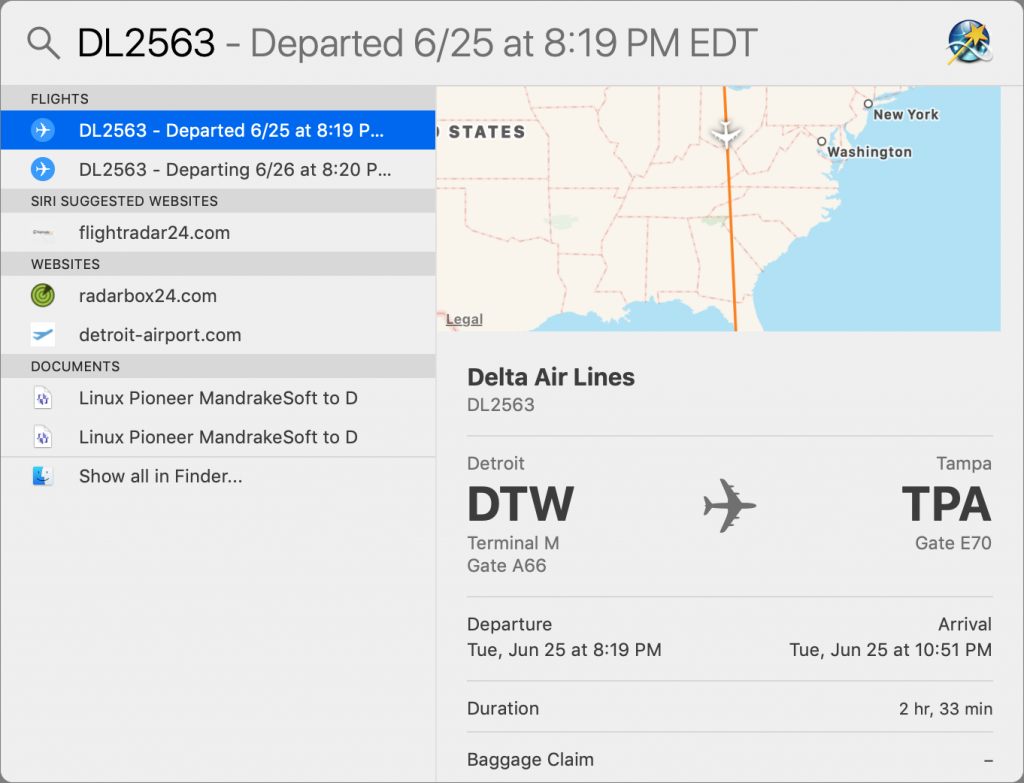
Need to pick your relatives up at the airport? Rather than hoping that their flight will be on time, check to see if it is, with Spotlight. You can usually type the airline name and flight number, but it’s safest if you know the airline’s two-letter code, like DL for Delta, UA for United Airlines, and so on.
Find Movie Info and Show Times

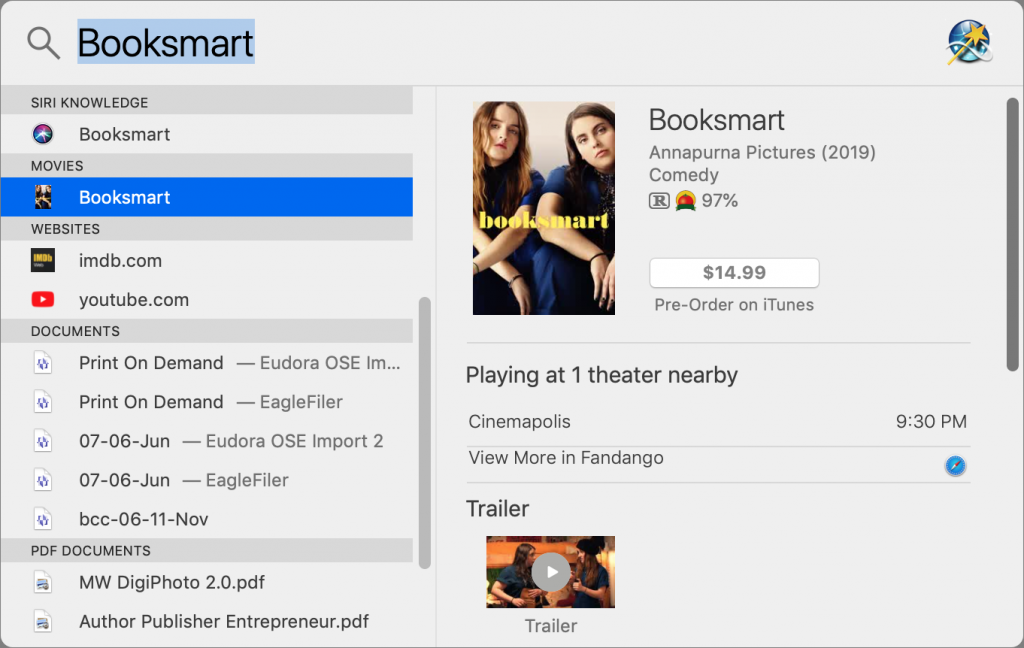
Spotlight can even prove useful at the end of the day when you’re trying to figure out if a particular movie is playing at the local cineplex. Enter the title of a current movie and click its entry in the results under Movies to see all sorts of details, including its Rotten Tomatoes rating, when and where it’s playing, and if you can instead get it on iTunes.
Stocks, Sports Scores, and Weather

Wait, there’s more! Type a ticker symbol, like AAPL, into Spotlight to see the stock’s current price and activity for the day. Enter the name of a professional sports team to see the score of the team’s latest game (assuming they’re in season) and upcoming schedule. And type “weather” and a city name to check the climate conditions for that location and get an extended forecast.

Customize Spotlight

You’ve probably noticed all sorts of other odd items in the results list. That’s because there’s no telling what old email messages or documents might also contain your search term. But you can trim the results somewhat by turning certain items off. To do this, open System Preferences > Spotlight and deselect any categories that aren’t helpful.
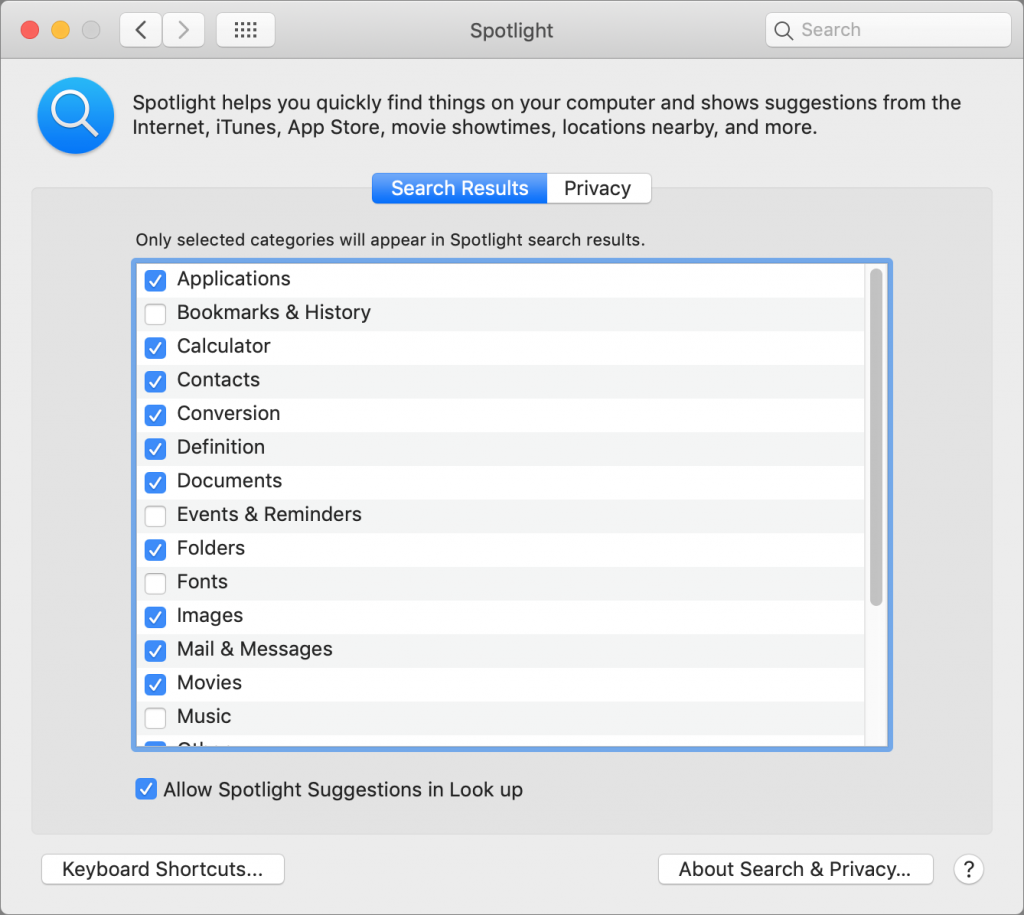
If you never knew or have forgotten how useful Spotlight can be, give it a try!

(Featured image by Nathan Anderson on Unsplash)

Did You Know You Can Make a Video of Anything on Your iPhone or iPad Screen?

You know how to use the Camera app on your iPhone or iPad to take a video, but did you know that you can also record a video of what happens on the screen of your device? That’s useful if you’re trying to explain the steps of some technical process to a friend or show a tech support rep what’s going wrong in an app or Web site. You could also use a screen recording to copy a video from Facebook, for instance, that you want to send to a social media–averse friend.

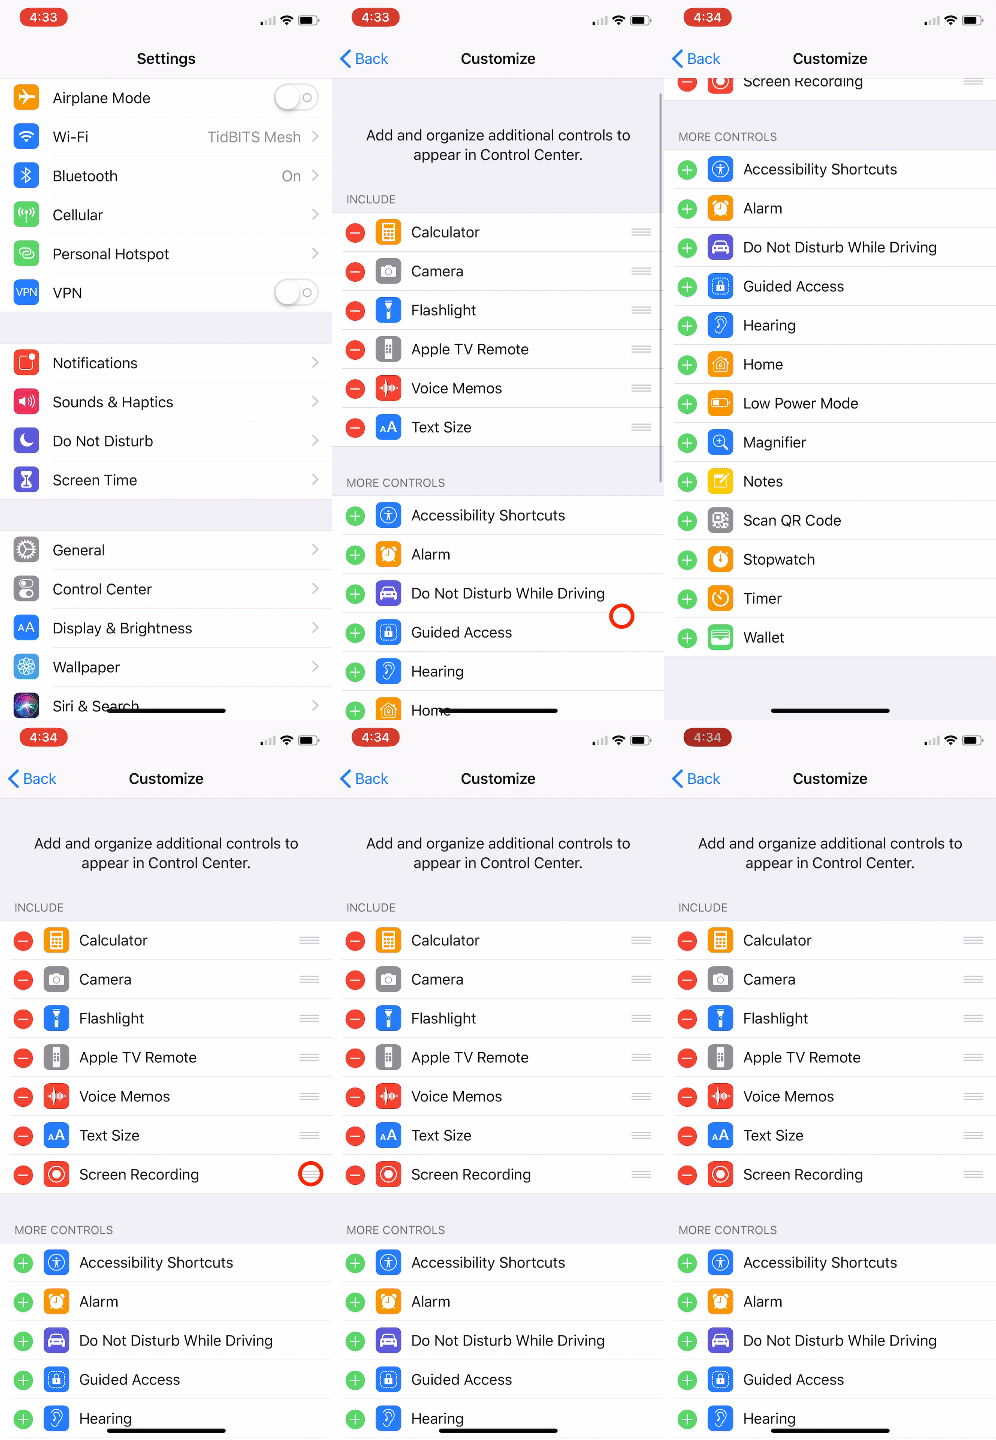
First, to get set up, go to Settings > Control Center > Customize Controls and tap the green + button next to Screen Recording to add it to the list of controls that appear in Control Center. Drag it in the list to rearrange where its round Record button will show up in Control Center. Here’s a screen recording showing those steps:

Making your first screen recording is simple. Follow these steps:

  1. Open Control Center. (Swipe up from the bottom edge of the screen, or, if you’re using an iPhone X or later, or an iPad running iOS 12, swipe down from the top-right corner of the screen.)
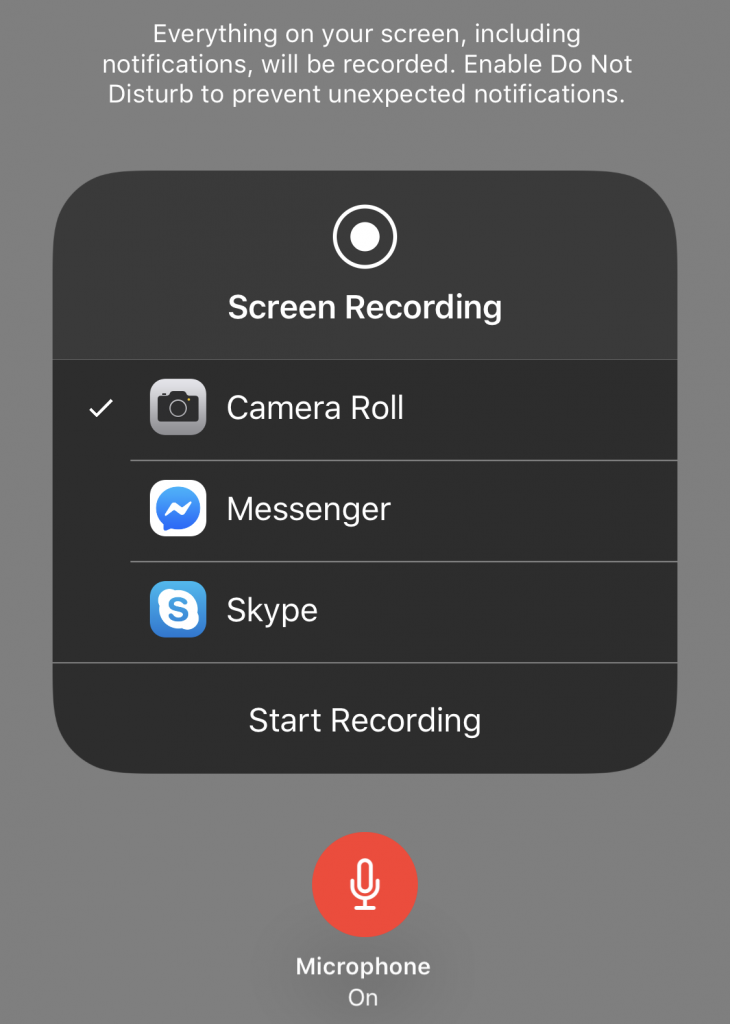
  2. Press deeply on the Screen Recording button to open a menu. If you want to record your voice via the microphone as well, tap the Microphone button to turn it on.
  3. Tap Start Recording, and then wait for the 3-second countdown.
  4. Perform the actions that you want to be recorded.
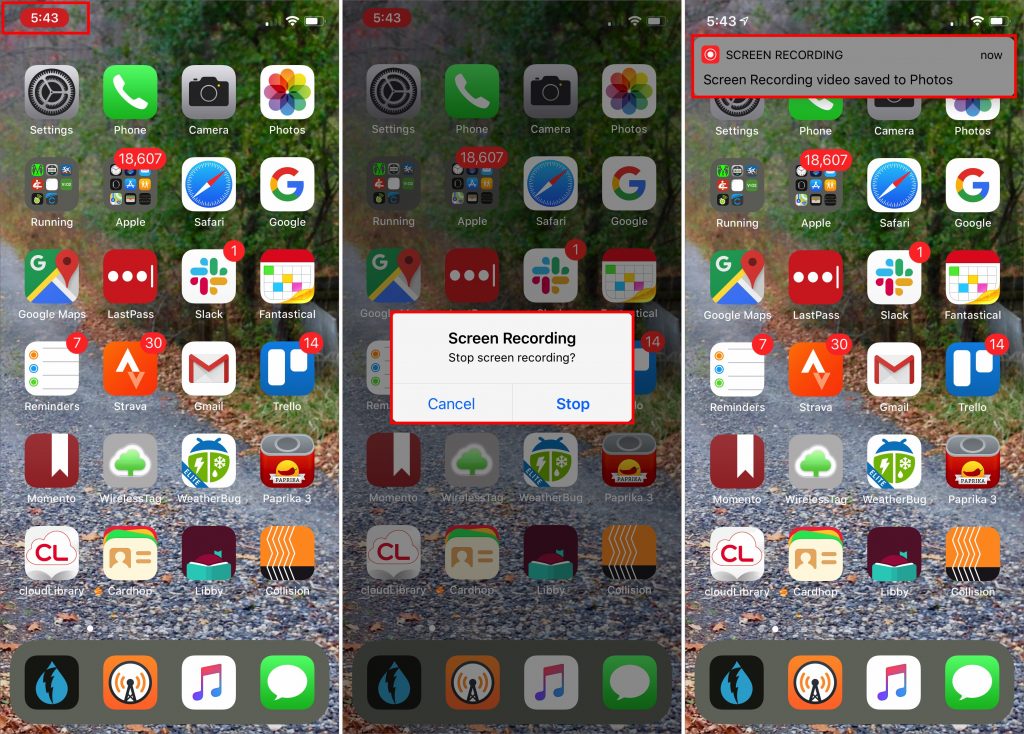
  5. To stop the recording, either enter Control Center again and tap the red Record button or tap the red status icon at the upper left of the screen and tap Stop. A notification appears, telling you that your screen recording was saved to Photos.

In fact, if you want to keep your options for the destination app and microphone at their current settings, making a screen recording is even easier:

  1. Open Control Center.
  2. Tap the Record button instead of pressing deeply.
  3. Perform your actions.
  4. Stop the recording via Control Center or the red status bar.

Told you it was simple. But we bet you have questions, so let’s provide some answers.

Where did my screen recording go?

As the notification informs you, screen recordings end up in the Photos app, just like any other photo or video. You’ll see them both in the Photos view and in Albums > Media Types > Videos.

What are Messenger and Skype doing in the screenshot earlier?

Instead of recording your screen to a video file, you can instead broadcast it to a Facebook Messenger or Skype chat. That might be useful for a quick show-and-tell while having a conversation.

Can I edit the screen recording?

Yes, although the Photos app limits you to trimming frames from the start and end of the video (which actually creates a new video with your selection rather than editing the original). For more significant editing, tap the ••• button in the Photos edit interface and send the video to iMovie.

Is there any way to show my taps and drags in the screen recording?

Yes, but it’s not easy. There’s a trick that relies on iOS’s Accessibility features, but it’s way too clumsy and leaves the Assistive Touch button on the screen the entire time. A better approach would be to use a dedicated app like ScreenFlow (which is what we used above) to insert circles where your fingers touch down, but that’s worthwhile only for videos where you need higher production values.

For the most part, though, the point of screen recordings is not to make the perfect movie—it’s to create and share a video of something that would otherwise be difficult or impossible to convey.

(Featured image by Lisa Fotios from Pexels)

Buy Quality Cables to Avoid Possible Device Damage or Even Fires

Apple’s prices for Lightning, USB-C, and Thunderbolt 3 cables often seem high—$19 for a USB-C to Lightning cable or $29 if you want a 2-meter version? Unfortunately, when it comes to cables, you often get what you pay for. Happily, other reputable hardware manufacturers like Anker and Belkin make quality cables and often charge less than Apple.

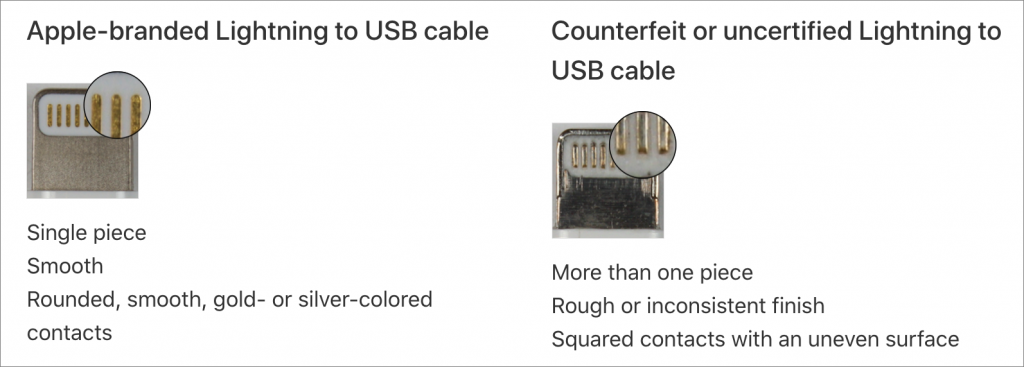
Stay away from the bargain basement prices from no-name Chinese manufacturers, and if you see a supposedly genuine Apple cable selling for a too-good-to-be-true price, consider the possibility that it’s counterfeit. Apple has even created a detailed page that explains how to identify counterfeit or uncertified Lightning accessories.

The problem with cheap cables is not just that they might break or wear out sooner, but that many modern cables carry power as well as data. When there’s sufficient juice flowing down those tiny wires, a short-circuit can fry hardware or in the worst cases, generate sparks, smoke, or even fire. Don’t misunderstand—fires aren’t likely, but over the years, there have been numerous headlines about fires caused by charging iPhones and Android smartphones. In fact, Target just recalled 90,000 Lightning to USB cables after 14 reports of the cables smoking, sparking, and igniting.

When it comes to damaging hardware, USB-C was a problem early on but is less so now, thanks to the efforts of Google engineer Benson Leung in 2015 and 2016. After a bad USB-C cable fried his Chromebook, he embarked on a one-man crusade to identify which USB-C cables were good and which were bad. He has moved on from that now, but in part due to his efforts, Amazon started prohibiting listings of USB-C cables and adapters that weren’t compliant with the USB-C specs. You might still run across bad cables that Amazon hasn’t yet identified, or dodgy cables sold through other retailers, but the danger is lower than it used to be, particularly with cables from name brands.

Lightning cables are incredibly common these days—you can buy them in gas stations and drugstores—and as with USB-C cables, you’ll do best if you stick with cables from brand name companies. You’ll pay more, but do you really trust electronics sold next to Twinkies and Slim Jims? It might be worth buying one in a pinch, but don’t rely on it.

Of course, even the best cables will fray and fail if you mistreat them. Follow this advice to ensure a long life for even heavily used cables:

  • Don’t create sharp bends in the cable, especially near the connector. Sharp bends can eventually break the insulation and reveal the wires inside.
  • When unplugging your device, pull from the plug instead of further down on the cord. That avoids stress near the connector.
  • When coiling your cables, avoid wrapping them tightly around something that’s not round. A tight wrap can cause kinks that will degrade the wires inside.
  • Don’t put heavy objects on cables, or sandwich them between a desk and the wall. Anything that compresses the cable can cause damage.
  • iPhones may be fairly water resistant these days, but try to keep both the Lighting port and the cable’s pins clean and away from liquids because crud or a droplet could cause a short circuit. USB-C cables are less susceptible to such problems because of their metal jackets, but it’s still worth being careful.
  • If a cable’s insulation ever breaks so you can see the wires inside, wrap it with electrical tape right away, and replace it as soon as you can.

In the end, the advice is pretty simple. Spend a little more on quality products from reputable manufacturers so you don’t have to worry about your $1000 iPhone XS being damaged by a $3 counterfeit Lightning cable.

(Featured image by Matthias Zomer from Pexels)

Here’s What’s Coming from Apple in 2019

At Apple’s Worldwide Developer Conference on June 3rd, the company unveiled the next versions of all its operating systems—macOS 10.15 Catalina, iOS 13 (and a new iPadOS), watchOS 6, and tvOS 13–along with the much-anticipated new Mac Pro and Pro Display XDR.

Nothing that was announced will ship until later this year—probably September—but we wanted to give you a quick overview of what’s coming down the pike.

macOS 10.15 Catalina

With macOS 10.15, which Apple is calling “Catalina,” the company is working to bring macOS and iOS ever closer while preserving what makes the Mac special.

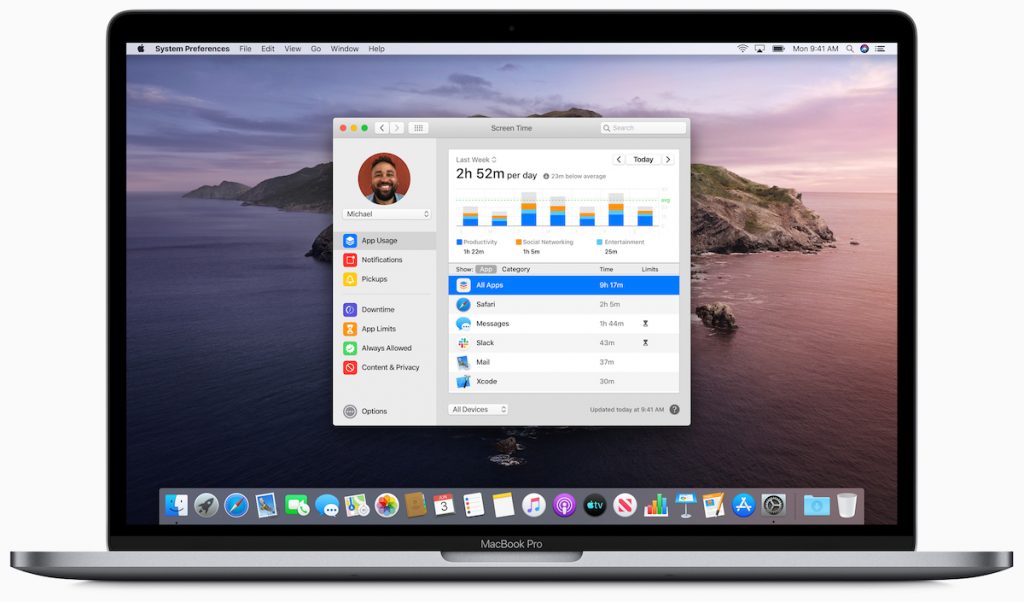
For instance, Catalina replaces the increasingly overloaded iTunes with three new apps that mimic those in iOS: Music, Apple Podcasts, and Apple TV. Reminders, Notes, and Photos also see significant enhancements that are mirrored on the iOS side, and a new Find My app on both platforms combines the capabilities of Find My iPhone and Find My Friends. Apple is even bringing Screen Time from iOS to the Mac to help you track and control your usage—and that of your kids—across all your Apple devices.

Some of these apps exist on the Mac thanks to Project Catalyst, an Apple technology that makes it easy for developers to convert iOS apps to the Mac. Apple used Catalyst internally last year to bring Home, News, Stocks, and Voice Memos to macOS 10.14 Mojave. This year, Apple is letting third-party developers use Catalyst, so once Catalina ships, we’ll see a flowering of new Mac apps coming over from iOS.

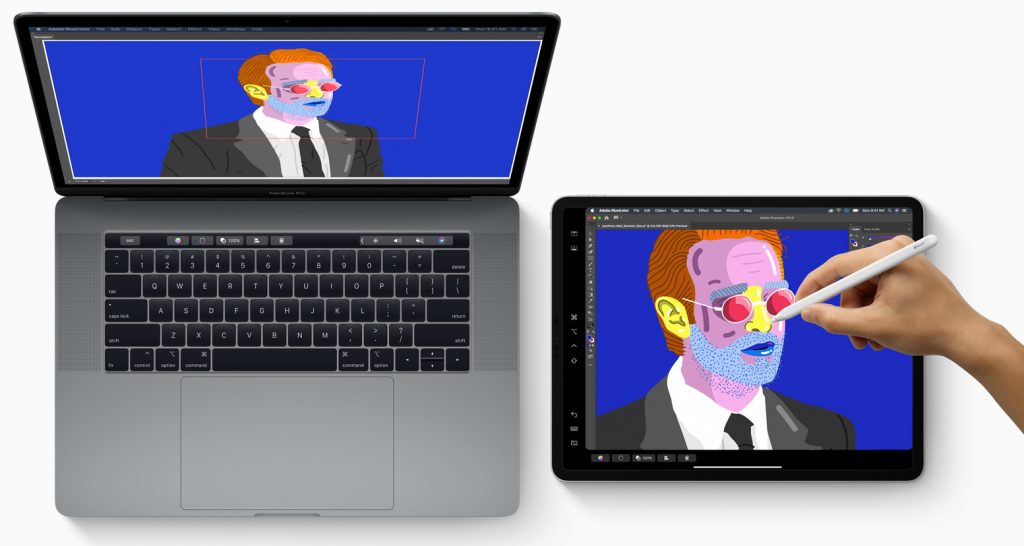
Another new technology, Sidecar, lets you use an iPad as a second screen for a Mac, either wired or wirelessly. Sidecar even enables you to use the iPad and Apple Pencil as a graphics tablet with apps that support such an input method. Two other new features will let you use a Sidecar-connected iPad to mark up any PDF or insert a sketch into a Mac document.

Catalina promises many more features, including some that will increase macOS security and others that will make the Mac much easier to use for people with disabilities. For instance, the new Voice Control capability lets you run a Mac (or an iOS device) entirely with your voice—it’s amazing.

If you’re running Mojave now, you’ll be able to run Catalina too since the system requirements remain the same.

iOS 13

With iOS 13, Apple appears to be focusing once again on performance and refinements. The company claimed we’ll see faster Face ID recognition, smaller app downloads and updates, and quicker app launches.

The most apparent new feature will be Dark Mode, which Apple is bringing over from Mojave. It displays light text on a dark background, which can be welcome when using an iOS device in a dark room without bothering others. It also may increase battery life on OLED-based iPhones like the iPhone X, XS, and XS Max. But keep in mind that research shows the human eye and brain prefer dark text on light backgrounds, so you may read more slowly and with less recall in Dark Mode.

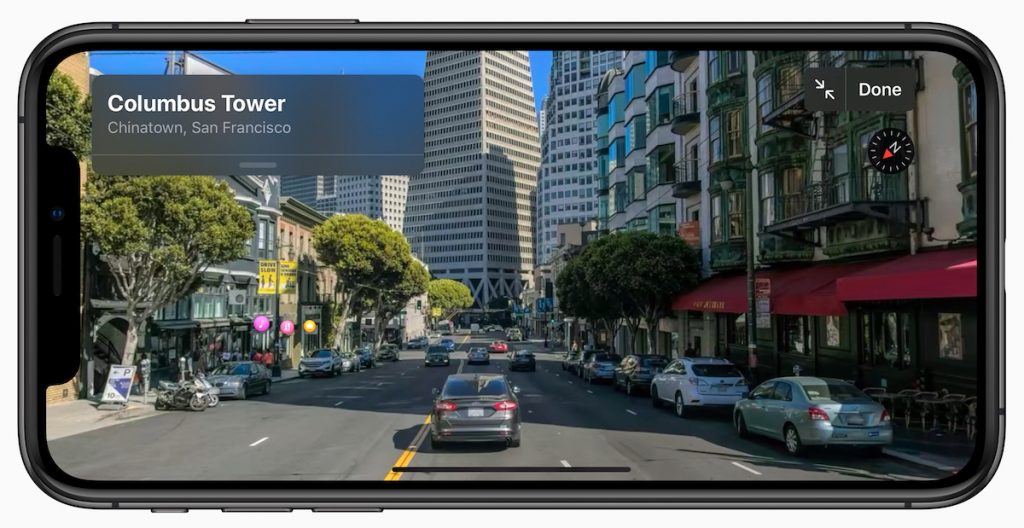
Along with the apps mentioned previously that also improve in iOS, Apple said it has rebuilt Maps and its underlying database from the ground up, so you’ll see far more detailed maps, and you can zoom in for a street-level photographic view called Look Around.

Camera and Photos received attention as well, giving you faster access to effects and letting you apply effects to videos as well. You can even crop and rotate videos taken in the wrong orientation—finally!

Other improvements include a new Sign In with Apple option for signing in to apps using your Apple ID, full text formatting in Mail, shared folders in Notes, SMB sharing in Files, iCloud Drive folder sharing, and support for USB thumb drives.

In terms of system requirements, iOS 13 drops support for some older devices, leaving the iPhone 6s, 6s Plus, and SE as the oldest iPhones supported, along with just the newest iPod touch.

iPadOS

Joining Apple’s other operating systems this year is iPadOS, a superset of iOS 13 that provides additional iPad-only features. In some ways, it’s nothing new, since the iPad has always had unique features, but it shows how Apple wants to differentiate the iPad from the iPhone.

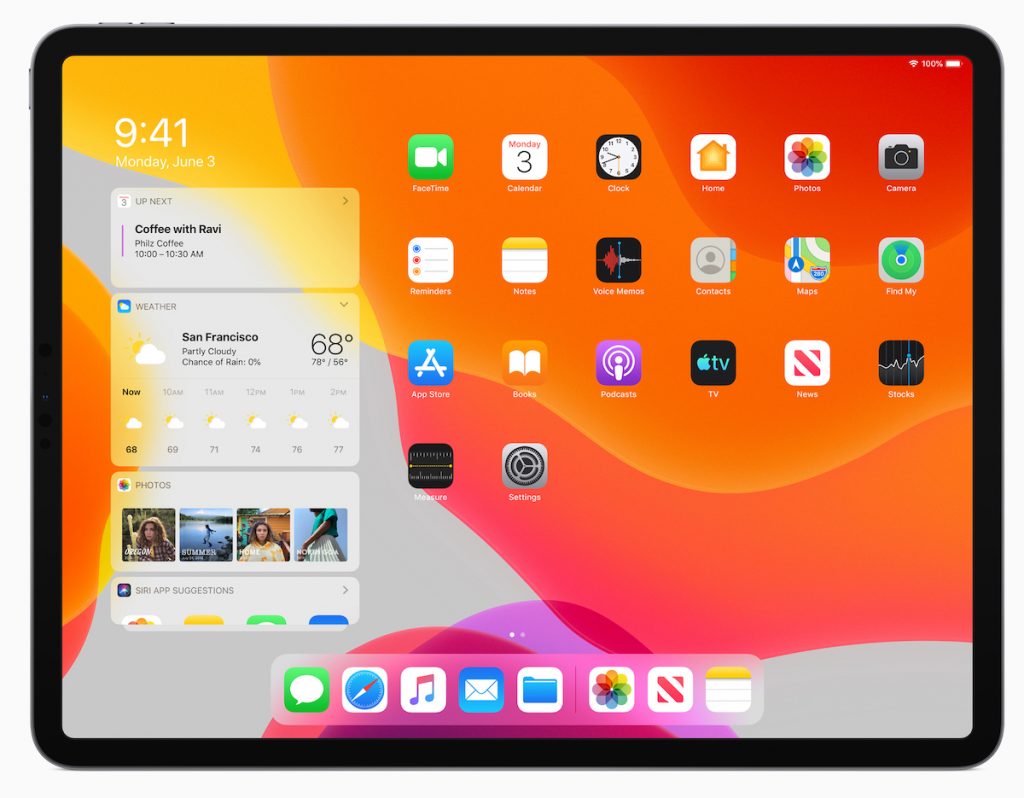
In iPadOS, the Home screen holds more icons in a tighter grid, and you can pin the Today View widgets on the side of the screen. Safari will be able to support complex Web apps like Google Docs, Squarespace, and WordPress, and it gains a download manager that lets you download files into the Files app.

Apple enhanced iPad multitasking so you can switch between apps in a Slide Over view, open multiple windows from the same app in Split View, and use App Exposé to navigate among your app combinations. Plus, text editing improves significantly, with direct access to the cursor and easier text selection, as well as new three-finger gestures for cut, copy, paste, and undo. The iPad even gets full-featured font management, and you’ll be able to buy fonts from the App Store.

iPadOS won’t work on many older iPad models, though it is compatible with all iPad Pro models, the fifth- and sixth-generation iPad, the iPad mini 4 and fifth-generation iPad mini, and the iPad Air 2 and third-generation iPad Air.

watchOS 6

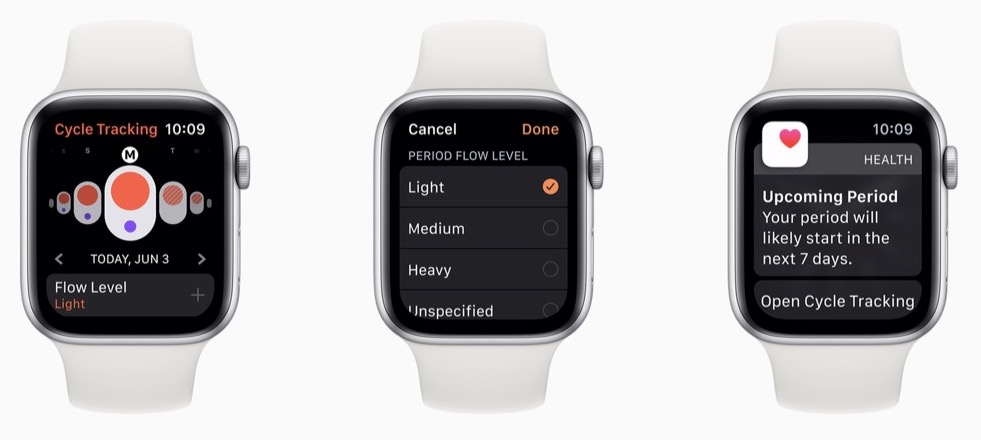
With watchOS 6, Apple is working hard on health and fitness capabilities for the Apple Watch. The company has added a Noise app that can warn you when sounds approach dangerous levels and a Cycle Tracking app that helps women monitor their periods and predict windows of optimal fertility. And, the Activity app has picked up trending features so you can see how you’re doing across time in a number of health metrics.

Apple has also untethered the Apple Watch from the iPhone to an extent, allowing developers to create standalone watch apps that don’t require a companion iPhone app and opening an App Store for such apps that you can browse and search from your wrist.

Other new watchOS 6 apps include Audiobooks, Calculator, and Voice Memos. Plus, once you upgrade to watchOS 6, you’ll be able to choose from more faces and additional complications.

As with watchOS 5, watchOS 6 will work on all Apple Watch models other than the original unit, but not all features are available on all models.

tvOS 13

The big news for tvOS 13 is that it finally gets multi-user support, so everyone in a household will be able to have their own personalized experience. (Speaking of which, the HomePod will also support multiple users with iOS 13.)

Apple has redesigned the tvOS Home screen to show previews, added a slide-in Control Center like in iOS and watchOS, and updated the Music app to show lyrics in sync with the currently playing song. The screensaver also goes under the ocean so your cat can be entertained by all the fish.

Finally, in a move that will significantly enhance the forthcoming Apple Arcade game subscription service, both tvOS and iOS will support the Xbox One S and PlayStation DualShock 4 game controllers.

Mac Pro and Pro Display XDR

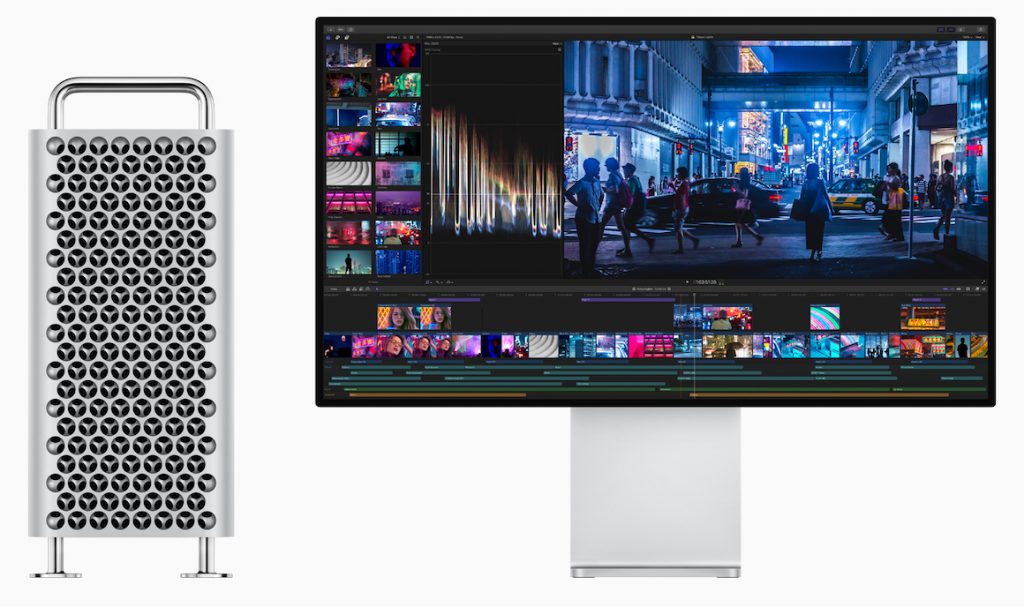
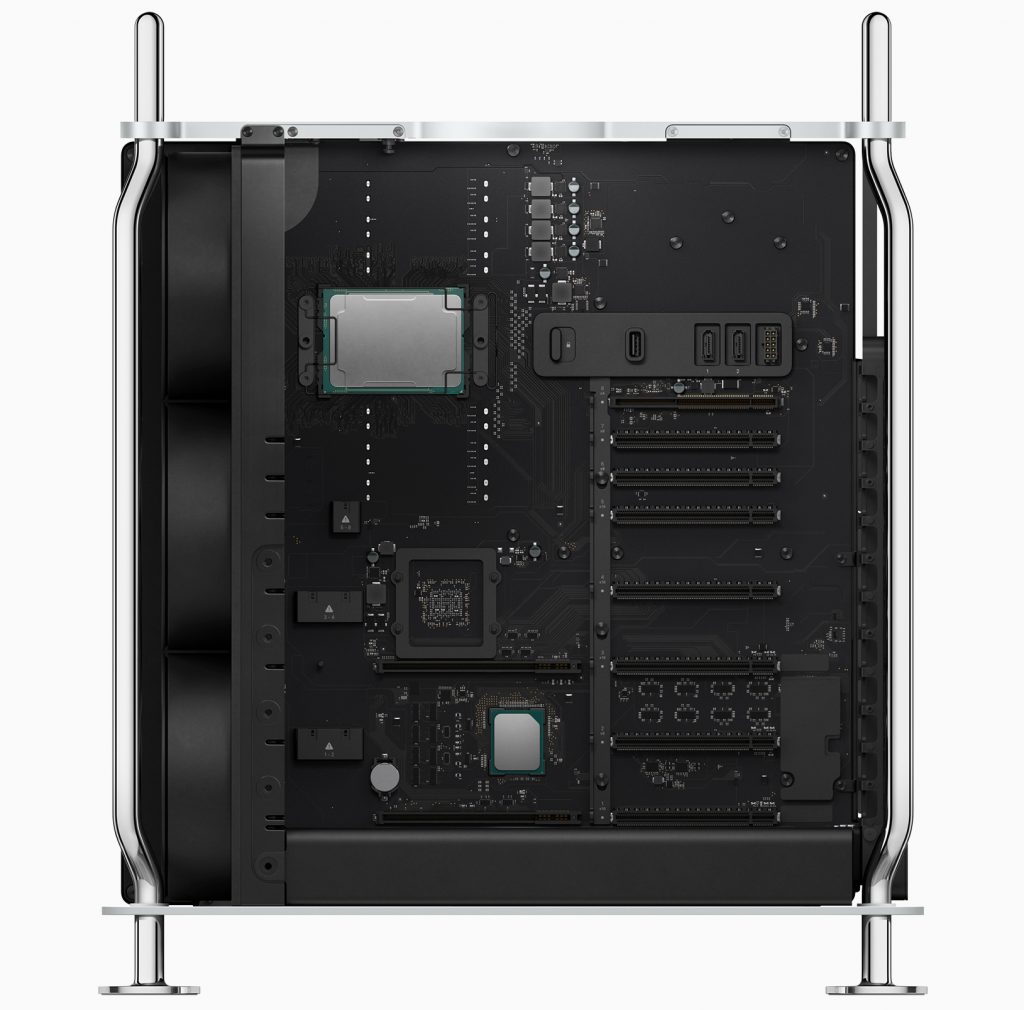
Although the Worldwide Developer Conference is mostly about Apple’s operating systems, the company took advantage of the keynote to show off the completely redesigned Mac Pro and its companion screen, the Pro Display XDR. The technical specs of both are astonishing—Apple has done what looks like a fabulous job of designing the most modular, flexible, and powerful Mac ever, combined with a display that competes against reference monitors costing tens of thousands of dollars.

The Mac Pro will rely on Intel Xeon W processors with 8 to 28 cores, and you’ll be able to configure it with up to 1.5 TB (that’s terabytes!) of RAM. It has eight PCI Express expansion slots, into which you can install MPX modules that contain up to four AMD Radeon Pro graphics cards for massive number crunching performance. Another slot can hold Apple’s new Afterburner accelerator card for ProRes and ProRes RAW video acceleration, and a half-length slot contains Apple’s I/O card with two USB-3 ports, two Thunderbolt 3 ports, and to 10 Gb Ethernet ports; there are two more Thunderbolt 3 ports on the top of the case. Storage starts at 256 GB of SSD and goes up to 4 TB.

All this fits into a stainless steel frame with an aluminum case that lifts off to provide access to all sides of the Mac Pro. It has a massive 1.4-kilowatt power supply and relies on three fans and a blower to keep the unit cool. It even has handles on the top and optional wheels in case you need to move it around regularly.

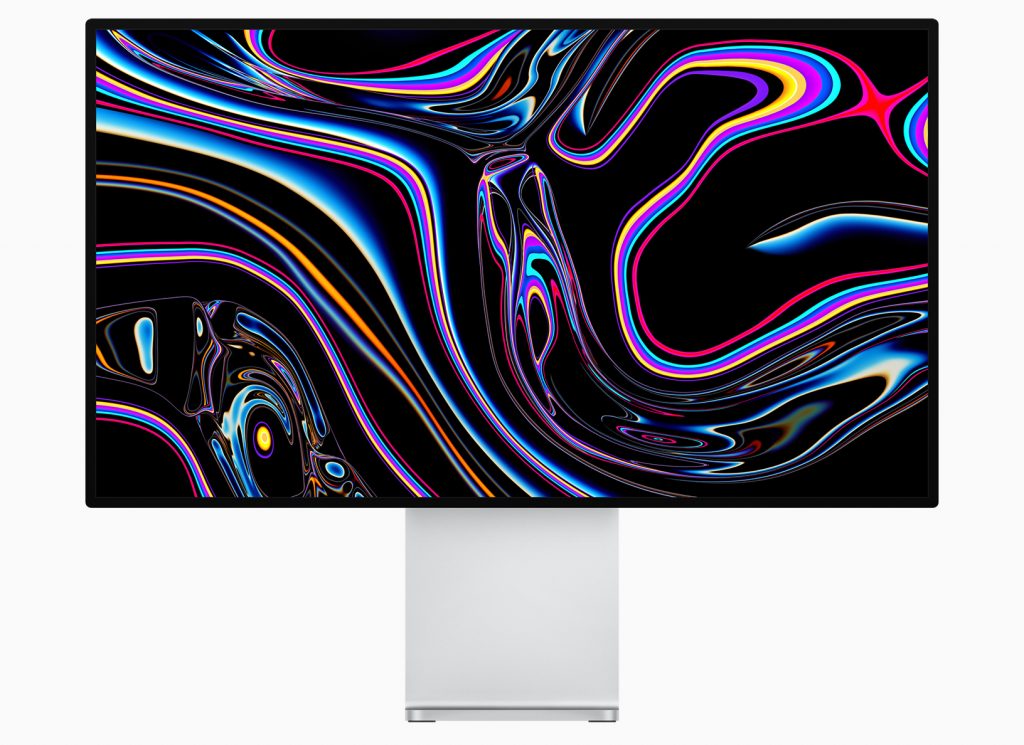
Accompanying the Mac Pro will be Apple’s first monitor in years, the Pro Display XDR. It’s a 32-inch 6K screen that supports P3 wide and 10-bit color that can display more than 1 billion colors accurately. It’s also incredibly bright and can sustain 1000 nits of full-screen brightness or peak at up to 1600 nits.

If your eyes glazed over reading those specs, this new hardware isn’t for you. Apple is aiming it at high-end professionals, the sort of people who happily spend many thousands of dollars on new hardware to enable faster video editing, data processing, or other performance-intensive tasks. The base-level Mac Pro will start at $6000, and the Pro Display adds another $5000. Even the Pro Stand (which provides tilt and height adjustment, plus rotates to portrait orientation) for the Pro Display costs $1000, so a tricked-out Mac Pro setup could easily exceed $20,000. So no, this is not a Mac for “the rest of us,” but it’s great to see Apple ensuring that the most demanding Mac users can stay on the platform.

(All images courtesy of Apple)its Worldwide Developer Conference, along with unveiling a new Mac Pro and the Pro Display XDR. Read on for what to expect in September!

Customize Your Mac’s Dock for Increased Productivity

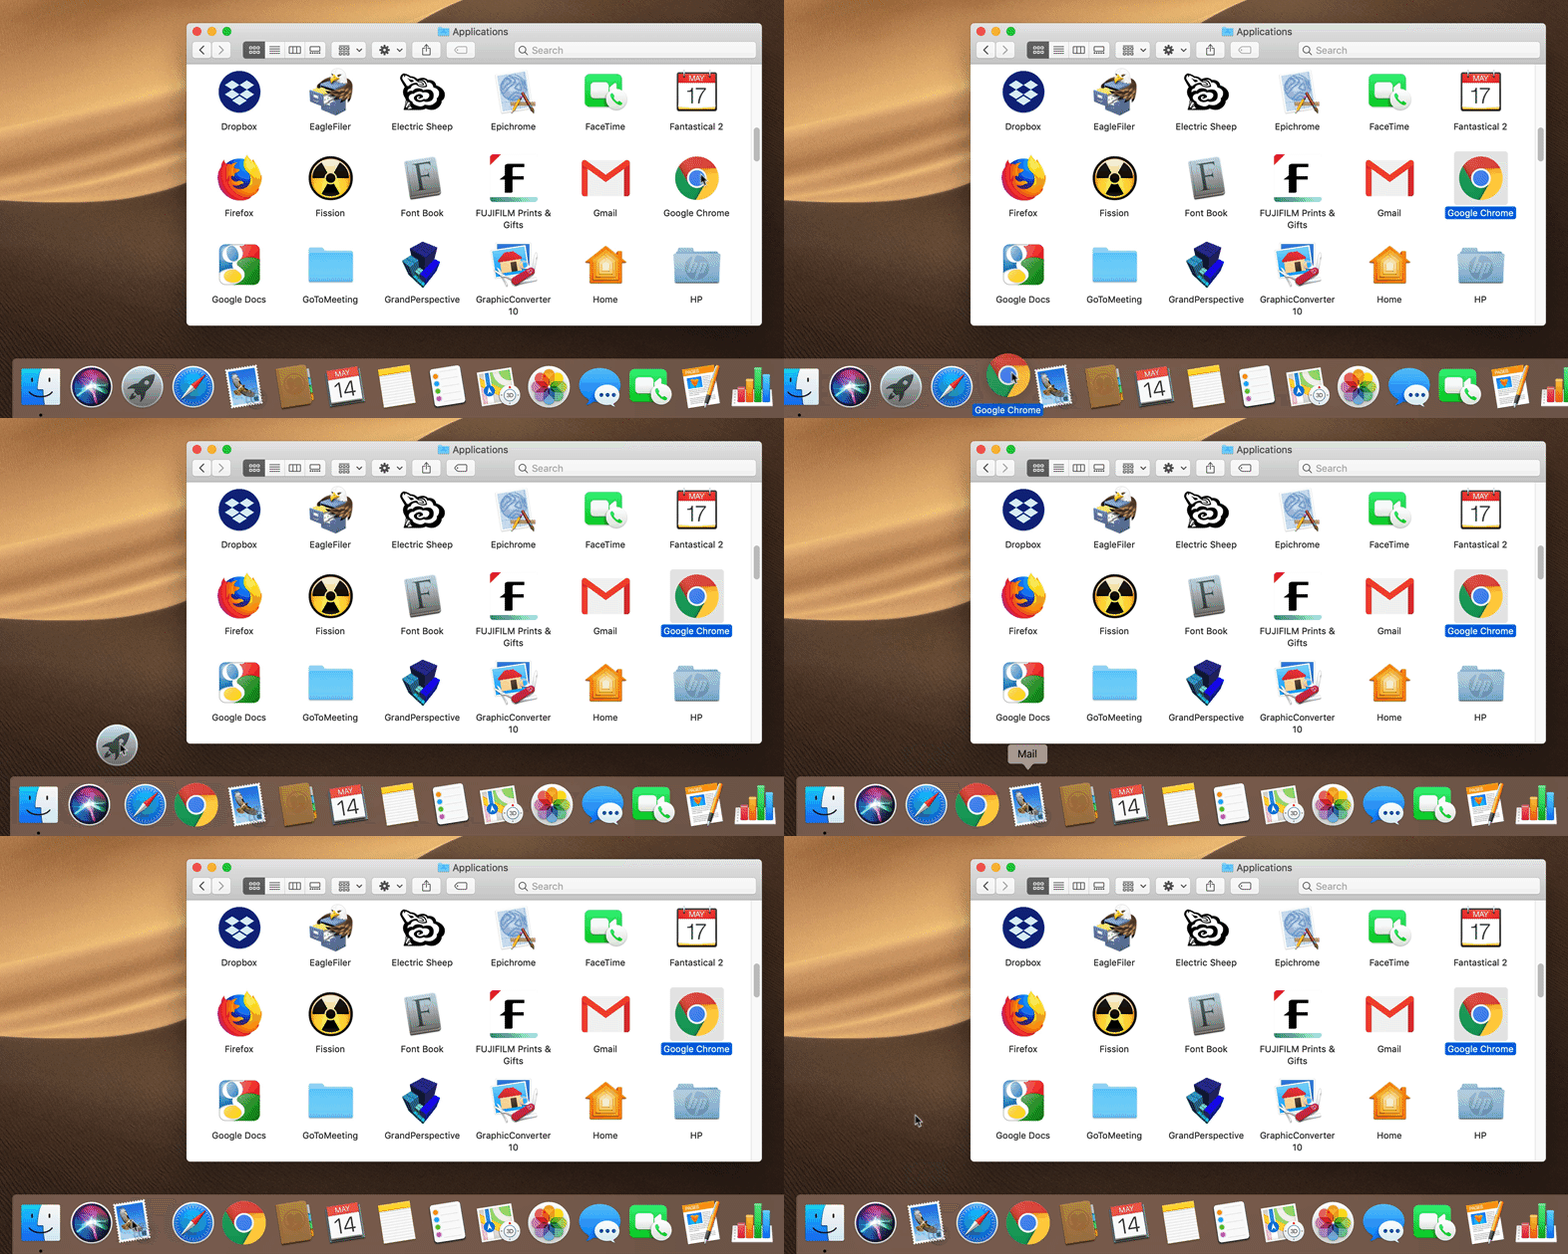
By default, Apple populates your Mac’s Dock with all sorts of apps and arranges them in a particular order. But there’s no rhyme or reason to the defaults, and you shouldn’t be afraid to add, remove, and rearrange apps on your Dock. To add an app, drag its icon from the Applications folder to the desired spot on the Dock. To remove an app you never use, drag its icon far enough off the Dock that a Remove tag appears above the icon and then let go. To arrange the Dock icons in the order that makes the most sense to you, just drag each icon to your preferred location. We generally like to put our most-used apps in the left-most or top-most spots.

(Featured image by StockSnap from Pixabay)