What Does Having a T2 Chip in Your Mac Mean to You?
If you own an iMac Pro, or a Mac mini, MacBook Air, or MacBook Pro model introduced in 2018 or later, your Mac has one of Apple’s T2 security chips inside. On the whole, having a T2 chip in your Mac is a good thing, thanks to significantly increased security and other benefits, but there are some ramifications that you may not realize.
What Is a T2 Chip?
Let’s step back briefly. In late 2016, Apple introduced the T2’s predecessor, the T1, in the first Touch Bar–equipped MacBook Pros. The T1 offered three primary capabilities:
- Management of the Touch Bar’s Touch ID fingerprint sensor and storage of sensitive biometric information
- Integration of the System Management Controller, which is responsible for heat and power management, battery charging, and sleeping and waking the Mac
- Detection of non-Apple hardware
The T2 builds on the T1’s foundation, adding four more important capabilities:
- Real-time encryption and decryption of data on built-in SSDs
- Support for invoking Siri with “Hey Siri”
- Image enhancement for built-in FaceTime HD cameras
- Optional protection of the Mac’s boot process to prevent it from starting up with an external drive
All these functions become possible because the T1 and T2 are essentially separate computers inside your Mac, much like the A-series chips that power iOS devices. They have their own memory and storage, and run an operating system called bridgeOS that’s based on watchOS.
Some of these features enhance performance by offloading processing (like enhancing FaceTime HD and listening for Siri) to a separate chip. Others increase security by ensuring that they can’t be compromised by an attack, even if macOS itself has been infiltrated.
How Does a T2 Chip Increase Your Security?
There are four basic ways that the T2 chip increases security, two of which apply only to the MacBook Air and MacBook Pro models.
Secure Boot
The T2 chip ensures that all the components involved in the Mac’s boot process, including things like firmware, the macOS kernel, and kernel extensions—can be cryptographically verified by Apple as trusted. That prevents an attacker from somehow inserting malicious code at boot and taking over the Mac.
There are two gotchas, however. First, Secure Boot trusts only code that’s signed by Apple, with one exception: a specific bootloader signed by Microsoft to enable Windows 10 to work with Apple’s Boot Camp technology for running Windows on a Mac. That means you can’t boot from Linux in Boot Camp, for instance.
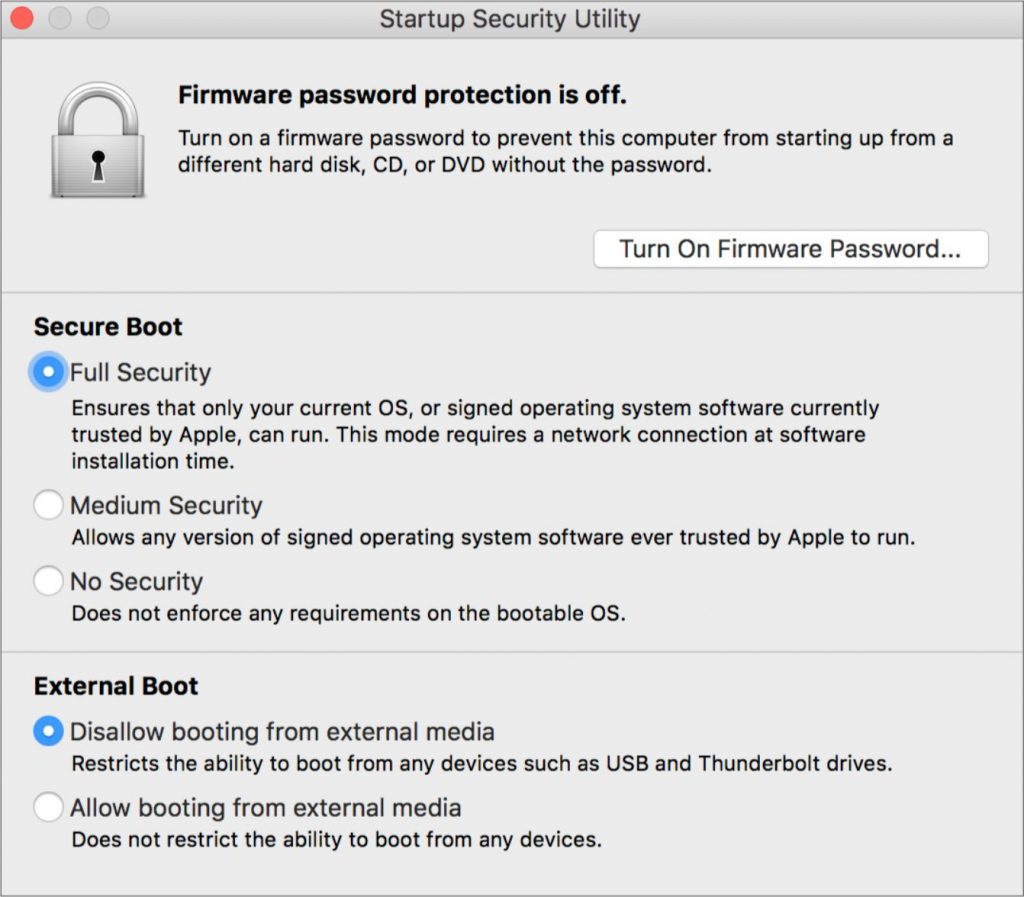
Second, with Secure Boot in its default settings, you can’t boot from an external drive at all. That’s great for security but can make troubleshooting internal drive problems tricky. To control these settings, Macs with T2 chips have a Startup Security Utility available in macOS Recovery (boot while holding down Command-R). You can use it to allow booting from an external drive for troubleshooting reasons and to turn down security if you need to install an older version of macOS or install macOS without an Internet connection available.
Encrypted Storage
Because the T2 contains both a crypto engine and the SSD controller, it enables on-the-fly encryption and decryption of all data stored on the internal SSD. It uses the same technology as FileVault and requires a password at startup. Macs with internal hard drives and external hard drives don’t receive the T2’s protection but can still be encrypted via FileVault.
The big win from the T2 encrypting all stored data is that there’s no way to decrypt the data without the password—as long as your password can’t be guessed, there’s no reason to worry about your data if your MacBook Pro disappears. The potential downside here is that it’s impossible to recover data from a damaged Mac without the password.
The T2 chip also controls what happens with failed password attempts. Fourteen tries are allowed without delays, and then tries 15 through 30 are permitted with increasingly long delays (1 hour between tries for the last three). After that, more attempts are possible, but after 220 total attempts through various approaches, the T2 chip will refuse to process any requests to decrypt data, rendering it unrecoverable. In short, back up your data!
Touch ID
The T2 chip manages the Touch Bar’s Touch ID fingerprint sensor that lets you log in to your MacBook Air or MacBook Pro without entering your password. Even so, the password is required after turning the Mac on or restarting, and the Mac also requires the password if you haven’t unlocked it in 48 hours, if you haven’t provided the password in the last 156 hours and used your fingerprint over the previous 4 hours, or if the fingerprint read fails five times.
Mic Drop
This isn’t exactly related to the T2 chip, but all T2-equipped MacBook Air and MacBook Pro models feature a hardware disconnect that disables the microphone whenever the lid is closed. That prevents any software from turning on the mic and eavesdropping on you. No disconnect is necessary for the FaceTime HD camera when the lid is closed because its field of view is completely obstructed in that position.
So there you have it. The T2 chip significantly increases the security of your Mac, but it comes with tradeoffs that make it harder to boot from external drives or run other operating systems.
(Featured image modified from an original by ahobbit from Pixabay)