What to Put at the End of Your Email Messages

Email has been around for decades, but there are no hard-and-fast rules for how you should close a message with either the signoff or the signature block. If you’ve always wondered about the best ways to finish off a message or are uncomfortable with what you’ve been doing, here’s our advice.

Use the form of your name that you want the recipient to use. If your given name is Mohammed, but everyone calls you Mo, use that for signing most of your messages. Otherwise, they’ll have no idea you prefer the shorter version. (The reverse is true too; if you’re not sure how to address someone, look at their signoff for a hint.)

However, for formal correspondence with people or organizations who would usually refer to you as Ms. So-and-so, stick with Elizabeth instead of Betty.

Match the formality of your closing to that of your recipient. When writing business email to someone you don’t know, it’s best to stay formal at first with closings like “Sincerely” or “Yours truly.” Once you know the person a little better, you could move on to “Kind regards” or “Best wishes.”

With friends, family, and people you know well, try “Cheers,” “Talk soon” (if you mean it), or even a quick “Later.” Finally, it’s never inappropriate to use “Thanks!” if you truly are thanking them for something.

Create context-specific signature blocks. We all wear many different hats in today’s world. Your email signature should match the role you’re in for the particular email message. For instance:

  • Work email should probably include at least your title, department, and formal organization name. If you work for a large organization, you may have been provided with a template for your signature. If much of your communication takes place outside of email, include your phone number and postal address.
  • If you serve on a nonprofit board or have a side gig—like as an author or musician—messages you send in those contexts need their own focused signatures with appropriate links.
  • For email to friends and family, there’s no need for a signature at all.

Avoid clever sayings and inspirational quotes. Although it’s tempting to instill some personality into your signature with a quote, don’t do it. The quote might be entertaining the first time someone sees it, but after that, it’s just one more thing to ignore. Part of combatting email overload is to keep messages short and to the point, so you want your signature to have less text than the message itself.

No fancy formatting or pictures. Along the same lines of avoiding quotes, keep your signature simple. Stick to plain text and links, and don’t insert your company’s logo or a picture of your pony just because you can. Just imagine how awkward it would be if someone were to look at a long email thread and see your signature repeated ad infinitum, taking up more space than your actual messages.

Don’t assume anyone will read your signature. Keep in mind that some email apps automatically hide signatures so your recipients may not see it at all. There’s usually a way to view a hidden signature, but never assume that everyone will see it.

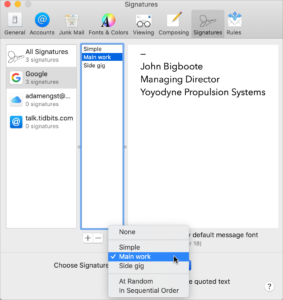
Consider automation tools for inserting signoffs and signatures. Many email programs, including Mail on the Mac, let you create multiple signatures and attach them to messages you send from specific email addresses. For even more flexibility, think about using a macro utility like Keyboard Maestro or a text expansion tool like TextExpander to insert custom signoff and signature combinations. Such options are commonplace on the Mac but much less so in iOS or iPadOS.

(Featured image by John-Mark Smith from Pexels)

Exercise (Some) Control over How Much Your Location Is Tracked

The New York Times recently published a bombshell article revealing just how completely our every movement is tracked by companies in the business of selling our locations to advertisers, marketers, and others. Anonymous sources provided the Times with a dataset from a single location-data company that contained 50 billion pings from the phones of more than 12 million Americans over several months in 2016 and 2017. 

This data enabled the Times reporters to track numerous people in positions of power, including military officials, law-enforcement officers, and high-powered lawyers. They were able to watch as people visited the Playboy Mansion, some overnight, and they could see visitors to celebrity estates. Once they identified any particular phone, they could track it wherever it went. Imagine what that data could be used for in the wrong hands.

No one intends to let unknown companies track their locations constantly. But code built into smartphone apps does just that, often without our knowledge. Many of the apps that request access to location services have an entirely legitimate reason for doing so—for example, Google Maps can’t provide navigation directions unless it knows where you are. But others want location access for less practical reasons—do you really want to let a coffeeshop app know your location at every moment in exchange for the occasional free latte? And some apps—notably weather apps—may have a legitimate need for location information but use that data for far more than users expect.

Even if you’re not too perturbed about companies you’ve never heard of knowing your exact whereabouts at all times (mostly to serve you more targeted advertising), there’s no guarantee this data couldn’t fall into the hands of foreign governments, organized crime, or hackers willing to sell your movement patterns to an aggrieved employee, corporate spy, or jealous ex-lover.

Steps You Can Take to Protect Your Location Privacy

Luckily, Apple provides controls in iOS that let you limit your exposure. For most people, going completely dark isn’t realistic. Too many iPhone capabilities require location services, ranging from turn-by-turn directions, to geotagging photos, to using Find My to see if your kid has left the soccer tournament yet. 

Nevertheless, going dark is a possibility: go to Settings > Privacy > Location Services and disable the Location Services switch at the top. That turns off location services for all apps, although iOS will turn them back on temporarily if you use Find My iPhone to enable Lost Mode.

Here’s what we recommend instead.

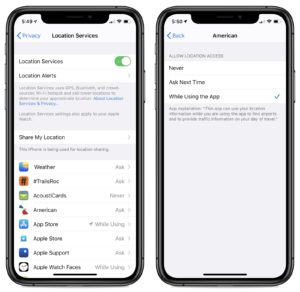
  1. Go to Settings > Privacy > Location Services and scroll down to see a list of every app on your iPhone that would like to know your location. (The same is true on the iPad, but fewer people use their iPads as much while out and about.)
  2. For each app in the list, tap the app’s name to bring up the Allow Location Access screen, which has up to four options:
    • Never: Prevent this app from ever determining your location.
    • Ask Next Time: The next time the app wants permission to track you, make it ask again.
    • While Using the App: Allow the app to track your location as long as you’re actually using it. 
    • Always: Let the app track your location at all times, even when you’re not using it.
  3. Tap one of the options to select it, and then tap Back to return to the list.


We can’t tell you exactly how to configure each app since everyone has a different set and different levels of privacy worry. However, here is some advice:

  • Apps and other entries from Apple are generally safe because Apple has an extremely strong privacy stance and excellent security against hacks. But, down in System Services at the bottom, we’d turn off Location-Based Apple Ads and Popular Near Me—even if Apple is collecting this data anonymously, it’s still being used to sell things to you, not to provide useful services to you.
  • For most apps, change the Allow Location Access setting to Ask Next Time to force each app to prompt you again. If it asks at a point where it’s reasonable that it would need to know your location, such as Yelp wanting to show you nearby restaurants, grant it. If you don’t understand why it’s asking, or if the request seems weak (“To show you which wines are available for purchase in your area.”), deny the request.
  • With apps that obviously need location services, such a parking app that needs to know which area you’re in, change the setting to While Using App and see if that meets your needs.
  • Only if you clearly need to allow a particular app to track your location in the background—turn-by-turn navigation apps are the most common—should you change that setting to Always. Almost no apps should be given such power, and many won’t even provide the option.

There’s one unusual item in the list: Safari Websites. It’s a master switch that lets Web sites loaded in Safari ask for your location. That’s probably not a major privacy concern, but few Web sites provide sufficiently useful location-based features (mostly for finding nearby chain store outlets) that it’s worth bothering.

In the end, go with your gut. If thinking about a particular app or company potentially recording your location constantly gives you the creeps, turn it off and either find an alternative or do without. Legislation may be the only solution in the end, but for now, we can take steps like these to protect ourselves.

(Featured image based on an original by Garik Barseghyan from Pixabay)

How to Find the Snaps You Want in the Mac’s Photos App

Digital cameras have been around long enough that people have stopped making snarky comments about how hard it is to find anything in a shoebox filled with hundreds of unorganized photos. But given the tens of thousands of photos many of us now have, it’s hard to be smug about the ease of finding any given image. Luckily, Apple has provided us with numerous tools in the Photos app to help. Some of these organization systems you have to set up and maintain, but others work silently for you in the background. Let’s start with the automatic methods.

Date

It’s impossible to miss how Photos automatically organizes your photo library by date, particularly in macOS 10.15 Catalina, where the Photos view lets you drill down by Year, Month, and Day. One tip: Day view doesn’t necessarily show you all the pictures taken on a particular day; to see them, click All Photos.


If you don’t want to browse, you can also search (choose Edit > Find) on things like “2015” or “January 2015.” The utility of such searches is that they filter the displayed images to just those taken in that year or month. You can even search on “January” to find all photos taken in January of any year.

People

With a little training of its facial recognition algorithms, Photos can automatically create and maintain collections of photos of particular people. Click People in the sidebar to see the faces that Photos has identified automatically, and if any of them currently lack names, click the Name button for a photo you want to identify, enter a name, and either press Return or select from the suggestions. Although it may not happen immediately, Photos will scan all photos for other pictures of each person and add them; if you get a banner in the toolbar asking you to review additional photos, click Review and then deselect any photos that aren’t that person in the next dialog.


Whenever you’re looking for a photo of a particular person, the fastest way may be to focus on just those photos that contain their face. Click People in the sidebar and double-click the desired person’s box to see their photos. Make sure to click Show More to see all the matched photos, rather than just those Photos deems the best.

Places

By default, the Camera app tags every iPhone or iPad photo with the location where you took the picture. That enables you to search for images on a map. Click Places in the sidebar, and then pan and zoom the map to find the desired location. Click any photo thumbnail to show just the photos taken in that spot. If you know the name of the location, you can also search for it directly—Photos knows the names of all geotagged locations.
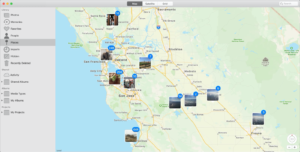
 

Location-based searching could be a godsend for real-estate agents, builders, and others who need to collect images by address. No need to use keywords or other metadata, since the geotagging provides all the necessary information. 

AI Object Search

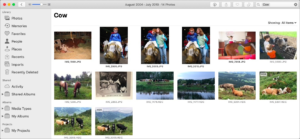
In the last few releases of Photos, Apple has added object searching, which finds photos based on their contents. Looking for photos of cows, or beaches, or oak trees? Just type what you want to find into the Photos search field, and Photos might find it.

Although it’s magic when this approach works, don’t put too much stock in it. Searching for “cow” also brought up images of pigs, goats, and horses for us. Close, in that they’re all four-legged farm animals, but no cigar.
 

Media Types

Sometimes, what you want to find is already categorized by its media type. If you want to find a selfie, for instance, or a panorama, look no further than the Media Types collection in the Photos sidebar. It includes dedicated albums that automatically update themselves to contain videos, selfies, Live Photos, Portrait-mode photos, panoramas, time-lapse movies, slo-mo movies, bursts, screenshots, and animated GIFs.

Albums and Smart Albums

With the categorization techniques so far, you don’t have to do much, if anything. With albums, however, all organization is entirely manual. Creating a new album is easy—select some photos and then choose File > New Album with Selection. After the fact, you can add more photos to the album by dragging them from the main window to the album in the sidebar. And, of course, clicking the album in the sidebar displays all the photos.

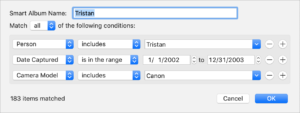
Smart albums are entirely different from albums—they are essentially saved searches. To create one, choose File > New Smart Album and then define the matching criteria. Photos provides oodles of options, making it easy to create a smart album that, for instance, holds photos of a particular person taken with one specific camera over a certain time frame.
 

An aspect of working with albums and smart albums that can be confusing is how to delete photos. When you remove a photo from a regular album, you’re just taking it out of that album, not deleting it from your library. (To actually delete a photo from your library, click Photos in the sidebar before selecting the photo and pressing the Delete key.) The only way to remove a photo from a smart album is to ensure that it no longer matches the smart album’s criteria, either by changing the conditions or by modifying the photo’s metadata, which isn’t always possible.

Keywords

If you want to tag individual images in a way that makes them easy to find later, keywords are an excellent option. Choose Window > Keyword Manager to display the floating Keywords window, and click Edit Keywords to open the editing view where you can click + to add a keyword (complete with a one-letter shortcut, which also puts it at the top of the Keywords window). Click – to remove a keyword (from the list and from any photos to which it’s assigned). Click OK to switch back to the main keyword view.
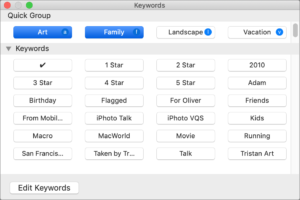
 

To assign a keyword, select a set of photos or just focus on the current one. Either click the keyword in the Keywords window or press its associated letter shortcut. Clicking or pressing the shortcut again removes the keyword.

You can see what keywords are attached to an image by making sure View > Metadata > Keywords is chosen and then clicking the badge that Photos adds to keyworded images. To find everything with a particular keyword, though, you’ll have to do a search and, if necessary, look at the Keywords collection at the bottom of the search results.

Titles and Descriptions
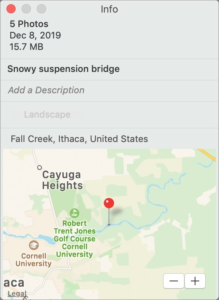
Another way to find photos manually is to give them titles or descriptions and then search for words in those bits of metadata. Applying consistent titles and descriptions manually would be onerous, but you can do multiple selected images as easily as one. Select some pictures, choose Window > Info, and in the Info window, enter a title or description. Close the Info window to save.

To see (and edit) the title under each image, make sure View > Metadata > Titles is chosen. To find included words, you need to do a search, just like with keywords.

Choosing the Best Approach for Your Needs

So many choices! Here’s our advice about which should you use:

  • When possible, stick with the approaches (date, People, Places, object search, media types) that require little or no additional tagging work. People and Places are particularly useful that way.
  • If you can construct a smart album that finds all the images you want, do it. However, it may not be useful (or possible) unless you’re looking for a subset of photos that already are in an album, have a keyword, or are attached to a person.
  • Use albums for quick, ad-hoc collections or for collections of related photos. They’re easy to make and use, and to delete if you no longer need them. An album would be good for collecting all the photos from your summer vacation.
  • Use keywords to identify general aspects of images throughout your entire photo library that you’re happy to access only by searching or via a smart album. Keywords would be useful for tagging all the photos you take of lecture slides, or that relate to your hobby.
  • Avoid relying on titles and descriptions if you can. It’s too easy to make mistakes such that later you can’t find items you’ve titled or described. Albums and keywords are better for organization. Leave the titles and descriptions for actually titling and describing individual images.

Next time you think, “I wish I could find all my photos that…,” take a minute and think through these options to decide which will best serve your needs.

(Featured image by Simon Steinberger from Pixabay)

Don’t Succumb to iOS 13 Update Fatigue!

Does it seem like that red badge on the Settings app indicating that there’s a new iOS 13 or iPadOS 13 update pops up at least once per week? You’re not imagining things—Apple has been frantically squashing bugs in its mobile operating systems since their release in mid-September.

If you haven’t yet upgraded from iOS 12, there’s no harm in waiting until the new year to see if things have settled down. (Well, no harm as long as you don’t receive a pair of Apple’s snazzy new AirPods Pro as a holiday gift, since they work only with devices running at least iOS 13.2, iPadOS 13.2, watchOS 6.1, tvOS 13.2, and macOS Catalina 10.15.1.)

That said, given Apple’s generally reliable record with major iOS updates, many people have upgraded to iOS 13. You shouldn’t feel bad if you have done so, either. Despite Apple’s flurry of bug fix updates, the overall user experience with iOS 13 has been generally acceptable.

Even if you haven’t noticed problems with iOS 13, it is important that you keep installing all these smaller updates, because they fix problems that could be serious. More important yet, if you do have trouble with your iPhone or iPad, and you’re not running the latest version of iOS or iPadOS, updating is the first fix to try.

To hammer home why you should stay up-to-date with iOS releases, here’s a brief timeline of Apple’s fixes so far:

  • iOS 13.0 (September 19): This was the initial release of iOS 13 for the iPhone, with oodles of new features… and lots of bugs. Apple promised iOS 13.1 and the first release of iPadOS 13.1 for September 29th, with additional features and bug fixes.
  • iOS 13.1 (September 24): After iOS 13.0 received scathing reviews in early iPhone 11 reviews, Apple moved the release date of iOS 13.1 up by five days. It added more features and addressed numerous bugs with Mail, Messages, Reminders, Notes, Apple ID sign-in, the Lock screen, and more.
  • iOS 13.1.1 (September 27): This quick Friday release the same week as iOS 13.1 fixed bugs that could prevent an iPhone from restoring from backup, cause batteries to drain too quickly, reduce Siri recognition accuracy, bog down Reminders syncing, and allow third-party keyboard apps to access the Internet without your permission.
  • iOS 13.1.2 (September 30): The next Monday brought iOS 13.1.2, which ensured that the progress bar for iCloud backups would disappear after a successful backup, addressed bugs that caused the Camera app and flashlight to fail, and improved the reliability of Bluetooth connections in some vehicles.
  • iOS 13.1.3 (October 15): After a two-week breather, this update addressed bugs that could prevent incoming calls from ringing, block meeting invites from opening in Mail, cause incorrect data in Health after daylight saving time changes, prevent apps and voice memos recordings from downloading after restoring from iCloud Backup, stop an Apple Watch from pairing successfully, and cause Bluetooth connection problems with vehicles (again) and hearing aids.
  • iOS 13.2 (October 28): With this update, Apple delivered additional promised features, including support for the HomePod, Siri privacy options, HomeKit Secure Video, new emoji, Deep Fusion in the iPhone 11 Camera app, and AirPods Pro support. It also fixed a bug with password autofill in third-party apps, resolved an issue that prevented swipe to go home from working on the iPhone X and later, eliminated a problem that caused saved notes to disappear temporarily, and ensured that manual iCloud backups completed successfully.
  • iOS 13.2.1 (October 30): As it turned out, iOS 13.2 could brick HomePods during installation or after a reset. This HomePod-exclusive update fixed that bug.
  • iOS 13.2.2 (November 7): This update stomped a big bug that could cause apps to quit unexpectedly in the background, potentially causing data loss and draining the battery more quickly. It also addressed two bugs that could cause an iPhone to lose cellular service.
  • iOS 13.2.3 (November 18): This release resolved one bug that could cause searches in Mail, Files, and Notes to fail and another that prevented photos, links, and other attachments from displaying in the Messages detail view. It also addressed problems that could prevent apps from downloading content in the background and prevent Mail from fetching new messages and including and quoting original content when replying.

With luck, you never ran into any of these bugs—they weren’t universal. But the problems were real, and they inconvenienced plenty of people. Just like with vaccinations, staying current with your iOS updates is the best way to keep the bugs at bay.

(Featured image modified slightly from an original by energepic.com from Pexels)

Need to Move Lots of Data Between Macs? Try Target Disk Mode

We have an embarrassment of riches when it comes to the number of ways we can move data between Macs. You can send files via AirDrop, attach them to an email message, put them in a Messages conversation, turn on and connect via File Sharing, or use Dropbox or Google Drive as an intermediary, to name just a few of the more obvious approaches.

But what if you have a lot of data—say tens or even hundreds of gigabytes—to transfer from one Mac to another? The techniques listed above might work, but we wouldn’t bet on it. If you had an external hard drive with sufficient free space handy, you could copy all the data to it from one Mac and then copy the data back off to another Mac. To cut the copy time in half, though, try Target Disk Mode instead.

What Is Target Disk Mode?

Target Disk Mode is a special boot mode that enables nearly any Mac to behave like an external hard drive for another Mac. You can connect the Macs using Thunderbolt 3, USB-C (on the MacBook), Thunderbolt 2, or FireWire. It’s best to use the same port on both Macs if possible, but it’s usually fine to use adapters, such as Apple’s Thunderbolt 3 to Thunderbolt 2 adapter for connecting newer and older Thunderbolt-capable Macs.

Target Disk Mode is nearly universal, easy to set up, and one of the fastest methods of moving files between Macs. Let’s unpack that statement:

  • Nearly universal: Every Mac sold in the last decade supports Target Disk Mode, so you can be sure it will work with any modern Mac.
  • Easy setup: Because Apple has baked Target Disk Mode into the Mac firmware, the version of macOS is irrelevant. There’s no software to configure nor any permissions to worry about. Putting a Mac into Target Disk Mode merely requires holding down the T key during boot or clicking a button in the Startup Disk preference pane.
  • Speed: Because Target Disk Mode on modern Macs relies on a Thunderbolt connection, and you’re connecting one Mac directly to another, you’ll get the fastest transfer speeds in the fewest steps.

You can also use Target Disk Mode on an old Mac to set up a new Mac with Migration Assistant, repair its drive using Disk Utility, or possibly even boot another Mac with it. Booting one Mac from another in Target Disk Mode works best if the two Macs are of the same model and vintage and are running the same version of macOS, but it might work even if those facts aren’t true.

Step-by-Step Instructions

To use Target Disk Mode to copy data between Macs, follow these steps:

  1. On the source Mac, either:
    • Restart the Mac, and once it starts booting, hold down the T key until you see the Target Disk Mode screen with a bouncing Thunderbolt logo.
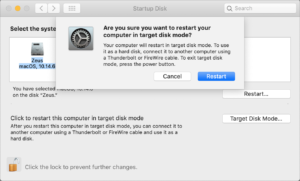
    • Open System Preferences > Startup Disk, click the lock button and enter your administrator credentials, click Target Disk Mode, and then click Restart.
  2. Connect the source Mac to the destination Mac with an appropriate cable. The source Mac’s drive appears on the destination Mac’s Desktop like an external hard drive. (If the source Mac is running macOS 10.15 Catalina, two drives will appear on the destination Mac’s Desktop: DriveName and DriveName – Data. The first is Catalina’s system volume; you’ll find all your files and folders on the Data volume.)
  3. Move or copy files as desired.
  4. When you’re done, press and hold the power button on the source Mac for a few seconds to shut it down.

If you have hundreds of gigabytes to transfer and either of your Macs is a notebook, it’s best to connect it to power to avoid draining the battery before the copy finishes.

Minor Gotchas

Two things can complicate putting a Mac into Target Disk Mode: FileVault and a firmware password. Both are easily worked around:

  • If the Mac is encrypted with FileVault, hold down the T key at startup like normal, but then enter the administrator password for that Mac to complete the switch to Target Disk Mode.
  • If the Mac has a firmware password, press the Option key while the Mac is starting up and enter the firmware password when prompted. Then press the T key to continue booting in Target Disk Mode.

Also, the Apple USB-C Charge Cable that comes with the power adapter for the MacBook, MacBook Air, and MacBook Pro models doesn’t support Target Disk Mode, so if that’s the cable you were planning to use, sorry, but you’ll need to buy a real Thunderbolt or USB-C cable.

Despite these small caveats, Target Disk Mode is one of the unsung innovations that has made Macs easier to use for decades, and it’s well worth keeping in mind whenever you need to move lots of data between machines.

(Featured image by Adam Engst)