Make Better Documents and Edit More Easily with Show Invisibles

Some of the trickiest editing and proofreading problems are related to characters you can’t typically see on the screen: spaces, tabs, and returns. Just because they’re invisible doesn’t mean they don’t affect the look of a document, often in negative ways. For instance:

  • An extra space can cause an awkward jump from one word to the next, or it could push punctuation away from the final word in a clause or sentence. And yes, current convention among professional publishers and typographers calls for one space after a period, not two.
  • The wrong number of tabs might not be obvious until you add or remove text from the line, at which point having too many or too few tabs will suddenly mess up the formatting.
  • An extra return causes a line break, something that you might overlook if the return falls naturally where the line would break on its own, but as you add or remove text, the line break could become embarrassing.

These and similar errors are easy to make or to encounter in copied and pasted text. They’re equally easy to fix, but only if you know why they’re happening. To help you identify them, most Mac word processors, page layout programs, and text editors have a command or option called something like “Show Invisibles.”

As you would expect from the name, Show Invisibles replaces previously invisible characters with something you can see. Spaces are generally replaced with a vertically centered dot, tabs with some sort of right-pointing arrow, and returns with something that’s formally known as a pilcrow but more commonly called a paragraph mark. Here’s what they look like in Pages.

Revealing invisible characters is tremendously helpful, but it can also clutter up the display and make text harder to read. So every app that lets you show invisibles also makes it easy to hide them again so you can focus on your text.

Note that even if you can see invisible characters on the screen, they will not show in a printout of the document.

Precisely where you find the Show Invisibles command—and what it’s called—varies from app to app. Here’s where to look in some popular Mac word processing, page layout, and text editing apps:

  • Pages: In Apple’s Pages, you can reveal invisible characters by choosing View > Show Invisibles. To hide them, choose View > Hide Invisibles—the command changes based on whether or not they’re showing.
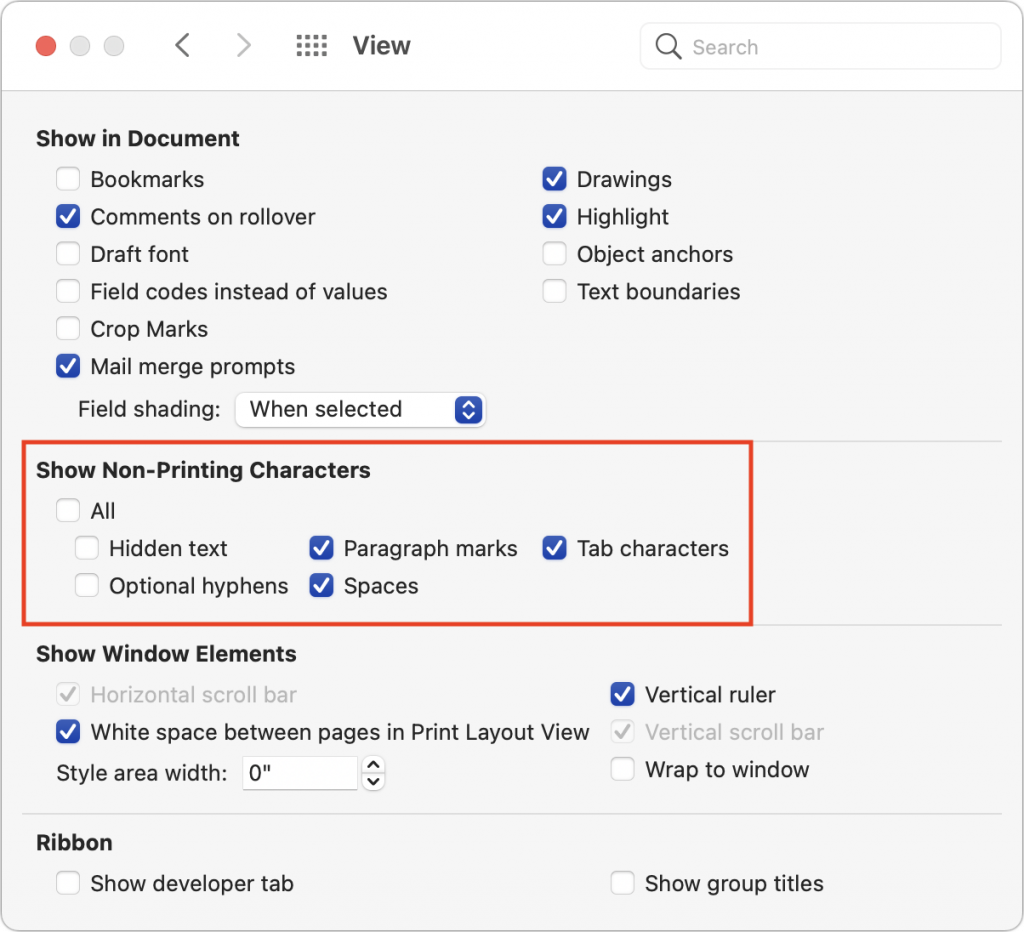
  • Microsoft Word: In Microsoft’s near-ubiquitous word processor, the primary way you show and hide invisibles is by clicking the button in the Home toolbar. Click it once to show and again to hide. However, if you always want certain invisible characters to appear, you can select them individually in Word > Preferences > View > Show Non-Printing Characters.

  • Nisus Writer Pro: In this highly capable, long-standing alternative to Microsoft Word, choose View > Show Invisibles. When selected, it gains a checkmark. Choose it again to conceal the characters and remove the checkmark.
  • Scrivener: In this word processor aimed at long-form writing and screenwriting, choose View > Text Editing > Show Invisibles. Choose it again to hide them.
  • Adobe InDesign: In Adobe’s market-leading page-layout app, choose Type > Show Hidden Characters. The command changes when selected. Hide them again by choosing Type > Hide Hidden Characters.
  • Affinity Publisher: In this inexpensive but surprisingly full-featured competitor to InDesign, the command you’re looking for is Text > Show Special Characters. When you choose this command, it gains a checkmark. Choose it again to hide invisible characters and remove the checkmark.
  • BBEdit: This text-editing powerhouse aimed at developers, bloggers, and Web designers lets you show tabs and returns, spaces, or both. Either choose the Show Invisibles and Show Spaces commands in View > Text Display or click the tiny gear icon in the upper left of the window and select the appropriate checkboxes.
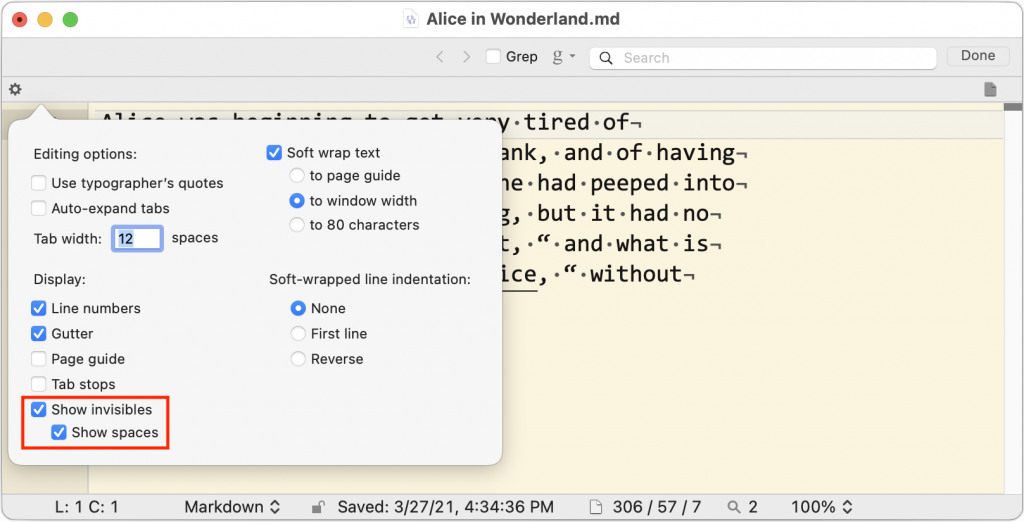
Not all text-focused apps offer a way of displaying these invisible characters. For instance, we know of no way of doing this in Apple’s TextEdit. Nor is it possible in the online word processor Google Docs, although you can achieve a similar effect temporarily by choosing Edit > Find and Replace, selecting Match Using Regular Expressions, and then searching (one at a time) for a space, for \t for tabs, and for \n for returns.

Even if you’re using an app not mentioned above, our descriptions of their approaches should give a sense of what to look for in the interface or the app’s documentation. Enjoy your newfound ability to see beyond the visible!

(Featured image by Aleksandar Pasaric from Pexels)

Archive Email to Avoid Mail Quotas, Improve Performance, and Reduce Clutter

Email is a major part of all our lives, both personally and professionally, and as such, it can add up. Before you know it, you have years of email stored away—potentially tens or even hundreds of thousands of messages. Most of the time, that’s fine. Email doesn’t take up any physical space and not even that much digital space in the scheme of things.

However, there are situations where you might want to archive email, by which we mean download it from the server and store it for posterity on your Mac, possibly outside your email app. Some of those reasons include:

  • Insufficient server space: Institutional email accounts sometimes have inflexible mail quotas, and although you can pay for more storage on many large email providers, you might prefer instead to clear out old mail that you don’t refer to anymore.
  • Reduce clutter: Even if you have sufficient server space, archiving mail—particularly mail from ancient completed projects—might reduce the mental load of having it in your email app.
  • Poor email client performance: Although good email apps should be able to handle hundreds of thousands of messages, it’s possible that reducing the amount of email in your account would help if you’re experiencing slowdowns.
  • Switching email providers: If you choose to stop using a particular email account, you might want to download all the mail in it first.
  • Leaving a job or graduating from school: If you have a work or school email account that will be shut down after you leave, you might want to archive all that email beforehand.
  • Preserving a former employee’s business communications: From the opposite perspective, if an employee of yours leaves, you might want to archive their work email account so you have an easily searched record of what they said to clients or suppliers.
  • Local backup: Although most email providers and businesses back up their servers (and probably better than most users), it’s not inconceivable that you could lose mail stored remotely. Archiving email locally—perhaps on an annual basis—ensures the long-term preservation of your email communications.

So how should you archive your email? There are two general approaches:

  • Store email in a local mailbox: The most straightforward approach is to store email in a local mailbox on your Mac using your existing email app. It’s free and keeps your mail together, but it makes switching to another email app more complicated, and it’s fussy to move local mailboxes to other Macs. Plus, it may require some effort to keep an archive up to date.
  • Archive email in a dedicated app: You’ll have to pay for an archiving app, but these apps work with multiple email apps, may provide more powerful searching capabilities, and often integrate email with other archived data. It’s also easier to move archived data between Macs or even keep it available on a server for access on multiple machines.

Store Email in a Local Mailbox

For simple archiving, it’s easy to create local copies of messages or mailboxes you want to preserve locally. The main thing to keep in mind here is the difference between moving and copying.

  • Move: When you move a message from the server to a local mailbox, you’re deleting it from the server. Move messages when you want to clear space on the server.
  • Copy: When you copy a message, the original message stays on the server, and a copy appears in the local mailbox. Copy messages if you want a local backup of important messages or mailboxes but also want to keep them available online.

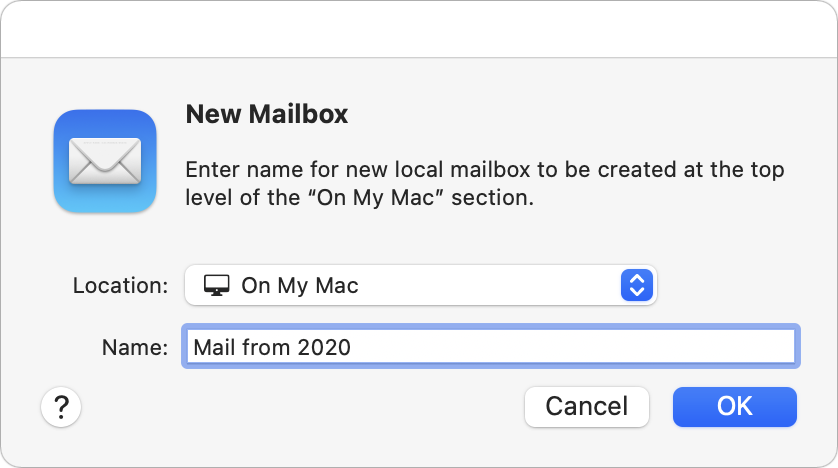
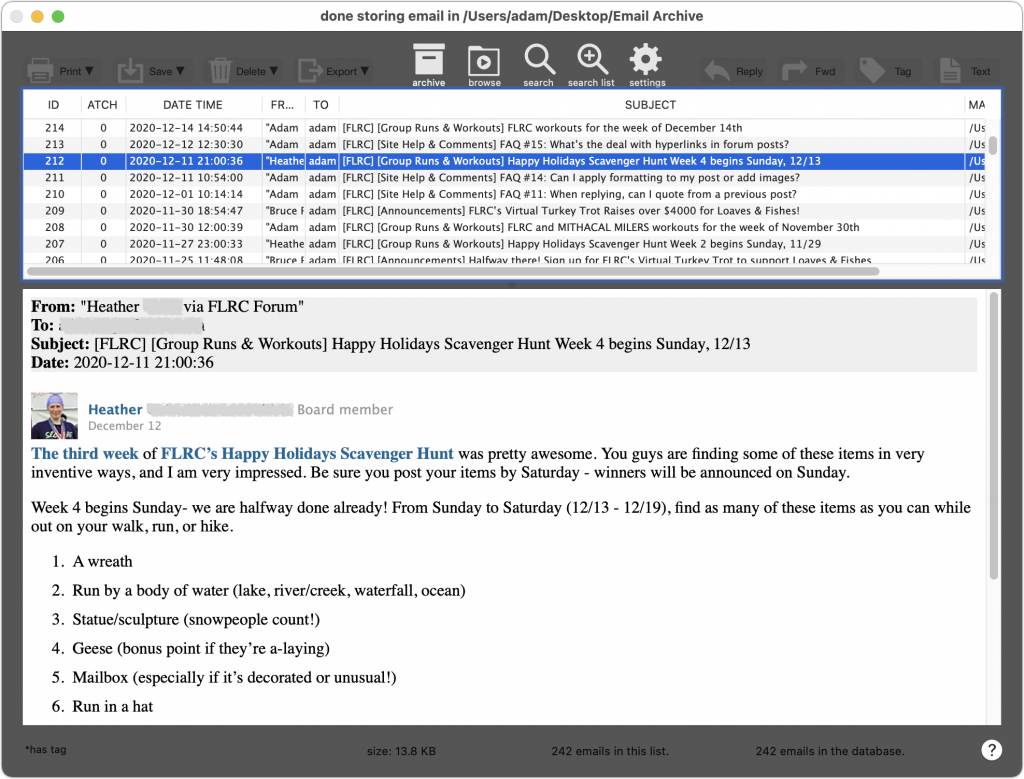
How you do this varies slightly by app, but let’s look at Apple’s Mail—other apps will be similar. The first step is to create a local mailbox. Choose Mailbox > New Mailbox and then choose On My Mac from the Location pop-up menu when naming it.

Then, to move or copy mail:

  • Move messages locally: Select messages and, from the Message > Move To menu, choose the desired On My Mac mailbox. You can also Control-click a selection to access the Move To menu or drag the messages from a server-based mailbox to a mailbox under On My Mac.
  • Copy messages locally: Select messages and, from the Message > Copy To menu, choose the desired On My Mac mailbox. Alternatively, Control-click a selection to access the Copy To menu, or Option-drag the messages to an On My Mac mailbox. Also note that you can copy an entire mailbox by dragging it from an online account in Mail’s sidebar to the On My Mac section of the sidebar.

You can also select a mailbox and choose Mailbox > Export Mailbox to save all the data to a local file in .mbox format suitable for importing into other email and archiving apps.

Archive Email in a Dedicated App

When it comes to archiving email in an app dedicated to that purpose, the details vary, so let’s focus on giving you some choices for the leading Mac archiving apps. Once you know what you want, you can more easily pick among them:

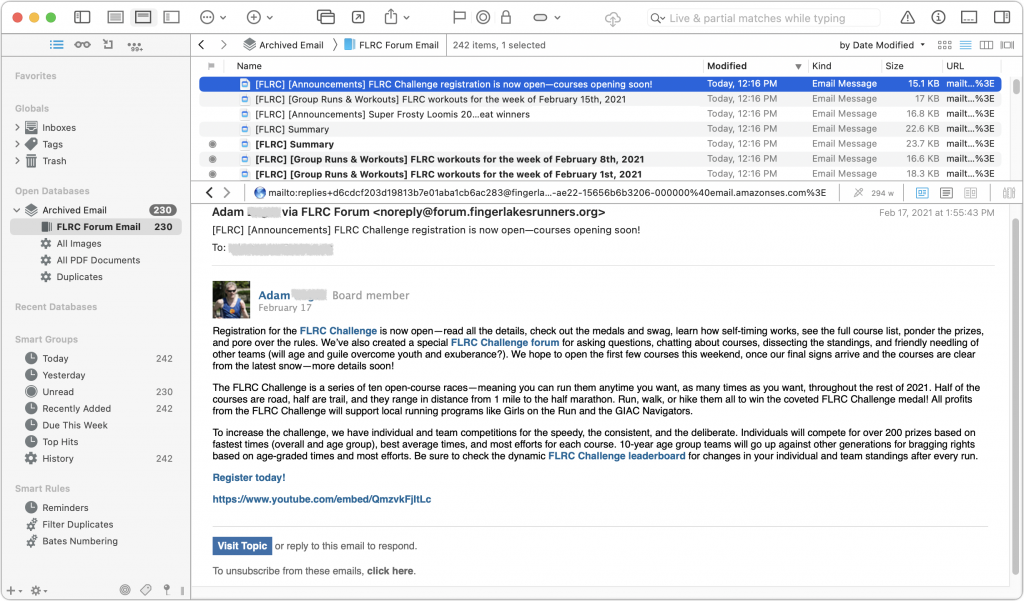
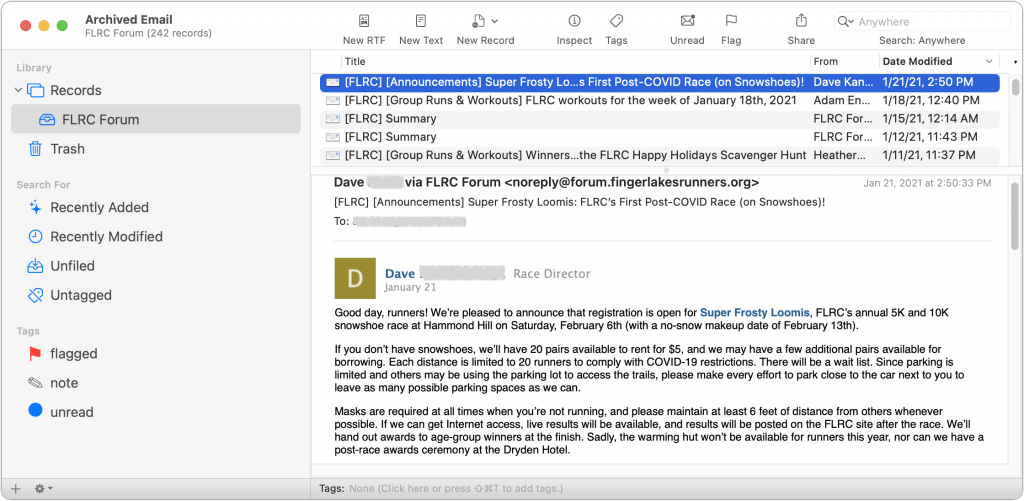
  • DEVONthink Pro ($199): The most powerful (and expensive) of these apps is undoubtedly DEVONthink Pro. It can import directly from Apple’s Mail and Microsoft Outlook and supports importing .mbox files exported from other email apps. Its integration with Mail and Outlook lets you continually archive new messages without worrying about duplicates. DEVONthink is a general-purpose information management app that also lets you import, organize, and search for files of any kind, scan documents with optical character recognition, and much more. The $499 DEVONthink Server lets multiple people access the shared data over the Web.
  • EagleFiler ($49.99): Another general-purpose archiving app, EagleFiler supports direct imports from Mail and Outlook, and it can also import .mbox files exported from numerous other email apps. With Mail, EagleFiler can skip previously imported messages and includes an option to remove duplicate messages from mailboxes. It makes it easy to search archived email and lets you reply (using your standard email app) to archived messages. Beyond email, you can import, organize, search, and view any kind of file, and everything is stored in its original format in a standard Finder folder.
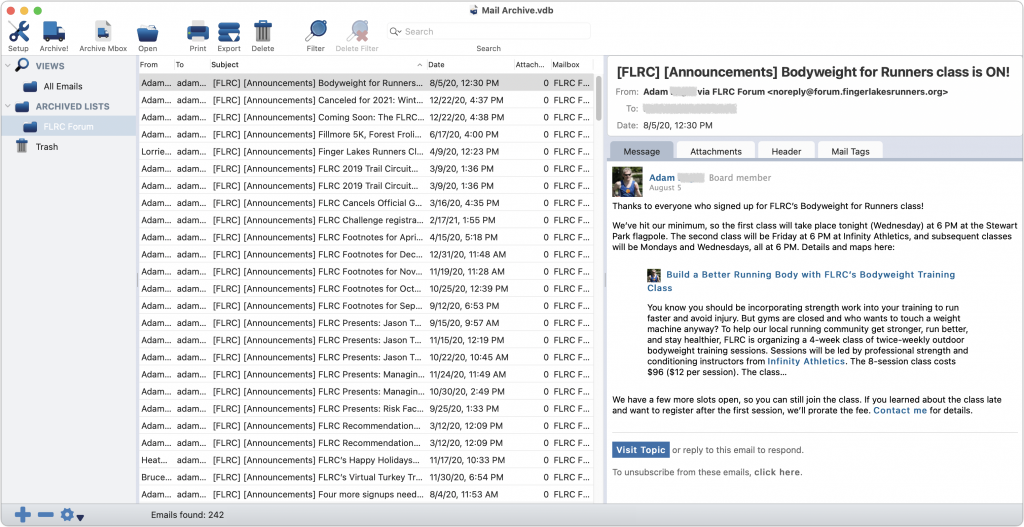
  • Mail Archiver X ($49.95): Mail Archiver X focuses on email, supporting major email clients like Mail, Outlook, Postbox, and Thunderbird along with .mbox files, and it can even archive email directly from your IMAP or Gmail account. You can set up Mail Archiver X to archive email on a schedule, automatically skipping previously archived messages. It lets you store messages in its internal database format, FileMaker (if you have a license), or PDF.
  • MailSteward ($24.95/$49.95/$99.95): All the basics are here—support for Mail and Postbox plus .mbox files, scheduling of imports, importing into a relational database, automatic skipping of duplicates (and later identification of them if necessary). The three editions of MailSteward let you pick how much power you need. The Lite edition may be all most people need, but the standard edition adds automatic scheduling, saved searches, and database exporting and merging. The Pro version is necessary only for very large archives over 250,000 messages—it trades MailSteward’s SQLite database for MySQL.

We realize there’s a lot to think about here, but no one solution fits all. If you’d like advice on which app would be best for your particular needs and help setting it up, don’t hesitate to contact us.

(Featured image by Gerhard G. from Pixabay)

Try iCloud Drive Folder Sharing Instead of Paying More for a File Sharing Service

Box, Dropbox, Google Drive, and Microsoft OneDrive all have their place, but as of March 2020, Apple users no longer have to venture outside the Apple ecosystem for online folder sharing. Before then, you could share a single file in iCloud with another iCloud user, but nothing more. With iCloud Drive Folder Sharing, you can share an entire folder, complete with permissions that control what your collaborators can do with the contents of the folder.

Pros and Cons

Why use iCloud Drive Folder Sharing instead of the more established services? Cost is the main one. Say you’re already paying Apple $9.99 for 2 TB of storage so you can use iCloud Photos with a large library. Why pay one of the other services another $9.99 per month—$240 per year—when you can get the same capabilities using iCloud? (Dropbox used to be entirely usable at its free level for those who didn’t need much shared storage, but users at that tier are also limited to just three devices, rendering it problematic for anyone with an iPhone, iPad, and desktop and laptop Macs.)

The main reason not to use iCloud Drive Folder Sharing is if the people with whom you want to share documents aren’t Apple users. Such people can get a free iCloud account if they create an Apple ID and then access iCloud Drive in a Web browser. Windows users can instead install iCloud for Windows to access it in Windows Explorer. But that may be too much effort for many.

iCloud Drive Folder Sharing on the Mac

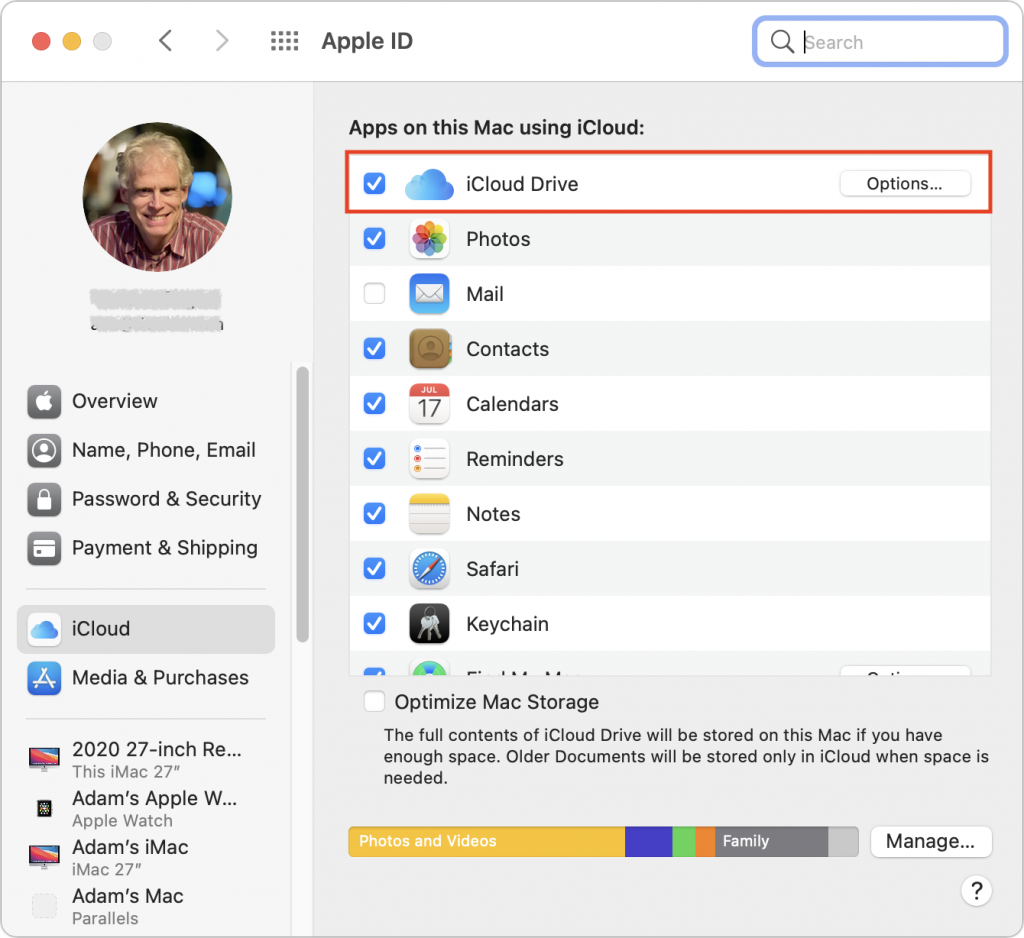
First off, make sure iCloud Drive is selected in System Preferences > Apple ID > iCloud. If you have plenty of storage, leave Optimize Mac Storage unchecked. It’s worthwhile only if your Mac’s internal drive is nearly full.


On the Mac, iCloud Drive creates a special folder to hold all the data mirrored to iCloud. You can access it by choosing Go > iCloud Drive in the Finder. It’s usually available in the sidebar of Finder windows too. If not, open Finder > Preferences > Sidebar and select iCloud Drive.
You’ll likely see quite a few folders in iCloud Drive already, with names and icons matching apps that synchronize their data and files via iCloud. These folders exist purely for you and your apps—you can’t share them. However, you can create and share other folders within iCloud Drive.

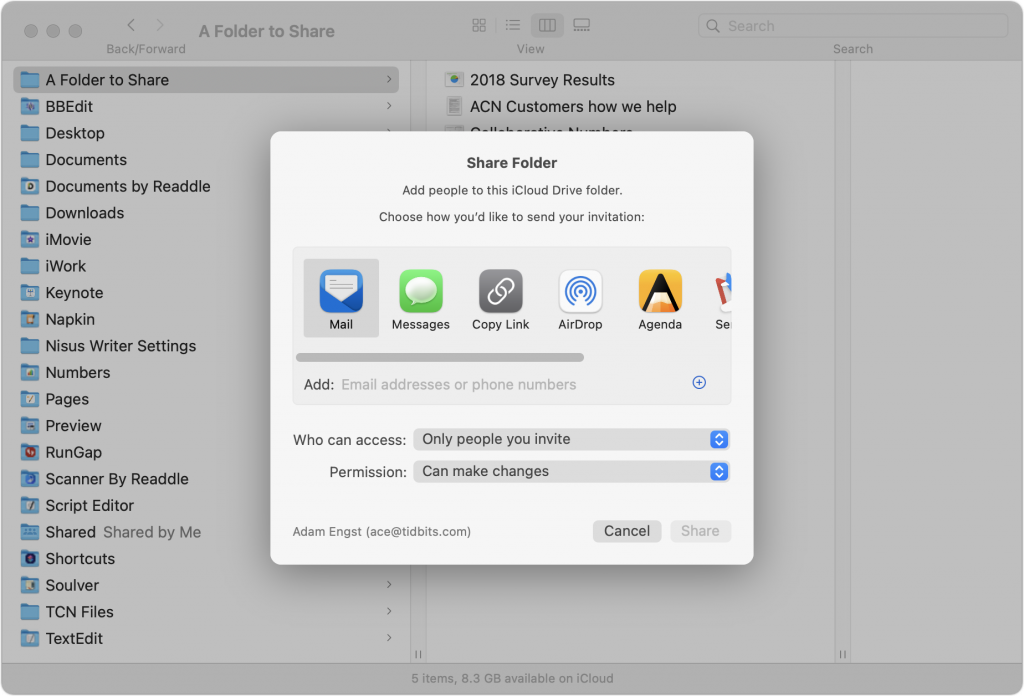
To share a folder you’ve created, Control- or right-click it and choose Share > Share Folder to display a Share Folder dialog. You need to do three things here:

  • From the Who Can Access pop-up menu, choose between “Only people you invite” and “Anyone with the link.” With the latter, you’re opting for security only through obscurity, so avoid that option if the data in the folder is confidential or important.
  • From the Permission pop-up menu, choose between “Can make changes” and “View only.” Think carefully about this choice—view-only users can still copy files out of the folder and change them locally on their computers. However, they won’t be able to change your versions of shared files or add new files to the folder.
  • Despite its position at the top of the dialog, choose the manner of sending the invitation last. If you’re sharing only with people you invite, you can select a sharing method and enter their email addresses or phone numbers. For folders shared with anyone who has the link, you don’t need to enter information for specific users.

When the people with whom you’re sharing the folder receive the sharing invitation or link and open it, the shared folder is added to their iCloud Drive folder. Its icon will have silhouettes of multiple people to indicate it’s a shared folder.

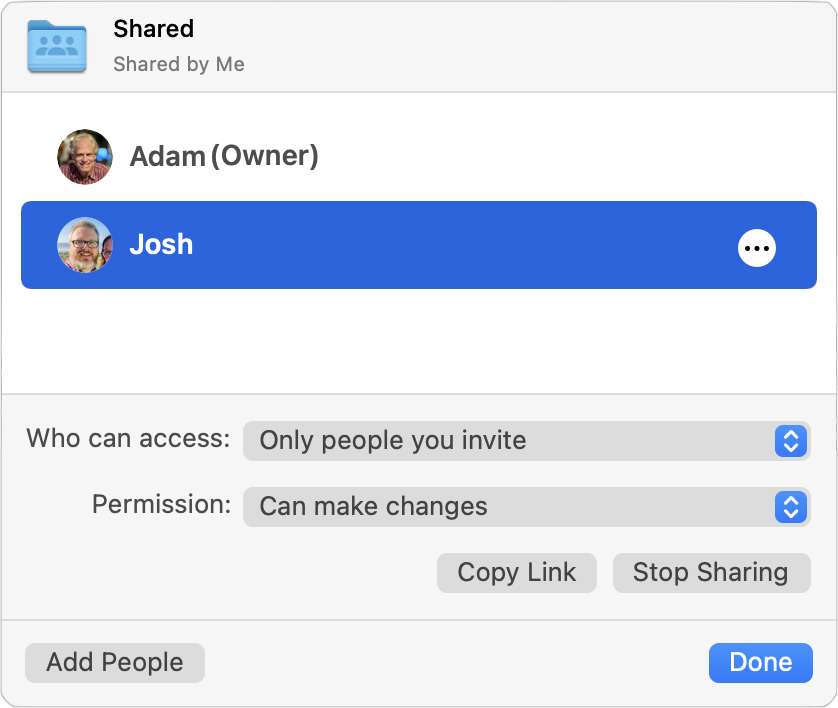
What if you need to invite more people, change permissions, get the sharing link again, or stop sharing entirely? Control- or right-click and choose Share > Manage Shared Folder (there’s also a Copy Link option there). A new dialog appears.

Most of the controls here are self-explanatory, but note that you can revoke a person’s access and change their permission level by clicking the ••• button in the row next to their name.

iCloud Drive Folder Sharing in iOS/iPadOS

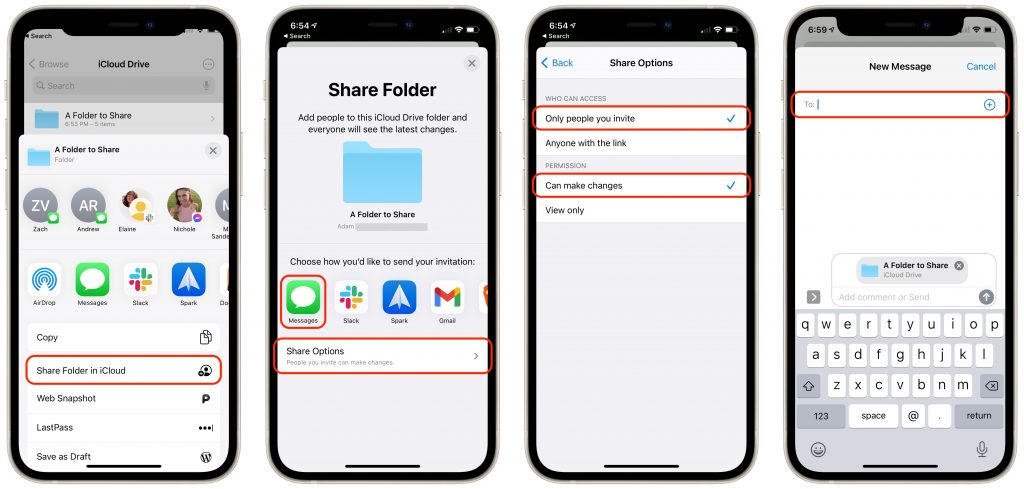
The process is similar in iOS and iPadOS. Follow these instructions in the Files app:

  1. Press and hold on the folder you want to share.
  2. In the sheet that appears, tap Share.
  3. In the Share sheet that appears, tap Share Folder in iCloud.
  4. On the Share Folder screen, first tap Share Options and set Who Can Access and Permission.
  5. Tap Back to return to the Share Folder screen, and tap the app through which you want to send your invitation (Messages below).
  6. Enter the name of your recipient or pick them from your contacts list.
  7. Enter a message to your recipient and send them the link to the shared folder.

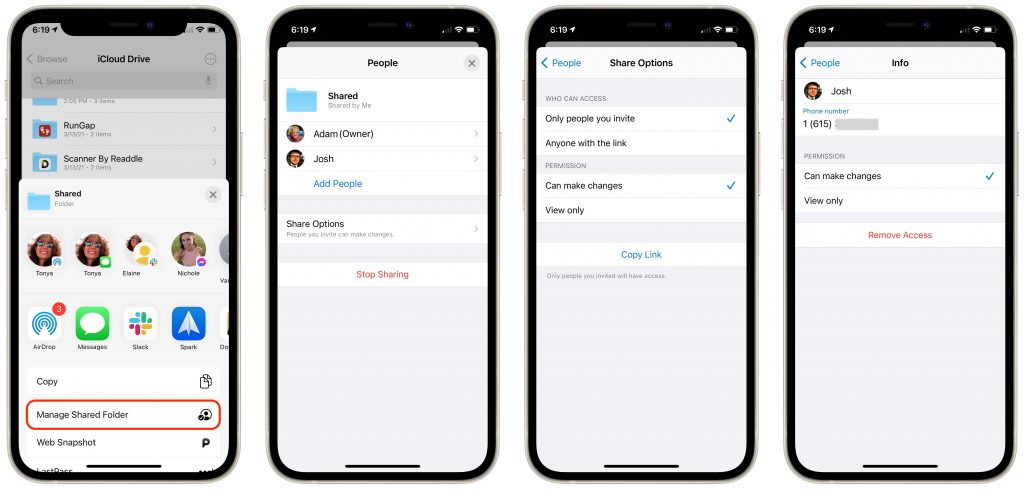
Managing a shared folder in the Files app is similar. Once you press and hold on an already shared folder and tap Manage Shared Folder in the Share sheet, you can do the following:

  • Tap Share Options to change Who Can Access and Permissions options, or to copy the link to the shared folder.
  • Tap a person’s name to change their permissions or remove access entirely.
  • Tap Stop Sharing to stop sharing the folder.

One final tip. Although iCloud Drive generally works well, we’ve occasionally seen it get stuck syncing on the Mac. You may see files or folders fail to sync between devices or have a file or folder permanently display the little cloud icon in the Finder that indicates iCloud Drive is updating. To resolve such problems and reset the local state of iCloud Drive, first make a copy of any critical files to the desktop, just in case. Then open System Preferences > Apple ID > iCloud, deselect iCloud Drive, click Remove from Mac when prompted, and then select iCloud Drive again. Give it some time to resync with iCloud and download new copies of your files.

(Featured image by sendi gibran on Unsplash)