Snapping the perfect photo is tough. Children, especially babies and teenagers, can be difficult to pose. Cats relish looking cute and then turning away just as you grab your camera. Action shots in sporting events are impossible to predict. And you never know when that unusual bird will choose to fly away. Miss the moment, and you’ve got a picture with closed eyes, funny expressions, blurry action, or nothing in the frame.
Professional news, sports, and wildlife photographers have long solved these problems with burst mode, which takes multiple photos in quick succession. Film cameras required a motor drive to advance the film quickly enough, but now that nearly every camera is digital, burst mode simply needs enough processing power and storage space to record frame after frame. And, unsurprisingly, the iPhone (and iPad) has more than enough of both, plus a tremendously easy way to engage burst mode.
The secret hidden trick to using burst mode in the iPhone’s Camera app? Instead of pressing the shutter button once, press and hold it as long as you want to keep taking shots, releasing it when you’re done. That’s it!
You’ll hear the shutter sound continuously as long as you hold the button down, and a count indicator appears just above the shutter button to show how many images you’ve taken. The iPhone’s burst mode captures at 10 frames per second, so if you shoot for 2.5 seconds, you’ll end up with 25 photos. Burst mode appears to be limited only by storage space; an iPhone 7 didn’t hesitate when using burst mode for 20 seconds—200 photos!
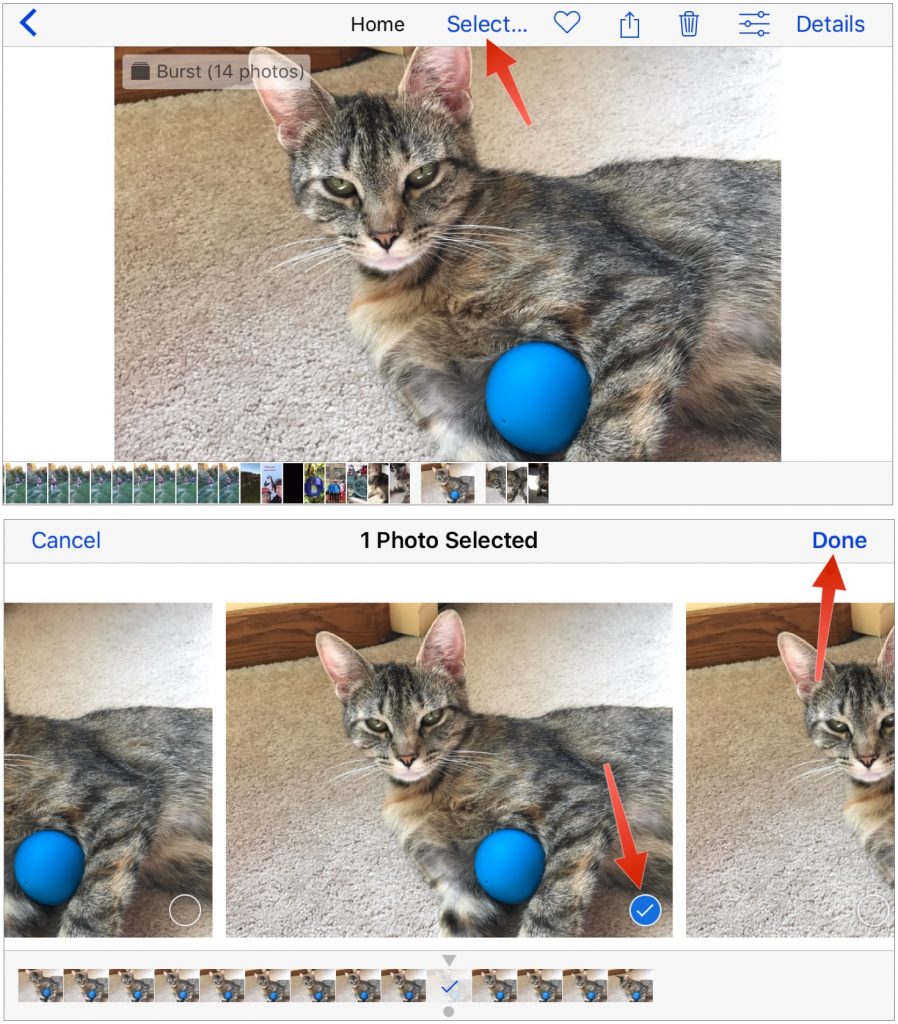
The hardest part of using burst mode is picking which images to keep, which you do in Photos in either iOS or macOS. Images captured in burst mode appear as “stacks” in both the main Photos view and the automatically created Bursts album.
First, tap a burst stack, tap Select (on the Mac, double-click the stack and then click the Make a Selection button), and swipe left and right to compare all the photos. Tap anywhere on each photo you want to keep so it gets a blue checkmark at the bottom. When you’re finished, tap Done.
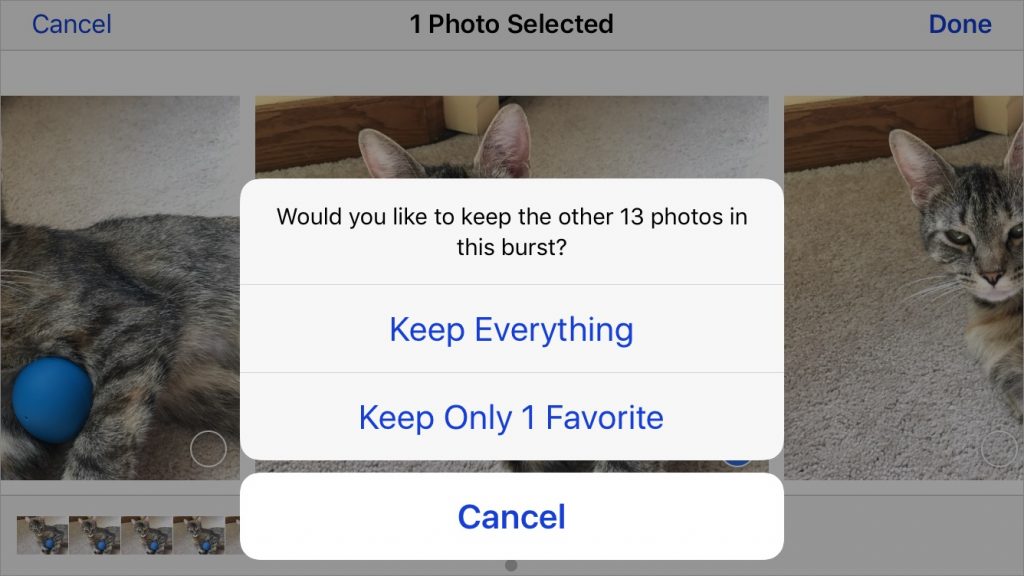
Photos then asks if you want to keep everything or just the favorites—unless you hadn’t finished selecting the best shots, tap Keep Only X Favorites (on the Mac, click Keep Selection).
One warning. If you use iCloud Photo Library or My Photo Stream to sync photos between devices, it might take quite some time for all the burst shots to move from the iPhone to the Mac. Photos on both platforms reports on the number of pictures in the burst, so if you’re selecting photos shortly after shooting, make sure the number of shots matches before proceeding. Photos on the Mac puts a circular progress indicator in the lower-right corner to indicate that photos are still loading.
OK, two warnings. If you’re using My Photo Stream to transfer photos to your Mac, only those burst photos that you’ve marked as favorites will transfer. To set it so entire bursts transfer automatically, open Settings > Photos & Camera and enable Upload Burst Photos.
Along with the obvious uses with kids, pets, sports, and wildlife, you might also find burst mode useful when:
- Framing a shot before a moving person or object enters it
- Capturing splashing water
- Shooting groups of people who can’t keep their eyes open at the same time
- Photographing someone walking in full stride
- Getting the perfect picture of an object blowing in the wind.
So give burst mode a try today!