September is here, which means that Apple will soon start releasing major upgrades for all its operating systems. Apple previewed these releases at its Worldwide Developers Conference in June, and many people have been testing the public betas since. Once Apple judges macOS 12 Monterey, iOS 15, iPadOS 15, watchOS 8, and tvOS 15 to be ready for prime time, the question arises—when should you install them?
(Note that we say when and not if. There’s no harm in delaying a major operating system upgrade until Apple has sanded off rough edges that slipped through testing. But waiting too long puts you at risk from security vulnerabilities, increases compatibility annoyances, and prevents you from taking advantage of new features. Plus, when you buy a new Mac, iPhone, or iPad after these operating systems have shipped, you’ll get the latest version, which could pose problems for your existing apps. It’s best to be prepared if you have to replace a device unexpectedly.)
In the past, we’ve offered separate takes on when you should install each of Apple’s operating systems, but many of this year’s new features are spread across multiple operating systems. For instance, the marquee feature of this season’s releases is SharePlay, which promises to let users watch videos, listen to audio, share screens, and more, all while on a FaceTime call that could involve an iPhone, iPad, Mac, or Apple TV. SharePlay sounds technically impressive—we’ll let you decide if it interests you—but it’s not a reason to upgrade right away. Apple has already announced that SharePlay is delayed and won’t ship until later in the year.
So here’s the general upgrade order that we suggest, starting with the iPad. Remember, always make a backup before upgrading a Mac, iPhone, or iPad so you can revert right away if necessary.
iPadOS 15
Upgrade your iPad to iPadOS 15 first. For the most part, iPadOS is a superset of iOS, so why should you upgrade your iPad before your iPhone? The big reason is that Apple has again taken a swing at improving iPad multitasking, and the changes are worth investigating. People who rely heavily on iPads will likely appreciate the new multitasking features, and those for whom the iPad is less important have nothing to lose by upgrading shortly after release.
Particularly welcome is a Multitasking menu at the top center of every window that lets you create a full screen, Split View, Slide Over, and in some cases (like Mail), a center window. There’s also a shelf at the bottom of the screen that shows open windows within an app. You can create Split View spaces by dragging one app from the App Switcher onto another. Finally, a list of keyboard shortcuts appears when you press and hold the Command key on an external keyboard. At long last, discoverability comes to multitasking!

Apple migrated some iOS 14 improvements to iPadOS 15. Widgets can now appear anywhere on the Home screen, and a new larger widget size lets apps display more information. Also coming to iPadOS 15 is the App Library, which automatically organizes all your apps into categories and enables you to avoid cluttered Home screens.
If you’re a Notes user, you’ll appreciate the new Quick Note feature, which lets you create a note with a swipe up from the corner of the screen using your finger or an Apple Pencil. Quick Note can automatically pull in highlighted text or links to a website or app, and it’s easy to add more with the Apple Pencil or keyboard.
Other welcome changes include a Focus mode that reduces distractions; voice searching and tab groups in Safari; FaceTime improvements; Live Text that allows you to search for, select, copy, and translate text in photos (on iPads with an A12 Bionic chip or later); and increased city detail in Maps.
iOS 15
It’s usually safe to upgrade iOS fairly quickly because Apple puts significant effort into ensuring that the new iOS version is a good experience for those who buy the new iPhones that come with it. However, because iPhones are so crucial to our everyday lives, it’s probably worth delaying the upgrade to iOS 15 for a few weeks, just in case. After that, you can install it and enjoy the new features.
Although SharePlay won’t arrive on day one, FaceTime still gets welcome improvements inspired by competing videoconferencing systems. There’s finally a grid view, Portrait mode for blurring the background, different mic modes for focusing on your voice or on sound in the room, the capability to include Windows and Android users, and FaceTime Web links for scheduling and sharing calls.

Messages will collect links, images, and other content that your friends have sent you in a new Shared with You section, which you’ll also find in other Apple apps like Photos, Safari, Apple News, Music, and Podcasts. Plus, when someone sends you multiple photos in Messages, they appear as either a collage or a stack that you can swipe through. There are also new Memoji options to try if you’re into that.
Other new features are similar to those in iPadOS 15, including Focus mode, voice searches and tab groups in Safari, Live Text in Camera and Photos, and improved city detail in Maps, which also gains immersive walking instructions.
watchOS 8
Once you upgrade your iPhone to iOS 15, go ahead and upgrade your Apple Watch to watchOS 8 right away. You may not even notice the difference since none of the changes will force changes in your existing usage patterns.
New features include Portrait mode photos on your watch face, Memories from Photos pushed to your watch, the capability to share photos via Messages and Mail, integration with HomeKit security cameras, more control over scenes and devices in the Home app, digital keys for HomeKit locks, a new Mindfulness app that replaces the Breathe app, a Pilates option in the Workout app, tracking of your sleeping respiratory rate, and a Find Devices app for locating lost devices from your wrist.

tvOS 15
Why put tvOS ahead of macOS? The decision to upgrade to tvOS 15 is easy for most people. It’s unlikely to cause problems for your Apple TV, and the new features won’t get in the way of basic TV watching. Plus, if you have automatic updates turned on in Settings > Software Updates, it will install automatically at some point after release.
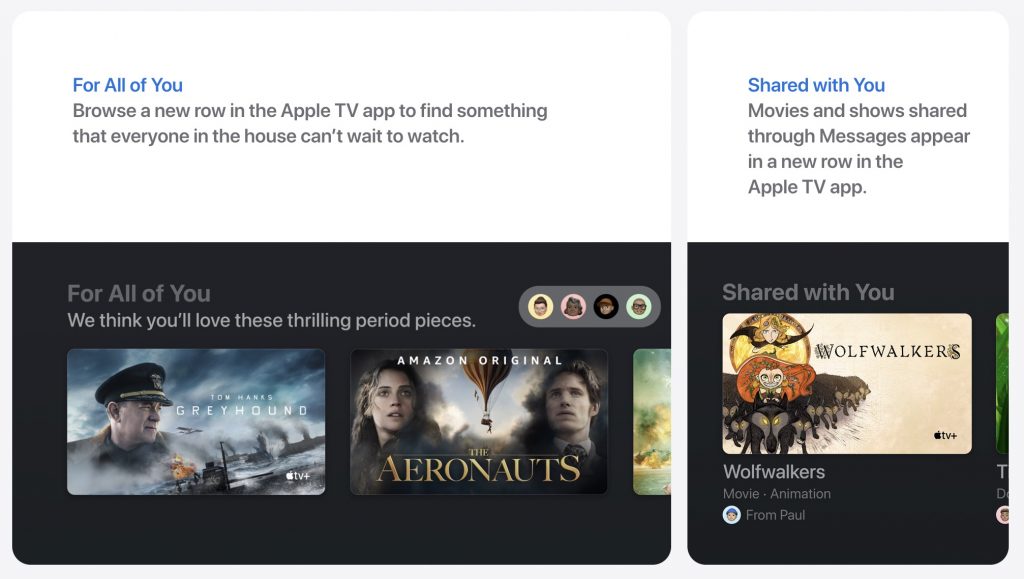
You might not want to wait for the automatic update, though. There are plenty of small but welcome improvements, such as the capability to sign in to Apple TV apps using Face ID or Touch ID on your iPhone. The playback interface has a redesigned scrubber that displays more information. The Apple TV will automatically detect nearby AirPods and show a notification to connect them, saving you a manual step. If you have AirPods Pro or AirPods Max, you can listen to Apple TV audio with dynamic head tracking. The TV app will include a “For All of You” row based on the interests of everyone in the house (via Family Sharing). Finally, you can ask a HomePod to play a particular show on the Apple TV and even use one or two HomePod mini speakers as the default audio output.
macOS 12 Monterey
The hardest upgrade decision revolves around your Mac, as always. For the most part, macOS 11 Big Sur has been relatively solid, with fewer complaints than plagued macOS 10.15 Catalina. Some beta testers believe that macOS 12 Monterey is more of a refinement upgrade without the major architectural changes that marked Big Sur and Catalina. That would suggest more stability and the possibility of an easier and earlier upgrade.
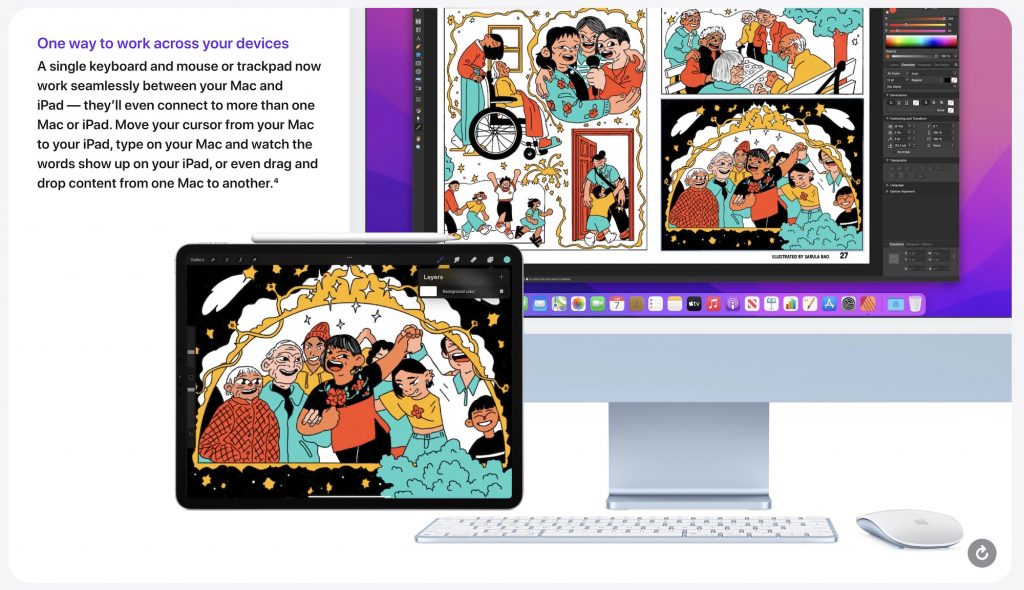
Plus, Monterey has some unique features. Most notable is Universal Control, which lets you work seamlessly between multiple Macs and your iPad, connected wirelessly or via USB. You can move the pointer from a Mac to the iPad, type into iPad apps with your Mac’s keyboard, and even drag and drop content from one Mac to another. Another welcome addition is the option to use AirPlay to display video, play audio, or present content from another Apple device to a Mac, something that has previously been possible only in the other direction. Finally, Monterey brings the Shortcuts automation app to the Mac, making it easier to automate repetitive tasks without learning AppleScript or using the aging Automator.
Apart from those features, you’ve already read about most of the changes. They include FaceTime improvements, support for Focus mode, Shared with You collections in Apple apps, tab groups (but not voice searching, sadly) in Safari, a Quick Note hot corner activation option, Live Text, and Maps enhancements.
You may find some of these features compelling, but we recommend waiting to upgrade to Monterey for at least a few months. App compatibility isn’t usually a big problem with the other operating systems, but most of us rely on specific Mac apps—sometimes older versions—to get our work done. Even once you’re confident your apps will work properly in Monterey, there may be workflow or intra-office compatibility concerns if some people upgrade and others don’t. And, of course, unanticipated bugs could crop up at professionally inconvenient times—important work takes place on Macs! So please, do not upgrade to Monterey without checking with us first. With luck, the start of the new year will have brought both the bug fixes and app updates necessary to give the green light.
(Featured image by Apple)