What Is The Best Hard Drive to Use for Your Backups?

Backing up your Mac is like flossing your teeth: everyone knows they should do it every night, but too many people never get around to it. Unlike flossing, once you set up backups, they don’t require daily attention. And turning on Apple’s Time Machine backup feature is easy—simply open System Preferences > Time Machine, click Select Backup Disk, and pick a hard drive to hold your backups.Ah, but there’s the rub. If you don’t have an appropriate hard drive, you need to get one, and there are tons of options. Here’s our rundown of what to look for, with recommendations.


How Much Space Do You Need?

The first question when looking for a backup drive is how much data it needs to hold. You could put a lot of effort into figuring this out, but for most people, the answer simple. Buy the largest drive you can reasonably afford, as long as it will hold at least two to three times as much data as you have or anticipate creating in the near future.

Say you use a MacBook Pro with a 512 GB SSD. You could get by with a 1 TB backup drive, which would be twice as large as your internal drive. But if a 1 TB drive costs $100 and a 2 TB drive costs $130, it’s worth the extra $30 to double the available space.

How Will You Connect It to Your Mac?

With external hard drives, you need to match the ports on your Mac with the ports on the drive. That might sound tricky, what with USB 3, FireWire, USB-C, and Thunderbolt. Luckily, for most people, the right choice is simple: a drive that supports USB 3. They’re inexpensive and plenty fast for backups.

Nearly every Mac sold since 2012 supports USB 3, either via the familiar USB-A port or the newer USB-C/Thunderbolt 3 port. If your Mac has only USB-C ports—as would be the case if you have either a MacBook or a recent MacBook Pro—you may also need an adapter cable that’s USB-A on one end and USB-C on the other.

What Type of Drive Should You Buy?

Inside the case, an external hard drive contains either a 2.5-inch or 3.5-inch drive mechanism.

  • 2.5-inch drives are smaller, more portable, and usually bus-powered, meaning they get power from your computer instead of from a wall outlet, which makes them easier to hook up and use. They’re also designed to be more rugged. On the downside, they cost more per gigabyte, max out at 5 TB in size, and are often slower.
  • 3.5-inch drives usually need to be plugged into power, and they’re less appropriate to carry around. However, they cost less per gigabyte and can be bought easily in sizes up to 8 TB. Plus, they tend to support more connection types, making them more flexible.

If you work mostly on a notebook Mac and lead a mobile lifestyle, carrying a bus-powered 2.5-inch drive ensures you can back up while traveling. Such a drive might also be best for a MacBook-equipped college student. However, if your Mac mostly sits on a desk or you bring your laptop back to the same place every night, you’ll likely be better served by a 3.5-inch drive—they’re faster, cheaper, and store more data.

Putting It All Together

At MacLife, we build our own external hard drive solutions that come with our exclusive 5-year in-store warranty, so there’s no fuss or hassle should you encounter problems. Come see us today!

All about Find My Friends

As iPhones have become ever more prevalent, one of Apple’s bundled apps—Find My Friends—has become significantly more useful. Although there are legitimate concerns about sharing your location willy-nilly, Find My Friends gives everyone full control over what they share, making it truly helpful for families and close friends. So if you’ve ever thought it would be useful to know when your child left their soccer game or wanted them to receive an automatic alert when you leave to pick them up, Find My Friends is the app for you. It’s also great for keeping track of aging parents or for housemates looking out for one another.

Add and Remove Friends

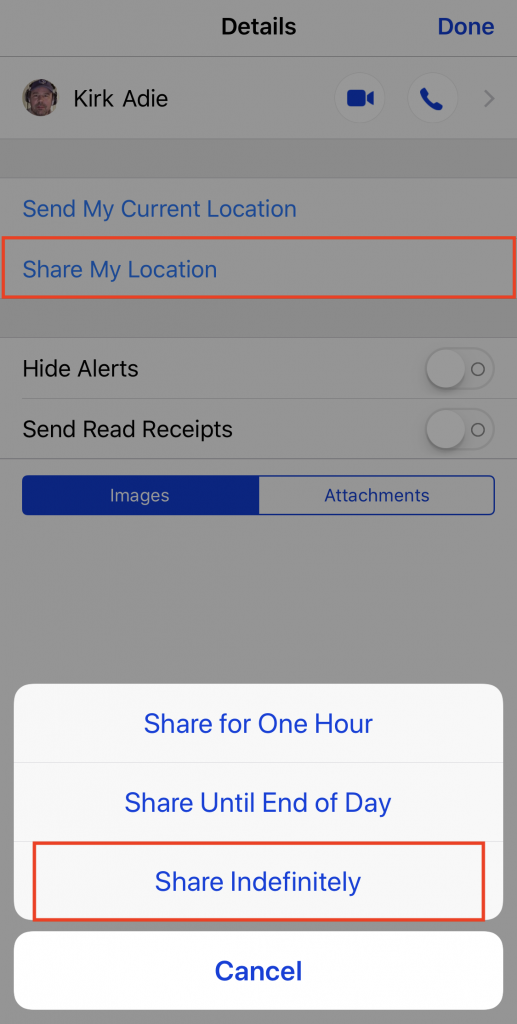
Although you can add friends in the Find My Friends app by tapping Add and selecting their contact card, it’s easier to work from Messages, assuming you want to share your location with someone with whom you regularly text anyway. In their conversation, tap the i button, tap Share My Location, and in the popover that appears, tap Share Indefinitely. (Share for One Hour and Share Until End of Day are useful for temporarily sharing your location while traveling, say, to visit colleagues with whom permanent sharing would be inappropriate.)

However you initiate the sharing, the other person receives a notification and can accept and choose to share their location as well. (If they don’t do so right away, you can tap their name in your Find My Friends list and tap Ask to Follow.) That said, unidirectional sharing is all right, though in families and particularly for children, bidirectional sharing can be more helpful.

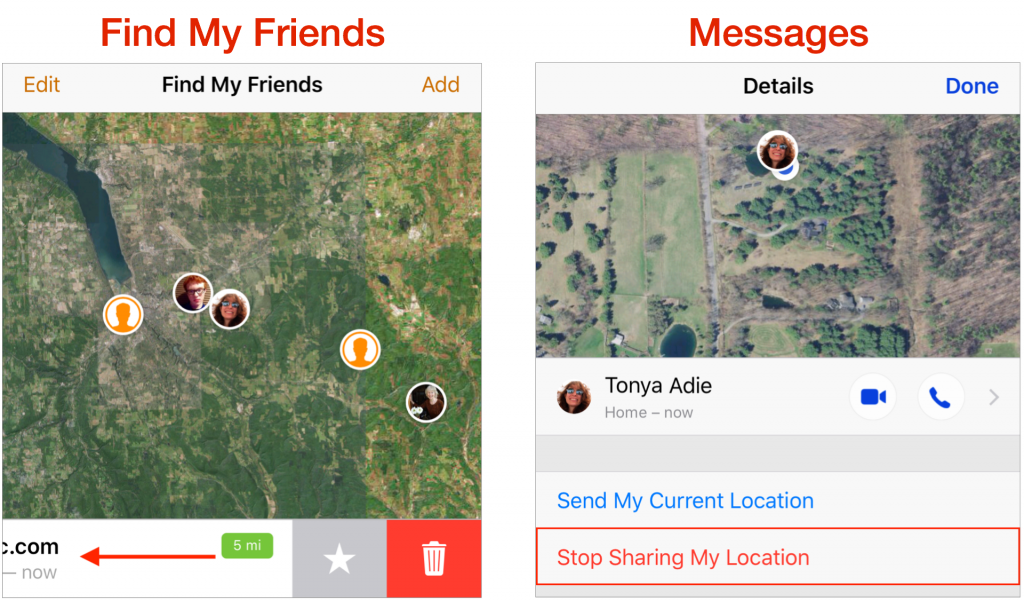
Should you ever wish to stop sharing your location with someone, you can either swipe left on their entry in Find My Friends and tap the red Trash button, or go into their conversation details in Messages and tap Stop Sharing My Location.

Work with Locations

Once you have someone in the Find My Friends app, you’ll see their entry in the list and their location on the map. That may be all you need if, for example, your goal is to see where your spouse is on their bike ride so you can figure out when to start dinner. A tip: for a quick location check, ask Siri something like, “Where is my wife?”

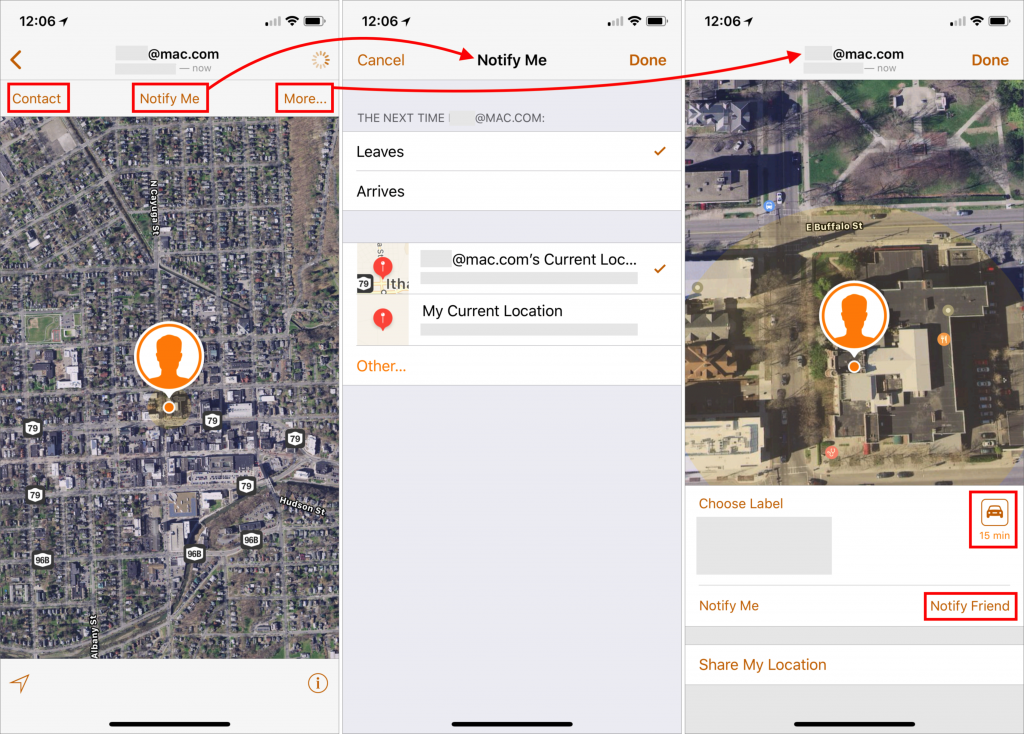
But Find My Friends has other features that make it even more useful. To access these features, tap a friend in the list or on the map to focus on them.

  • Contact: Tap Contact to view your friend’s contact card. From it, you can start a Messages conversation, phone call, FaceTime call, email message, or money transfer via Apple Pay. You can also edit their details from here.
  • Notify Me: With the Notify Me feature, Find My Friends can tell you when your friend leaves or arrives at a particular location. Two locations—their current location and your current location—are always available for quick selection. Or tap Other, and then either search for a location or press and hold on the map to drop a pin at that spot. You can even expand the orange dropped-pin circle to make the location less precise (and thus less likely to miss, if the person doesn’t quite go where you expect).
  • Notify Friend: On the flip side, Notify Friend (tap More to access this feature) lets you tell your friend of your location right now, or when you leave or arrive at a location. A welcome addition here is a Repeat Every Time switch, so you could, for instance, have Find My Friends alert your mother in advance whenever you decide to stop over at the last minute.
  • Get Directions: Also in the More screen is a car icon; tap it to display directions to your friend’s current location in Maps. It’s a great way to avoid those awkward conversations when you need to pick up your kid after a party and they can’t tell you precisely where they are.

It’s easy to be cynical about the privacy implications of location sharing. Obviously, you want to share locations only with people you trust, and who trust you. But once you do that, you’ll likely discover that Find My Friends provides peace of mind, since you know you’ll be on time to pick up your kid after an away game and your spouse knows that if she has a bike accident, you’ll be able to find her.

Create and Name Reminders Lists to Use Them Via Siri

Do you create reminders with Siri on the iPhone? Those reminders are automatically added to your default list, which you set in Settings > Reminders > Default List. That’s great generally—“Hey Siri, remind me to update watchOS tonight at 11 PM”—but less good when you want to maintain different shopping lists. For instance, create a list called “Grocery,” and then you can tell Siri, “Put chocolate-covered bacon on my Grocery list.” Want to get fancy? Make a list called “Hardware,” and then tell Siri, “Add birdseed to my Hardware list, and remind me when I arrive at Home Depot.” You may have to pick the correct Home Depot location from a list, but then you’ll receive an alert reminding you to buy birdseed when you pull into the parking lot. To look at any list via Siri, just say something like “Show my Grocery list.”

Install Minor Operating System Updates to Maintain Herd Immunity

It seems like Apple releases updates to iOS, macOS, watchOS, and tvOS nearly every week these days. It has been only a few months since iOS 11 and macOS 10.13 High Sierra launched, and we’ve already seen ten updates to iOS and seven updates to macOS. Some of these have been to fix bugs, which is great, but quite a few have been prompted by the need for Apple to address security vulnerabilities.

Have you installed all these updates, or have you been procrastinating, tapping that Later link on the iPhone and rejecting your Mac’s notifications? We’re not criticizing—all too often those prompts come at inconvenient times, although iOS has gotten better about installing during the night, as long as you plug in your iPhone or iPad.

We know, security is dull. Or rather, security is dull as long as it’s present. Things get exciting—and not in a good way—when serious vulnerabilities come to light. That’s what happened in November 2017, when it was reported that anyone could gain admin access to any Mac running High Sierra by typing root for the username and leaving the password field blank. That one was so bad that Apple pushed Security Update 2017-001 to every affected Mac and rolled the fix into macOS 10.13.2.

Part of the problem with security vulnerabilities is that they can be astonishingly complex. You may have heard about the Meltdown and Spectre hardware vulnerabilities discovered in January 2018. They affect nearly all modern computers, regardless of operating system, because they take advantage of a design flaw in the microprocessors. Unfortunately, the bad guys—organized crime, government intelligence agencies, and the like—have the resources to understand and exploit these flaws.

But here’s the thing. Security is an arms race, with attackers trying to take advantage of vulnerabilities and operating system companies like Apple, Microsoft, and Google proactively working to block them with updates. If enough people install those updates quickly enough, the attackers will move on to the next vulnerability.

The moral of the story? Always install those minor updates. It’s not so much because you will definitely be targeted if you fail to stay up to date, but because if the Apple community as a whole ceases to be vigilant about upgrading, the dark forces on the Internet will start to see macOS and iOS as low-hanging fruit. As long as most people update relatively quickly, it’s not worthwhile for attackers to put a lot of resources into messing with Macs, iPhones, and iPads.

That said, before you install those updates, make sure to update your backups. It’s unusual for anything significant to go wrong during this sort of system upgrade, but having a fresh backup ensures that if anything does go amiss, you can easily get back to where you were before.

Call 911! Or, with an iPhone or Apple Watch, Invoke Emergency SOS.

Have you ever needed to call emergency services from your or someone else’s iPhone? Almost by definition, such calls take place at stressful times, and it can be hard to remember what to do. Or, if you’ve been in an accident, it might be difficult or impossible to navigate the iPhone’s interface. In iOS 10.2 and watchOS 3 and later, Apple added the Emergency SOS feature to help.

Emergency SOS does three things:

  • First, it calls emergency services, using whatever number is appropriate for your location, which could be particularly helpful when you’re traveling abroad.
  • After your emergency call ends, Emergency SOS sends a text message with your location to emergency contacts that you’ve set up previously in the Health app.
  • Finally, it displays your Medical ID for first responders so they can be aware of things like medication allergies. You create your Medical ID in the Health app as well.

How you invoke Emergency SOS varies slightly depending on which Apple device you have:

  • On the iPhone 8, iPhone 8 Plus, and iPhone X, press and hold the side button and either of the Volume buttons until the Emergency SOS slider appears. Either drag the Emergency SOS slider to call emergency services right away, or just keep holding the side and Volume buttons. If you continue holding the buttons down, a countdown begins and an alert sounds; at the end of the countdown, the iPhone automatically places the call, a feature that Apple calls Auto Call. 


  • On the iPhone 7 and earlier, rapidly press the side button five times to bring up the Emergency SOS slider. Drag the slider to call emergency services. (The quintuple-click can work on the new iPhones too; it’s an option in Settings > Emergency SOS.) 
  • The Apple Watch acts like the newer iPhones. Press and hold the side button to bring up the Emergency SOS slider, or keep holding the side button to start a countdown after which the Apple Watch will call emergency services automatically via Auto Call. The Apple Watch must be connected to your iPhone, be on a known Wi-Fi network and have Wi-Fi Calling enabled, or be an Apple Watch Series 3 with a cellular plan.

It’s only human to want to test this in a non-emergency situation, and you can do so without actually placing the call. On both the iPhone and the Apple Watch, there will be a red hangup button you can tap, followed by an End Call or Stop Calling button. Similarly, you can cancel notifications of your emergency contacts.

You’ll also want to stop calls if they’re placed accidentally—we know someone who had his hand in his pocket in such a way as to press the Apple Watch’s side button long enough to start the call, and since he was in a noisy environment, he didn’t hear the alert or notice anything until the 911 service called his iPhone back.

To add emergency contacts—the people who you’d want notified if you were in an accident, for instance—follow these steps on your iPhone:

  1. Open the Health app, and tap the Medical ID button at the lower right.
  2. Tap Edit, and then scroll down to Emergency Contacts.
  3. Tap the green + button to add a contact.
  4. Select the desired person, and when prompted, pick their relationship to you.
  5. Tap Done to save your changes.

Two notes. First, if you’re concerned about activating the Auto Call feature inadvertently, you can turn it off in Settings > Emergency SOS on the iPhone, and for the Apple Watch in the Watch app, in My Watch > General > Emergency SOS.

Second, bringing up the screen with the Emergency SOS slider also automatically disables Touch ID and Face ID, such that you must enter your passcode to re-enable them.

We sincerely hope that you never have to use Emergency SOS, but that if you do, it proves to be a faster and more effective way of contacting emergency services.