Use AirPods to Improve Your Hearing

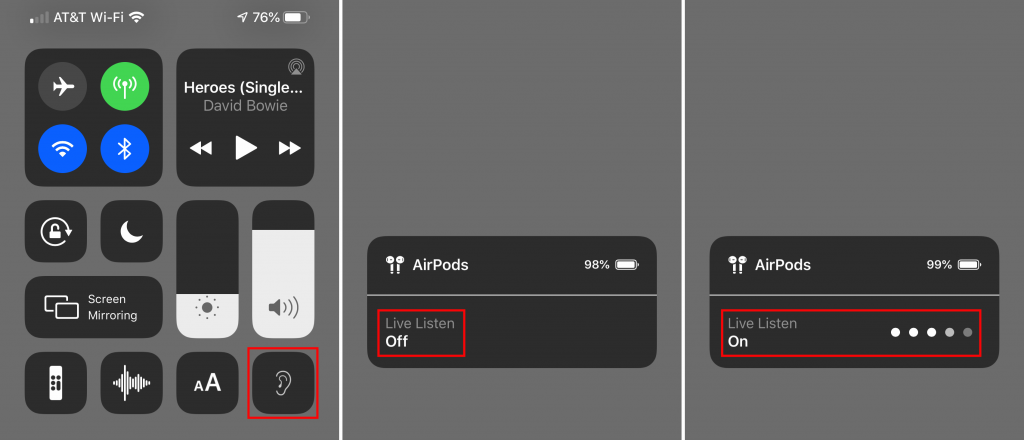
An ever-increasing number of people have hearing loss due to exposure to loud noise and age. If you’re in that group, but don’t yet need hearing aids, try using your AirPods to help you hear better in certain situations. iOS’s Live Listen feature uses your iPhone’s mic to pick up specific sounds and then sends that audio directly to your AirPods, helping you focus on what you want to hear. To enable Live Listen, go to Settings > Control Center > Customize Controls and tap the green + button next to Hearing. Then put your AirPods in, open Control Center, tap the Hearing button, and tap to turn on Live Listen. Fine-tune what you’re hearing by moving the iPhone closer to what you want to hear and pointing the mic at the source of the sound—pay attention to the sound level meter dots—and by adjusting the iPhone’s volume controls. To stop listening, tap Live Listen again or just remove your AirPods.

(Featured image by kyle smith on Unsplash)

What Can You Store in Apple’s Wallet App? Credit Cards, Boarding Passes, Tickets, and More!

Have you wondered what you can do with the Wallet app on your iPhone? Although it started out life called Passbook, Apple soon realized that the only sensible name was Wallet. That’s because it stores digital versions of roughly the same sort of things you might put in a physical wallet: credit and debit cards, store cards, membership cards, and even cash (well, Apple Pay Cash, anyway).

Nearly all airlines can put your boarding passes in Wallet, too, and if you buy something like a concert ticket online, you may be able to add it to Wallet by tapping the “Add to Apple Wallet” button in the confirmation page or email. Having a boarding pass or ticket, which Apple calls a pass, in Wallet makes it easy to scan for a gate attendant.

Here’s how to use cards and passes in Wallet.

Display Your Cards and Passes

The main Wallet screen shows your cards and passes in a scrollable list, with credit/debit cards at the top. (If you’ve set up Apple Pay Cash, it’s treated as a debit card.)

To view more details about a card or pass, tap it.
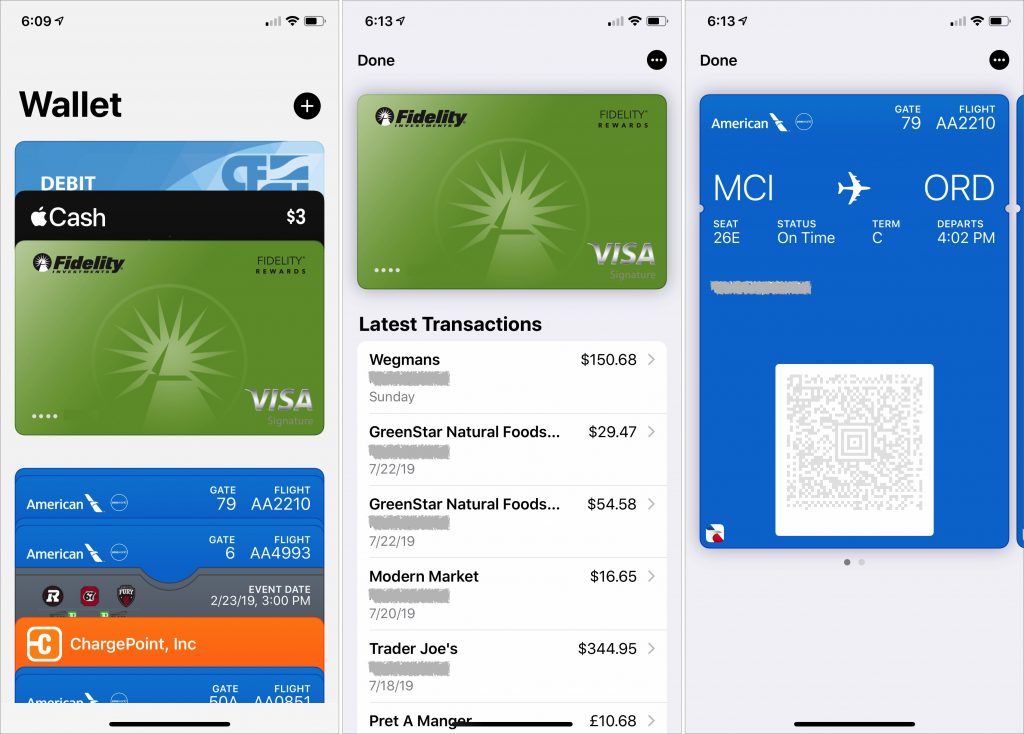
In the case of a credit/debit card, you see the face of the card and a list of its recent Apple Pay transactions.

For boarding passes for multi-flight trips, you see a single pass in the main list, but after you tap it, you can swipe horizontally to display the pass for each leg of the trip.

Membership cards, such as the ChargePoint card, may work like credit/debit cards in that you need to hold them near a reader to sign in.

In each case, to access settings related to the card or pass, tap the black ••• button at the upper right.

Adding and Using Credit and Debit Cards

Adding a credit/debit card so it can work with Apple Pay starts with tapping the black + button at the upper right of the Wallet screen. From there, follow the prompts—you can scan your card with the camera instead of keying in the data.

If you add more than one card, you’ll want to specify which should be the default for Apple Pay. Go to Settings > Wallet & Apple Pay. Scroll down to Transaction Defaults, and tap Default Card. Tap the desired card. In Wallet, the default card appears with its full face showing, below your other credit/debit cards.
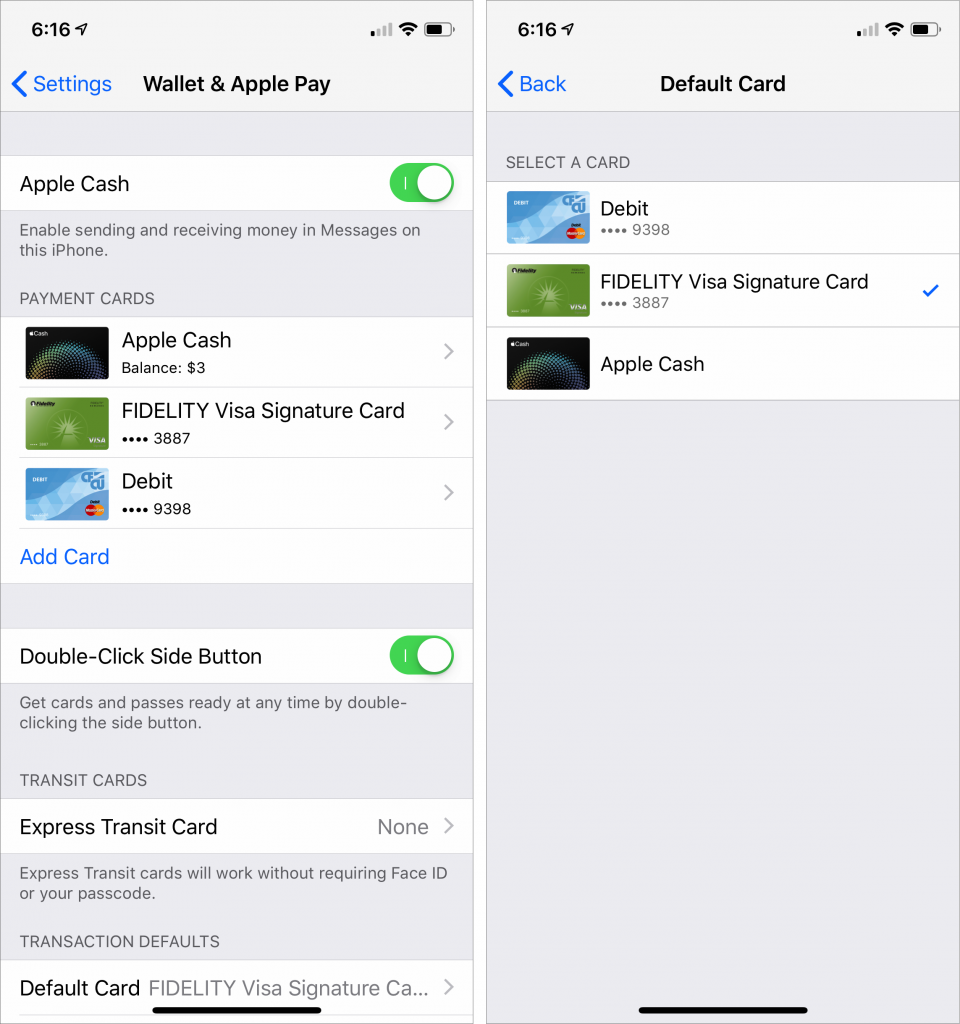
To pay for a purchase with a stored credit/debit card at a payment terminal, put your iPhone right next to the terminal. The iPhone may automatically prompt you to authenticate Apple Pay, but if not, double-click the Home button or, with the iPhone X, XR, XS, or XS Max, double-click the side button. Wallet displays your default card. To authenticate, rest your finger on the Home button or, with the iPhone X models, authenticate with Face ID. To use a non-default card, tap the card pile at the bottom of the screen and then tap the desired card.

Adding and Using Airplane Boarding Passes and Event Tickets

For flights, when you check in and get boarding passes using the airline’s iPhone app, you’ll be given the opportunity to tap an Add to Apple Wallet button. Do that and the boarding pass appears in Wallet, which will also display a notification for it on the Lock screen in the hours before your flight. When you need to show the boarding pass to security or the gate attendant, tap that notification to display the boarding pass with its QR code.
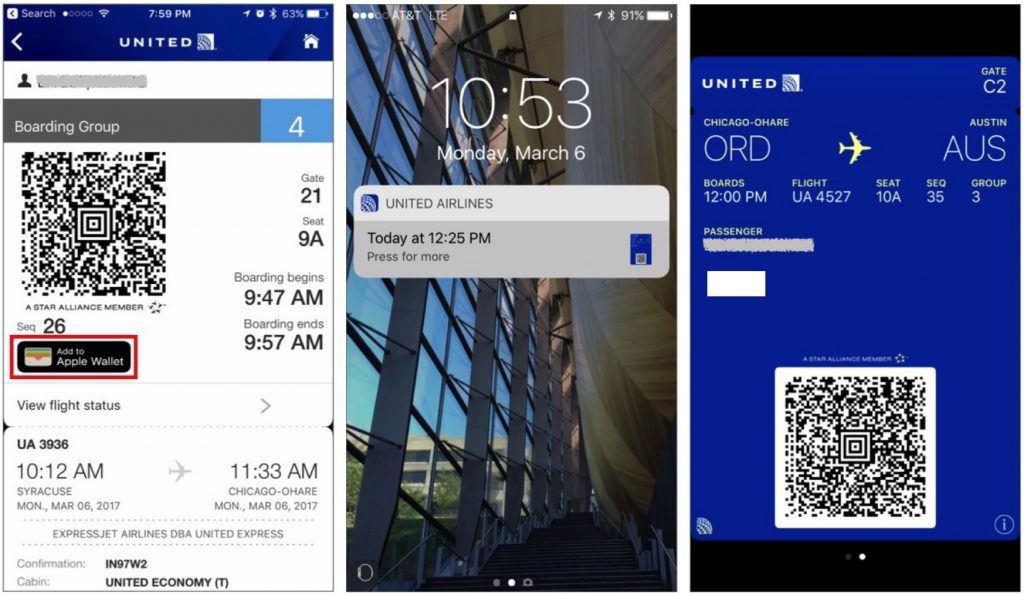
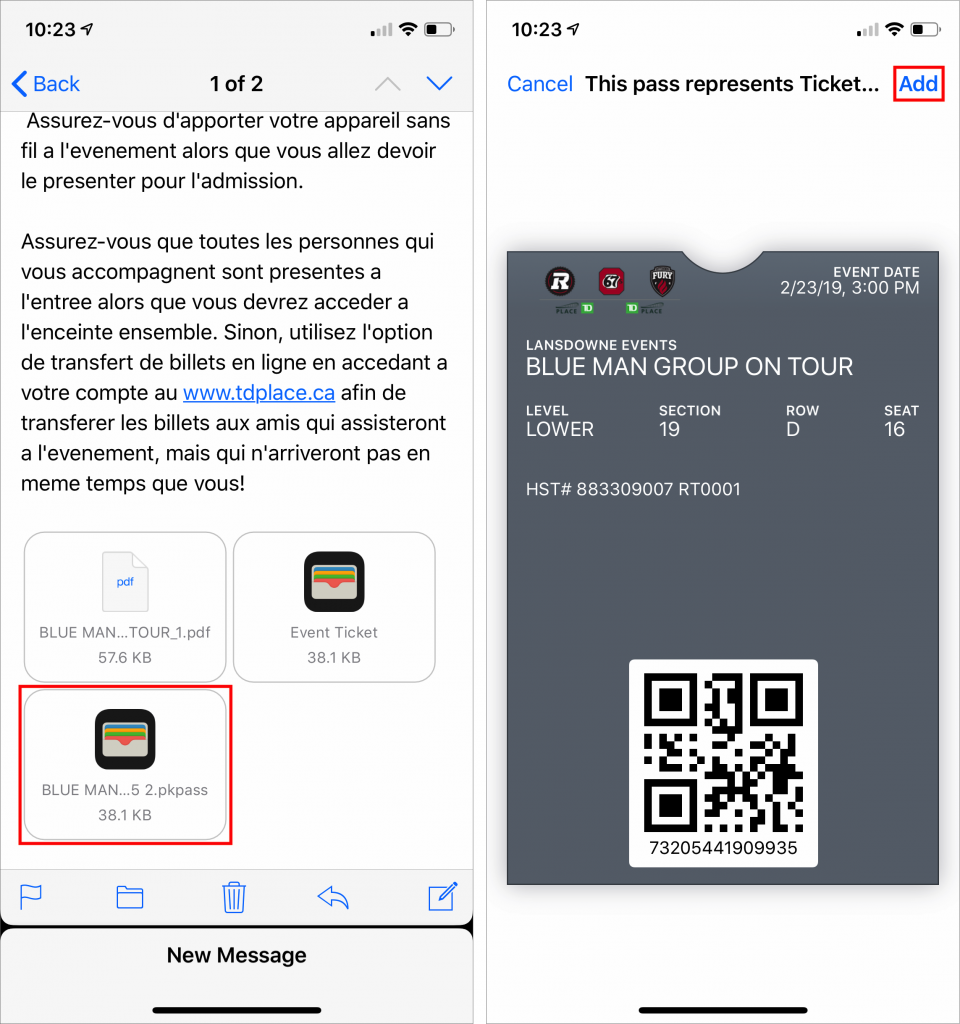
For events, the ticket-seller may display the Add to Apple Wallet button on the confirmation page of the checkout process or attach the tickets to your email receipt. In the latter case, open the message in Mail and tap the attachment to open it, and then tap Add to put it into Wallet. Later, when you arrive at the venue, open Wallet and display the ticket—again with a QR code—to gain entry.
Deleting Cards and Passes

Although you may want to keep some digital tickets for nostalgic reasons, it’s best to clean out old items:

  • To delete a credit/debit card, tap the card to view it and then tap the black ••• button. Scroll down and tap Remove This Card.
  • To remove a pass, go to the bottom of the main Wallet screen and tap Edit Passes. Tap the red delete button for that item, tap the next Delete or Delete All button, and then tap Done at the upper right.
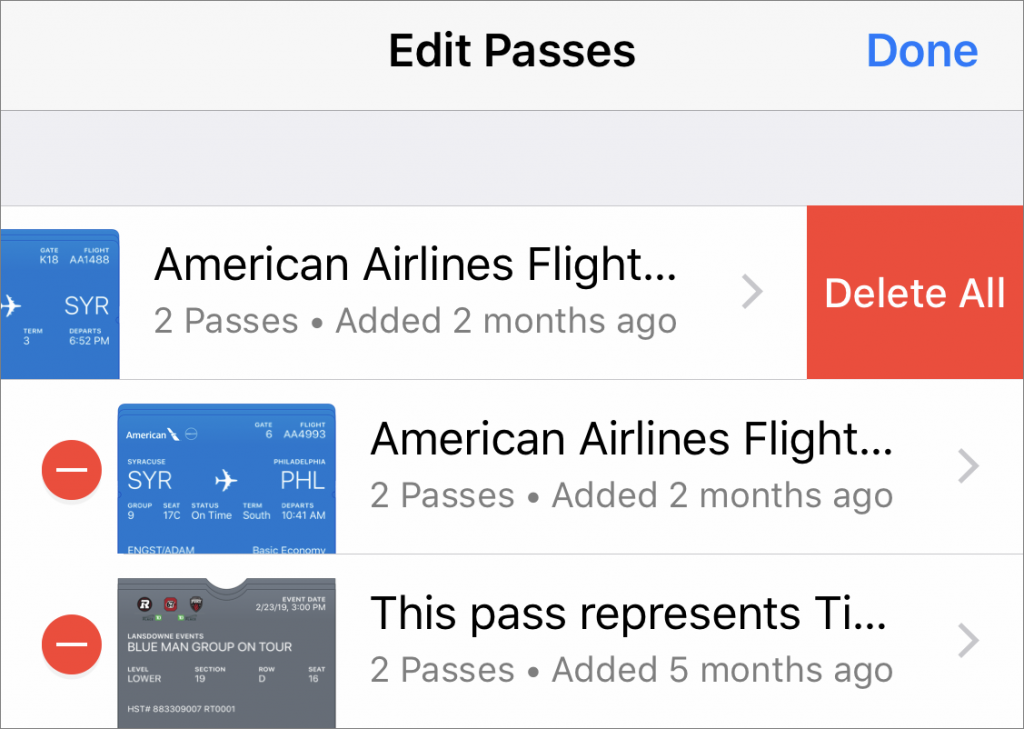
Using Wallet makes it easier to keep your physical wallet slimmer. It can take a few minutes to add your cards and passes initially, but it’s worth the effort.

(Featured image by Two Paddles Axe and Leatherwork on Unsplash)
Learn How to Autofill SMS Login Codes in iOS 12 and Mojave

An ever-increasing number of Web sites boost their security via two-factor authentication (2FA), which requires you to type in a short numeric code to complete a login after entering your username and password. It’s a big win because that code is generated on the fly and is good for only a short time (often 30 seconds). So even if your username and password were revealed in a data breach, your account is safe if you use 2FA. We recommend using it whenever possible.

You get these codes—usually six digits—in one of two ways. The most common is via an SMS text message to your iPhone, but you may instead be able to generate authentication codes with an app such as 1Password, Authy, or Google Authenticator, or LastPass. And yes, if you’ve followed our advice to use 1Password or LastPass as a password manager, their capabilities to generate and enter these codes is a nice bonus.

Many sites support only the SMS text message approach, however, so Apple added features to iOS 12 and macOS 10.14 Mojave that simplify entering the codes sent via SMS.

Autofill SMS codes in iOS 12

In iOS 12, the trick to easier entering of the code is to use the QuickType bar above the standard iOS keyboard, where iOS suggests auto-complete options. Follow these steps:

  1. Start logging in to a site that requires 2FA via SMS with your username and password.
  2. When you’re prompted for your code, tap in the Enter Code field.
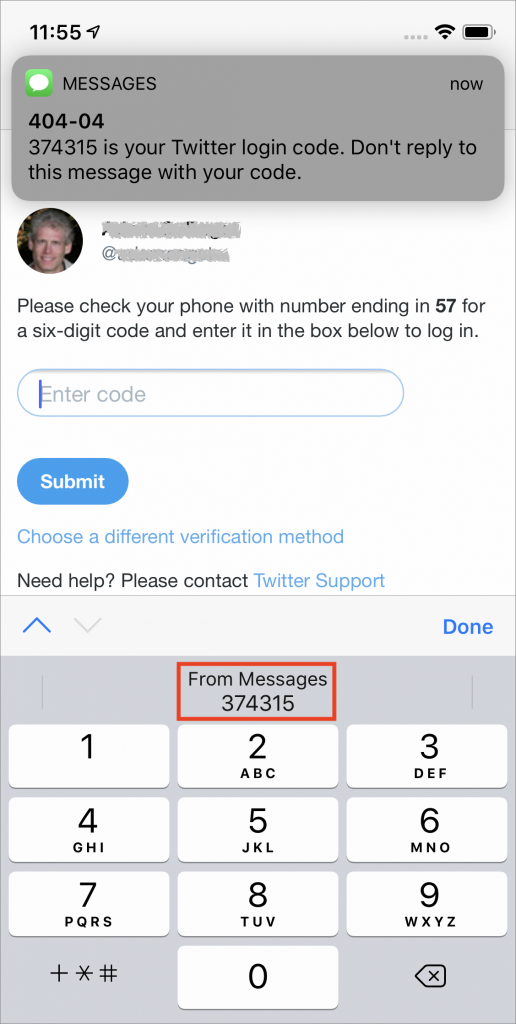
  3. When the text message arrives, instead of trying to remember and retype the six digits, look at the QuickType bar at the top of the keyboard, where iOS 12 displays “From Messages” and the code. Tap it to enter the code in the field.
  4. Submit the form to log in.

Autofill SMS codes in Mojave

In Mojave, Apple did something similar with autocomplete, but it works only in Safari, so if you prefer Google Chrome or Firefox, you’re out of luck. Follow these steps:

  1. Using Safari, start logging in to a site that requires 2FA via SMS with your username and password, after which you’re prompted for a code.
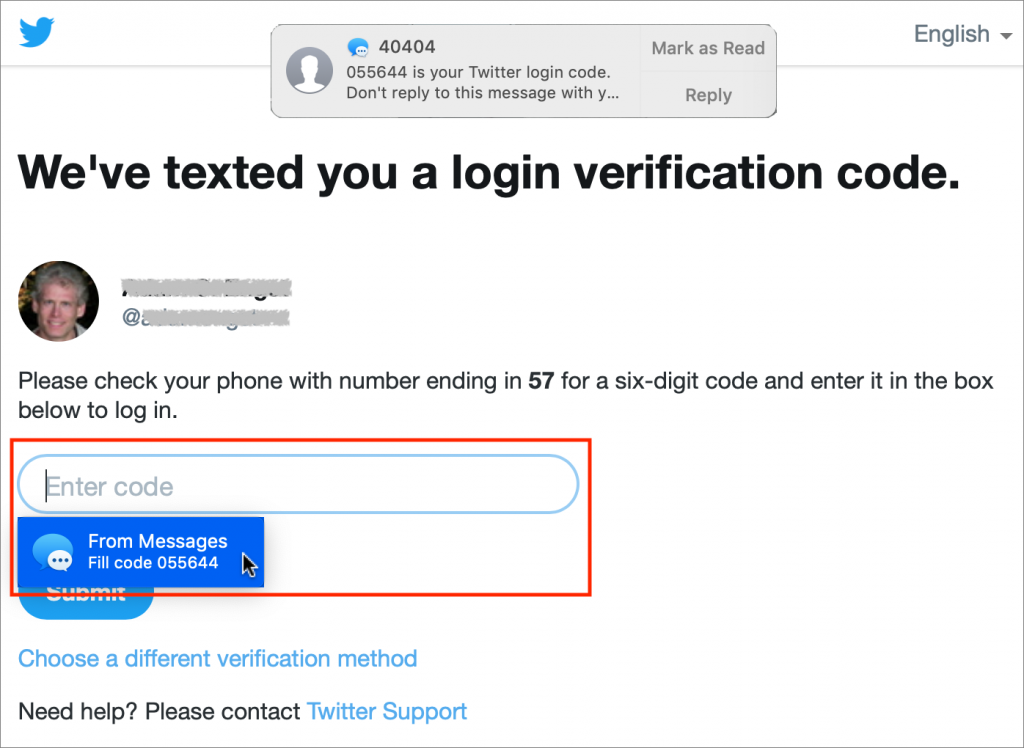
  2. When the text message arrives, instead of trying to remember and retype the six digits from your iPhone or the macOS notification, click in the Enter Code field.
  3. The code appears in a pop-up underneath the field under the “From Messages” tag. Click it to enter the code in the field.
  4. Submit the form to log in.

One final note. If you have a choice, use an authentication app instead of SMS for your 2FA codes. There are several ways a hacker could intercept an SMS text message meant for you and use that to complete a login. The chance of you being targeted like this is low, but there’s no reason not to use an authentication app instead to eliminate the worry. Plus, it means you can still log in even if your phone number changes, as it does if you use a different SIM card while traveling.

(Featured image by James Sutton on Unsplash)

Six Tips for Writing Better Email

Apple has put a lot of effort into Mail, providing lots of features you can employ to get through your email more quickly. But one of the most effective ways to improve your email productivity has nothing to do with an app. Instead, train yourself to write better email and you’ll cut down on a lot of unnecessary back-and-forth and confusion. Remember, email is not chat—you say things in an interactive conversation that could take days to untangle in an email thread. Here are some of the top ways to ensure that your email achieves your goals.

1. Write a good Subject line

Everyone receives too much email, and as a result, most people scan email Subject lines and open only those messages that seem relevant. Good Subject lines should be direct and specific, and ideally have key words at the front to catch the recipient’s attention.

Bad: Finishing off reviews…
Good: Discuss performance reviews at lunch on Thursday at 12:30 PM?

2. Keep it short and focused

Even if your recipient opens your message, if it rambles on, they will likely set it aside to deal with later, and later may never happen. Plus, if it includes multiple unrelated topics, replying to everything may seem overwhelming. And if they don’t know how to respond to even one point, the entire message may go unanswered.

When you start an email message, consider the most important point you want to convey and focus on that. Summarize ruthlessly, and if you find yourself wanting to write more and more, propose a phone call or meeting to discuss the topic instead.

Carry this advice over to your words too. Aim for short, understandable sentences. Whenever the thought changes, start a new paragraph. Short, single-topic paragraphs are easier to scan and understand, which is why newspaper reporters write the way they do.

3, Provide relevant context and details

As much as it’s important to stay concise, don’t leave out essential information. To check that your message is complete, evaluate it according to the journalistic formula of the Five Ws: does your message answer the questions of Who, What, When, Where, and Why?

Consider the example above about scheduling a lunch to discuss performance reviews. The message needs to make it clear who is invited to the lunch, what the topic of discussion will be, when and where it will take place, and why you’re setting up the meeting. Although the Subject and To lines already answer Who, What, and When, be sure to repeat those facts within the message.

4. Stay polite and friendly

If you’re having a bad day, it’s all too easy to be abrupt or even abrasive in email. Resist the temptation, since it will reduce the chance that the recipient will take your words to heart or reply as you wish.

Instead, imagine that you’re speaking to the person, and don’t say anything in email that you wouldn’t say to their face. You’ll catch more flies with honey than vinegar.

5. Use proper spelling and grammar

Consider email a professional communication medium, even if you’re writing to your kid’s soccer league mailing list. Before sending, look over what you’ve written and fix errors in spelling (look for red underlines) and grammar (“it’s” should always be replaceable with “it is”). It never helps if your correspondents see you as barely literate.

6. State the desired outcome at the end

Finally, never send an email message unless you know what you want it to achieve, and be clear about that goal when you close the message. If your recipient doesn’t understand what you want, getting to that result may require several additional messages. In our example about the lunch meeting, compare these alternatives:

Bad: Let me know what works for you.
Good: Can you join me for lunch on Thursday at 12:30 PM in the conference room so we can go over the performance reviews?”

And to follow our own advice, we hope you’ll keep these tips in mind while composing future email messages. That will reduce confusion and irritation on the part of your correspondents, and reduce your email load by eliminating unnecessary requests for clarification.

(Featured image by JESHOOTS.COM on Unsplash)

Go Beyond External Hard Drives with Network-Attached Storage

If you’ve filled up your external hard drives or become frustrated by their limitations, it’s time to look into a network-attached storage (NAS) device. What’s a NAS? It’s an intelligent storage device that can accept one or more hard drives or SSDs and connects to your network via Ethernet.

NAS Benefits

A NAS is a good choice for anyone who needs access to lots of storage, but small businesses will particularly appreciate the benefits of a NAS. They include:

  • More storage: Most NAS devices provide multiple drive bays, so you can pop in a few large hard drives or even attach expansion units for a vast amount of available storage.
  • Expandable storage: A NAS is perfect if you anticipate your storage needs growing over time. You could start with 3 TB drives today and swap them out for 6 TB drives in a year or two.
  • Data protection: Drives fail, but some NAS devices can ensure that you don’t lose data if that happens by combining multiple drives into RAID arrays.
  • Network backups: Because a NAS is always available on your network and provides lots of storage, it can work well for on-site backups.
  • Laptop access: It’s fussy for mobile users to attach external hard drives to laptop Macs. An always-available NAS eliminates that annoyance.
  • Remote access and cloud storage: You can usually configure your NAS so it’s available over the Internet from outside your network. That means it can work like a private version of Dropbox that’s entirely within your control and has no monthly fees.
  • Streaming media: Home users with massive movie libraries can take advantage of NAS features that make it easy to stream video to computers, TVs, tablets, and smartphones.

NAS Features

Quite a few manufacturers make NAS devices, including Synology, QNAP, Drobo, and WD, and prices vary widely depending on the feature set. Things to consider include:

  • Number of drive bays: The most important decision to make when choosing a NAS is the number of drive bays. It may be tempting to start with a less-expensive two-bay model, but particularly if you want to use RAID to protect your data, that limits your storage significantly.
  • RAID support: RAID works well for preventing data loss if a drive dies. RAID 1 constantly mirrors the data from one drive to another so if one fails, all the data is on the other. RAID 5 uses data striping techniques with at least three drives to preserve data even if one drive fails. Proprietary technologies may be more flexible in terms of the number and size of the required drives. Synology’s RAID Calculator is helpful for figuring out how much space you get with different collections of drives.
  • Ethernet speed and ports: Most NAS devices have Gigabit Ethernet, but you can pay more to get 10 Gigabit Ethernet. That’s helpful only if you have an iMac Pro or a Thunderbolt 3 adapter. Also, some NAS devices have a feature called link aggregation that uses multiple Ethernet ports and an LACP-enabled Ethernet switch to balance traffic across ports for higher performance in multi-user setups.
  • Hardware encryption: For additional security, some NAS devices offer hardware encryption. It requires more CPU power but ensures that a stolen NAS won’t reveal your data.
  • Hardware transcoding: Those who host media libraries on a NAS may find this feature useful. It automatically converts high-resolution video files to versions that are optimized for the destination—there’s no reason to send 4K video to a 1080p TV.
  • CPU and RAM: Since a NAS is a full-fledged computer, it has a CPU and needs RAM to accomplish its tasks. If all you’re doing is serving files, the CPU doesn’t matter much, but for hardware encryption and transcoding, a faster CPU will be helpful. Similarly, those functions, or support for lots of users, may benefit from more RAM, so look for a NAS whose RAM is expandable.
  • Physical factors: Since a NAS runs all the time, pay attention to how much power it draws and how much noise it makes. In general, the less of each, the better.

Use NAS-specific Drives

One final piece of advice. It’s tempting to use old drives you have around, but doing so may be problematic for a few reasons:

  • Combining drives of different capacities can result in unusable disk space in some RAID configurations.
  • The likelihood of failure is higher with older drives, and even if a RAID prevents data loss, dealing with a dead drive is still stressful.
  • NAS-specific drives, as opposed to garden-variety drives, sport features designed to minimize data corruption, minimize vibration, and adjust rotation speeds for longer life.

Instead, look for NAS-specific drives, such as those in the WD Red and Seagate IronWolf lines.

Honestly, while a NAS is a great investment and effective addition to your technical infrastructure, picking the right one is a complex decision. If you need help, get in touch with us to see what we recommend for your specific situation.

(Featured image by Alex Cheung on Unsplash)