Perturbed by Location Tracking Revelations? Here’s How to Protect Yourself

Recent news reports have revealed that a little-known company called Babel Street can track iPhone and Android user locations. Babel Street does this by leveraging data from mobile advertising data brokers. Investigators from data removal firm Atlas Privacy discovered they could use Babel Street’s Locate X tool to identify patients at a Florida abortion clinic, jurors in a New Jersey trial, attendees at a Los Angeles synagogue and a Dearborn mosque, and even children in a Philadelphia school.

Much of this is possible because people use apps that reveal their location to data brokers, who package the information and resell it to companies like Babel Street. Apple does have an advantage here—Atlas estimated they could locate roughly 80% of Android phones but only 25% of iPhones. That’s due to Apple’s App Tracking Transparency feature, introduced in iOS 14.5, which requires apps to get permission from users before tracking them for third-party advertising purposes. Unfortunately, many people unthinkingly grant such permissions, and location and identification data can also leak out in other ways.

Although it’s difficult to avoid being tracked by data brokers entirely, you can drastically reduce the likelihood and frequency of tracking, which helps ensure that any location information that does become available isn’t sufficient to identify you personally. Your employer may also consider your location to be sensitive information and want you to restrict it to the extent possible. To achieve this, you’ll need to adjust settings in several parts of Settings > Privacy & Security on your iPhone (and iPad, if you regularly use it in multiple locations).

Turn Off Allow Apps to Request to Track

You’ll find the most important setting in Settings > Privacy & Security > Tracking. At the top of the screen is a switch labeled Allow Apps to Request to Track. Make sure that is off! If it has been on in the past, apps that have requested permission will appear below.

By preventing apps from even asking if they can track you, you keep them from sharing a unique identifier associated with your iPhone with other apps and websites. Otherwise, advertisers can follow you from app to app and website to website, gathering information about you—often including your physical location—as you go about your life.

Don’t let apps persuade you to turn this setting on or allow them to track you. Apple’s rules explicitly forbid them from reducing functionality to those who refuse to allow tracking.

Allow Location Access Only for Apps That Need It

While you can turn off Allow Apps to Request to Track with a single switch, preventing apps from seeing your location requires more targeted work. Although Settings > Privacy & Security > Location Services has a big Location Services switch, turning that off will drastically reduce the utility of your iPhone. You won’t be able to get directions from Maps, tag photos with their location, share your location with family members, and much more.

Instead, for each app in the list, determine what level of location access you want to grant based on its function and description of why it needs access. Grant the minimal level of access necessary, which varies by app. Navigation apps need location access to work at all. Camera apps need it to geotag photos. Weather apps use it to provide custom weather reports and extreme weather notifications. But do you want to give a social media app access to your location at all times?

Apple provides five location access levels:

  • Never: Choose Never for any app with questionable explanations of why location access is requested.
  • Ask Next Time or When I Share: If you’re unsure if you want to allow or deny location access for an app, select this option. The app will prompt you the next time it wants your location, enabling you to make an informed decision based on your actions.
  • While Using the App: For most apps you want to allow to see your location, choose While Using the App. It’s entirely reasonable that a location-requiring app be allowed to determine your location while you’re using it.
  • While Using the App or Widgets: This option only appears for apps with widgets; choose it only if you use a widget that needs location access.
  • Always: Grant Always access only to apps that generate location-related notifications when the app is not open. The most common example is a weather app that provides notifications of incoming storms.

The Precise Location option becomes available if you allow location access for an app. Turn it on only if the app needs to know your location within 15 to 200 feet (5 to 60 meters). An Uber or Lyft driver will need to know where to pick you up, for instance, so those apps should have Precise Location turned on, as should navigation and camera apps. For most others, turn off Precise Location. Your approximate location—a variable radius between 2.5 to 12 miles (4 and 20 kilometers)—is usually sufficient to locate you in the right part of the world.

Block Bluetooth and Local Network Access for Apps That Don’t Need It

Apps can use Bluetooth to infer your general location through interactions with other Bluetooth devices and movement patterns, so Apple requires apps to ask to use Bluetooth. As a result, just as with location, you should go through the apps listed in Settings > Privacy & Security > Bluetooth and revoke permission from any that don’t seem as though they should need it. Most will be legitimate—an app designed to communicate with a Bluetooth-connected device, for instance. Any app that needs access to Bluetooth and doesn’t have it should prompt you when you next open it.

Similarly, Apple now requires apps to request permission to use your local network. For the most part, these requests are reasonable—apps may need to discover network-connected devices like routers, printers, speakers, smart home gadgets, and more. Or games may need to discover other players on the network. However, because your network can reveal information about your location, it’s best to revoke access for any apps that don’t seem as though they should need it. There’s no harm in doing so; they’ll ask again if they need access.

Ultimately, all we can do is stay vigilant about what we’re allowing on our devices, encourage Apple to add even more privacy protections, and lobby our elected representatives for legal protection. It’s unconscionable that private companies can gather extensive location data on hundreds of millions of citizens.

(Featured image by iStock.com/Chayada Jeeratheepatanont)

Apple Brings the M4 Chip Family to the iMac, Mac mini, and MacBook Pro

Apple has concluded a three-day release of the first Macs to use the M4 chip family, which debuted earlier this year with the iPad Pro. The updated iMac and MacBook Pro retain the same industrial designs as in the past, while Apple took a shrink ray to the Mac mini.

These are highly compelling Macs, with the M4, M4 Pro, and M4 Max chips providing best-in-class performance; the iMac and MacBook Pro gaining an iPhone-like 12-megapixel Center Stage camera; Thunderbolt 5 offering faster data transfers; and a nano-texture glass option available for those battling glare and screen reflections. If you’re pondering your next Mac, here’s what you can look forward to.

iMac Adds M4 Chip, 12MP Center Stage Camera, and Nano-Texture Glass

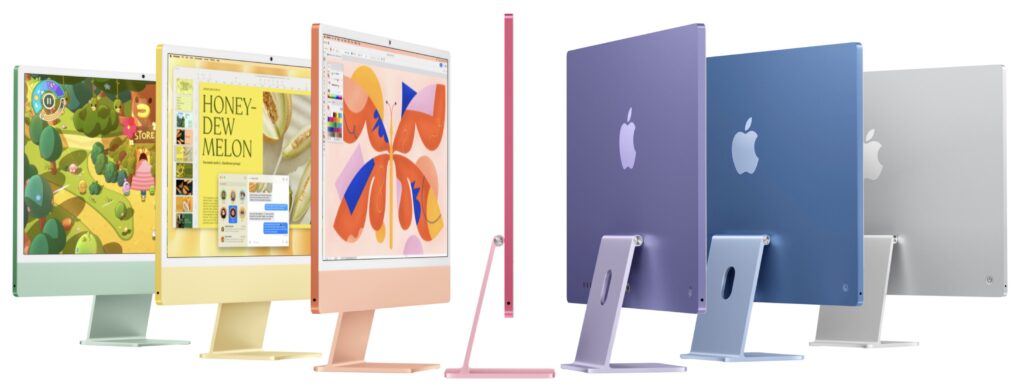
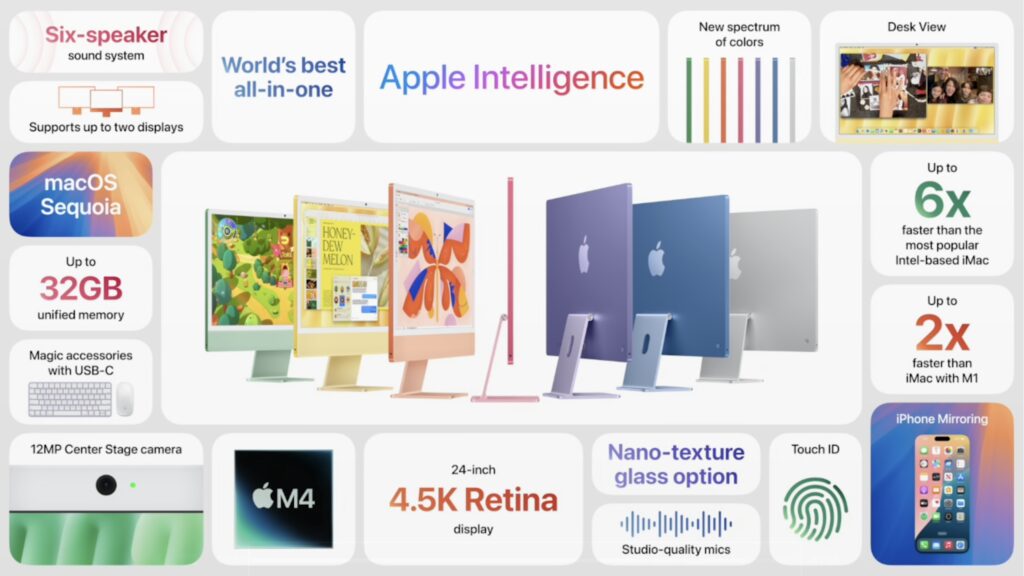
Apple’s colorful all-in-one iMac is popular as a public-facing Mac or household workhorse. The M4 chip packs even more power into the iMac’s svelte frame without changing its low starting price of $1499 ($1299 for a two-port model with several odd limitations). To ensure optimal performance with Apple Intelligence, the company increased the base memory from 8 GB to 16 GB, and you can up that to 24 GB for $200 more or 32 GB for $400.

The iMac still boasts a 24-inch 4.5K Retina display that provides crisp text and vibrant graphics. For $200, you can get it with nano-texture glass that cuts down on reflections and glare from windows or bright lights. Apple also replaced the 1080p FaceTime HD webcam at the top of the screen with a new 12-megapixel Center Stage camera that pans and zooms to keep you in the frame as you move around during video calls. (Not having to sit perfectly still makes those lengthy virtual meetings easier to handle.)

Lastly, the M4 chip supports Thunderbolt 4, so the higher-end model of the M4 iMac gives you four Thunderbolt 4 ports instead of the two Thunderbolt and two USB 3 ports in the previous model.

Along with the new colors, Apple is shipping color-matched versions of the Magic Keyboard, Magic Trackpad, and Magic Mouse. They all now charge using USB-C rather than the outdated Lightning. Apple left the Magic Mouse’s charging port on the bottom, which prevents it from being used while plugged in.

While the M4 is roughly twice as fast as the M1, most current users probably won’t benefit greatly from upgrading, and it’s even less of an improvement over the previous M3 iMacs. However, for anyone upgrading from an Intel-based Mac or transitioning from a PC, the new M4 iMac is an extremely attractive option.

Smaller Mac mini Gains M4 and M4 Pro Chips, Plus Thunderbolt 5

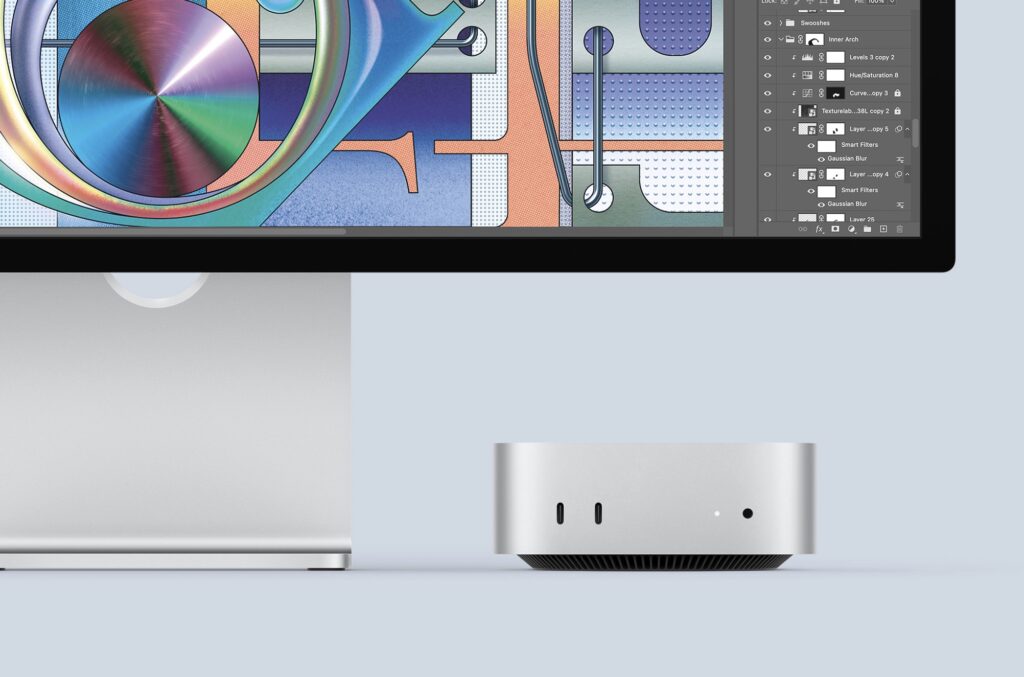
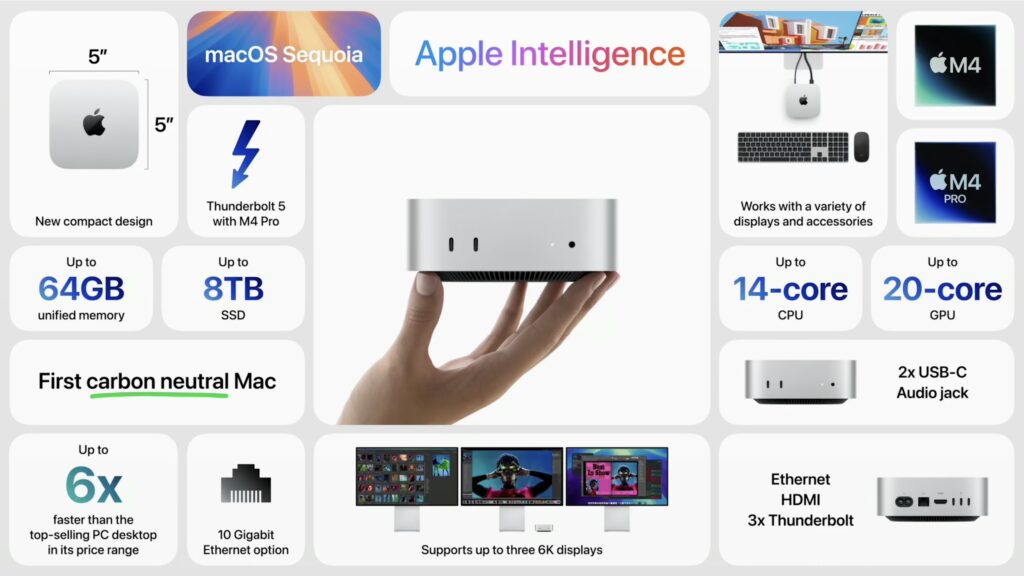
The entire point of the Mac mini is the “mini” part—it’s supposed to be small and inexpensive. With the new M4 Mac mini, Apple has reduced its footprint even more, dropping its depth and width from 7.7 to 5.0 inches. To maintain airflow, Apple had to add some height, so it’s now 2.0 inches tall, up from 1.4 in the previous model.

The price for the base M4 model remains $599, and it now includes 16 GB of memory and 256 GB of storage. The M4 Pro model has increased by $100, now starting at $1,399 for 24 GB of memory and 512 GB of storage. You’ll still need to supply your own keyboard and mouse, but Apple updated the Magic Keyboard, Magic Trackpad, and Magic Mouse to charge using USB-C rather than Lightning.

As with the iMac, the M4 model is roughly twice as fast as the M1 version of the Mac mini, and Apple says the M4 Pro is two to three times as fast as the M2 Pro it replaces. It’s probably not worth upgrading for performance alone unless you’re coming from an Intel-based Mac or relying on resource-intensive apps.

Apple also positioned two USB-C ports and a headphone jack on the front panel for easy access. That’s a win unless you connect speakers to the headphone jack, at which point your Mac mini will always have a cable sticking out. The back side features Gigabit Ethernet for networking, HDMI for a display, and three Thunderbolt ports for connectivity. On the M4 model, those ports are Thunderbolt 4; on the M4 Pro model, they use Thunderbolt 5 to provide high-speed data transfers up to 120 gigabits per second.

Finally, those who need lots of screen real estate will appreciate the fact that the M4 Mac mini can support up to three external displays.

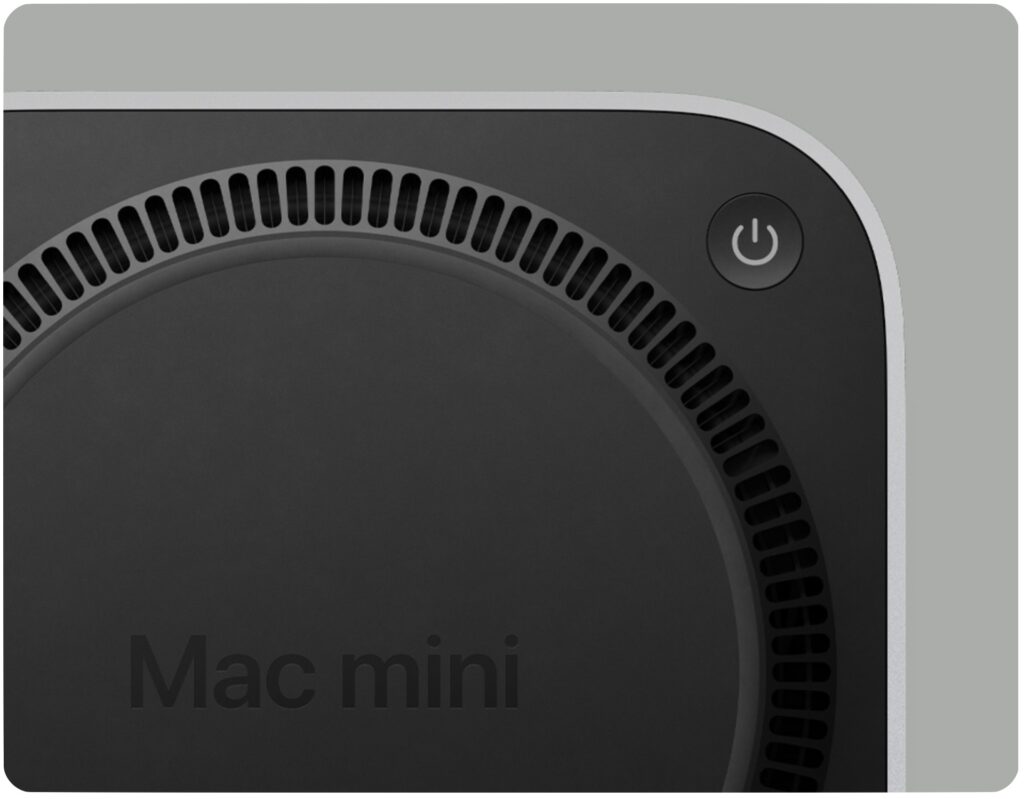
As much as the new Mac mini is an impressive and inexpensive package, it has a few trade-offs compared to the previous model. Along with the M4 Pro model’s price increasing by $100 and the possible annoyance of plugging speakers into the front, the previous M2 Pro Mac mini had four Thunderbolt ports, one more than in the new version. Plus, it had two USB Type-A ports, which remain popular despite the ascendance of USB-C. But the strangest thing? The power button is on the bottom, so you must pick up the Mac mini to turn it on or off.

Even if current Mac mini users don’t have much incentive to upgrade, the M4 Mac mini is compelling for anyone still using an Intel-based Mac. In particular, those still using 27-inch iMacs would do well to consider an M4 Mac mini and Apple Studio Display—the performance gains will be incredible.

Powerful MacBook Pros Leverage M4, M4 Pro, and M4 Max Chips, Add 12MP Center Stage Camera and Thunderbolt 5

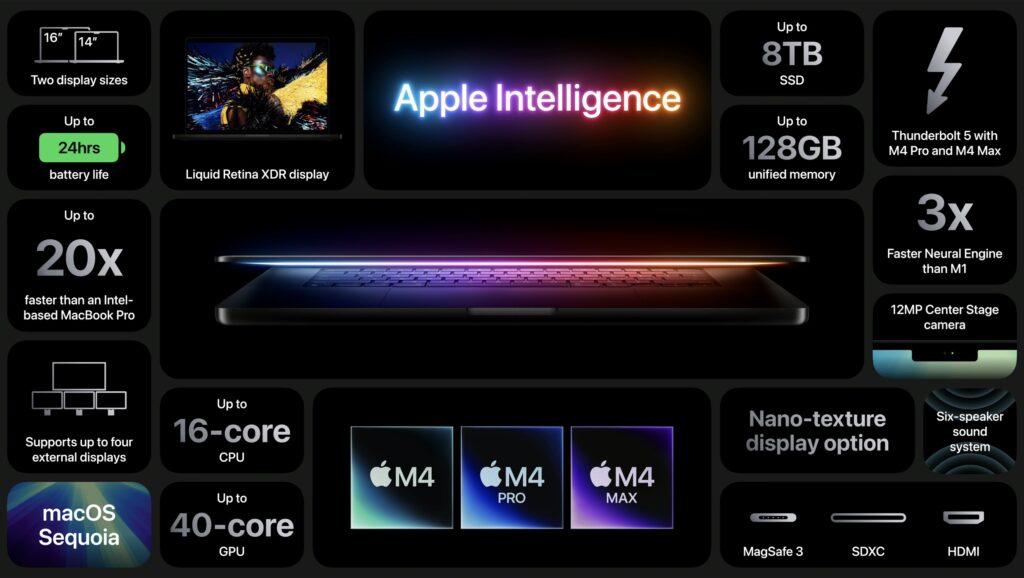
Apple’s final announcement of the week put all the pieces together. The new 14-inch and 16-inch MacBook Pro models feature:

  • A choice of the M4, M4 Pro, or M4 Max chip, with a dizzying array of processor core and memory options that provide everything up to insanely great performance
  • A 12-megapixel Center Stage camera that enhances video calls by panning and zooming to keep you in the frame as you move around
  • A nano-texture glass option to make the screen easier to read outside in bright sunlight
  • Thunderbolt 5 in the M4 Pro and M4 Max models for high-speed data transfers

Along with those improvements from the iMac and Mac mini releases, Apple also added some welcome tweaks specific to the MacBook Pro:

  • All models of the M4 MacBook Pro feature brighter Liquid Retina XDR screens rated at 1000 nits outdoors, up from 600 nits.
  • The M4 14-inch MacBook Pro now includes three Thunderbolt 4 ports, a step up from the two ports in the M3 version.
  • The M4 14-inch MacBook Pro can now drive two external displays along with its built-in screen. The M3 version could do that only if you closed the lid.

The 14-inch MacBook Pro starts at $1,599 with an M4, $1,999 with an M4 Pro, and $3,199 with an M4 Max. The 16-inch MacBook Air starts at $2,499 with an M4 Pro and $3,499 with an M4 Max.

These new MacBook Pro models are nearly ideal. (More ports would always be welcome, but a Thunderbolt hub will help.) The only hurdle is the price, which increases rapidly as you choose faster M4 chips, more memory, and additional storage. You can’t swap chips or expand memory later, but you can save some money by putting less storage onboard and expanding capacity with inexpensive external SSDs.

MacBook Air Models Now Start with 16 GB of Memory

Finally, we can expect Apple to upgrade the MacBook Air, Mac Studio, and Mac Pro to the M4 family sometime next year. Until then, however, Apple has quietly raised the base level of memory for its M2 and M3 models of the MacBook Air from 8 GB to 16 GB. That’s likely to ensure optimal performance for Apple Intelligence, which is rather resource-intensive. Whatever the reason, the M2 MacBook Air still starts at $999 and the M3 model at $1,099, both with 16 GB of memory and 256 GB of storage. They’re great little machines, but if you can wait, the M4 version can’t be too many months away.

(Featured image based on originals by Apple)

Tips for Working with Mac Display Resolutions

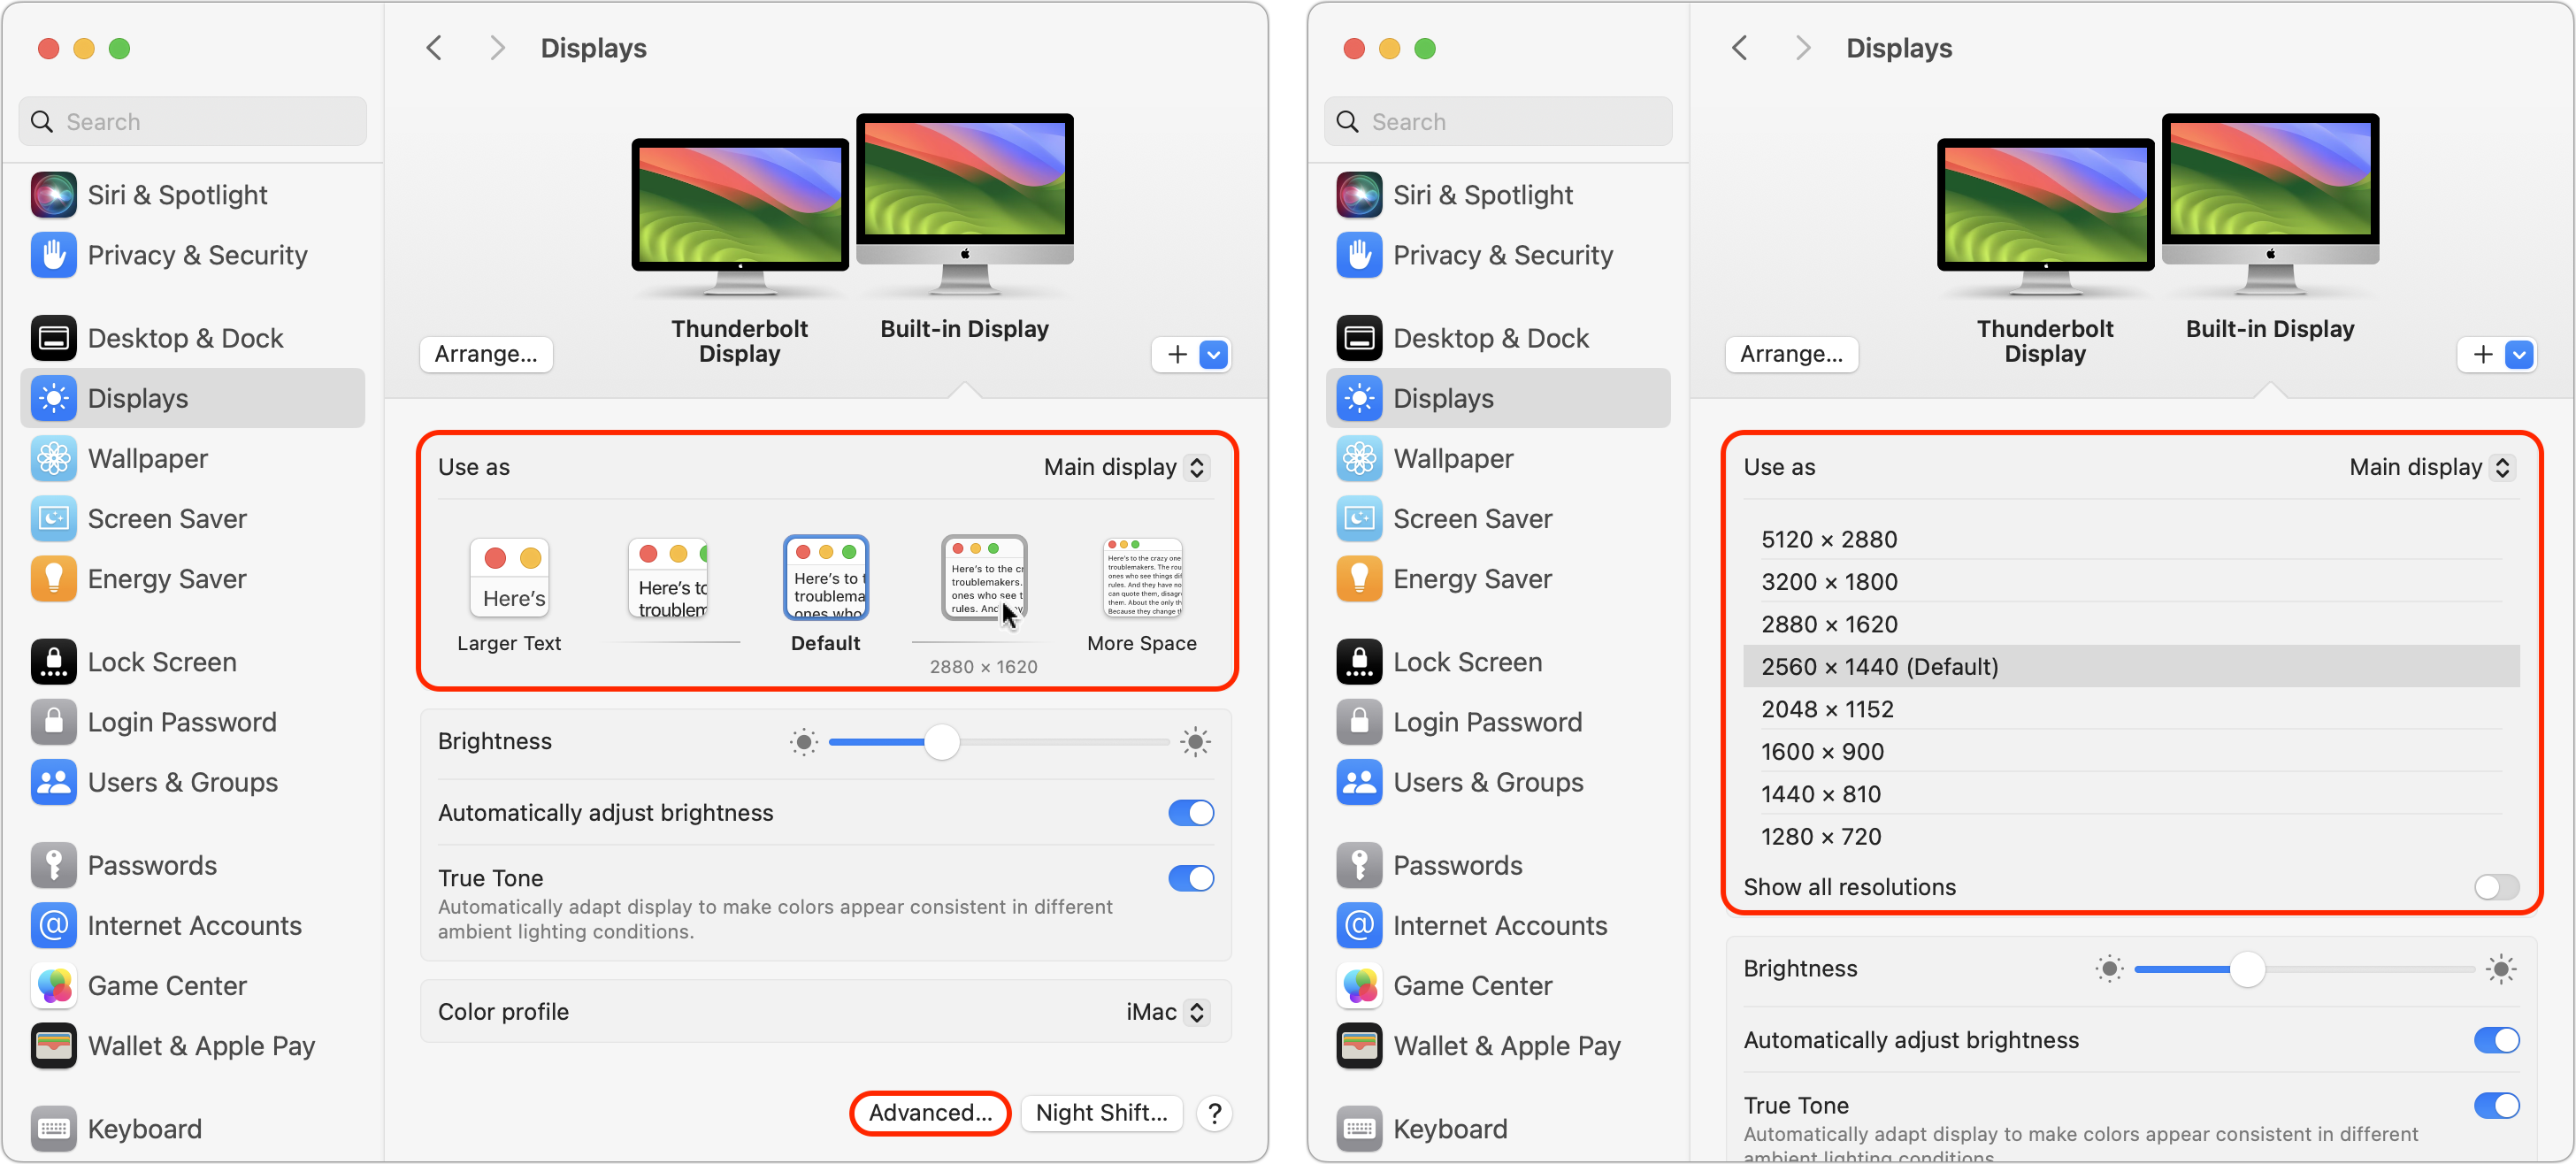
You can change the resolution of your Mac’s screen—how many pixels appear—to make text and graphics larger and easier to see or smaller to fit more content onscreen. In System Settings > Displays, Apple shows thumbnails for five likely possibilities. Hover the pointer over a thumbnail to see its numeric resolution underneath. If you prefer the traditional list of numeric resolutions, Option-click a thumbnail—another Option-click in the list brings back the thumbnails. Although the Show All Resolutions switch reveals more options, most will be fuzzy. If you always want to see resolutions as a list, click Advanced at the bottom and turn on Show Resolutions as a List. Finally, look closely for a tiny Easter egg: the text in the thumbnails is the script from Apple’s classic Think Different ad spot.

(Featured image by Adam Engst)

Looking for Apple Manuals? Check the New Documentation Site

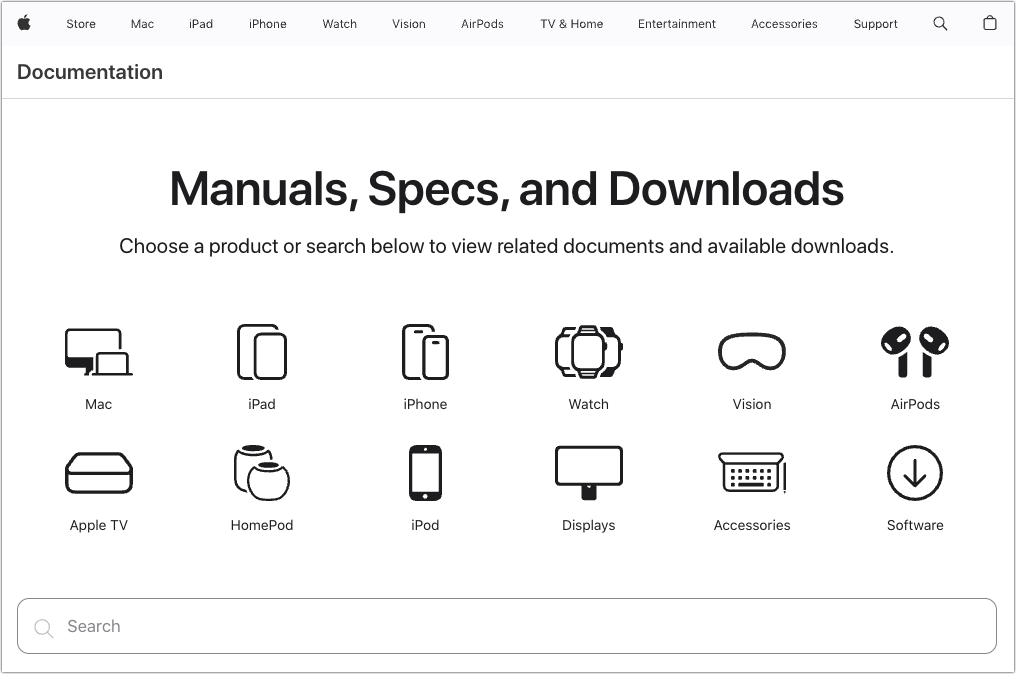
Apple publishes a multitude of manuals and tons of technical documentation for its products on its support site, but until recently, it could be challenging to find something specific because the search engine on Apple’s site is poor. For a better path into Apple’s online support materials, check out the company’s new Documentation site, which brings together manuals, specs, and some downloads for nearly all its products. The operating system User Guides are particularly helpful, and they even provide a Version pop-up menu that lets you make sure you’re getting information for the version you’re using.

(Featured image by iStock.com/Ildo Frazao)

How to Sync Your Text Messages across All Your Apple Devices

Although many of us think of Messages as an iPhone app, Apple’s platform integration lets you read and reply to conversations in Messages on other Apple devices, including the Mac and iPad. All your devices must have the correct settings to make this work reliably. We regularly hear from users who don’t see all their messages on all their devices. If that’s you, check these settings:

  • Same Apple ID: Your devices all know they’re yours when they’re logged in to the same Apple ID. That’s not a problem for most people, but couples who share an Apple ID, for instance, can run into trouble here. To verify this, open Settings > Your Name in iOS and iPadOS, or System Settings > Your Name in macOS. The email address under your picture at the top of each of those screens should match. If it doesn’t, scroll to the bottom, tap or click Sign Out, and sign in again with the correct Apple ID.
  • Two-factor authentication: As with so many Apple services now, your Apple ID must be set up for two-factor authentication, which causes certain logins to be queried a second time on another device. Most people have two-factor authentication set up by now, but if not, turn it on using Apple’s instructions.
  • iCloud Keychain: Your devices must have iCloud Keychain turned on to share your Messages account information. It’s probably already on, but you can enable it if not. Turn it on for an iPhone or iPad in Settings > Your Name > iCloud > Passwords and Keychain > Sync this iPhone. On a Mac, the switch is in System Settings > Your Name > iCloud > Passwords & Keychain > Sync this Mac.
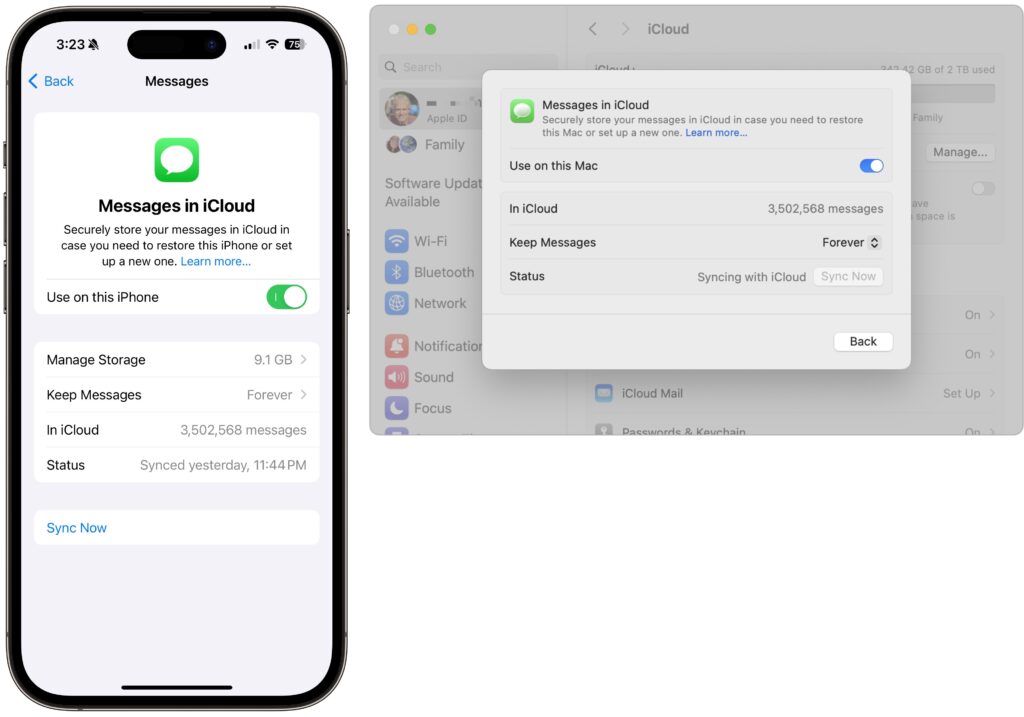
  • Messages in iCloud: This is the key setting—the previous three are just foundational requirements. Enable it for an iPhone or iPad in Settings > Your Name > iCloud > Show All > Messages in iCloud > Use on this iPhone. On the Mac, look in System Settings > Your Name > iCloud > Show More Apps > Messages in iCloud > Use on this Mac.
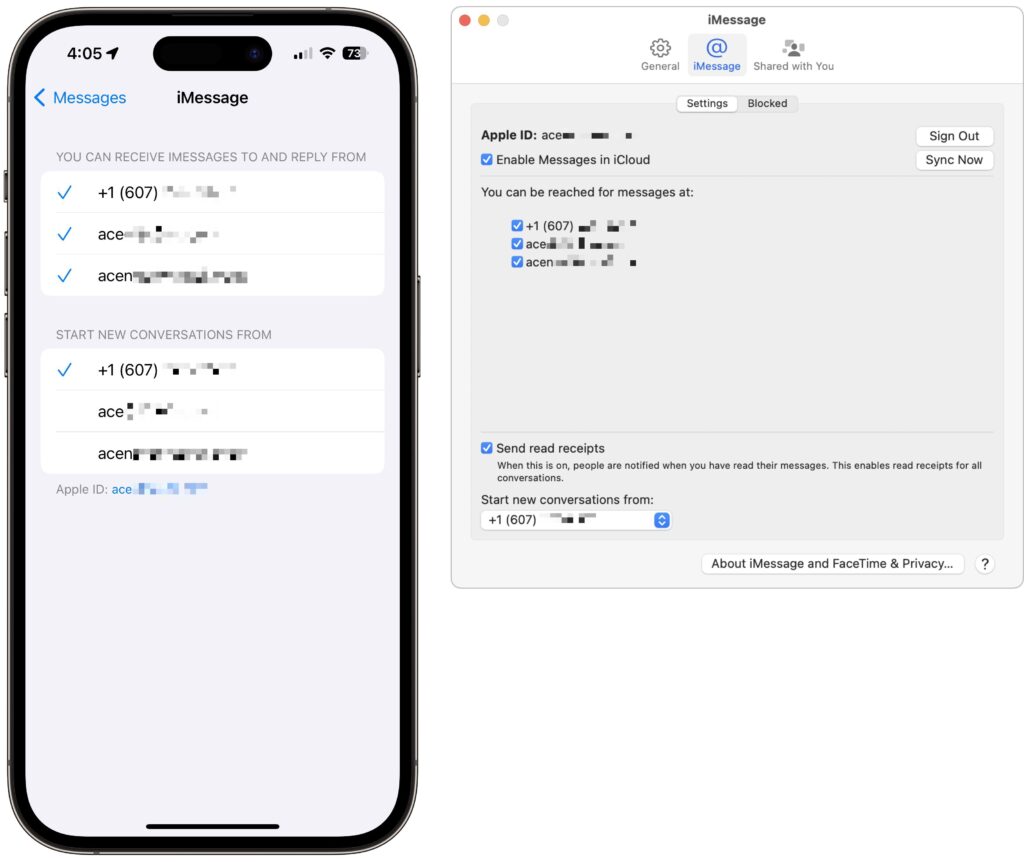
  • iMessage account: You’ve checked that you’re using the same Apple ID everywhere, but there’s a similar setting that’s also important. On your iPhone or iPad, go to Settings > Messages > Send & Receive and make sure you’re signed into iMessage with the same Apple ID—look at the bottom of the screen. Also, ensure you’re set to send and receive from your phone number and appropriate email addresses. It’s safest to send and receive from all the possibilities and start new messages from your phone number. On the Mac, verify that you have the same settings in Messages > Settings > iCloud.
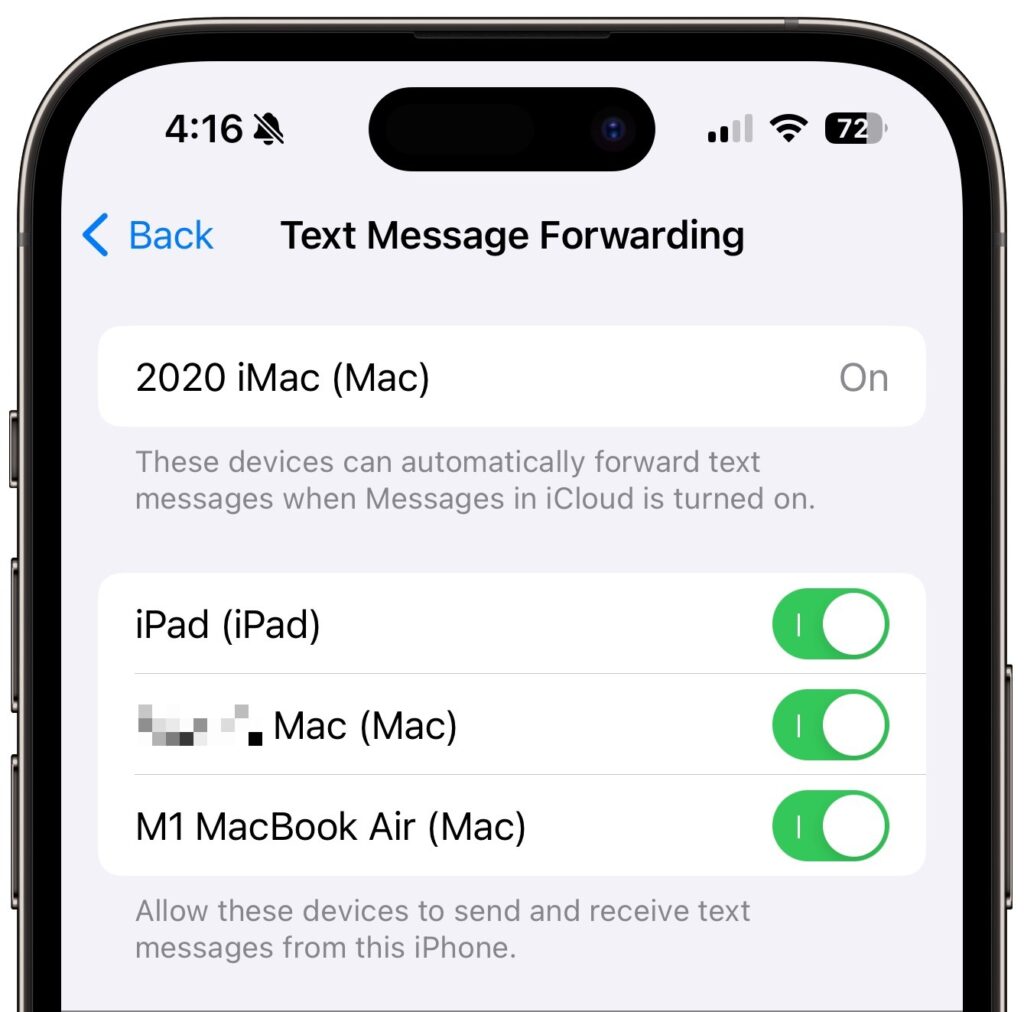
  • Text Message Forwarding: Turning on Messages in iCloud should keep message history synced across all your devices, including green bubble SMS/MMS text messages. However, it’s worth verifying that SMS/MMS messages are being sent to all your devices. On your iPhone, in Settings > Messages > Text Message Forwarding, select all the devices you want to receive text messages.

Although all the above settings may seem like a lot, most should already be set up correctly. We listed them all because when people have trouble with their messages syncing across all their devices, one or more of these are usually set wrong.

Even with everything configured correctly, there can be hiccups—nothing’s perfect. If messages fail to sync consistently, try these troubleshooting steps:

  • Use the Sync Now button in the Messages in iCloud settings on any device that hasn’t caught up. That likely won’t help instantly, but syncing should eventually catch up.
  • Restart the device—it’s always worth trying. On an iPhone or iPad, choose Settings > General > Shut Down (at the bottom), slide to power off, and then press and hold the side (iPhone) or top (iPad) button to turn the device back on. On a Mac, just choose Restart from the Apple menu.

When Messages in iCloud is working properly, though, you can carry on text message conversations using any of your devices at any time. It’s especially nice to switch to the Mac for easier typing when you’re in an involved conversation.

(Featured image by iStock.com/anyaberkut)