How to Digitize Your Signature So You’re Ready for Online Document Signing
Over the last decade, and particularly during the last year of pandemic life, documents have become more likely to arrive in email or as downloads than on paper. If you need to return a signed document on paper, it’s easy to print and sign it before popping it in the mailbox. But what if you need to send it back via email or another online method? You could print, sign, scan, and return the scanned document, but that’s both tedious and wasteful.
Happily, Apple has made it easy to digitize your signature such that you can quickly apply it to digital documents without them ever hitting paper. It’s not difficult to set up, and once your signature is in the system, it remains available for repeated use. Even better, it syncs automatically to all your other Apple devices signed in to the same iCloud account, so it’s available wherever you need it. The process varies a little depending on which Apple devices you have available.
Create Your Signature on an iPad or iPhone
You can create a signature on an iPad or iPhone with your finger or a rubber-tipped stylus, but you’ll get the best results with an Apple Pencil on an iPad. Follow these steps:
- Open any PDF in any app, such as this IRS Form 1040 in Safari.
- Tap the share icon and tap Markup in the share sheet.
- In the Markup toolbar, tap + and then Signature.
- Tap Add or Remove Signature and then tap + to add a signature.
- In the New Signature panel, sign your name. (You can rotate an iPhone to landscape orientation if that’s easier.)
- If you don’t like your signature, tap Clear and try again.
- When you have a good signature, tap Done.
- Close the PDF—there’s no need to save it.

Create Your Signature on a Mac
On a Mac, you create signatures in Preview in one of several different ways. You’ll get the best results from using the camera to scan your signature on a piece of paper, with an iPad and Apple Pencil as the next best. The trackpad approach is the least successful.
- Open any PDF in Preview, such as the aforementioned IRS Form 1040.
- Choose Tools > Annotate > Signature > Manage Signatures. (You can also click the Signatures button on the Markup toolbar.)
- Click Create Signature.
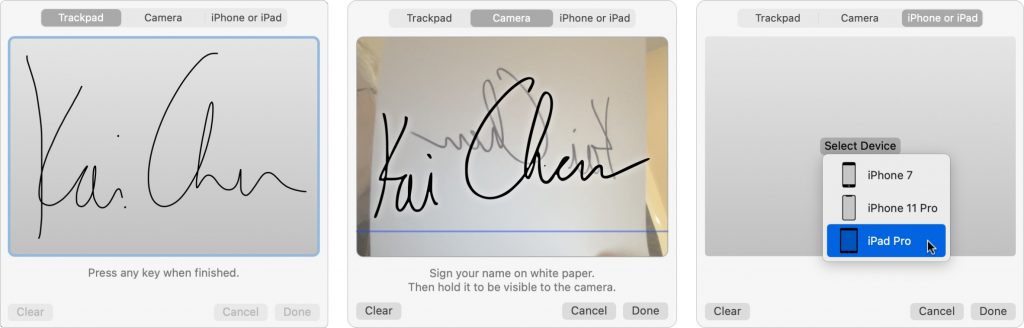
- Click Trackpad, Camera, or iPhone or iPad to create your signature:
- Trackpad: Click the Click Here to Begin button and sign your name with your finger or a rubber-tipped stylus—after you click, lift your finger or stylus and start writing your signature at the left side of the trackpad. Press any key on the keyboard when you’re done, or click Clear and try again if necessary. (Tip: press any key to start and clear too.)
- Camera: Sign your name with a black pen on a white piece of paper. Hold it up to the camera, just above the blue line, for automatic recognition. If necessary, click Clear and try again. For best results, use a full-size piece of paper and a fairly thick pen, like a Sharpie.
- iPhone or iPad: Click Select Device and pick an available iPhone or iPad. The entire screen of the device becomes a signing surface—you can use whichever orientation is easier. Sign your name using your finger, a rubber-tipped stylus, or for best results, an Apple Pencil on an iPad. Tap Clear if you need to try again.
- When you’re finished, click Done.
- Close the PDF.
Although most of us have only one signature, Apple lets you create and sync as many signatures as you like. That could be useful if you have to sign documents for your boss or a member of your family (with their permission, of course).
Once you’ve digitized your signature, you can add it to any PDF form that you receive, either using Markup from an iPhone or iPad share sheet, or in Preview or the Markup tools on a Mac.
(Featured image by energepic.com from Pexels)