Apple Starts Releasing Rapid Security Responses for the iPhone, iPad, and Mac

By now, you’ve probably seen a new form of update for iOS, iPadOS, and macOS: the Rapid Security Response. Early in May, Apple released the first instances of these updates, which the company had promised for iOS 16, iPadOS 16, and macOS 13 Ventura when those operating systems were first announced. Let’s answer some of the questions we’ve been hearing.
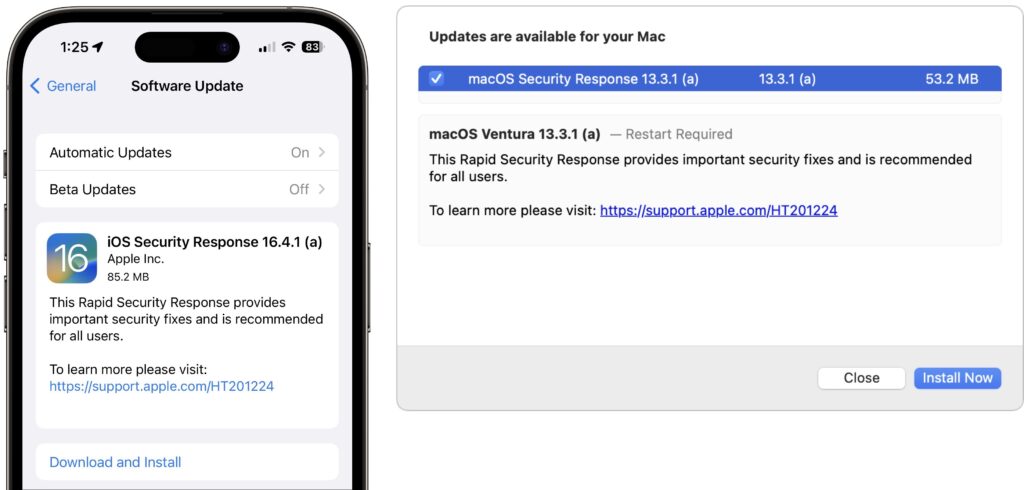
What are Rapid Security Responses?

Rapid Security Responses are security updates that Apple wants to distribute as quickly and broadly as possible. Users often delay installing standard operating system updates because they’re huge downloads, interrupt work for a long time while installing, and occasionally cause new problems.

To address these concerns, Rapid Security Responses are much smaller, install far more quickly (sometimes without a restart), and can easily be removed if they cause problems.

What security vulnerabilities do Rapid Security Responses address?

Apple released no security notes for its first set of Rapid Security Responses, and we don’t anticipate that changing for future releases. The point of a Rapid Security Response is to block a serious vulnerability that’s likely being exploited in the wild, and Apple doesn’t describe such fixes until it has patched vulnerable operating systems, including older versions, tvOS, and watchOS, none of which can take advantage of Rapid Security Responses. If this last set of updates is any indication, Apple will identify the Rapid Security Response fixes in security notes for the next full operating system update, which will also include the same fixes.

How do I install a Rapid Security Response?

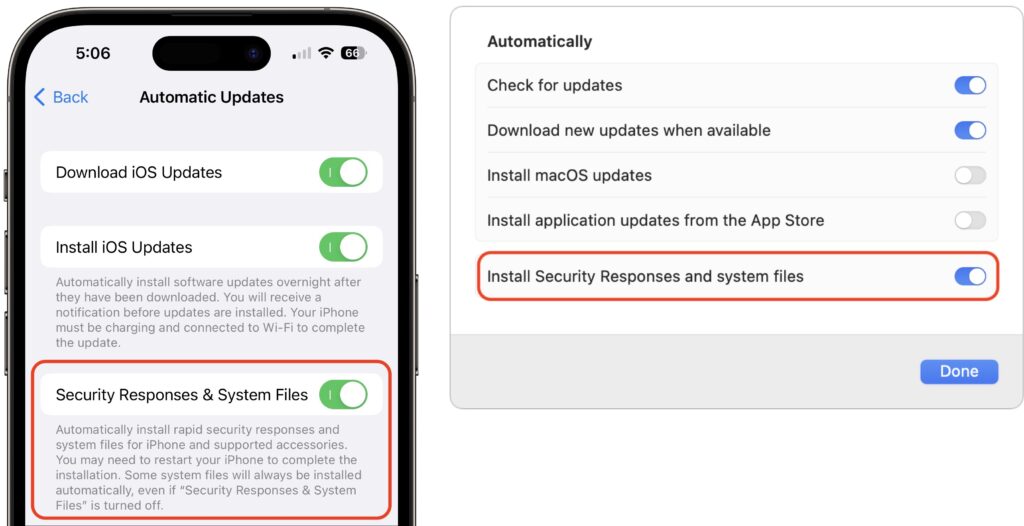
Rapid Security Responses use the same software update mechanism as Apple’s other operating system updates. You can and generally should let Rapid Security Responses install automatically. That’s the default, but check to make sure.

  • iOS/iPadOS: Go to Settings > General > Software Update > Automatic Updates, and look at “Security Responses & System Files.”
  • macOS: Go to System Settings > General > Software Update, and click the ⓘ next to Automatic Updates. Then look at “Install Security Responses and system files.”
On recent iPhones and Macs, the installation time was quick, with the device being ready to use again within 2–4 minutes, including a restart. Older devices took longer, and future Rapid Security Responses may take more or less time.

How can I revert if a Rapid Security Response causes a problem?

Apple makes this easy in both iOS/iPadOS and macOS, with the amount of time being roughly similar to how long the Rapid Security Response took to install:

  • iOS/iPadOS: Go to Settings > General > About > iOS/iPadOS Version, tap Remove Security Response, and confirm the action.
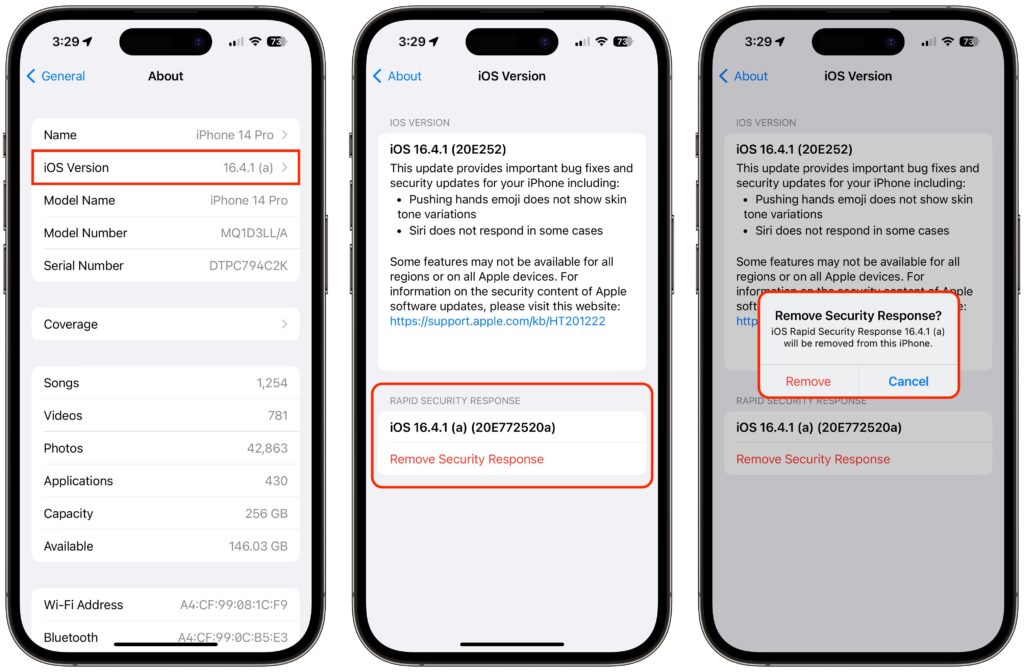
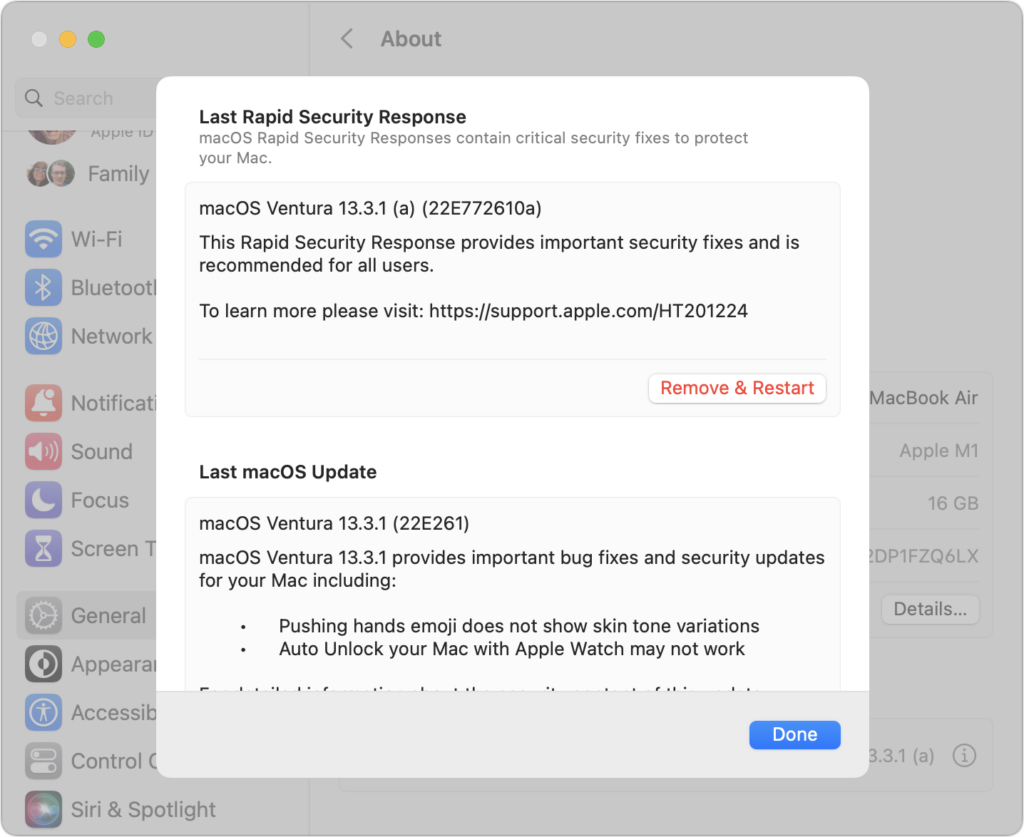
  • macOS: Go to System Settings > General > About, click the ⓘ next to the macOS version, click Remove & Restart, and confirm the action.
How can I tell if I’m running a Rapid Security Response?

With this first Rapid Security Response, iOS and iPadOS both posted a notification informing the user of the update; macOS did not.
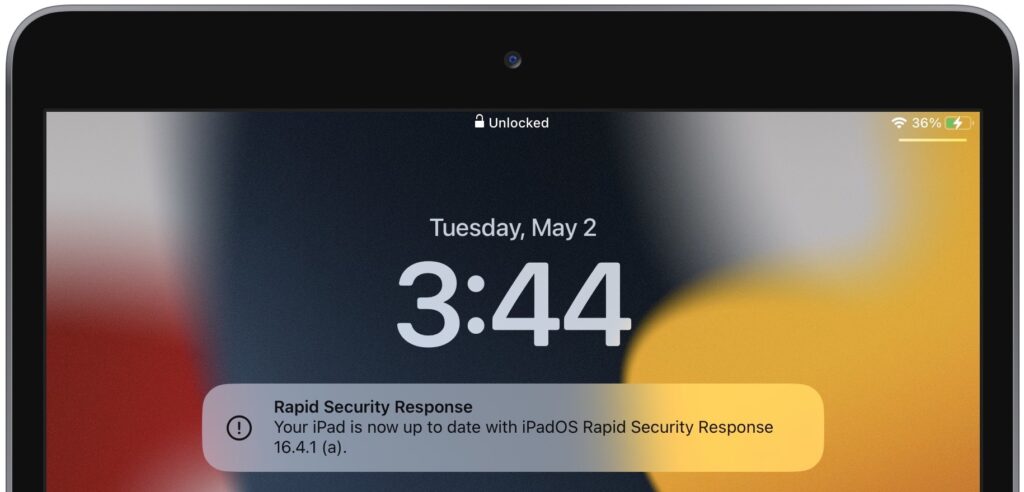
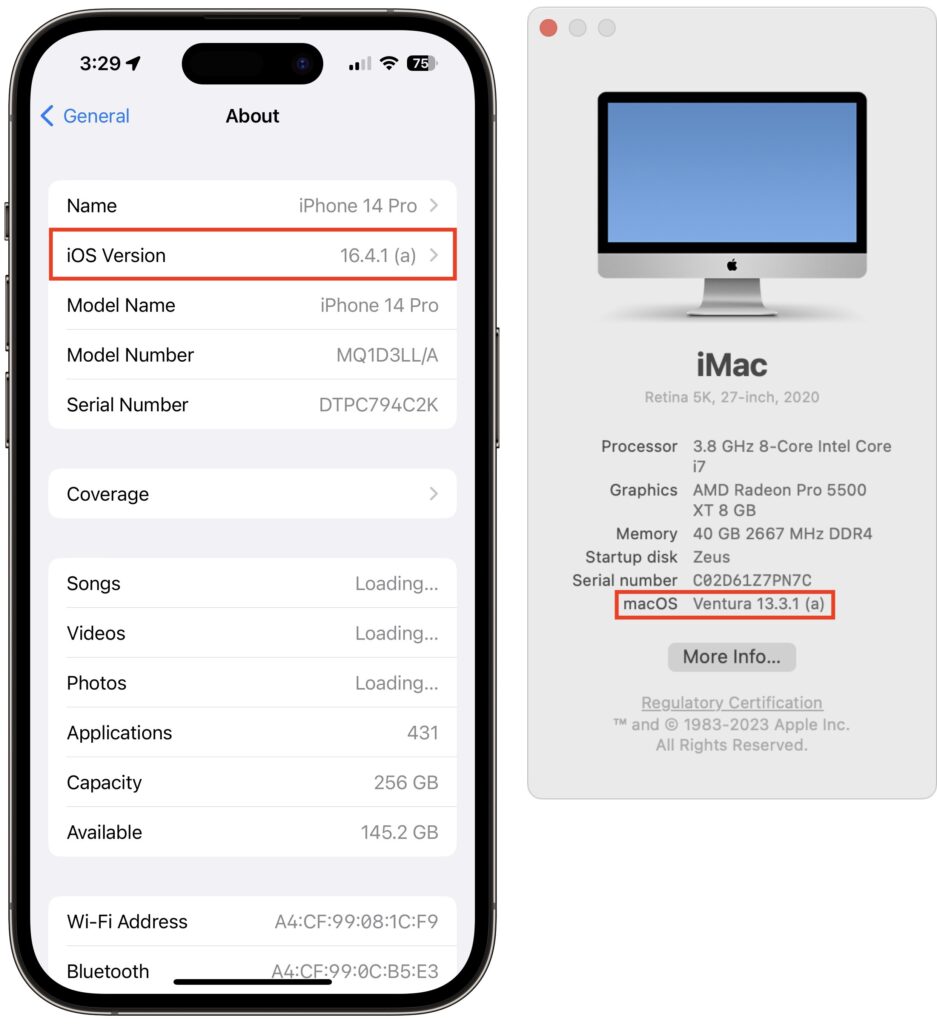
More generally, devices updated with a Rapid Security Response will have a letter after their version number, such as 16.4.1 (a), and the letter will disappear with the next full update, such as iOS 16.5. To determine what version your devices are running:

  • iOS/iPadOS: Go to Settings > General > About, and look at the iOS/iPadOS Version line.
  • macOS: Choose About This Mac from the Apple menu, and look at the macOS line.
Given what we know now, we recommend that everyone install Rapid Security Responses as soon as they’re available. If you notice a problem afterward, you can remove it. The only caveat is that if your employer manages your device, they may prefer to delay the Rapid Security Response installation until they’re comfortable with the changes.

(Featured image by iStock.com/champpixs)

What to Do If You’re a Mac User Who Needs Some Windows Software

For the most part, the days of Mac versus PC are over. Common apps now exist on both platforms, and when they don’t, there are plenty of alternatives in nearly every app category. Plus, many apps either run entirely on the Web in any browser. Large organizations now regularly run “employee choice” programs that allow people to pick the platform where they’re the most comfortable.

But the fact remains that there are many more Windows-based PCs out there than Macs, and particularly for an old or unusual app, or for software needed for specific hardware peripherals, sometimes the only available option is a Windows app. What’s a modern Mac user to do? Here are a few possibilities.

Use Boot Camp on an Intel-based Mac

The cheapest approach to running Windows software on a Mac is to use Apple’s free Boot Camp. However, it comes with a number of limitations compared with the virtualization software we’ll discuss next:

  • Boot Camp works only on Intel-based Macs; it’s not available for M-series Macs.
  • You must choose between macOS and Windows every time you turn on or restart your Mac, rather than being able to run both side-by-side.
  • Boot Camp creates its own partition on your drive, and you can’t resize it later. You must guess how much space you need and leave enough for future expansion, all without wasting too much available space.
  • Installing Windows 11 is involved and can’t be accomplished on a Mac with a Touch Bar. You can install Windows 10 and then update it to Windows 11.

The main advantage of Boot Camp over virtualization software is that it provides the best performance for Windows apps because no resources are being shared with macOS. Also, a few apps, primarily games, won’t run on a virtual machine.

Given that Intel-based Macs are on the way out, we recommend the Boot Camp approach mostly if you have an extra Intel-based Mac that can be dedicated to your Windows task.

Use Virtualization Software on an Intel-based Mac

Shortly after Apple switched Macs from PowerPC processors to Intel chips in 2006, virtualization apps appeared, notably Parallels Desktop, VMware Fusion, and VirtualBox. Because Windows runs natively on those same Intel chips, virtualization software can create a virtual machine (VM) that Windows runs on just as though it were running on a physical PC. A few of the significant advantages of virtualization software include:

  • You can run Windows apps alongside Mac apps, switching back and forth with a click.
  • You can install Windows on a disk image that you can resize as necessary.
  • You can move data from macOS to Windows with copy-and-paste and by dragging files, plus you can specify a shared folder whose contents are accessible to both macOS and Windows.
  • You can install different versions of Windows or other Intel-compatible operating systems, and maintain multiple virtual machines for testing.

The main downside of virtualization software is that its performance can’t be quite as good as Boot Camp because it must share some CPU and RAM resources with macOS. Plus, Parallels Desktop and VMware Fusion aren’t free, although VMware Fusion offers a free personal license. VirtualBox is free but more complicated, and it’s not yet compatible with macOS 13 Ventura.

Parallels Desktop (starting at $99.99) and VMware Fusion (starting at $149; free for personal use) provide the best user experience for most Windows needs if you have an Intel-based Mac.

Use Parallels Desktop on an M-series Mac

When Apple introduced the first Macs based on Apple silicon, people wondered what would happen to virtualization software, which could no longer just pass the software commands down to an Intel chip. The solution was to create a new virtualization engine that leverages the M-series chips’ hardware-assisted virtualization to run Arm-based virtual machines. (Apple’s M-series chips are based on the Arm architecture, which differs from the x86 architecture used by Intel chips.)

The upshot is that the latest versions of Parallels Desktop and VMware Fusion can run on M-series Macs, but you can install only Arm-based operating systems, not Intel-based operating systems. Luckily, Microsoft makes Windows 11 on Arm, a full-fledged version of Windows that can run most Windows apps, even those designed for Intel chips.

In early 2023, Microsoft announced that it is officially supporting Windows 11 on M-series Macs when run in Parallels Desktop. Although VMware Fusion can run Windows 11 on Arm Insider Preview—a beta version—installation is challenging. We recommend sticking with Parallels Desktop for an experience that’s significantly easier and officially supported.

Use a Windows 365 Cloud PC

Virtualization enables you to run Windows not just on a Mac, but also in the cloud. Microsoft’s Windows 365 service is another alternative that lets you stream Windows to any device with a Web browser. While the concept of Windows 365 is compelling, the pricing is not. The cheapest plan costs $31 per user per month, or $372 per year, for a virtual PC with 2 CPUs, 4 GB of RAM, and 128 GB of storage. Parallels Desktop is about a quarter the price.

Buy a Cheap PC

We know, we know. The entire point of running Windows on a Mac is so you don’t have to buy a PC. But there are situations where it makes more sense to purchase an inexpensive PC than to fuss with virtualizing Windows on a Mac. Perhaps multiple people in your office need access to your essential Windows app, or maybe some hardware device can be controlled only from a PC. In such cases, a dedicated PC may be the better part of valor. Contact us for configuration and buying advice—the PC world can be a confusing place for those accustomed to buying from Apple.

(Featured image based on originals by iStock.com/manaemedia)

Which Should You Use—a Mac, iPhone or iPad, or Web App?

Apps are everywhere these days, but it can be hard to remember that many exist in multiple versions. You can often run the same app on a Mac, an iPhone or iPad, and in a Web browser, each of which has benefits.

Generally speaking, Mac apps:

  • Have better-designed, more obvious interfaces that improve the user experience
  • Are easily switched to and managed among many other apps
  • Lend themselves to automation through Shortcuts, AppleScript, and Keyboard Maestro
  • Work best for processor-intensive, text-heavy, and large-screen tasks

iPhone and iPad apps:

  • Give you quick access to functionality away from your desk and on the go
  • Offer small-screen touch interfaces that can be superior for some tasks

Web apps:

  • Are accessible from any computer and many smartphones
  • Can be linked to other Web apps using services like IFTTT and Zapier
  • Can be used in any Web browser instantly without having to download anything

The key takeaway is that there’s no either/or situation here. For any app you depend on, it’s usually best to use the native Mac app on your Mac, the native iOS app on your iPhone or iPad, and the Web app whenever the native Mac or iOS app doesn’t fit the bill. Web apps are particularly welcome when you’re away from your Mac and need a full-fledged interface with a keyboard such that an iPhone version won’t suffice. Web apps can also be lifesavers when you need to get something done but are having trouble with the native versions.

Here is a list of apps that run natively on your Apple devices and are accessible in any standard Web browser. It’s far from comprehensive but should give you a feel for what apps you can use in different forms, often with almost no loss of functionality or access to stored data. Note that you’ll almost always need to log in to use a Web app, so make sure you have access to your stored credentials in a password manager.

Before we get into the list, we want to call out two special categories:

  • Email: Most IMAP-based email services that you can use in Apple’s Mail or another email client also provide access to your stored mail through a Web app.
  • iCloud: Many of the apps that Apple bundles with macOS, iOS, and iPadOS are also available as Web apps at iCloud.com. That list includes Calendar, Contacts, Find My, iCloud Drive, Mail, Notes, Photos, and Reminders.
App Native Apps Web App
1Password Mac, iOS 1password.com
Airtable Mac, iOS airtable.com
Asana Mac, iOS app.asana.com
Basecamp Mac, iOS basecamp.com
Box Mac, iOS app.box.com
Canva Mac, iOS www.canva.com
ClickUp Mac, iOS app.clickup.com
Dialpad Mac, iOS dialpad.com
Dropbox Mac, iOS dropbox.com
Evernote Mac, iOS www.evernote.com
Figma Mac, iOS figma.com
Gmail iOS gmail.com
Google Docs iOS docs.google.com/document/
Google Drive Mac, iOS drive.google.com
Google Sheets iOS docs.google.com/spreadsheets/
Hive Mac, iOS app.hive.com
Keynote Mac, iOS www.icloud.com/keynote/
Microsoft Excel Mac, iOS www.microsoft365.com/launch/excel
Microsoft OneDrive Mac, iOS onedrive.live.com
Microsoft PowerPoint Mac, iOS www.microsoft365.com/launch/powerpoint
Microsoft Teams Mac, iOS teams.live.com
Microsoft Word Mac, iOS www.microsoft365.com/launch/word
Monday.com Mac, iOS monday.com
Notion Mac, iOS www.notion.so
Numbers Mac, iOS www.icloud.com/numbers/
OneNote Mac, iOS www.onenote.com
Outlook Mac, iOS outlook.live.com
Pages Mac, iOS www.icloud.com/pages/
Skype Mac, iOS web.skype.com
Slack Mac, iOS slack.com
Todoist Mac, iOS todoist.com
Trello Mac, iOS trello.com
Wrike Mac, iOS www.wrike.com
Zoom Mac, iOS zoom.us

Again, this list is by no means comprehensive, but you can use it as a starting point for thinking about the apps you use. If you’ve been relying solely on a Web app, some quick searches should reveal whether it has a native Mac or iOS version that might be faster and smoother. It’s also equally worth investigating if one of your native apps has a Web version that you could turn to in a pinch.

(Featured image by iStock.com/Rudzhan Nagiev)