Should You Use Apple’s New Password Manager in iOS 15, iPadOS 15, and macOS 12 Monterey?

We continually recommend that every Apple user rely on a password manager like 1Password or LastPass for creating, managing, and entering passwords securely. What we haven’t encouraged as heavily is relying on Apple’s built-in password management features. Although they’re free, they’ve been too basic and hard to use over the years, relying largely on an ancient utility called Keychain Access.

However, with the release of iOS 15, iPadOS 15, and macOS 12 Monterey, Apple has at long last created a coherent platform-wide interface—the bluntly named Passwords—for viewing, editing, and deleting passwords on each of its platforms. You might wonder if you need a separate password manager anymore. First, let’s dispense with two common scenarios:

  • Start if you’re new to password management: If you have so far resisted adopting a password manager, you should start using Passwords on your Apple devices immediately. In all likelihood, you already have some login credentials stored there.
  • Don’t switch if you like your password manager: If you’re already using another password manager that you like, there’s no reason to switch to Apple’s password manager. It’s fine, but it doesn’t offer any capabilities beyond most independent password managers.

Those who are already using a password manager but aren’t entirely happy with it or would prefer not to pay for it face a tougher decision. How much your password manager is worth to you is a question only you can answer, but would Apple’s Passwords provide the features you need? Here’s what it can do:

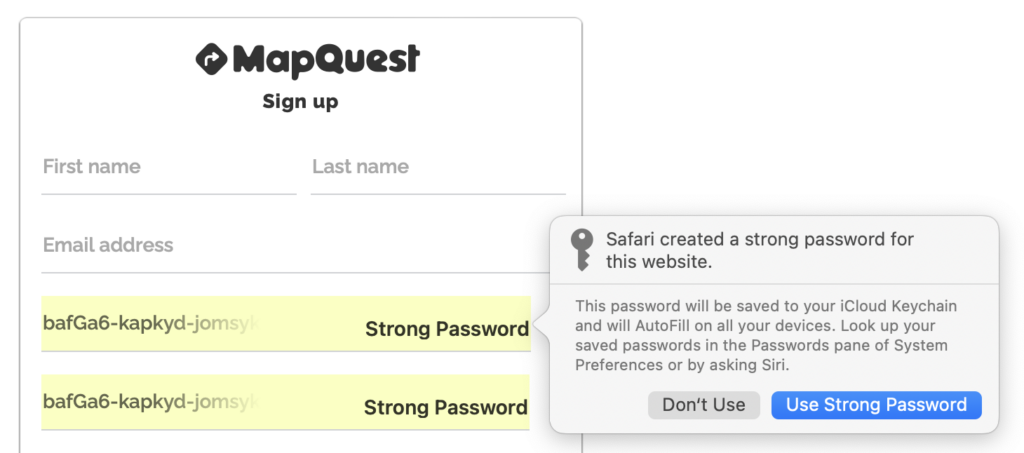
  • Create strong passwords: Safari suggests strong passwords when it detects that you’re creating a new login. In iOS and iPadOS, make sure Settings > Passwords > AutoFill Passwords > AutoFill Passwords is enabled. On the Mac, make sure Safari > Preferences > Autofill > User Names and Passwords is selected.
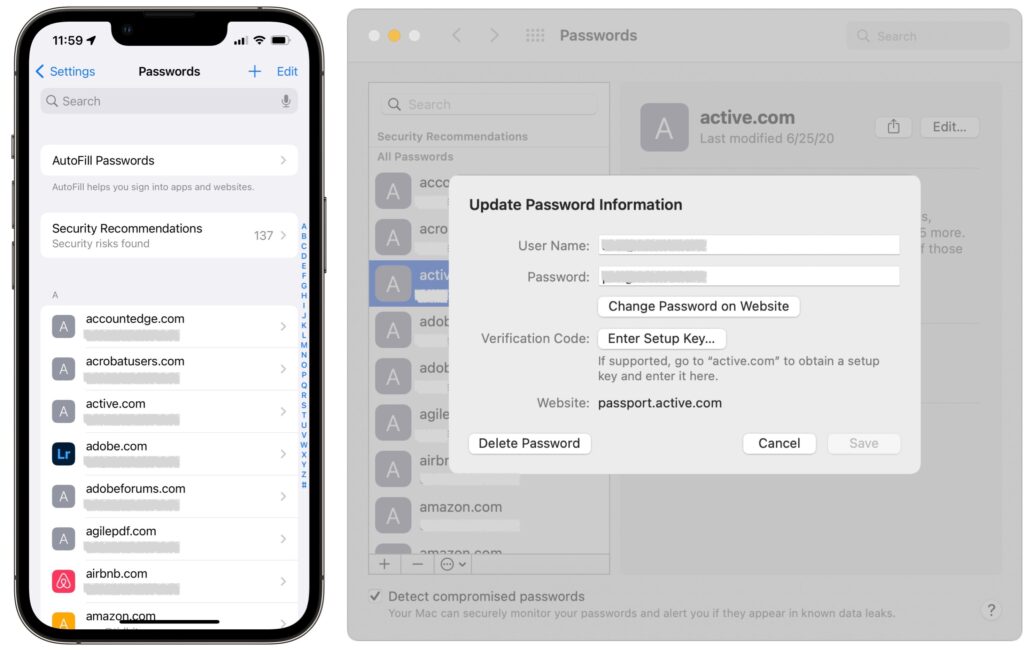
  • Manage passwords: To see all your passwords, look in Settings > Passwords in iOS 15 and iPadOS 15, and in System Preferences > Passwords in Monterey. Tap or click one to view its details; once inside, use Edit to make changes. You can delete an unused login while editing or from the list. In iOS and iPadOS, swipe left on a login and tap Delete; on the Mac, Control-click the login and choose Delete.
  • Sync passwords: Passwords are most useful when they’re accessible on all your devices. That will be true as long as Settings > Your Name > iCloud > Keychain > iCloud Keychain is enabled in iOS and iPadOS, and System Preferences > Apple ID > iCloud > Keychain is selected on the Mac. And, of course, all your devices must be signed in to the same iCloud account.
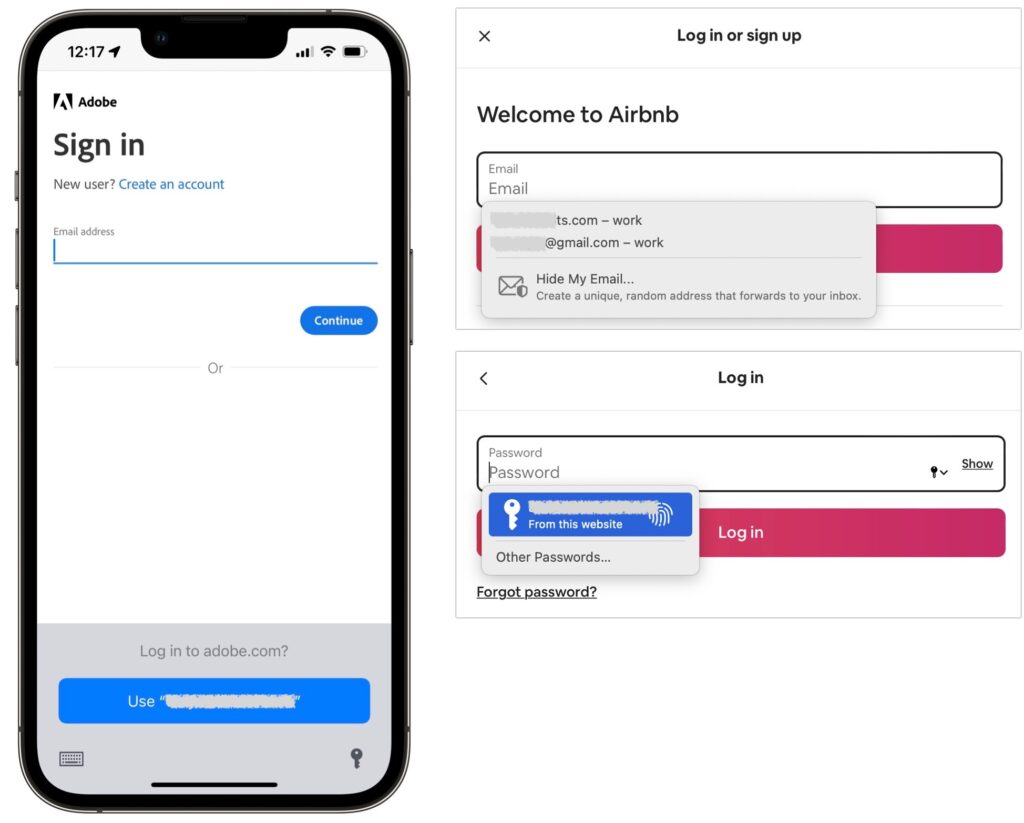
  • Autofill passwords: As long as the autofill settings mentioned earlier are active, Safari will offer to autofill passwords when you log in to a site whose credentials you’ve stored. iOS and iPadOS apps also support autofill through the keyboard.
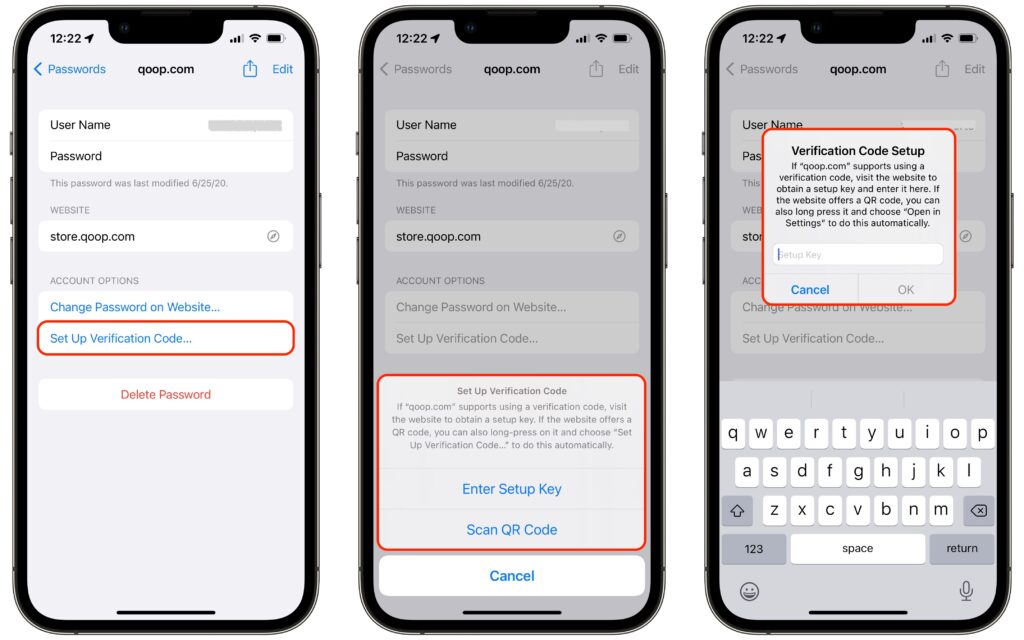
  • Support two-factor authentication (2FA): This new feature allows you to add the setup secret (usually a scanned QR code or manually entered key) that enables the creation and automatic entry of 2FA codes.
  • Import and export passwords: In the Passwords preference pane on the Mac, you can now import and export passwords, simplifying migration.
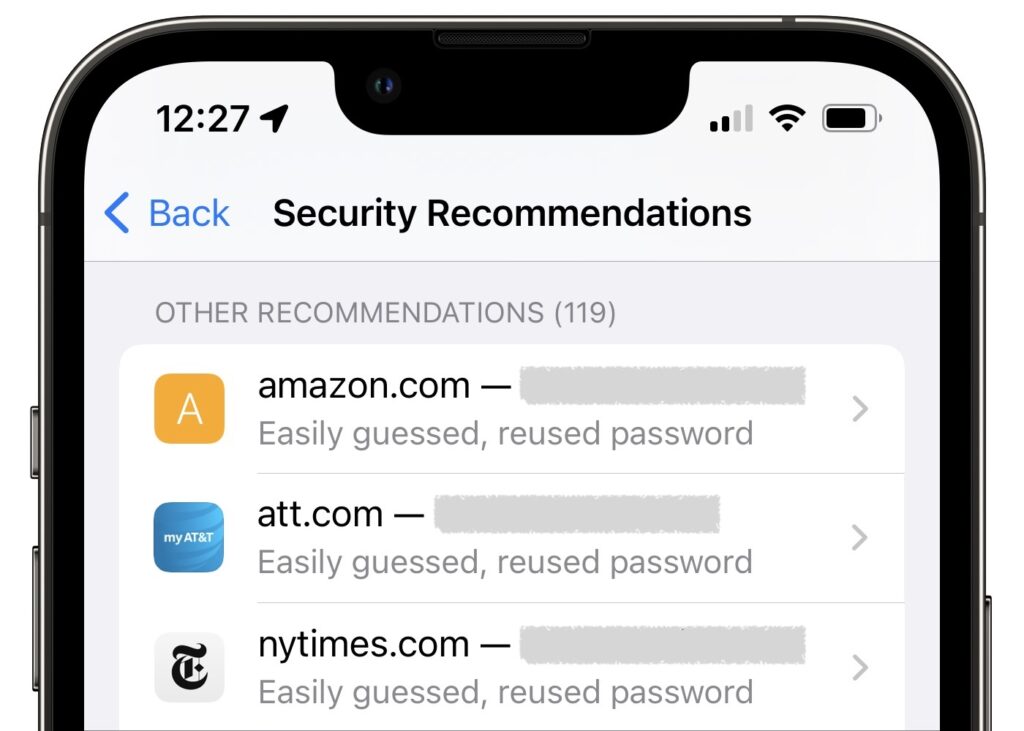
  • Report questionable passwords: We all have passwords that are easily guessed or reused on multiple sites—the Passwords interface calls out such passwords so you can change them.
  • Share passwords: If you need to share a password with a family member or colleague, the Share button lets you do that via AirDrop. Passwords are saved into the recipient’s keychain directly.
  • Detect compromised passwords: Both Settings > Passwords > Security Recommendations and System Preferences > Passwords have a Detect Compromised Passwords option. Select it to be alerted if any of your login credentials are compromised in a site’s security breach.

That’s a solid set of features, and for many people, it will be sufficient. However, independent password managers like 1Password and LastPass have evolved over many years and boast very real advantages:

  • Multiple platforms and Web browsers: Apple’s password management features focus on Apple operating systems and Safari. There is an iCloud Passwords Chrome extension for Windows, and Web browsers in iOS and iPadOS can tie into the system-wide password features. But for broad support across platforms and use within browsers other than Safari, stick with an independent password manager.
  • Data beyond Web logins: Want to store your bank account numbers, driver’s license, credit cards, vaccination card, and the like in your password manager? Many independent password managers support secure storage of types of data beyond logins. They also often let you leave notes on items and include file attachments—a screenshot of a screen summarizing login requirements, for instance.
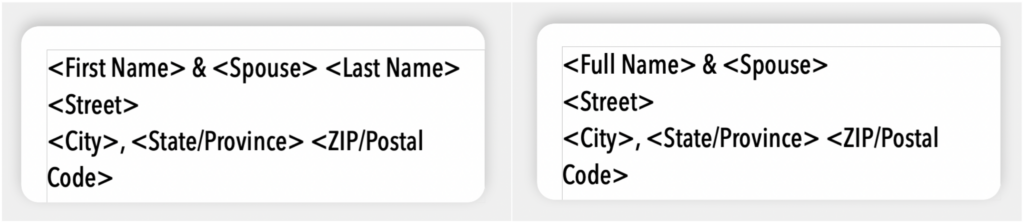
  • Families and teams: Although Apple is inching in this direction with the forthcoming Digital Legacy program, in which you can specify someone as a Legacy Contact so they can access to your iCloud account in the event of your death, the group sharing features of independent password managers are much more useful here and now. Share key passwords with your spouse or your college-bound child to ensure that everyone will have the access they need to shared accounts.
  • One-time password sharing: 1Password added this feature recently, and there are independent sites like 1ty.me and onetimesecret.com that provide it as well. In essence, it lets you securely share a single password with anyone else, embedding it in a link that can be viewed only once. That prevents passwords from being sent around in email or text messages where they could be stolen.

In the end, Apple’s new password management features are like so many other built-in features. They offer the basic capabilities that most users need while leaving plenty of room for enterprising developers to offer compelling additional features. Use Apple’s Passwords or another password manager, whichever you prefer. Just don’t rely on a simple text file or physical notebook to manage passwords. It’s more work, easily lost, and far less secure.

(Featured image by iStock.com/peshkov)

Apple’s Evolution of Do Not Disturb Helps You Focus

Between texts, alarms, reminders, calls, and myriad other notifications on our iPhones, iPads, and Macs, it’s a miracle we get anything done at all. To free us from this onslaught, Apple previously provided Do Not Disturb, which let you set times during which you could be free from interruption.

In iOS 15, iPadOS 15, and macOS 12 Monterey, Apple has gone even further. Do Not Disturb is now called Focus, and Apple has made it more powerful and flexible. Focus can turn on automatically at certain times, at particular locations, or when you’re using certain apps so you can avoid interruptions during activities like working out, doing homework, eating dinner, or gaming. But not all interruptions—you can allow certain people and apps to break through the cone of silence. A Focus can also hide or show certain Home screen pages, prevent notifications from appearing on the Lock screen, and more. Plus, all your devices can share the same Focus settings—we’re showing iPhone screenshots below, but the interface is identical in iPadOS and similar on the Mac, where you’ll find it in System Preferences > Notifications & Focus > Focus.

In Settings > Focus, Apple provides a pre-built Focus for Do Not Disturb, Driving, and Sleep to match the old Do Not Disturb options:

  • Do Not Disturb: This catch-all Focus takes over from the old Do Not Disturb setting.
  • Driving: This Focus replaces the old Do Not Disturb While Driving option. It’s unusual in that it doesn’t allow any app notifications through at all (eyes on the road!). It also lets you write a custom auto-reply for those who text you while you’re driving.
  • Sleep: If you use Apple’s sleep management features in the Health app, you’ll use this Focus to control which notifications can get through while you’re asleep.

Apart from those, Apple makes six suggestions: Personal and Work (in the main list), and Fitness, Gaming, Mindfulness, and Reading (when you add a new Focus). You can also create a custom Focus from scratch.

Apple’s suggestions are special in one important way. Fitness, Gaming, and Mindfulness can turn on automatically: when you’re engaged in a workout, when you connect a wireless controller, and when you’re in a Mindfulness session started from your Apple Watch, respectively.

When configuring a suggested Focus or creating a new one from scratch, Focus runs you through several setup screens. One has you choose people whose notifications you want to come through regardless, and what to do about incoming phone calls. The other screen lets you pick which apps can notify you when the Focus is active, with an additional option to allow notifications marked as Time Sensitive through regardless. (Time Sensitive notifications include timed Reminders alerts, for instance, and are usually best left enabled.)

Once your Focus is ready, you can configure various options, including:

  • Focus Status: Enable this option to allow apps to alert those who message you that you have notifications silenced.
  • Home Screen: If your Focus involves you using the Home screen a lot, you can have it hide notification badges that might lure you into another app or even hide entire Home screen pages that could be distracting.
  • Lock Screen: If you might be looking at your Lock screen while the Focus is active, you can have it dim automatically and hide or show silenced notifications as appropriate.
  • Schedule or Automation: Although you can turn on any Focus from Control Center, it may be easier to have it turn itself on automatically at certain times, in particular locations, or when certain apps are active.

As with any new feature, it’s going to take a bit to figure out how to make Focus work best for you. We’re still learning it ourselves, but here are some recommendations:

  • To identify when a Focus would be helpful, wait until you find notifications irritating and then think about which ones you’d want a Focus to block.
  • Create just one or two Focuses at first. You don’t want to end up with a bunch that interact in unexpected ways and cause you to miss important notifications.
  • Be careful with schedules and automations. An automation that invokes the Reading Focus when Books is open might work well for reading before bed but could be problematic if you read while waiting for a meeting to start.
  • It may be safest to allow silenced notifications to appear on the Lock screen so you can easily see what you missed afterward and adjust the Focus as necessary.
  • You can manually invoke a Focus by tapping the Focus button in Control Center and selecting the one you want. Tap the ••• button to the right of the Focus to specify when it should turn off automatically, or just tap the Focus again to turn it off.

Newness aside, Focus looks like it will help us all cut down on distracting notifications. And if all else fails, stick with just Do Not Disturb, Driving, and Sleep to replicate what we had before.

(Featured image by iStock.com/Daisy-Daisy)

Print Mailing Labels for Your Holiday Cards with Apple’s Contacts App

If mailing your holiday cards (which you designed in Photos with a plug-in like Motif or Mimeo Photos, right?) is made harder by having to write addresses on envelopes, you can skip the handwriting step this year. Although many people don’t realize this, it’s easy to print mailing labels on standard label stock using the Contacts app on the Mac. You can even add a personal touch by including a graphic and using a custom color and font choice. Follow these steps:

  1. In Contacts, choose File > New Group to create an empty group into which you can collect your card recipients. Name the group something like Holiday Cards.
  2. Click All Contacts to see your full collection of contacts, and then drag your recipients from the center column to copy them into the Holiday Cards group. Note that you have to click and hold briefly before Contacts lets you start dragging a contact. You can drag contacts one at a time or select several at once and drag the entire selection. This doesn’t move contacts out of All Contacts—you’re just adding them to the Holiday Cards group, which functions like a playlist in Music.
  3. Once the Holiday Cards group contains all your recipients, click its name in the sidebar, and then choose File > Print to open the Print dialog.
  4. To set up your cards, you need to see details in the Print dialog, so at the bottom of the Print dialog, click the Show Details button (if it’s already called Hide Details, you’re all set). You also need to see the special controls for Contacts, so make sure Contacts is chosen from the pop-up menu underneath the page range fields. Then from the Style pop-up menu, choose Mailing Labels.
  5. Beneath the Style pop-up menu, make sure Layout is selected, and then in the Layout view, from the Page pop-up menus, choose the manufacturer of your labels and the number associated with the labels. (Avery 5160 is a particularly common label type and is readily available at office supply stores and online.)
  6. Click Label to switch to the Label view. From the Addresses pop-up menu, choose the type of address you’re using. Home is likely the most appropriate; if you choose All, Contacts will print both Home and Work addresses if available. You can also select the checkboxes for Company and Country here, and if you print the country, you can exclude your own country, which makes it easy to include overseas friends and relatives without printing the country for most people.
  7. Although the defaults are fine, you can change the color of the label text, select a small image to print next to each contact, and change the font.
  8. It’s time to print, but not on your label stock just yet! Click the Print button to print a draft of your labels on plain paper. You’ll use this draft for two things—checking the addresses for accuracy and verifying that the labels will print properly on the label stock. To check if the labels will print correctly, stack a page from the draft on top of a sheet of blank labels, and then hold them up to a bright light or sunlit window. You should be able to see whether the positioning is right—it should be in most cases. If not, make sure you’ve chosen the right label in the Print dialog, and if all else fails, create a custom label with your own margins and gutters to make it work. You may also want to increase or decrease the font size, making sure that even your longest addresses will fit.
  9. Once you’ve fixed addresses for everyone who has moved recently and verified your positioning, you can print for real on your label stock.

There’s only one limitation to using Contacts to print your labels. If you’re a perfectionist, you might want to customize how the names of couples appear on the label. Even though it has the necessary Spouse relationship field that links contacts together, Contacts doesn’t support different name formats on labels. For instance, if you’re sending a card to a couple who share a last name, you might want the name line to read “Barack and Michelle Obama.” The same goes for couples who don’t share a last name, like “Ellen DeGeneres and Portia de Rossi.” The solution for this picky conundrum is Belight Software’s $9.99 Swift Publisher app, which lets you create label templates using individual fields from Contacts.

But that’s overkill for most of us, who care more about what’s inside the envelope. Most of the work comes in selecting people, making sure their addresses are right, and updating those that have changed—actually printing labels takes only a few minutes. As you stick your labels on envelopes, you can revel in the knowledge that it will go even faster next year!

(Featured image by iStock.com/Bet_Noire)