Flash Is Dead—Uninstall Flash Player to Keep Your Mac Secure

In July 2017, Adobe announced that it would stop distributing and updating Flash Player on December 31st, 2020. Web standards like HTML5 provide a viable alternative to Flash content, and organizations that relied on Flash have had three years to replace it. Because Adobe will no longer be addressing security vulnerabilities in Flash with updates, Flash Player now prompts users to uninstall. We strongly recommend doing so—just click the Uninstall button if you get this alert. If you don’t, a Flash Player Install Manager app in your Utilities folder should be able to remove Flash Player as well. Adobe also provides instructions to uninstall manually.

(Featured image based on an original by Gary Meulemans on Unsplash)

So, Are Apple’s New M1-Based Macs Any Good?

In November, Apple unveiled its new M1 chip and three new Macs that use it: the MacBook Air, 13-inch MacBook Pro, and Mac mini. The M1-based MacBook Air replaces the previous Intel-based MacBook Air, but with the 13-inch MacBook Pro and the Mac mini, Apple continues to sell some Intel-based models with beefier specs—most notably a higher memory ceiling.

Even though Apple makes impressive performance claims for the new Macs, the community was still somewhat skeptical. Were these new Macs as fast as Apple said? Would they be limited in some other way? And the biggest question of all, should we be buying untested M1-based Macs or tried-and-true Intel-based models? Now that these new Macs are shipping and people have had a chance to try them, let’s address these and other questions so you can plan your future Mac purchases appropriately.

Are these new Macs fast?

It’s hard to overstate just how astonishing the performance benchmarks for these new Macs are. In single-core GeekBench 5 tests, the M1-based Macs beat every existing Mac by a lot: the most recent 27-inch iMac clocked in at a benchmark score of 1250, whereas the M1 Macs hovered around 1700. (The Mac Pro and iMac Pro are tweaked for faster multi-core performance instead, so they fare even worse on the GeekBench 5 single-core benchmarks.) For many everyday apps, single-core performance is what you’ll notice.

Of course, the top-of-the-line 28-core Mac Pro and its siblings outperform the 8-core M1-based Macs in the GeekBench 5 multi-core benchmarks, but if you focus on the new M1 Macs in the multi-core rankings below, you can see that they’re just behind the fastest 27-inch iMacs and low-end Pro models. That’s doubly impressive when you remember that the Mac Pro in the screenshot below costs $6000, compared to $700 for the Mac mini.

Benchmarks don’t lie, but they also don’t tell the whole story. These new Macs feel fast. Apps launch with only a bounce or two of the icon on the Dock. The MacBook Air and MacBook Pro wake from sleep and unlock with an Apple Watch so quickly that they’re ready to use by the time you’ve finished opening the screen. We can’t promise you’ll never see the spinning beachball wait cursor, but we haven’t so far. In some ways, using these new Macs feels more like using a fast iPad or iPhone, where everything happens nearly instantly.

Finally, note that only apps that have been rewritten to support the M1 chip receive the full speed boost. Older apps must be “translated” by Apple’s Rosetta 2, which converts apps from Intel instructions to the Arm instructions needed by the M1. That happens at launch, after which macOS launches the translated app. The first launch might be slow, but subsequent launches are faster. Although emulation environments are generally quite slow, early tests show apps translated by Rosetta 2 as running at about 80% of native speed. The upshot of that is that even translated apps might run faster than the equivalent app running on an Intel-based Mac.

What’s the deal with the new M1-based Macs having only 8 GB or 16 GB of RAM?

With the new M1-based Macs, you can choose between 8 GB and 16 GB of RAM, and that’s it. In contrast, the current Intel-based 13-inch MacBook Pro lets you go up to 32 GB, and the Intel-based Mac mini can take up to 64 GB.

Although 16 GB of RAM sounds limiting, that doesn’t seem to be nearly as concerning as one might think. The reason is that the M1 chips use what Apple calls “unified memory,” which is built onto the M1 chip itself and shared by the CPU, GPU, and Neural Engine. A significant performance bottleneck in modern computers is moving data around in memory. Benchmarks suggest that the memory bandwidth on the M1 chip is about 3x faster than on a 16-inch MacBook Pro. The faster that data can be moved around in memory and shared between the processing cores, the less memory is needed.

The speed of their SSDs also lets the M1-based Macs get away with less memory. When macOS uses all its physical RAM, it falls back on virtual memory, which effectively involves moving data on and off the SSD as needed. When Macs used hard drives, swapping memory to and from disk was very slow, but modern SSDs are fast enough to hide swapping delays.

To be fair, there are still memory-intensive tasks that will run better on Macs with lots of physical RAM. That’s a big reason Apple kept the Intel versions of the 13-inch MacBook Pro and Mac mini for sale. On the very high end, you can put a whopping 1.5 TB of RAM in a Mac Pro, and if you need that kind of RAM for your work, you’ll need to stick with Intel-based Macs for now.

How will the M1-based Macs fit into a workflow?

Here’s where things get tricky. If you have an office full of Macs, there are some good reasons why you might want to stick with Intel-based Macs for a while.

  • Big Sur: The M1-based Macs require macOS 11 Big Sur. In general, we recommend that people hold off on upgrading to Big Sur until Apple has released maintenance updates to solidify stability and compatibility. Plus, mixing versions of operating systems and apps can lead to interoperability problems.
  • Apps: Although Rosetta 2 appears to do a good job translating older apps, there may still be quirks or performance hits, particularly for complex apps.
  • Memory: As mentioned above, there are some tasks where lots of physical RAM is essential, and there’s currently no way to go above 16 GB on an M1-based Mac.

But here’s the thing. Apple very intentionally focused its initial M1-based Mac models on the low end of the Mac product line. These Macs are ideal for students and individuals, or as auxiliary or traveling Macs for office workers, particularly given the startlingly good battery life in the laptops. They won’t be replacing a Mac Pro or even a 27-inch iMac right now, but no one would have replaced such a machine with a MacBook Air, 13-inch MacBook Pro, or Mac mini before either.

In the end, we’re bullish on these new M1-based Macs. They’ve redefined what the most inexpensive Macs can do, making them compelling for those who don’t require more than 16 GB of physical RAM or need to slot them into highly specific workflows.

(Featured image by Apple)

Take a Few Minutes to Lock Down Your Facebook Privacy Settings

Even beyond its often controversial behavior in the 2020 US presidential election, Facebook continually makes news headlines for its numerous privacy and security problems. Most notable, of course, were the 50 million Facebook profiles gathered for Cambridge Analytica for the 2016 election. Closer to home, the company pushed a VPN service in the Facebook iOS app that collected all your mobile data traffic for Facebook. After pressure from Apple, Facebook pulled the VPN but reused it for the Facebook Research program, which paid users as young as 13 for their data. Apple caused that to be shut down too.

Facebook has also silently shared user data with other tech giants, received confidential health data from other apps without users’ informed consent, and stored hundreds of millions of Facebook and Instagram passwords in an unencrypted form, among much else. The criticisms of Facebook go on and on.

Because of this, many have encouraged Facebook users to delete their accounts. That even includes the billionaire co-founder of the WhatsApp messaging service, which Facebook bought in 2014. If you’re done with Facebook, you’re welcome to deactivate or even delete your account. Facebook provides instructions for both actions. Deactivating your account just makes you invisible on Facebook, whereas deleting your account may eventually (up to 3 months) result in most of the data being removed.

The problem is that Facebook can be useful. It may be the only connection you have with certain friends or family members, and many informal groups use Facebook for meetup logistics. For many, losing access to Facebook would hurt real-world relationships and activities. Plus, lots of companies have Facebook pages, and taking those down might result in a loss of business from customers who would find out about the firm only through Facebook. What to do?

If you’re a business, the most sensible approach is to keep your Facebook page but avoid relying on it. Remember, Facebook is not your friend. Back in 2018, Facebook said it would be prioritizing posts from friends and family over public content, which is a nice way of saying that Facebook is deprecating business-related posts. So make sure you have a Web site that you control, and make sure that customers can easily find it and contact you through it. It’s also a good idea to offer customers multiple ways to contact you, particularly via email.

On a personal level, there are two ways to think about privacy on Facebook: limiting the information you share with other people on Facebook and limiting the information that you’re willing to provide to Facebook. If Facebook doesn’t have data about you, it can’t sell it to the highest bidder, let it be harvested by hackers, or use it in ways you might find creepy.

Facebook’s Privacy Checkup walks you through many of Facebook’s privacy settings:

  • On the Mac, sign in to the Facebook website, click the down-pointing arrow button on the top-right corner of the page, click Settings & Privacy, and click Privacy Checkup.
  • In Facebook’s iOS app, tap the hamburger button in the bottom-right corner, scroll down to and expand Settings & Privacy, tap Privacy Shortcuts, and then tap “Review a few important privacy settings.”

For each of the five tiles in the Privacy Checkup, work through the steps to make sure you’re comfortable with the settings. Although all of them are important, pay special attention to “Your data settings on Facebook,” which lets you control what apps could leak data about you, whether Facebook can use facial recognition to identify you in photos and videos, and if Facebook can know your precise location.

If you don’t want to go through the entire Privacy Checkup just to check a single setting, look at Facebook’s Privacy Settings and Tools in the overall Settings collection (accessible from that dropdown menu on the Mac—choose Settings & Privacy > Settings > Privacy, or from the iOS app’s hamburger button—tap Settings & Privacy > Settings > Privacy Settings). This page also provides a link to help you review the posts you’re tagged in, removing those that you don’t want on your timeline.

Beware that you could also be sharing information about everyone you know—Facebook loves to know who you know, even if they don’t have Facebook accounts. You can prevent this, but doing so requires two steps, one on Facebook’s Manage Your Invites and Uploaded Contacts page and another on Messenger’s Manage Your Uploaded Contacts page. Just delete them all. Otherwise, you’re giving away your contacts’ personal information without their permission.

To ensure that contact uploading doesn’t happen again, in the Facebook iOS app, tap the hamburger button, scroll down, and then tap Settings & Privacy > Settings > Upload Contacts (at the bottom) and make sure the switch is off. In the Messenger app, tap your avatar in the upper-left corner, tap Phone Contacts > Upload Contacts, and make sure it’s off.

Also, in the iPhone Facebook app, tap the hamburger button again and then Settings & Privacy > Settings > Location, and turn off all the settings. Facebook doesn’t need to know everywhere you go.

If you’re perturbed by the way Facebook’s iOS app is trying to capture your contacts and locations, you could delete it from your devices and rely instead on the Facebook website, which can’t access as much information about you. To make it easier to open, in Safari, visit facebook.com, tap the Share button, and then tap Add to Home Screen in the share sheet.

Let us leave you with one thought. Always assume that anything you post to Facebook or allow Facebook to have access to could end up in the hands of companies who want to exploit you or on the front page of your local newspaper… or the New York Times. Nothing on Facebook is ever private—Facebook has shown that it isn’t trustworthy or reliable—and the best way to ensure confidential or embarrassing information doesn’t leak inadvertently is to avoid posting it to Facebook in the first place.

(Featured image based on an original by Michael Treu from Pixabay)

Want to Send Holiday Cards This Year? Try Building Them with Motif for Photos

In 2018, Apple dropped support for creating print projects from within Photos, including greeting cards, calendars, and books. Instead, Apple allowed other print-service companies to build Photos Project extensions that gave users the same sort of capabilities. At first, they didn’t match up with what Apple had previously provided, but they’ve improved over time.

It’s the holiday card season again, and given how little we’ve all been able to see friends and family, we expect a lot more people will be sending cards this year. You’re welcome to use Mimeo Photos, Shutterfly, Fujifilm Prints & Gifts, Mpix, or WhiteWall, but we’re going to focus on Motif, which generally performed well in our testing.

To begin, install the Motif app from the Mac App Store, which also adds the Motif extension to System Preferences > Extensions > Photos Projects. Once you have the extension installed, here’s what you do:

  1. Select photos: Although you can add photos to your card project at any time by dragging them into the project in the Photos sidebar, it’s easiest to make a new album that contains a dozen or so of the best candidates for your card. If you don’t already know exactly what you want, don’t be picky at this point because it’s easier to choose the final images from within the card layout.
  2. Create the card: With your new album selected, choose File > Create > Card > Motif. Then select either a 5×7 folded card or a 4×6 flat double-sided card, in either portrait or landscape orientation.
  3. Select a theme: Motif provides various themes, and although it doesn’t currently include any holiday themes for cards, they’re all completely customizable. Since cards have relatively few images, we recommend clicking Don’t Autoflow and placing images by hand. (For a book or a calendar, autoflow would be a boon.)
  4. Choose layouts: Although every card page starts with a default layout, you can customize every page in various ways. Would you prefer a single image on the front, rather than a multi-photo layout? Click the layout button below the page to open the Page Layout screen, click a number corresponding to how many images you want, and click the desired layout. (A bug in the current version prevents this from working on pages containing text blocks, but you can still tweak such pages—see the instructions below for adding, removing, resizing, and rearranging blocks.)
  5. Add photos: To add a photo to a blank spot on the card, drag it from the photo tray at the bottom of the window, which shows all the available images (scroll to the right to see all the photos if necessary). Dragging a photo on top of a placed image replaces it, pushing the previous one back into the image tray.
  6. Add and edit text: Themes come with pre-defined text blocks, but you can always add your own by clicking the Aa button under the page. You can tweak the font face, style, size, color, and more in the controls that appear whenever you select a text box.

Although that’s the basics of what you need to know to create and customize a card. Motif provides numerous other options that may prove helpful:

  • Move between pages: Arrow buttons on the left and right side of the screen let you move between the pages of a card, but it’s easier to press the left and right arrow keys. If you prefer to see all your pages at once, click the right side of the page button in the upper-right corner of the window.
  • Resize blocks: You can resize any image or text block by clicking it and dragging its blue size handles. If the Magic Resize button in the top right of the window is selected, other blocks will resize to fit.
  • Rearrange image blocks: To move a block within a layout, click it, click the Move button in the control bar that appears, and then drag the block to a new location.
  • Add or delete a block: You can add or delete an image block without going through the Page Layout screen. To add a block, drag an image from the tray to a blank spot in between other blocks. To remove a block, select it and click the trash icon in the control bar.
  • Edit photos: To edit a photo from within the project, select it and then double-click it again to open it in the regular Photos editing view. Other tools in the control bar let you zoom the image (drag the zoomed image to move it within the block), rotate the image, and change its opacity—for all three, adjust the changes with the slider underneath.
  • Overlay text: Once you’ve placed a text block on a page, resize or move it so it overlaps an image. If the text doesn’t appear because it’s underneath the image, choose Send Backward from the control bar’s Arrange menu.
  • Change page color: In the Page Layout screen, find the Page Color button. Click it to change the color using the standard macOS color picker.

Some people may be able to create a card, drop a few photos in, change the text, and be done in minutes. Others will want to tweak every last detail to get things just so—if you’re particular, you can probably spend hours on it.

Either way, when you’re done, it’s time to place your order. You’ll need to create an account with Motif and run through a six-step process of choosing the number of cards you want, providing your billing information, picking shipping options, and entering your payment details.

After that, it’s merely a matter of waiting until they arrive and then stuffing envelopes, addressing them, and popping them in a mailbox.

(Featured image by Annie Spratt on Unsplash)

Overwhelmed by Apps? Use iOS 14’s App Library to Manage Your Home Screens

Many of us have been using iPhones for years, and apps we bought or downloaded long ago molder in corners of our Home screens. Even if you haven’t played Flappy Bird in years, its pixelated icon still stares glumly at you every time you peer at its Home screen, and it’s far from alone. To find out how many apps you have, go to Settings > General > About and look next to Applications. So where are they all?

Unless you’re one of those highly organized people who keeps every app in a folder (we’re jealous), you probably have quite a few Home screens holding all those apps. The first one or two may be nicely laid out, with your most frequently used apps close at hand. But after that? We can never find little-used apps on the fourth or sixth Home screen. Instead, we search for such apps—swipe down on a Home screen and type a few characters from its name. But wouldn’t it be nice to see an alphabetically sorted list of all your installed apps?

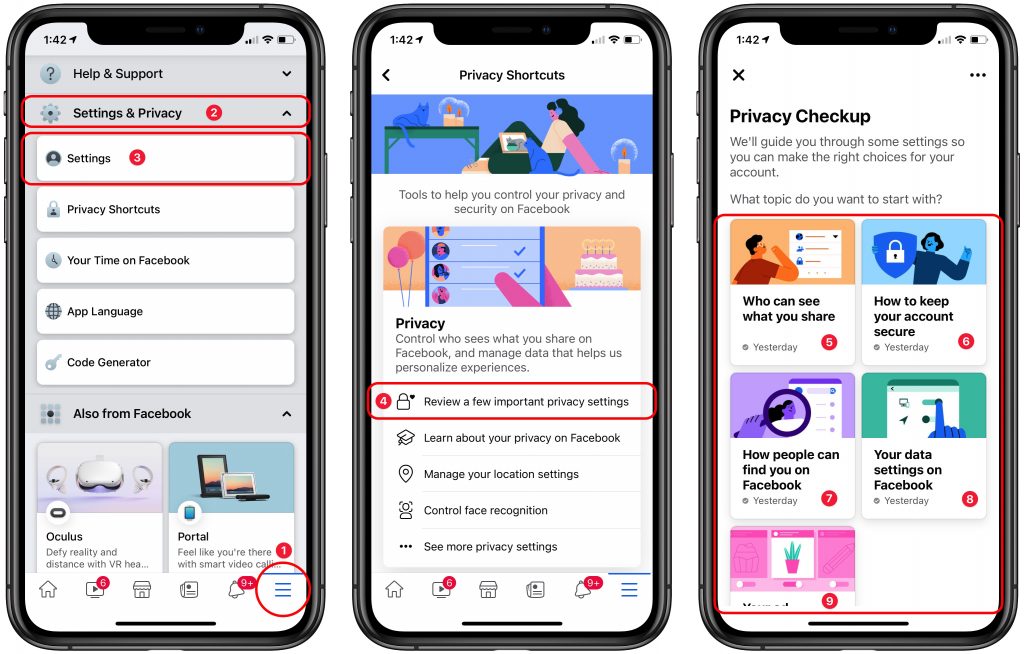
That’s what iOS 14’s App Library provides, though it may not be evident at first glance. (Sadly, the App Library isn’t available in iPadOS 14.) A new screen to the right of your last Home screen, the App Library collects all your apps into folders. At the top, Suggestions includes four suggested apps based on time, location, or activity, and Recently Added shows the apps you’ve downloaded lately. The rest of the folders organize apps by category. In a folder grid, tapping a large icon opens that app, while tapping the group of four small icons in the lower-right corner opens the folder. When in jiggle mode, you can also drag an app out of the App Library to a Home screen or tap the X badge on an app icon to delete it.

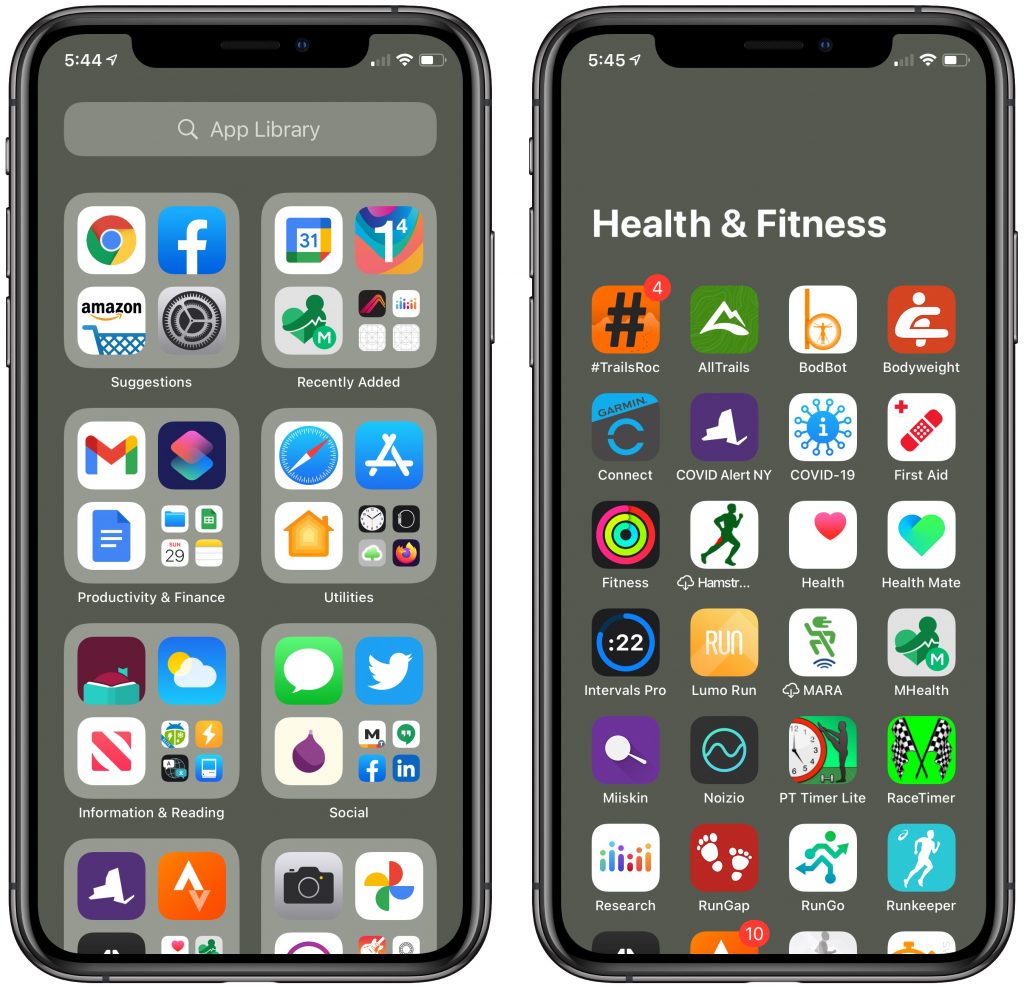
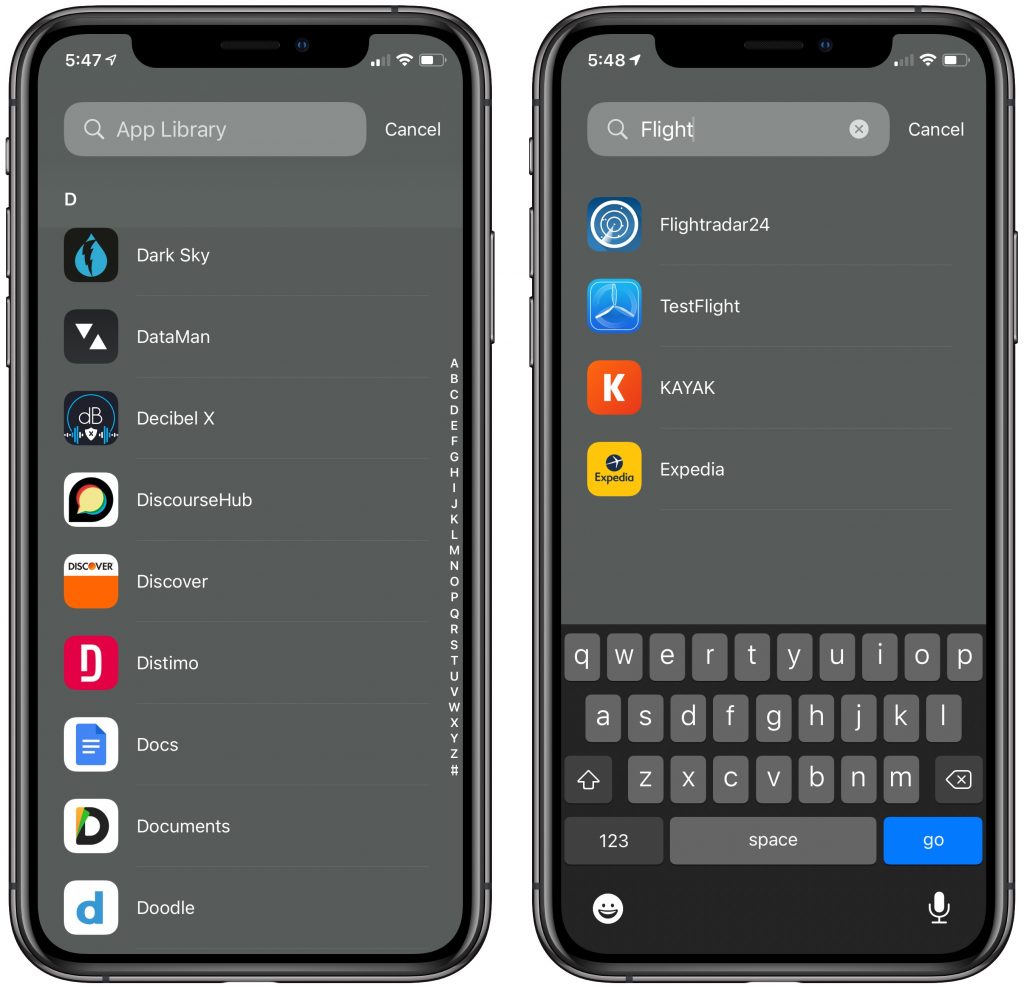
Since you can’t rename any of the App Library folders or move apps between them, most of them aren’t that useful for finding something quickly, though you may enjoy browsing in them. However, if you tap the App Library search field at the top, it displays a lovely alphabetical list of all the apps installed on your iPhone. Finally! You can tap a letter on the right to jump to that spot in the list (D in the left-hand screenshot below), or enter a couple of characters to filter the list by name and category (which is why a search for “Flight” also finds travel apps like Kayak and Expedia in the right-hand screenshot).

Perhaps most important, you need to understand that the App Library always contains all the apps installed on your iPhone. If you delete an app from the App Library, you’re deleting it from your iPhone.

Now that you know what the App Library is, what does it enable you to do?

Remove Apps from Your Home Screens

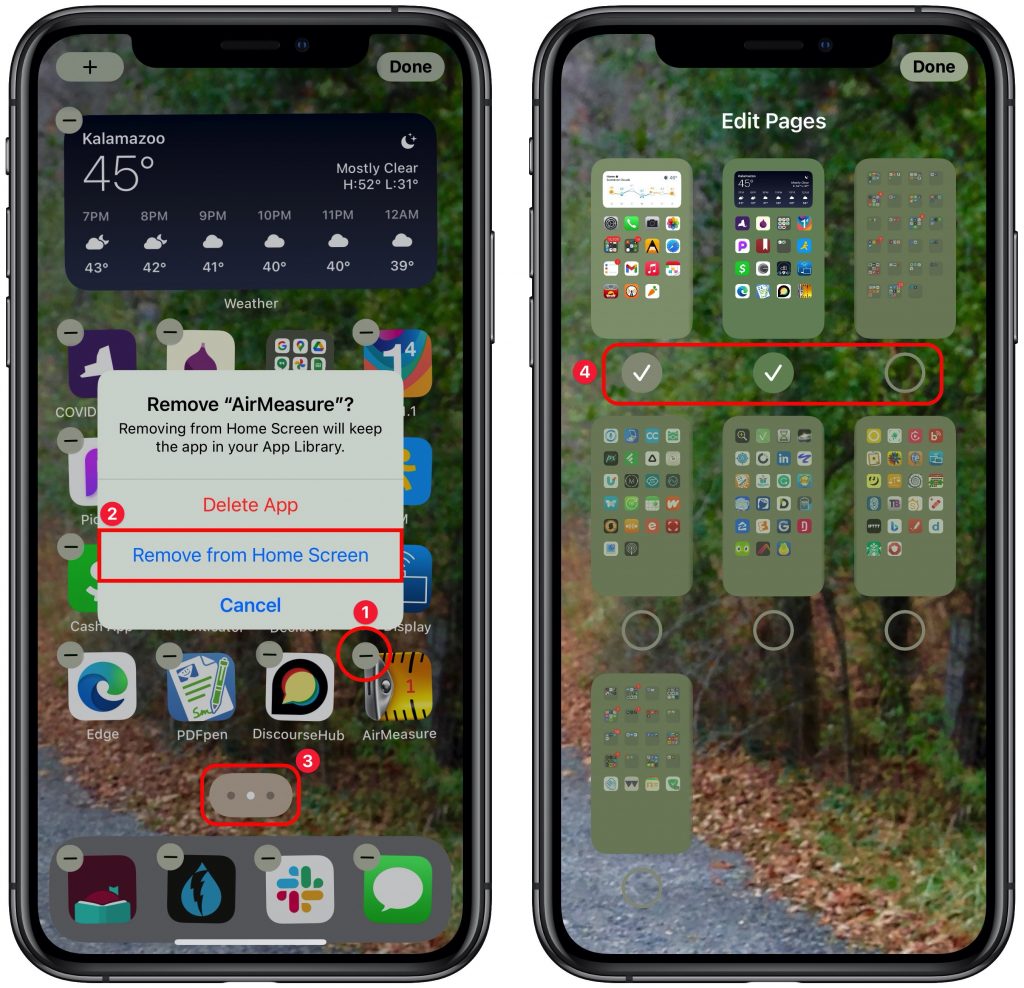
Because all apps are accessible from the App Library, they no longer need to be on a Home screen. That means you can take seldom-used apps off your Home screens and access them from the App Library. To do this, first touch and hold an empty spot on any Home screen to enter jiggle mode. Tap the minus sign badge on any app ➊, and then tap Remove from Home Screen ➋. That’s effective but slow, since you have to remove apps one at a time.

Here’s a faster approach. In jiggle mode, start dragging an app with your thumb. Then, with another finger, tap other apps to add them to the stack. Once you’ve collected all the apps you want to remove from the Home screen, drag them to the right (or swipe left on the Home screen with another finger) until you get to the App Library. Then lift your thumb.

If you’d rather sweep your apps under a virtual rug, you can hide entire Home screens. They still exist; you just don’t see them until you reveal them again. (You could also create a Home screen that contains just travel-related apps and show it only when you’re on vacation.) When in jiggle mode, tap the lozenge that indicates the number of Home screens (➌ above) and then tap the circle ➍ under each Home screen thumbnail to show (checked) or hide (empty) it. Tap Done when you’re finished.

Organize Your Main Home Screens

Before the App Library, creating focused Home screens was a nightmare because you had no idea where the apps you wanted to bring together might be located. With the App Library, that’s no longer an issue. Try these steps to create a new Home screen that contains a particular subset of your apps.

  1. In the App Library, tap the search field to display the alphabetic list of all apps.
  2. Touch and hold the app you want to add to a Home screen.
  3. Keep your finger down without moving; you should feel a tap of feedback and a menu will appear.
  4. Continue holding down on the app without moving your finger; a second or two later, iOS will display the rightmost Home screen.
  5. Lift your finger to drop the app; it will show up in a few seconds.
  6. Swipe back to the App Library and repeat these steps.

That approach is effective but a bit slow. Here’s a faster way. Enter jiggle mode, go to the App Library, navigate into a folder, and start dragging an app with your thumb. iOS will immediately send you to the last Home screen, but use another finger to swipe left so you go back to the App Library. Then navigate into a folder and tap desired apps to add them to your stack. Once you’ve collected everything, swipe right with your other finger to return to the last Home screen and lift your thumb to drop all the apps.

Once you’ve populated the Home screen with your desired apps, rearrange them as desired while still in jiggle mode. Remember that you can also create folders by dragging one app onto another, and put apps in folders by dragging them in.

Focus on Newly Downloaded Apps

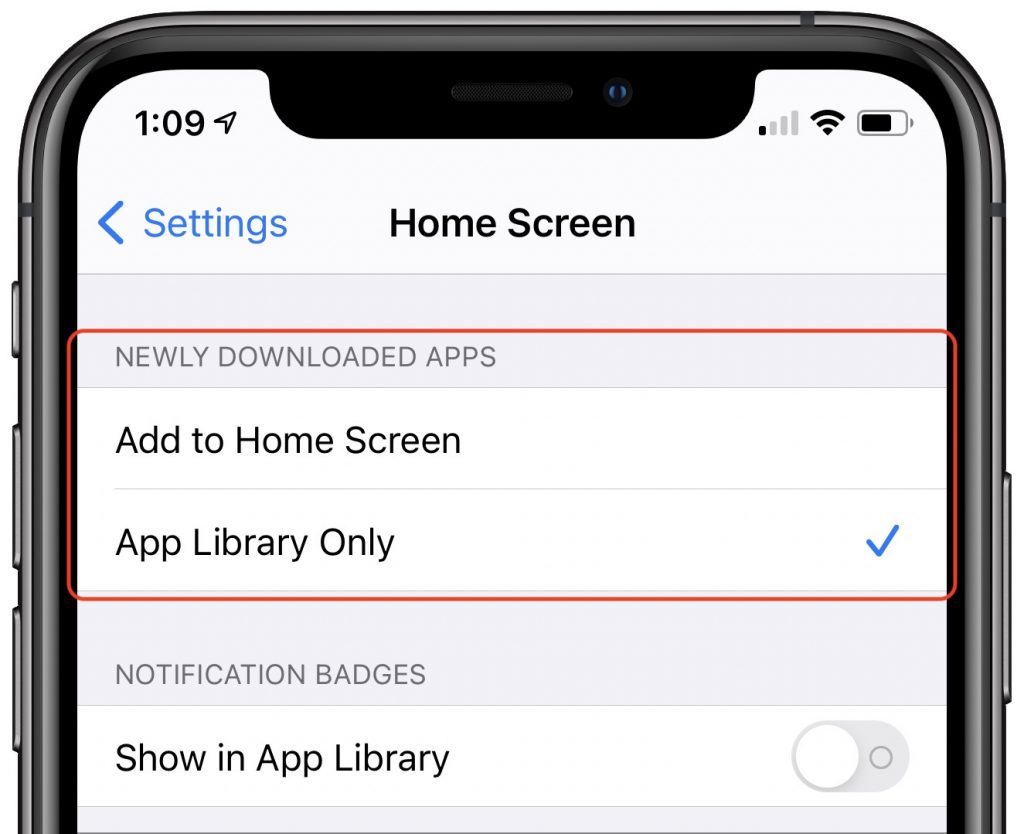
The App Library also addresses the problem of what to do with newly downloaded apps. Previously, they’d show up at the bottom-right of some Home screen, but you couldn’t always predict which one. In iOS 14, you can now control that behavior in Settings > Home Screen. If you select Add to Home Screen, iOS will continue to add apps that you download to a Home screen. But if you prefer a clean screen, select App Library Only instead.

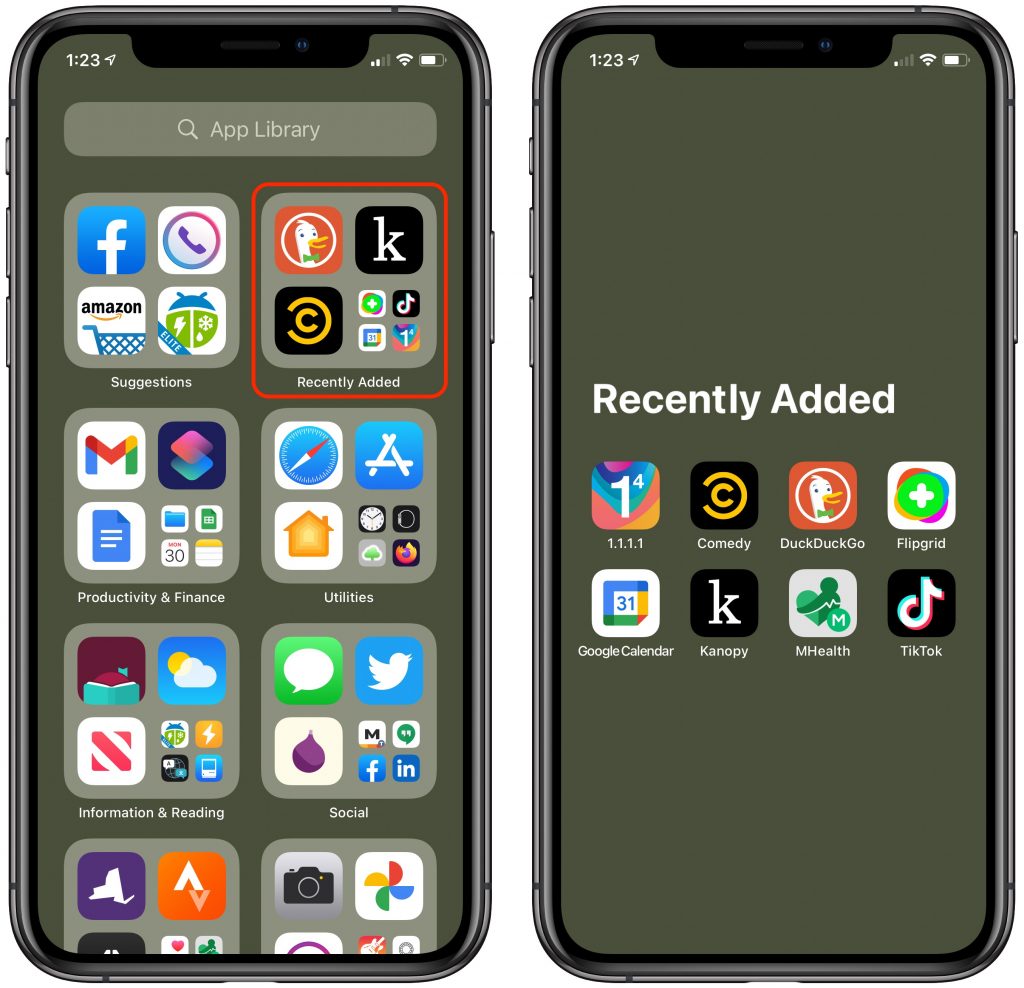
In the latter case, newly downloaded apps appear in the Recently Added folder on the main App Library screen, with the three most recent apps represented with large icons. Remember that you can tap the large icons to open the associated app or tap the four small icons to open the folder. The folder shows only the eight most recently downloaded apps, sorted alphabetically. And, of course, all the new apps also appear in the App Library’s alphabetical list and in the appropriate category folders.

If you’ve been suffering under the cognitive load of numerous unorganized Home screens, think about how you can use the App Library in iOS 14 to streamline your iPhone experience. You might even find that you like having just a couple of Home screens and leaving everything else in the App Library.

(Featured image by Eugenio Mazzone on Unsplash)