Apple Unveils New M1-Powered MacBook Air, MacBook Pro, and Mac mini

Continuing its pandemic-driven approach of short, focused announcements, Apple once again took to the Internet to stream its “One More Thing” event. On center stage this time was the Mac, or specifically, three Macs, all of which replace the longstanding Intel chip with Apple’s new M1 chip. All three Macs can be ordered now and will be available within a week or so.

What Is the M1 and Why Should You Care?

Before we talk about the Macs that are now based on Apple’s custom-designed M1 chip, let’s explain what it is and why it’s important.

First, the M1 is what’s called a “System on a Chip” or “SoC.” Instead of having a separate CPU (main processor), GPU (graphics processor), and RAM (memory, which both the CPU and GPU need), the M1 combines those components onto a single chip. The M1 also has a special 16-core processor, called the Neural Engine, that helps with machine-learning tasks, along with a custom storage controller, image signal processor, and Secure Enclave.

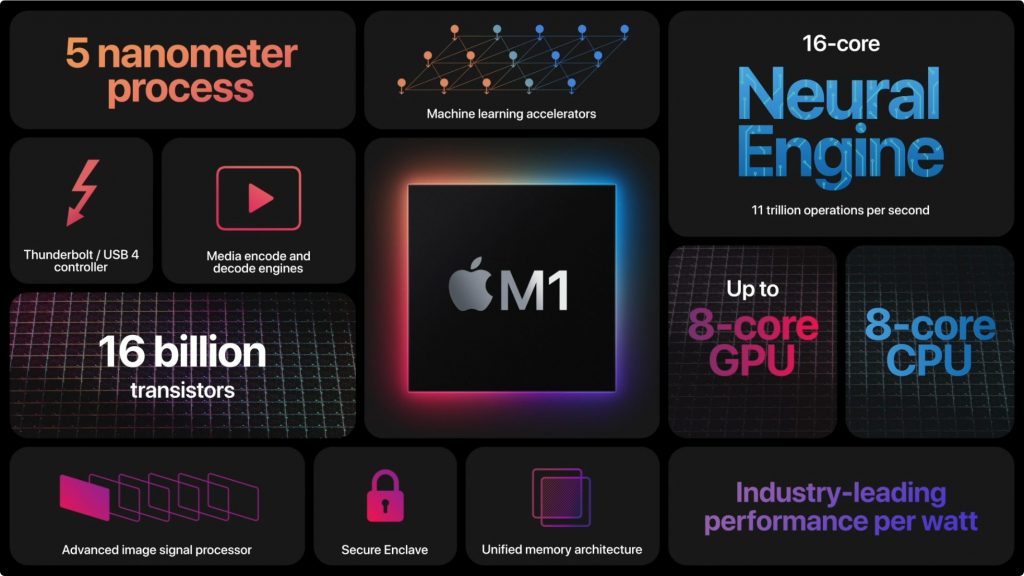
Within the 8-core CPU, Apple has four high-performance cores and four high-efficiency cores. When you need maximum processing power to edit a video, for instance, macOS dynamically brings the high-performance cores into play. However, if you’re just reading email, macOS switches to the high-efficiency cores to avoid wasting power and draining laptop batteries. Another way the M1 achieves its performance gains is through “unified memory.” By putting the RAM on the chip and sharing it among the CPU, GPU, and Neural Engine, those processors can access it more quickly than when it’s elsewhere on the motherboard. The downside is that the M1 chip comes with only 8 GB or 16 GB of RAM; there’s no option for more.

Second, since 2006, Macs have been powered by CPUs from Intel. Switching to its own M1 chip benefits Apple in three ways:

  • Performance: When Apple moved the Mac to Intel chips, it did so because IBM’s PowerPC chips couldn’t compete in performance per watt. That measurement is key for battery-powered laptops and has come home to roost again. With the M1, Apple has customized the design in many ways to provide up to three times the performance per watt.
  • Control: By designing its own chip, Apple can optimize performance in all sorts of small ways that integrate perfectly with macOS. Previously, Apple had to work with whatever Intel shipped, forcing Apple to make trade-offs in macOS. Plus, Intel’s roadmap and production schedule often conflicted with Apple’s.
  • Profit: Apple won’t say this, but Intel processors have high profit margins, and Apple would far prefer to keep that money rather than giving it to Intel.

In essence, the M1 will enable Apple to make Macs that are faster and cheaper, and that have better battery life. It will also allow Macs to run all iPhone and iPad apps, since the M1 is similar to the A-series chips that power those devices.

The first three Macs to take advantage of the M1 are the MacBook Air, 13-inch MacBook Pro, and Mac mini. Apart from a few small exceptions, the main thing that has changed about these Macs is the M1 chip. They look the same, feel the same, and work the same, although they do all come with—and require—macOS 11 Big Sur.

MacBook Air

The new M1-based MacBook Air confidently replaces the previous Intel-based model that Apple released in March 2020. It does so thanks to massive M1-powered performance improvements: up to 3.5x faster processing, up to 5x faster graphics, and up to 9x faster machine-learning workloads. The M1’s integrated storage controller and the latest solid-state storage technology also combine for up to 2x speedier SSD performance.

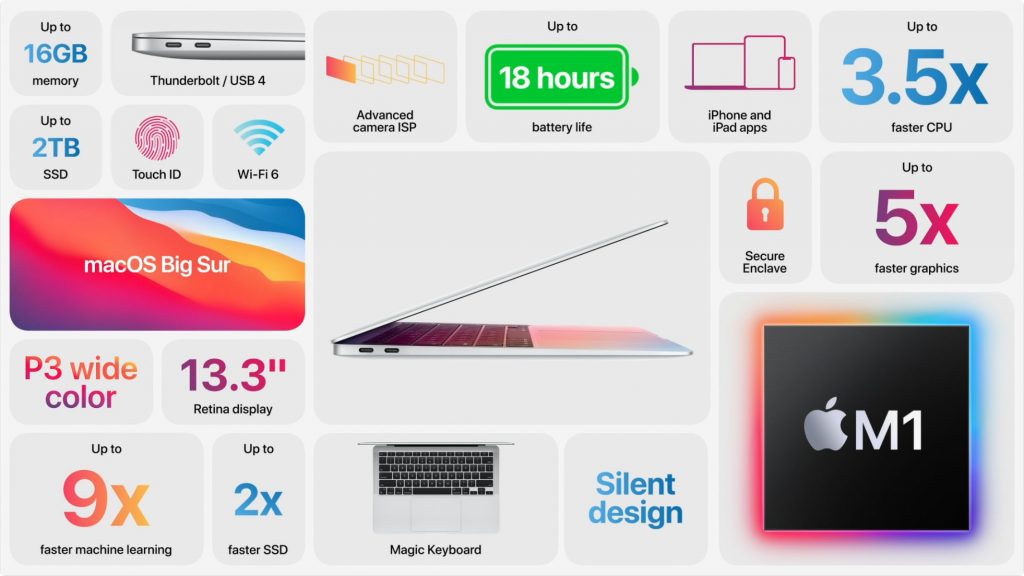
Because the M1 is so much more efficient than Intel chips, the MacBook Air no longer needs a fan to keep its cool. It’s now silent. Apple significantly improved battery life as well, promising up to 15 hours of “wireless web” and up to 18 hours of video playback, up from 11 and 12 hours for the previous model. More relevant is that videoconferencing should last twice as long on a single charge.

There are a few other small improvements:

  • Support for P3 wide color on the 13-inch Retina display
  • Two Thunderbolt 3 ports that support the new USB 4
  • 802.11ax Wi-Fi 6 networking, up from 802.11ac Wi-Fi 5
  • Better image quality on the (unchanged) 720p FaceTime HD camera, thanks to the M1’s dedicated image signal processor
  • Instant wake from sleep

Note that the MacBook Air lacks the Touch Bar of the MacBook Pro—which may be a pro or a con—but its Magic Keyboard does include traditional F-keys and a Touch ID sensor for login and authentication.

The MacBook Air comes in two configurations: a low-end model whose M1 chip has an 8-core CPU and a 7-core GPU, plus 8 GB of unified memory and 256 GB of storage for $999. The high-end model switches to an 8-core GPU and 512 GB of storage for $1249—that’s $50 cheaper than the previous high-end model. You can bump the RAM to 16 GB for $200, and the storage levels include 256 GB, 512 GB, 1 TB, and 2 TB.

Frankly, it’s a great machine.

13-inch MacBook Pro

Things get a little more confusing with the M1-based 13-inch MacBook Pro. Previously, there were four configurations, priced at $1299, $1499, $1799, and $1999. Apple replaced the bottom two with M1 configurations but left the top two with Intel chips. Why? Probably because the higher-end Intel models can take up to 32 GB of RAM. They also have four Thunderbolt 3 ports and a 4 TB storage option.

Apple doesn’t say if or by how much the new M1 MacBook Pro is faster than the Intel models, but it does say that it’s up to 2.8x faster overall than what it replaces, has up to 5x faster graphics, and is up to 11x quicker for machine-learning tasks. It should outperform the M1 MacBook Air, even though they share the same chip, because the 13-inch MacBook Pro has a fan that lets the M1 chip run faster and thus hotter than in the MacBook Air. Nonetheless, battery life is excellent, with up to 17 hours of “wireless web” and up to 20 hours of video playback—the longest battery life ever for a Mac.

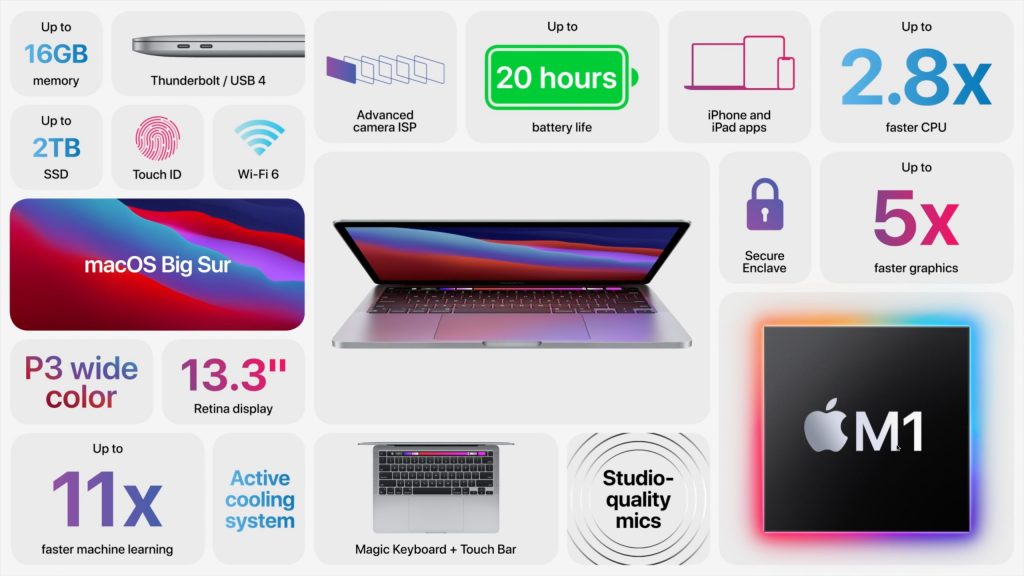
The M1 MacBook Pro shares most of the small improvements in the MacBook Air, including the two Thunderbolt 3/USB 4 ports, 802.11ax Wi-Fi 6, better image quality from the 720p FaceTime HD camera, and instant wake. New is a “studio-quality three-mic array” that promises better audio for videoconferencing. It already supported P3 wide color, and the Retina display remains gorgeous.

The M1-based 13-inch MacBook Pro starts at $1299 with an M1 chip that has an 8-core CPU, 8-core GPU, 8 GB of memory, and 256 GB of storage. Going to 16 GB of RAM costs $200, and you can upgrade the storage to 512 GB ($200), 1 TB ($400), or 2 TB ($800).

It can be hard to choose between the MacBook Air and the 13-inch MacBook Pro. Our take? Pick the MacBook Air for its lower price, fanless design, and F-keys, or go with the MacBook Pro if you’re willing to pay for more performance and a Touch Bar.

Mac mini

The third Mac model to switch to the M1 chip is the Mac mini. Like the 13-inch MacBook Pro, not all models make the jump, however. Previously, there were two Mac mini models, one starting at $799 and the other at $1099. The M1 Mac mini replaces the low-end model and drops the price to $699.

As with the other two M1-based Macs, the M1 Mac mini boasts impressive performance improvements. Apple says its CPU performance is 3x faster than the model it replaces, it has up to 6x faster graphics, and machine-learning tasks complete up to 15x faster.

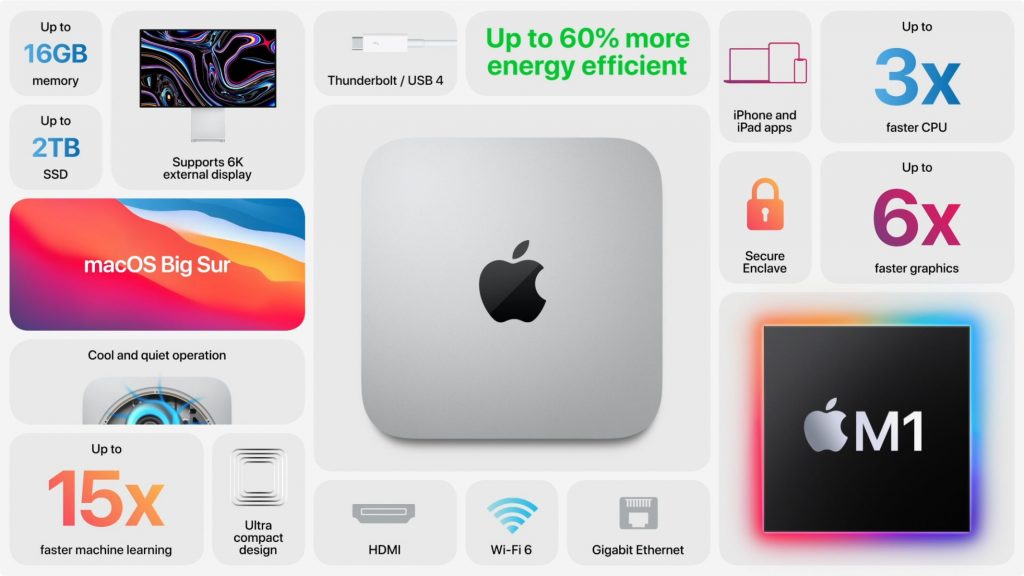
Although Apple made no comparisons with the remaining Intel-based Mac mini, we suspect the M1 model will be faster, and it has the new 802.11ax Wi-Fi 6. So why is that Intel Mac mini sticking around?

  • The M1 Mac mini offers only 8 GB or 16 GB ($200) of RAM, whereas the Intel Mac mini is configurable to 32 GB ($600) or 64 GB ($1000) as well.
  • The Intel Mac mini can drive up to three displays, whereas the M1 Mac mini supports only two. On the plus side, the M1 Mac mini can drive Apple’s 6K Pro Display XDR at full resolution, which the Intel Mac mini can’t.
  • The M1 Mac mini has only two Thunderbolt ports, whereas the Intel Mac mini has four.
  • The Intel Mac mini has a $100 option for 10 Gigabit Ethernet, whereas the M1 Mac mini is limited to Gigabit Ethernet.

Our feeling is that, at $200 cheaper, a comparable M1 Mac mini is a better deal unless you need any of the hardware options that exist solely on the Intel Mac mini.

macOS Big Sur on November 12th

Finally, Apple said that it would release macOS 11 Big Sur on November 12th. The new Macs require it, but put bluntly, we strongly recommend that you do not upgrade any other production Macs to Big Sur yet. Along with a complete user interface overhaul, it has significant under-the-hood changes that could pose compatibility problems for many workflows in the near term. We’ll be evaluating Big Sur with common productivity apps shortly and will update our advice about when it’s safe to upgrade as we learn more.

(Featured image by Apple)

Amazing New Tips for Rearranging Apps on Your iPhone or iPad

You’ve likely seen our tip on using the Dock on an iPhone or iPad as a temporary holding place that makes rearranging apps easier. We’ve learned two new tips that help even more! First, you can move multiple apps at once. Start by touching an app, waiting to feel a tap, and then moving it (or just touch and hold and tap Edit Home Screen to enter jiggle mode first). Once you’ve picked up an app, drag it down to the blank spot on the right side of the Home screen just above the Dock so you can see what you’re doing while keeping your finger down. Then, with a finger on your other hand, tap other apps to “stack” them on the first app. Now move the stack to the desired location and lift your finger. Second, instead of laboriously dragging the stack to another Home screen, before you lift your finger to drop the stack, use that other finger to swipe left or right to move between Home screens—in essence, you’re moving the Home screen under the stack you’re holding. For a visual demo of these tips, see the TidBITS video.

(Featured image by ammiel jr on Unsplash)

New Back Tap Feature in iOS 14 Provides Two Customizable Shortcuts

We all have things we do regularly on our iPhones, whether it’s checking the weather, searching Google, or invoking the magnifier. Apple has long provided ways of making your most common actions easier to access. You might put an app on your Dock, open Control Center, or take advantage of the triple-press Accessibility shortcut. With iOS 14, Apple has opened up a new and customizable way of triggering actions: Back Tap.

With a double or triple tap on the back of any iPhone 8 or newer running iOS 14, you can invoke any one of a variety of actions, including custom Shortcuts. Sorry, Back Tap isn’t available in iPadOS 14.

Enabling Back Tap is easy, although you might not stumble upon it on your own. That’s because it’s technically an accessibility feature for those who have trouble interacting with the iPhone physically. But just as curb cuts help both those in wheelchairs and stroller-pushing parents, the Back Tap feature is a boon for everyone.

Go to Settings > Accessibility > Touch > Back Tap (it’s way down at the bottom), where you can attach actions to both double tap and a triple tap.

Apple provides a broad set of actions, but most of them are focused on helping people who can’t use other iPhone gestures. So yes, you could make a double tap open Spotlight for searching, but unless that’s somehow a lot easier than swiping down on the Home screen, it’s not worth one of your two triggers. Actions fall into four categories:

  • System: Most of the System choices mimic easy Home screen gestures or button presses. Most interesting are Mute, which toggles the ringer volume without forcing you to press the Volume Down button repeatedly, and Screenshot, which takes a picture of your screen without making you press two buttons at once.
  • Accessibility: For those who need these Accessibility options, having them easily accessible via Back Tap will be welcome. The most compelling actions for the general public are Magnifier, Speak Screen, and Voice Control. (Voice Control provides much more capable dictation than Siri.)
  • Scroll Gestures: These options scroll a vertically oriented page or screen. Sadly, they don’t work for horizontally driven page flipping in book reading apps like Libby.
  • Shortcuts: Here’s where Back Tap becomes ultimately useful, at least if you can find or build the necessary shortcuts. Anything Shortcuts can do, you can invoke with a double or triple tap.

Wait, what’s Shortcuts? It’s an automation app that Apple includes with every iPhone. With it, you can chain together multiple actions derived from iOS capabilities or provided by your apps to create custom shortcuts. Other systems call similar collections of commands macros or automations or workflows.

Explaining how to build your own shortcuts is a topic for another day, but you can also download sample shortcuts from Apple’s gallery, both to see how it’s done and to use them. For instance, if you tap the Gallery button in Shortcuts ➊, tap Starter Shortcuts ➋, tap Take a Break ➌, and tap Add Shortcut ➍, you’ll copy the Take a Break shortcut to My Shortcuts. Then you can assign a double tap in Back Tap to invoke Take a Break, which sets an alarm for a specified number of minutes and turns on Do Not Disturb until the alarm goes off.

If you want to learn more about Shortcuts right away, check out Take Control of Shortcuts, a 122-page ebook by Rosemary Orchard.

Give it a try! Back Tap might turn out to be the iOS 14 feature you use more frequently than any other.

(Featured image by Ekaterina Bolovtsova from Pexels)

Home Screen Widgets Take Center Stage in iOS 14

A significant new feature in iOS 14 is Home screen widgets, information-rich tiles that share space on a Home screen with app icons. iPhone users familiar with Google’s Android smartphone operating system have long clamored for widgets because they provide quick information at a glance, without having to launch an app or swipe right on the Home screen for Today view.

In fact, you could think of iOS 14’s Home screen widgets as having escaped Today view—which is still there and provides access to a scrolling list of widgets that you choose. Widgets do need to be updated for iOS 14 to live on the Home screen and appear at the top of the Today view list. Older widgets remain accessible at the bottom of Today view, and you can add and remove them by tapping Edit at the very bottom of the Today view screen.

Adding Widgets

To add a widget to a Home screen or to Today view (which, for the purposes of widget management, is just another Home screen), follow these steps:

  1. Touch and hold any empty spot on a Home screen until the icons start jiggling.
  2. Tap the + button at the top of the screen.
  3. In the Widget pop-up, scroll or search to find apps that offer widgets.
  4. Tap any widget to see its options; swipe left and right to see different sizes or types of information.
  5. Once you’ve found the widget size and content you want, tap Add Widget.
  6. Back on the Home screen, drag the widget to the desired location, which may involve dragging it to another Home screen or the Today view. Remember that you can instead swipe with another finger to move the screen underneath the widget while you’re dragging.
  7. After you position it as you want, tap Done in the upper-right corner (Face ID) or press the Home button (Touch ID).

One tip: Other apps and widgets will move out of the way, which can be disconcerting, and it can result in your apps being shuffled around weirdly in the end. It’s safest to add widgets to an empty or nearly empty Home screen and, once you’ve gotten them configured as you like, move them to your final destination Home screen.

Choosing Widget Sizes and Types

Widgets come in up to three sizes: a small square that occupies the space of four app icons, a horizontal rectangle that’s the size of two rows of apps, and a large square that takes up the space of four rows of apps. Plus, apps can provide multiple widgets, so the Spark email and calendar app, for instance, has nine different widgets that show recent email messages and upcoming events in a variety of layouts.

You might be thinking that widgets are cool but that they take up a lot of space. That’s true, and although nothing prevents you from having a bunch of Home screens devoted to nothing but widgets, you can also combine widgets into a stack. To do this, when you’re in jiggle mode, simply drag one widget onto another of the same size, much as you’d add an app to a folder. iOS 14 combines the two and, once you leave jiggle mode, lets you swipe up and down on the widget to move between them. You can add quite a few widgets to a stack, though at some point, it will become challenging to find the one you want.

Stacks have another trick up their sleeve: Smart Rotate. When this option is enabled, the stack automatically displays the widget it thinks you’re most likely to want to see from the available set. How it chooses is a black box, so we can’t predict how well it will work for you. Smart Rotate seems to be on by default; if you want to check or turn it off, touch and hold on a stack ➊, tap Edit Stack ➋, and then toggle the Smart Rotate switch ➌. Note that you can also rearrange the order of widgets by dragging their handles ➍ and delete one directly by swiping left on it ➎.

For an Apple-mediated taste of what this might be like, consider adding a special type of widget: the Smart Stack, which always sits at the top of the otherwise-alphabetical list of apps that provide widgets when you’re looking for one to add. The Smart Stack widget, which is available in all three sizes, automatically populates itself with widgets that it thinks you’re likely to find interesting. It too employs Smart Rotate, and you can edit the Smart Stack just like one you’ve created.

Removing Widgets

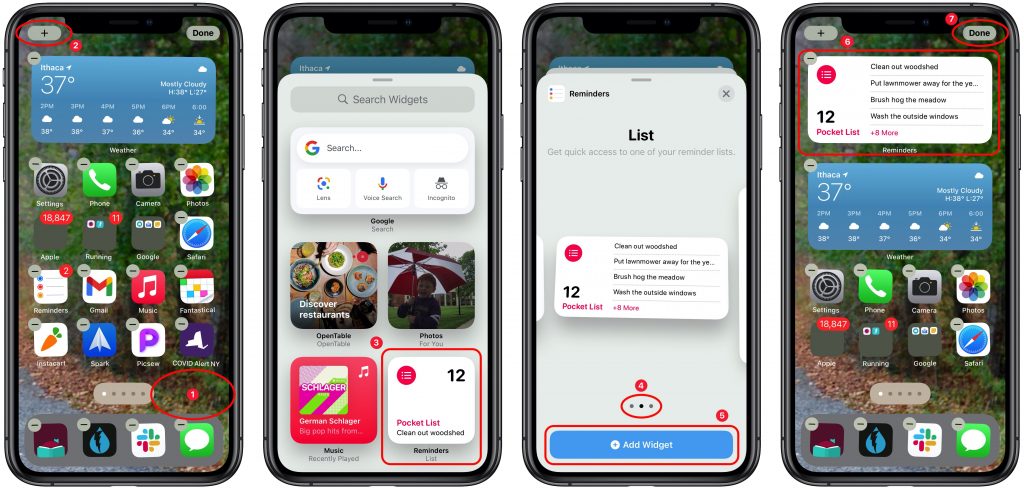
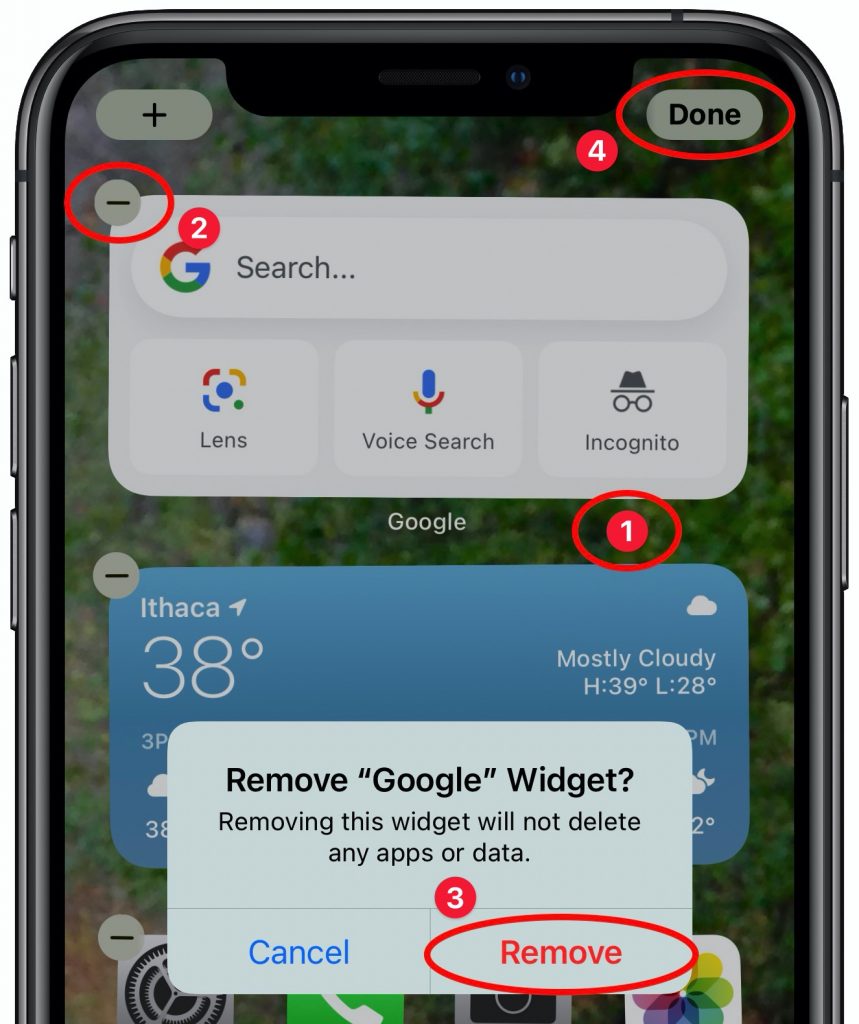
It will take some experimentation to hit upon a set of widgets that show the information you want, so don’t be shy about removing widgets or stacks that aren’t being helpful. To do so:

  1. Touch and hold any empty spot on a Home screen until the icons start jiggling.
  2. Tap the – button in the upper-left corner of a widget or stack.
  3. In the alert that appears, tap Remove. Repeat as desired.
  4. Tap Done in the upper-right corner (Face ID), or press the Home button (Touch ID).

You can also touch and hold a widget or stack and then tap Remove Widget or Remove Stack.

What’s most important about the new Home screen widgets in iOS 14 is that they’re completely individualized. No two iPhone users will even have the same widget choices, and as your favorite apps are updated for iOS 14, new widgets will appear. So take a few minutes to explore what’s available now, and be sure to check back every month or so.

(Featured image by Adam Engst)

What’s MDM, and Why Is It Useful for Organizations?

For those who work in organizations, regardless of size, you know how much effort is involved with coordinating a group’s technology. It can take quite some time to set up a new Mac, iPad, or iPhone with all the right apps, settings, and logins. And that’s just to get started—on an everyday basis, maintaining solid security practices is essential, and support requests are inevitable.

The solution to all this is MDM, or mobile device management, which is a way of centrally administering computers, tablets, and smartphones to simplify setup and ensure peace of mind for both employers and employees. Apple strongly encourages the use of MDM; the company continually enhances the core capabilities that MDM systems expose for IT administrators. If the benefits we outline here interest you, contact us to talk about your needs.

Benefits to the Organization

MDM is a big win for organizations, including businesses, non-profits, schools, government agencies, and more. It’s just too hard—and too insecure—to deal with every device individually. With MDM, organizations benefit in the following ways.

  • Quick, consistent setup: With MDM, organizations can create profiles—collections of settings and account information—and install them automatically as part of a deployment strategy. In the best case, users have to do little more than power on the device and sign in; it automatically checks with the MDM server and downloads the necessary information. MDM solutions also let organizations install and configure approved sets of apps to ensure that every employee has the tools they need at their fingertips.
  • Improved security: A great deal of digital security comes down to policies: requiring a strong passcode, ensuring secure settings for things like screensavers, requiring that backups be encrypted, and more. All these options are easily set and enforced by MDM profiles. Plus, MDM can separate personal and business accounts and data and even ensure encryption of on-device data. And perhaps most important, MDM enables remote locating, locking, and wiping of lost devices.
  • Lower costs: Although MDM solutions usually come with a monthly cost, research shows that organizations save money overall in two main ways. Initially, MDM reduces setup costs by replacing an hour or two of hands-on effort with remotely pushed deployment. Over time, the consistency of setup and app availability dramatically reduces ongoing support costs.
  • Asset tracking: An MDM solution enables information-rich asset tracking, making it easy for an organization to see exactly what devices it owns, which employees have them, and where they’re located. Such a system enables more efficient use of existing resources and easier lifecycle management.

Benefits to the User

Although it might seem as though MDM is primarily aimed at helping and protecting the organization, individual users benefit as well.

  • Personal/work separation: MDM makes it possible to separate personal and work accounts and data, which can eliminate the need to carry both personal and work phones at all times. In some cases, MDM can also make it so employees can securely use their own devices—which might be newer or more powerful—with organizational data and accounts.
  • Faster, easier setup: Most people don’t look forward to setting up and configuring devices, particularly when typing in usernames and passwords for numerous accounts. MDM does much of that, so employees can focus on their actual jobs.
  • Peace of mind: With the security policies enforced by MDM, users can have confidence that they haven’t inadvertently done anything to expose confidential data. Plus, mistakes happen, and devices are lost or stolen. An MDM solution might be able to locate a lost device, and if not, it can ensure that the device is both worthless and unable to reveal anything damaging.

As helpful as MDM is once your organization is using it, we won’t pretend that choosing and setting up an MDM solution is trivial. Unless you have significant IT staff and resources, it makes sense to work with people who already have considerable MDM experience. We do, and we’d be happy to discuss a custom approach that fits your needs.

(Featured image by Annie Spratt on Unsplash)