Apple Updates 13-inch MacBook Pro with Magic Keyboard and Twice the Storage

In a move that completes the transition of the MacBook line from the troubled butterfly keyboard to the Magic Keyboard, Apple has released a new 13-inch MacBook Pro. The company also doubled the amount of storage in each of the standard configurations while keeping prices the same, and it ramped up the specs in the model with four Thunderbolt 3 ports.

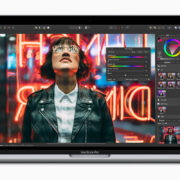
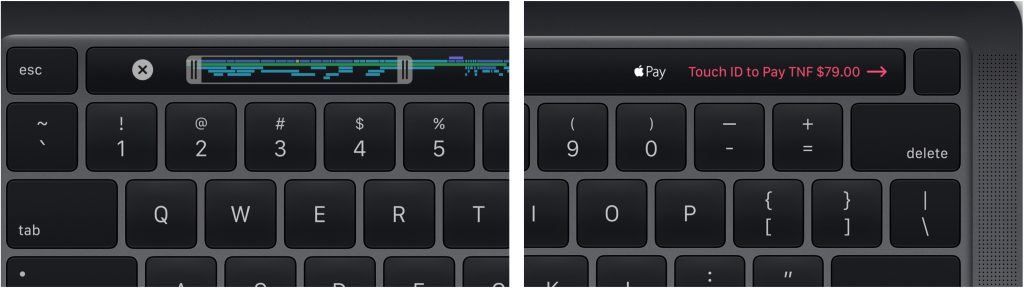
Like the MacBook Air that Apple released several months ago, the most notable change in the new 13-inch MacBook Pro is the replacement of the butterfly keyboard with the new scissor-key Magic Keyboard introduced last year in the 16-inch MacBook Pro. So far, that keyboard has been well-regarded. Unlike the MacBook Air, however, the 13-inch MacBook Pro continues to include Apple’s Touch Bar, though now with a physical Escape key and a separate Touch ID sensor.

Apple doubled the onboard storage across all base configurations, so the 13-inch MacBook Pro now starts at 256 GB, and you can choose from configs that include 512 GB, 1 TB, 2 TB, and even a whopping 4 TB.

As in the past, there are two models of the 13-inch MacBook Pro, one with two Thunderbolt 3 ports on the left side and another with four Thunderbolt 3 ports, two on each side. The two-port model receives the Magic Keyboard and additional storage, but is otherwise unchanged from last year’s model. It still features 8th-generation quad-core Intel Core i5 and i7 processors running at 1.4 GHz and 1.7 GHz, respectively (the faster processor is a $300 option), and 8 GB of RAM, upgradeable to 16 GB for $100.

However, Apple beefed up the four-port model with faster 10th-generation processors, either a 2.0 GHz quad-core Core i5 or, for $200 more, a 2.3 GHz quad-core Core i7 that should provide even better performance.

These new processors also feature updated Intel Iris Plus Graphics that Apple claims improve graphics performance by up to 80% and can drive the company’s 6K Pro Display XDR screen.

Finally, the four-port model now starts at 16 GB of RAM (up from 8 GB) for the same price, uses faster memory than before, and can be upgraded to 32 GB of RAM for an additional $400.

The two-port model of the 13-inch MacBook continues to start at $1299, and the price of the four-port model still starts at $1799. Both are available now in silver or space gray.

If you’re looking for a new laptop, which should you choose? With its new processors, more and faster RAM, and improved graphics performance, the four-port model provides a particularly attractive package for the price.

For those who would prefer something less expensive, however, the new MacBook Air may be more compelling than the two-port model of the MacBook Pro—it largely comes down to whether you would prefer the MacBook Pro’s Touch Bar or the MacBook Air’s function keys. Contact us for help choosing the right Mac for your needs!

(Featured image by Apple)

iPhone Not Charging Reliably? Clean Its Lightning Port with a Toothpick

If you’re plugging your iPhone in regularly but getting low-battery warnings when you shouldn’t, consider the possibility that something is preventing your iPhone from charging successfully while plugged in. If there’s no lightning bolt badge on the battery icon when the iPhone is plugged in, that’s a sure sign that no power is reaching the device. Another hint that failures could be happening intermittently would be a lack of charging in the Last Charge Level graph in Settings > Battery when you know the iPhone was plugged in. Luckily, the solution is often easy. Take a wooden (not metal) toothpick and gently poke around inside the iPhone’s Lightning port for pocket fuzz. You’d be amazed how much crud can end up in there. If cleaning doesn’t solve the problem and you use only a single Lightning cable to charge, try another one.

(Featured image by Adam Engst)

Audiovisual Tips for Better Videoconferencing

Whether for work or socializing, we’re all spending a lot more time in video calls these days. But—surprise!—it turns out that many of our group video calls could be more pleasant, less embarrassing, and overall better if we follow a few basic audiovisual tips.

Make Sure You Have Decent Lighting

Natural light is best, but room light is generally fine too, especially if it’s coming from the side. Overhead light isn’t quite as flattering, but whatever you do, avoid light that comes from underneath your face or you’ll look like an old-time movie villain. Also, avoid sitting in front of a window because the bright light behind you will make you look way too dark. Pull a shade or try to put your computer against the window so the light hits your face instead.

Arrange for a Decent Background

You may not have many choices for where your computer is located, and thus for what’s behind you when you’re on a video call. If you’re using Zoom or Skype, you can employ a virtual background (pick one that’s appropriate for the context, and for goodness sake, don’t use an animated background). Otherwise, make sure that what’s behind you is tidy and wouldn’t embarrass you if the people on the call were to visit in person. Or, take it up a level and put a pleasing arrangement of art or photos on the wall behind you. Even if they are too small to be seen well, they will break up a monotonous blank wall.

Wear Appropriate Clothing

Yes, it’s tempting to schlub around all day in pajamas or ratty old sweats. Resist the urge and wear the same type of clothes you’d put on if you were meeting with these people in person. That includes pants—if you get up in the middle of the call without thinking, you don’t want to advertise your taste in boxers. You don’t want your boss and colleagues to have a mental image of you as a total slob. For bonus points, avoid tops that are bright white, black, or have distracting patterns.

Think Like a Movie Director

Particularly if you need to use a phone, tablet, or laptop to participate in a video call, think about your camera angles. It’s best to have the camera at roughly the same height as your face, if possible, so if you can avoid it, don’t put your laptop in your lap or hold your phone at your waist. And if you’re using a phone, don’t walk around such that the changing background distracts everyone else.

And Like a Movie Star

It’s sometimes hard to remember that everyone can see you even though they’re not in the room, but you’ll come off as more alert, confident, and engaged if you sit up straight, get close enough to the camera so your face fills the screen, and smile. Seriously, you’re on Candid Camera, so act like it. You’ll almost always have a thumbnail that shows what you look like, so make sure you like what you see. Oh, and don’t touch your face repeatedly.

Look at the Camera, Not the Other Participants

This one is tough. The camera is usually at the top center of your screen, so if you look anywhere else, it seems like you’re avoiding eye contact. It can make you look shifty or inattentive. But it’s hard not to look at the other people or at your own video thumbnail. The best trick is to resize and position your video window so the person you’re most likely to look at is right under the camera.

Pay Attention and Don’t Multitask

Look, we get it—a lot of meetings are boring. But it’s both rude and distracting to the speakers if you are clearly doing something else or worse, leaving and coming back. Focus on the screen, and show that you’re paying attention by nodding your head, smiling, and all the other little things you’d do if the meeting were taking place in person. If you truly can’t stay engaged, turn off your audio and video so no one has to see and hear you. If you need an excuse for that, say that your Internet connection is being a little wonky, so you want to cut down on bandwidth usage.

Mute Your Mic When Not Talking

The more people on a call, the more important this tip is. All videoconferencing apps have a Mute button you can click so others in the call aren’t distracted by you coughing or sneezing, your children playing in the other room, or other extraneous noise. Just remember to unmute before you start talking. It’s hard to remember at first, but you’ll get good at it.

All this may seem like a lot to think about, but once you get your environment set up properly, you’ll be a bright spot in the video grid at your regular meetings. And then maybe you can forward this article to your family, friends, and colleagues so they can up their video game too.

(Featured image by Marcus Aurelius from Pexels)

Forrester Research and IBM Studies Show Macs Are Cheaper than PCs

It’s taken as gospel that Macs are more expensive than PCs. A quick look at the Dell Web site reveals laptops for as low as $300. Sure, we can say that the configurations aren’t comparable, that macOS is better than Windows, or that Apple’s hardware quality is superior. Still, our friendly local bean counters have trouble getting past those low upfront prices.

However, unless you’re Rancho Gordo, the goal isn’t to count beans, it’s to get work done, and that’s a different scenario. Let’s look at a few ways that Macs are not just worth the money but can also be cheaper than comparable systems. We’ll start with a Forrester Research study commissioned by Apple that compared the total economic impact of Macs and PCs in large companies with employee-choice programs. In such programs, every employee gets to choose between a Mac and a PC, providing a sizable group across which to compare numbers, but the conclusions apply to large and small organizations alike.

Deeper Cost Analysis

Although the Forrester Research study found that the upfront acquisition cost of Macs was indeed $500 higher than comparable PCs, when additional factors were taken into account, Macs ended up costing about $50 less.

That’s in part because Macs have a higher residual value after 3 years, meaning that you can resell a 3-year-old Mac for more than a 3-year-old PC. Pay more up front, but get more back later on.

Macs also don’t need operating system licenses, and the Mac’s better security eliminates the need for additional licenses for security software.

Reduced IT Support Costs

It has long been thought that Macs required less support than PCs, but only in the past few years have there been organizations with enough Macs and PCs to compare. At IBM, one of the largest Apple-using companies with 290,000 Apple devices, a 2016 study found that the company was saving up to $543 per Mac compared to PCs over a 4-year lifespan. Forrester Research came up with an even higher number, showing that Macs cost $628 less over a 3-year lifespan.

What accounts for these reduced support costs? It takes less time to set up a new Mac, Macs are easier to manage, Macs users open fewer service tickets, and many fewer IT staff are needed. All that adds up to paying for fewer support resources. In another 2018 study, IBM found that it needed just 7 support engineers per 200,000 Macs, compared to 20 support engineers per 200,000 Windows machines.

Improved Employee Productivity and Engagement

Beyond reduced support costs, Mac users turn out to be more productive, more engaged, and more likely to stay with the company than PC users. Forrester Research found that over 3 years, Mac-using employees posted 48 hours more productivity (in part due to reduced downtime). That’s likely thousands of dollars more benefit to the company, per employee.

Even still, it can be hard to quantify that benefit, which is why Forrester Research compared users in sales positions. In its study, Forrester found that Mac-using employees showed a 5% increase in sales performance. That’s nothing compared to IBM, which found that its Mac-based salespeople closed deals worth 16% more than their Windows-using counterparts.

Finally, both Forrester Research and IBM discovered that Mac users were less likely to leave the company—20% less likely in Forrester’s study and 17% less likely in IBM’s research. That’s not just an indication of loyalty. There are significant costs to replacing employees who leave, so the higher the retention rate, the better it is for the bottom line.

Improved Overall Security

Few would argue with the belief that Macs are more secure than PCs. In Forrester’s research, the interviewed organizations said that the Mac has a fundamentally more secure architecture than Windows. In today’s world, criminals employ malware to steal information. Data breaches are costly, with a 2019 study by IBM Security and the Ponemon Institute pegging the average cost of a data breach at $3.9 million. The amounts vary by industry and the size of the breach, of course, but the average cost per data record was nearly $150.

Security breaches can have other costs as well. With a compromised account, attackers have often been able to pose as executives and get accounting departments to wire money to offshore accounts. Plus, when news of a data breach hits, it can result in the loss of customers. In the IBM Security study, healthcare companies suffered from a 7% customer turnover after a breach.

So yes, Macs do have higher upfront costs than PCs. But savvy managers know to look past such simplistic comparisons to the bigger picture, where equipping employees with Macs both saves far more than the difference in cost between a Mac and a PC and enables employees to produce more for the organization.

(Featured image by freestocks on Unsplash)

Want to Push Some Buttons? Make the Most of Control Center in iOS

Starting back in iOS 11, Apple made Control Center significantly more useful by letting you customize it more to your liking by adding and rearranging buttons. You can even remove a few of the default buttons if they’re just taking up space.

Opening and Closing Control Center

To open Control Center in iOS 11 and later on an iPhone X or later (the models with Face ID), swipe down from the top-right corner of the screen. For iPhones with a Home button that use Touch ID (including the just-released iPhone SE and the iPod touch), swipe up from the bottom edge of the screen.

On an iPad, you’ll swipe down from the top-right corner of the screen if it’s running iOS 12 or iPadOS 13; if it’s still running iOS 11, swipe up from the bottom edge of the screen.

If you swipe down to invoke Control Center, you can close it by tapping a blank area of the screen or by swiping up from the bottom of the screen. If you swipe up to show Control Center, close it either by tapping the top of the screen or pressing the Home button.

Interacting with Controls

In Control Center, you can interact with the various controls in two ways: tap or press and hold. Unfortunately, the interface provides no clues to alert you to how you should interact with any given item.

Start with a tap, but it’s always worth pressing and holding to see what options Apple might have hidden behind that button. Some buttons, like Camera, Do Not Disturb, and Flashlight, even react to both a tap (launching the app or turning on) and a press-and-hold (providing extra useful options).

What happens when you tap a button varies, but here are some guidelines:

  • Apps: A number of buttons, like Camera, Magnifier, and Stopwatch, open other apps instantly. Alas, you can’t pick just any apps to open in this way.
  • Toggles: Some Control Center buttons, like Screen Lock and Low Power Mode, are simple on/off toggles. Tap the button once to turn it on; tap it again to turn it off.
  • Sliders: Drag the sliders for Brightness and Volume to adjust the intensity of the setting.
  • Option screens: With a few of the buttons, like Screen Mirroring and Text Size, a tap opens another screen with more options.

What happens when you press and hold is more predictable. If you press and hold a button that has more options (or if you press and hold a “card,” which is what Apple calls the collection of buttons for networking and audio controls), another screen opens, showing controls for those settings. Some of those screens provide even more options—press and hold the networking card to expand it from four buttons to six, and then press and hold the Wi-Fi, AirDrop, or Bluetooth button to switch Wi-Fi networks, choose who can send you files via AirDrop, or connect to Bluetooth devices.

Customizing the Controls

To change which buttons are available in Control Center, go to Settings > Control Center > Customize Controls. The Customize screen is split into two sections: Include lists controls that are showing in Control Center, and More Controls contains inactive controls you can add.

Here’s how to switch things up:

  • Add a button: Tap its green plus button. It moves to the Include list. You can add as many buttons as you like. If you add so many that they don’t fit on the screen, you’ll have to swipe in Control Center to see the extras.
  • Remove a button: Tap its red minus button, and tap Remove. The button moves to More Controls.
  • Arrange buttons: For any button in the Include list, drag the grab handle on the right side up or down.

Pay attention to which buttons you find yourself actually using in Control Center and how often you use them. Then you can adjust which ones appear and where they’re located, so you can find them quickly whenever you open Control Center.

Interesting Buttons

Apple has a full list of all the controls in Control Center, but here are a few of our favorite optional buttons, and what to expect from them:

  • Apple TV: This button opens an Apple TV remote control that can replace your Siri Remote. It’s especially useful when you need to type a search string or password into the Apple TV.
  • Clock Options: Need to keep track of the time? Three buttons—Alarm, Timer, and Stopwatch—each open their corresponding screen in the Clock app so you can complete a timing task quickly. Timer is the most useful because it has a press-and-hold option that lets you start a timer without switching to the Clock app.
  • Magnifier: Tapping the Magnifier button takes you to a camera-like app designed to zoom in on something in the physical world so you can see it better. It’s helpful for seeing tiny type, such as serial numbers on electronic devices.
  • Notes: Tap to start a new note in the Notes app. Or press and hold to bring up a menu of choices for starting a new note with a checklist, a photo, or a scanned document.
  • Screen Recording: Want to make a movie of something you see on your iPhone or iPad’s screen? Tap the Screen Recording button to start a recording, then tap the red button in the upper-left corner of the screen to stop.
  • Text Size: This button brings up a slider for adjusting the size of the system font—this is the text in places like the Messages and Settings apps.
  • Voice Memos: This button opens the Voice Memos app when you tap it, but if you press and hold instead, you can start a new recording immediately or access recent recordings. If your yoga instructor doesn’t mind, recording a class is a handy way to recap workout instructions.

Only Apple can provide new controls for Control Center right now, so you won’t find any options for working with independent apps. But who knows—as with Siri, perhaps Apple will open Control Center up to developers in the future too.

(Featured image by Adi Goldstein on Unsplash)