Invoke Split View More Easily in Catalina

Split View on the Mac helps you focus on your work in one app—perhaps a word processor—while providing access to one other app, like a Web browser. (Make sure “Displays have separate Spaces” is selected in System Preferences > Mission Control.) Before macOS 10.15 Catalina, you had to click and hold on the green full-screen button in the upper-left corner of any window, drag that window to one side of the screen, and click a window on the other side to put them side by side. Catalina makes this easier to discover: hover over the green full-screen button briefly and then choose Tile Window to Left of Screen or Tile Window to Right of Screen before selecting a window on the other side of the screen. If you don’t want a 50-50 split, drag the black divider bar between the windows to adjust the proportions. To leave Split View, move your pointer to the top of the screen to reveal the menu bar and then click the green full-screen button.

Split View Catalina

(Featured image by Adam Engst)

Set Your Preferred Name and Photo for Messages in iOS 13

In your list of conversations in Messages, you probably have lots of people who have generic icons next to their names or numbers. You likely look like that to other people as well, but a new feature in iOS 13 lets you share your preferred name and avatar picture with other iMessage users (blue-bubble friends). In Messages, first tap the ••• button and then Edit Name and Photo. Then, in the activity view that appears, tap Edit under your photo to select a new photo and set your name as you want it. Make sure Name and Photo Sharing is enabled before tapping Done. From now on, for any iMessage conversations, you’ll see a little banner at the top that asks if you want to share your name and photo. Do so and your recipient will get a prompt to replace whatever they’re seeing for you. (And if, as a recipient, you don’t want to accept the new photo, tap the X button at the right of the prompt.)

Photo in Messages

(Featured image by Daniel Frese from Pexels)

Troubleshooting Steps for When Your Mac Won’t Print 

There’s little more frustrating than being unable to print a document when you need it. You choose File > Print, and nothing happens. Or, worse, macOS looks like it’s printing, so you focus on some other task, only to realize 20 minutes later that nothing has come out of the printer. Now what? Try these troubleshooting steps.

Check the Printer’s Print Queue App

Whenever you print, the printer’s Print Queue app appears in your Dock, named for the printer. (If it doesn’t, open System Preferences > Printers & Scanners, select the desired printer and click Open Print Queue.)

Print Queue Paused

In the Print Queue app, look at the status of the printer and the print job. First off, if you print to multiple printers, does the app correspond with the correct printer? If not, cancel the job by clicking the X button to its right, quit the Print Queue app, print again, and choose the correct printer from the Printer pop-up menu in the Print dialog.

The Print Queue app may also display a useful error message that tells you what’s wrong, such as the printer being offline or not connected. You may also see old print jobs stuck in the queue that are blocking the current job—delete them by clicking the X next to their names.

If something has caused the printer to be paused, click the green Resume button. That won’t work if the printer has paused itself due to a paper jam or low supplies—in such a case, resolve the problem first.

Check the Printer and Its Connection

Error messages may have given you a hint about problems with the printer itself, but they’re not always helpful. Verify the following:

  • Is the printer turned on? Doh! If necessary, turn it on. Also, try turning it off and back on—this resolves a surprising number of printing problems.
  • Is the printer connected? It should be connected via either USB or your Wi-Fi or Ethernet network—make sure the cables are plugged in and it’s on the same network as your Mac. Consider restarting your router if there seem to be communication issues.
  • Does the printer have paper in it? No paper, no printout.
  • Is there a paper jam? Printers usually squawk about paper jams. Clear it before trying again.
  • Are any ink or toner cartridges empty? Some printers are notorious for refusing to print if even one ink cartridge is empty, or even low. That can be true even if you’re printing only in black and a color cartridge is empty.

There’s one final check of the printer you can perform: printing a test page directly from the printer (check your printer’s manual for instructions). If that fails, the printer may need servicing.

Check Your Mac’s Printing Setup

The final place to look for a solution to printing problems is in your Mac’s printing subsystem. Problems here can be specific to your document or to its app, or they can be related to the printer driver.

For your first test, try opening your document in Preview as a PDF (in the document’s Print dialog, choose PDF > Open in Preview) and printing it from Preview.

Print to PDF

If that works, you know that your Mac can print, so the problem has to do with either the document or the app. To isolate the problem to the document or the app, print another simple document from the app. If that does print, you know the problem is with your document, but since you’ve already gotten a PDF to print of that document, your immediate problem may be already solved. If the problem is with the app, you’ll eventually need to solve it, of course. But most of the time, the problem actually lies with your printer driver.

It’s uncommon for driver updates to come outside of macOS updates these days, but check System Preferences > Software Update just to make sure. You can also check the printer manufacturer’s Web site for updates; Google on “printerNameAndModel Mac driver” to find what’s available. Compare that against what you see when you select the printer in System Preferences > Printers & Scanners and click the Options & Supplies button. If there’s a newer version, download and install it.

Canon Pixma Drivers

If installing a new version doesn’t work, try deleting the printer from Printers & Scanners and re-adding it. Select the printer in the list and click the – button at the bottom to delete it. Then click the + button and add it back.

No luck? Try deleting the driver and adding it again, but choose a different option from the Use pop-up menu at the bottom. Start with the name of the printer itself instead of Secure AirPrint to ensure you’re using the manufacturer’s driver instead of Apple’s. If that doesn’t make a difference, try again with Generic PostScript Printer or Generic PCL Printer—beware that they may not provide full functionality beyond basic printing. For the ultimate in trying something different, if it supports your printer, try installing an independent driver from the open-source Gutenprint project.

Alternate Drivers

One note: if possible, avoid using the Printer Sharing feature that’s been in macOS for years. It works, but it requires that the Mac doing the sharing be turned on and awake whenever anyone using the shared printer wants to print.

If you’re still stuck, go nuclear. Go back to the Printers & Scanners preferences, Control-click any printer, and choose Reset Printing System. As the warning dialog tells you, doing so will delete all your existing printers, scanners, and faxes, and any pending print jobs. You’re basically resetting your printing system to factory defaults, after which you’ll have to add printers back again.

Reset Printing System

One of these solutions will almost certainly solve your problem, but if not, give us a call!

(Featured image by Adam Engst)

How to Choose Between iCloud Photos and My Photo Stream

For quite a few years, Apple enabled users to download their iPhone or iPad photos to their Macs with a service called My Photo Stream. It wasn’t perfect, but it was free, and it did a decent job of ensuring that photos you took on your iPhone or iPad would end up on your Mac.

Then Apple introduced iCloud Photo Library, later renamed to iCloud Photos, which is a full-featured cloud-based photo syncing service. However, because it stores all your photos in the cloud, most people need to purchase more storage from Apple to use it.

As a result, Apple has kept My Photo Stream around, at least for most existing users. (The company says, “If you recently created your Apple ID, My Photo Stream might not be available. If My Photo Stream isn’t available, use iCloud Photos to keep your photos and videos in iCloud.” Huh.) For those who have a choice, which should you use? (On the Mac, you make that choice in Photos > Preferences > iCloud; in iOS, look in Settings > Photos.)

Photos Preferences

Cost and Storage Details

The key advantages of My Photo Stream over iCloud Photos are that My Photo Stream is completely free and the storage it uses doesn’t count against your iCloud limits.

In contrast, Apple gives every iCloud user 5 GB of free storage, but that’s shared among all your iCloud services, like iCloud Drive and icloud.com email, so it disappears quickly. Most of us have more than 5 GB of photos anyway. You can purchase 50 GB for $0.99 per month, 200 GB for $2.99 per month, or 2 TB for $9.99 per month (prices vary slightly in other countries).

On a pure price basis then, My Photo Stream wins. However, it suffers from other limitations that make it less compelling:

  • My Photo Stream stores your photos on your iOS devices in a lower resolution to save space and transmission time. On the Mac, however, your photos download in full resolution. In contrast, iCloud Photos lets you choose on each device whether you want original images or optimized versions to save space—full-resolution originals are always stored in iCloud itself.
  • My Photo Stream manages only the last 30 days of photos and only the last 1000 photos. That’s fine for just transferring photos from your iPhone to your Mac for permanent storage, but your other devices will be able to display only your most recent photos. iCloud Photos stores all your photos as long as you have sufficient space.
  • When you edit a photo while using My Photo Stream, the edits apply only to the photo you edited, not to versions synced with other devices. With iCloud Photos, all edits you make—on any of your devices—sync to all the rest of your devices.

Supported Formats

There’s another big gotcha with My Photo Stream. It supports only photos and images in JPEG, PNG, and TIFF formats, plus most raw formats. That doesn’t sound terrible until you realize that it doesn’t include Live Photos or any video formats. That’s right—My Photo Stream won’t sync your Live Photos or videos from your iPhone to your Mac at all! You’ll have to move them over manually in some other way.

In comparison, iCloud Photos supports the same still image formats as My Photo Stream and adds GIF, HEIF, and more raw formats, along with Live Photos. Plus, it supports MP4 and HEVC videos. In other words, iCloud Photos will sync all your images and videos, regardless of format.

Supported Devices

Finally, My Photo Stream works on the Mac, iPhone, iPad, iPod touch, and Apple TV, and with Windows-based PCs. iCloud Photos extends that list to include the Apple Watch and the iCloud.com Web site. Apple Watch support likely isn’t a dealbreaker for most people, but it can be useful to be able to see all your photos in a Web browser on any computer.

Making the Choice

Technically speaking, you can have both My Photo Stream and iCloud Photos turned on. However, if you’re using iCloud Photos, My Photo Stream doesn’t get you anything, so you should turn it off.

If you’re trying to save money and have more than 5 GB of photos, My Photo Stream works to bring most of your iPhone photos down to your Mac for permanent storage in the Photos app. Just beware that it won’t sync your Live Photos or videos, and any other iOS devices you have will be limited to seeing the last 30 days or 1000 photos.

For most people, though, iCloud Photos is the way to go. It’s easily worth $12 or $36 per year for 50 GB or 200 GB of storage, it syncs all your photos and videos among all your devices, and it even syncs edits.

(Featured image based on originals by Jon Tyson on Unsplash and OpenClipart-Vectors from Pixabay)

What to Do If You Run Low on iCloud Storage Space

By default, Apple gives every iCloud user 5 GB of storage space. That disappears quickly, given how it’s shared between iCloud Mail, iCloud Drive, iCloud Photos, Messages, and iCloud-enabled apps.

Apple will, of course, sell you more iCloud space. $0.99 per month gets you 50 GB, $2.99 per month provides 200 GB, and for $9.99 per month, you can use a whopping 2 TB. The latter two plans can even be shared with others in your Family Sharing group.

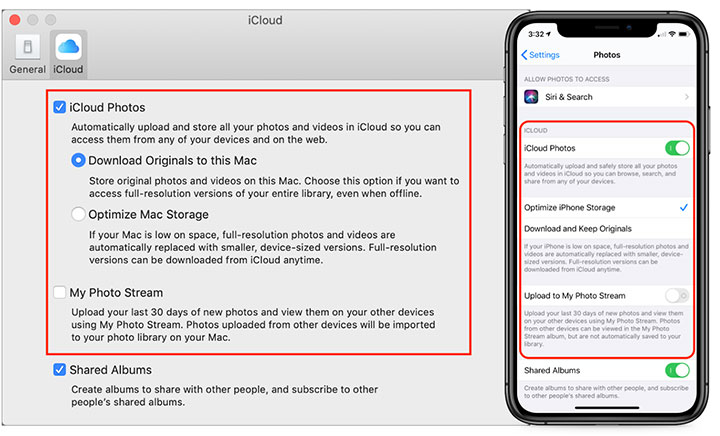
As we’ve noted elsewhere, using iCloud Photos almost certainly requires you to pay for extra storage. But if you’re paying $2.99 per month and nudge up against the 200 GB limit, you may not be enthused about increasing your payment to $9.99 per month when you’re unlikely to need anywhere near 2 TB.

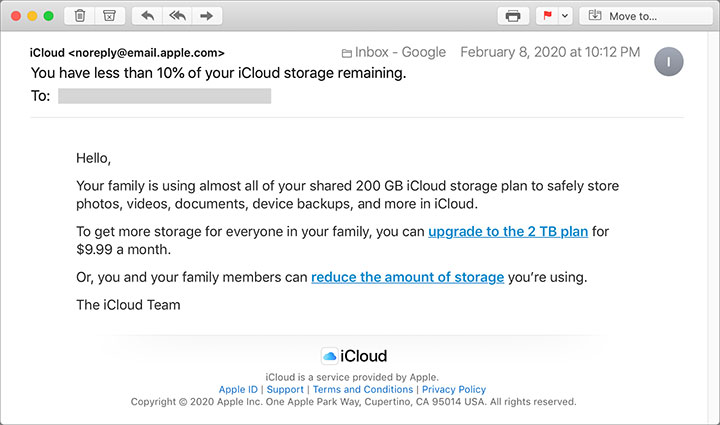
That said, you don’t want to run out of storage space. Email to your iCloud email address will be rejected, photos won’t upload from your iPhone, and app data will fail to sync. Happily, Apple alerts you when you’re running low on space, before things get bad.

Apple Warning

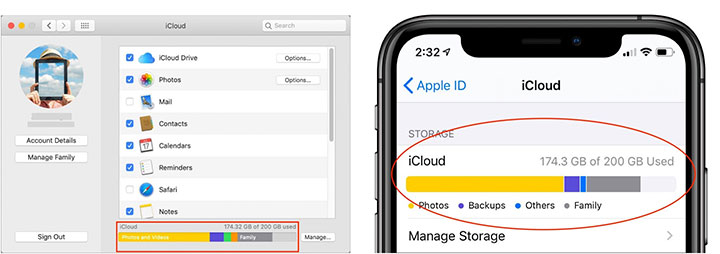
It’s often easy to recover space that’s not being used in a helpful way. First, check how much space you have and how much you’re using. In macOS 10.14 Mojave, look at the graph at the bottom of System Preferences > iCloud. In 10.15 Catalina, the graph is in System Preferences > Apple ID > iCloud. In iOS, you’ll find a similar graph at Settings > Your Name > iCloud.

iCloud Storage

Then, to clear space, work through these five approaches.

1. Remove Unnecessary iCloud Device Backups

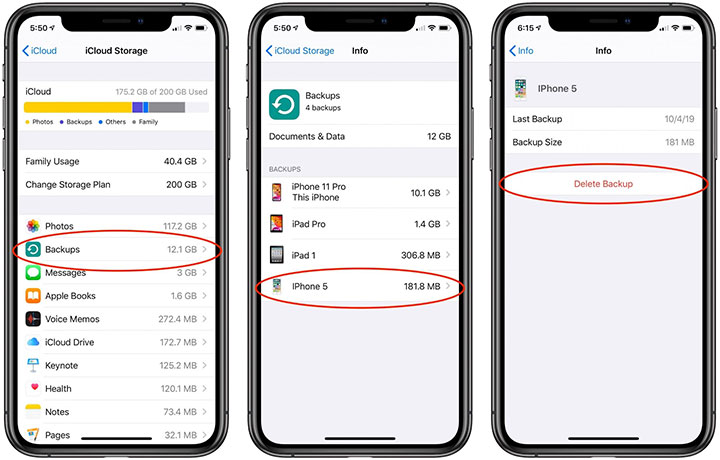
The biggest win comes from deleting iCloud device backups for devices you no longer use. It’s common for these to stick around, so if you recently upgraded from an iPhone X to an iPhone 11 Pro, the iPhone X backup is probably still consuming gigabytes.

Navigate to Settings > Your Name > iCloud > Manage Storage > Backups to see what you have. If you find backups for a previous iPhone or iPad, tap it and then tap Delete Backup.

Delete Old Backups

2. Delete Unnecessary Data from iOS Apps

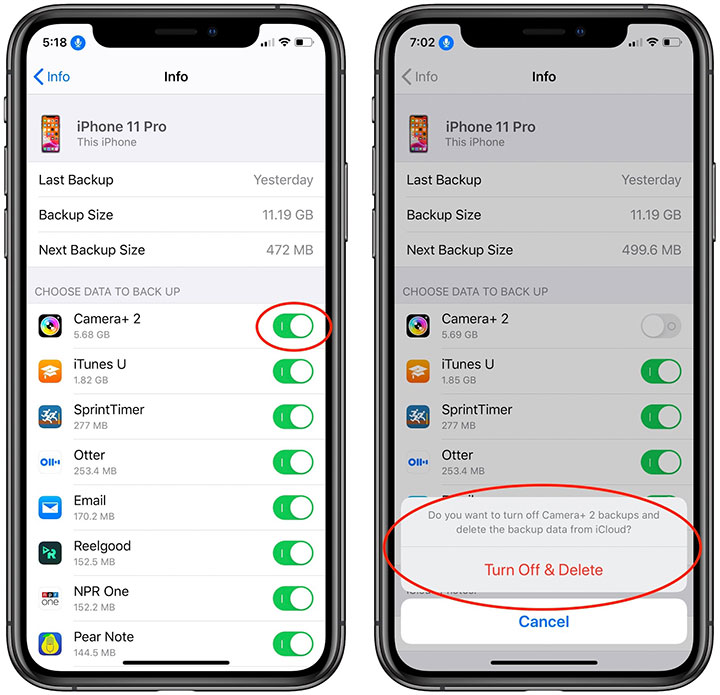
While you’re in the iCloud Storage screen (the leftmost screenshot above), look through the other apps at the top of the list. The Photos app will likely be using the most storage, but all you can do to minimize its space usage is delete unnecessary screenshots, duplicate photos, and accidental videos from Photos. That will likely require lots of manual effort.

However, some other apps—think about third-party camera or video apps—may be using space unnecessarily. Investigate any apps reporting a lot of usage in the iCloud Storage screen, and if possible, clear out the unnecessary data.

Finally, consider Messages. If you regularly trade photos and videos in chats, it could be another place you can save significant space. In the iCloud Storage screen, tap Messages > Top Conversations to see which conversations are the largest. Tap one to switch to Messages, tap the person’s avatar at the top of the conversation, tap the Info button, scroll down to see the photos, and tap See All Photos. Tap Select, tap photos you have no desire to keep within that Messages conversation, and then tap Delete at the bottom-right of the screen.

Clean Messages

3. Avoid Backing Up Apps with Massive iCloud Data Stores

If one of your apps is storing a lot of data that you don’t want to delete, but that you don’t care if it were to be lost, you can prevent it from being backed up by iCloud Backup and reduce the size of your backups.

To find such apps, navigate to Settings > Your Name > iCloud > Manage Storage > Backups and tap the name of the device you’re on. That screen shows which apps consume the most space in your backup. Tap the toggle switch next to an app to stop backing it up and delete its data from your backup.

Prevent Apps from Backing Up

4. Scan for and Delete Large Files in iCloud Drive

It’s hard to know if you’re likely to be using lots of space in iCloud Drive—it all depends on what iCloud-savvy apps you use and if you store other files in iCloud Drive via the Mac’s Finder or the Files app in iOS.

There’s no need to guess, however, thanks to free Mac apps that help you identify especially large files and folders. Our favorites are GrandPerspective and OmniDiskSweeper. GrandPerspective uses a graphical view so you can see at a glance where your space is going, whereas OmniDiskSweeper opts for a classic text-based approach that gives you hard numbers. In GrandPerspective, choose File > Scan Folder and select iCloud Drive in the sidebar of the Open dialog. For OmniDiskSweeper, choose File > Size Folder.

Scanning Disks

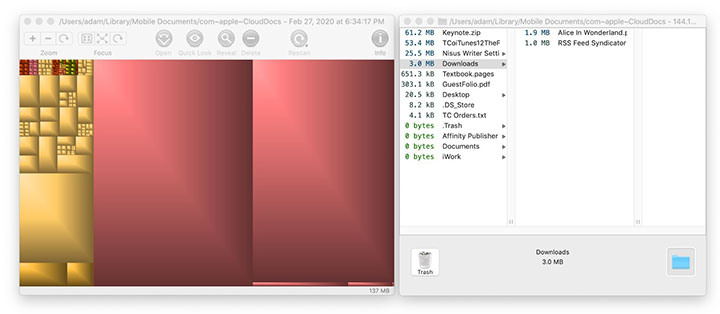
Whichever app you use, it’s easy to select large files or folders and click Delete (GrandPerspective) or Trash (OmniDiskSweeper). You may have to set an option in GrandPerspective > Preferences to enable deletions if its Delete button is disabled.

5. Delete Old Email from iCloud Mail

All the email you store at iCloud counts against your free space, so it can be worth clearing out unwanted old messages (and their large attachments). To delete individual messages using Apple’s Mail, just select them and click the Trash button in the toolbar. Some messages are much bigger than others, however, and to find them, choose View > Sort By > Size. That puts the largest messages at the top.

Of course, deleting messages normally just moves them to the Trash mailbox; to reclaim the space they occupy on iCloud, choose Mailbox > Erase Deleted Items > AccountName. Once you do that, the messages are gone for good.

If you want to remove an entire mailbox and its contents, select it in the sidebar and choose Mailbox > Delete Mailbox. That deletes all of its messages immediately and can’t be undone.

When you put all these space-clearing techniques together, you’ll likely be able to clear enough cruft that you won’t have to pay Apple for more iCloud storage space. But if you’re uncomfortable deleting such data, there’s no shame in upgrading to a larger iCloud storage plan.

(Featured image by stokpic from Pixabay)