Do You Put Dates in Filenames? Use This Format for Best Sorting

There are plenty of situations where it makes sense to put a date in a filename, but if you don’t use the right date format, the files may sort in unhelpful ways. For instance, using the names of months is a bad idea, since they’ll sort alphabetically, putting April before January. And although the Mac’s Finder is smart enough to sort filename-3 before filename-20, most other operating systems are not (because 2 comes before 3). So, to make your life—and the lives of everyone with whom you share files—a little easier, use this date format, which is guaranteed to sort correctly everywhere: YYYY-MM-DD. That translates to a four-digit year, followed by a two-digit month (with a leading zero if necessary), and a two-digit day (again, with a leading zero if need be).

(Featured image by Henry & Co. on Unsplash)

Which Precise Mac Model Do You Have? Here’s How to Find Out

Apple likes to keep Mac names simple, but that’s not always helpful. For instance, if you want to add RAM to your Mac, it’s not good enough to know that it’s an iMac. You’ll need to know that it’s a 27-inch iMac with Retina display from late 2014. To find that out, choose About This Mac from the Apple menu. In some cases, you might even need to know the model identifier, which is a numeric code that’s accessible if you click the System Report button in the About This Mac window, and then click Hardware at the top left of the System Information window. It will be something like iMac15,1.

(Featured image modified from an original by Startup Stock Photos from Pexels)

iOS 13 Makes Editing Text Easier

Let’s be honest—text editing in iOS has never been anywhere near as good as it is on the Mac. We may be more accustomed to our mice and keyboards, but the Multi-Touch interface has always been clumsy when it comes to text. Apple keeps trying to improve iOS’s text editing features, and iOS 13 (and iPadOS 13) brings some welcome changes in how we go about positioning the text insertion point, selecting text, and performing the familiar options in the Mac’s Edit menu: Cut, Copy, Paste, and Undo/Redo. Has it caught up with the Mac yet? You’ll have to decide that for yourself, once you’ve learned the new techniques.

Note that these changes apply only to spots in iOS where you’re entering and editing text, not selecting and copying static, read-only text such as a Web page in Safari. And even when you are working on a Web page where you can enter and edit text, the site may override iOS’s text handling.

Insertion Point Positioning

Positioning the insertion point on the Mac is easy—you move the cursor to the right spot and click. In previous versions of iOS, you could tap to put the insertion point at the start or end of a word, or press and hold briefly to bring up a magnifying glass that let you put the insertion point anywhere, including within a word. It was slow and awkward, and made better mostly by trackpad mode, which you could invoke by long-pressing the Space bar.

iOS 13 improves positioning by letting you press and hold the insertion point to pick it up and then drag it to where you want it. This approach is much easier and more sensible than the previous method.

Selecting Text

On the Mac, you can select text with multiple clicks, by clicking and dragging, or by using the keyboard. In iOS, however, text selection has always been tough—you could double-tap to select a word, but anything else required subsequent moving of start and end markers. (On an iPad with a keyboard, you could hold Shift and use the arrow keys too.)

Happily, iOS 13 improves text selection. To start, you can still double-tap to select a word, but you can also triple-tap to select a sentence (shown below) and even tap four times in quick succession to select an entire paragraph. Unfortunately, these selection shortcuts may not work in all apps, but you can always fall back on the previous approach.

For selections of an arbitrary length, just press, pause ever so briefly to start selecting, and then drag to extend the selection. In other words, it’s as close to the Mac approach as is possible with the Multi-Touch interface. If the selection isn’t quite right, you can adjust the start and end markers.

Cut, Copy, Paste, and Undo Gestures

Everyone knows Command-X for Cut, Command-C for Copy, Command-V for Paste, and Command-Z for Undo on the Mac. In previous versions of iOS, those commands were available only from a popover that appeared when text was selected, or (for Paste) when you pressed and held in a text area. The only command with a gesture, so to speak, was Undo. At the risk of dropping it, you could shake your iOS device to undo your last action. Not good.

iOS 13 introduces a variety of three-finger gestures to make these commands quick and easy to invoke. Note that you can use the entire screen for these gestures—it’s OK to make them with one finger over the keyboard.

  • Copy: To copy selected text, pinch in with three fingers, or, more likely, your thumb, index finger, and middle finger.
  • Cut: To cut (copy and then delete) selected text, perform the copy gesture twice in quick succession.
  • Paste: To paste the text you’ve copied at the insertion point, reverse the action—pinching out (spreading) with three fingers.
  • Undo: To undo a mistake, immediately swipe left or tap twice with three fingers. You can keep swiping or double-tapping to undo more actions.
  • Redo: To redo the action that you just undid, swipe right with three fingers.

Whenever you use one of these gestures, a little feedback badge appears at the top of the screen to reinforce what you just did.

If you can’t remember which direction to pinch or swipe, press and hold with three fingers anywhere for a second to see a shortcut bar at the top of the screen with icons for Undo, Cut, Copy, Paste, and Redo.

Finally, instead of using Cut and Paste to move a swath of selected text, try dragging it to the new position.

Slide to Type

Various third-party keyboards have provided “slide-to-type” over the years, letting you type a word by sliding your finger from letter to letter on the keyboard without lifting it up in between. But switching to a third-party keyboard meant that you often gave up useful other features, like Siri dictation, so most people stuck with Apple’s default keyboard.

On the iPhone, iOS 13 now lets you slide to type on its default keyboard, and it works surprisingly well. In iPadOS 13, slide-to-type works only on the new floating keyboard you can get by pinching with two fingers on the default keyboard (pinch out with two fingers to restore the default keyboard). When you get to the end of a word, lift your finger to insert it, and then start sliding again for the next word. If you make a mistake, the suggestions above the keyboard often provide the word you want. You can switch between tapping (best for unusual words) and sliding on a word-by-word basis.

Make a mistake with sliding? By default, tap Delete after inserting a slide-to-type word to delete the whole word, not just the final letter. If you don’t like that behavior, turn off Delete Slide-to-Type by Word in Settings > General > Keyboard.

(Featured image by Lorenzo Cafaro from Pixabay)

What Does Having a T2 Chip in Your Mac Mean to You?

If you own an iMac Pro, or a Mac mini, MacBook Air, or MacBook Pro model introduced in 2018 or later, your Mac has one of Apple’s T2 security chips inside. On the whole, having a T2 chip in your Mac is a good thing, thanks to significantly increased security and other benefits, but there are some ramifications that you may not realize.

What Is a T2 Chip?

Let’s step back briefly. In late 2016, Apple introduced the T2’s predecessor, the T1, in the first Touch Bar–equipped MacBook Pros. The T1 offered three primary capabilities:

  • Management of the Touch Bar’s Touch ID fingerprint sensor and storage of sensitive biometric information
  • Integration of the System Management Controller, which is responsible for heat and power management, battery charging, and sleeping and waking the Mac
  • Detection of non-Apple hardware

The T2 builds on the T1’s foundation, adding four more important capabilities:

  • Real-time encryption and decryption of data on built-in SSDs
  • Support for invoking Siri with “Hey Siri”
  • Image enhancement for built-in FaceTime HD cameras
  • Optional protection of the Mac’s boot process to prevent it from starting up with an external drive

All these functions become possible because the T1 and T2 are essentially separate computers inside your Mac, much like the A-series chips that power iOS devices. They have their own memory and storage, and run an operating system called bridgeOS that’s based on watchOS.

Some of these features enhance performance by offloading processing (like enhancing FaceTime HD and listening for Siri) to a separate chip. Others increase security by ensuring that they can’t be compromised by an attack, even if macOS itself has been infiltrated.

How Does a T2 Chip Increase Your Security?

There are four basic ways that the T2 chip increases security, two of which apply only to the MacBook Air and MacBook Pro models.

Secure Boot

The T2 chip ensures that all the components involved in the Mac’s boot process, including things like firmware, the macOS kernel, and kernel extensions—can be cryptographically verified by Apple as trusted. That prevents an attacker from somehow inserting malicious code at boot and taking over the Mac.

There are two gotchas, however. First, Secure Boot trusts only code that’s signed by Apple, with one exception: a specific bootloader signed by Microsoft to enable Windows 10 to work with Apple’s Boot Camp technology for running Windows on a Mac. That means you can’t boot from Linux in Boot Camp, for instance.

Second, with Secure Boot in its default settings, you can’t boot from an external drive at all. That’s great for security but can make troubleshooting internal drive problems tricky. To control these settings, Macs with T2 chips have a Startup Security Utility available in macOS Recovery (boot while holding down Command-R). You can use it to allow booting from an external drive for troubleshooting reasons and to turn down security if you need to install an older version of macOS or install macOS without an Internet connection available.

Encrypted Storage

Because the T2 contains both a crypto engine and the SSD controller, it enables on-the-fly encryption and decryption of all data stored on the internal SSD. It uses the same technology as FileVault and requires a password at startup. Macs with internal hard drives and external hard drives don’t receive the T2’s protection but can still be encrypted via FileVault.

The big win from the T2 encrypting all stored data is that there’s no way to decrypt the data without the password—as long as your password can’t be guessed, there’s no reason to worry about your data if your MacBook Pro disappears. The potential downside here is that it’s impossible to recover data from a damaged Mac without the password.

The T2 chip also controls what happens with failed password attempts. Fourteen tries are allowed without delays, and then tries 15 through 30 are permitted with increasingly long delays (1 hour between tries for the last three). After that, more attempts are possible, but after 220 total attempts through various approaches, the T2 chip will refuse to process any requests to decrypt data, rendering it unrecoverable. In short, back up your data!

Touch ID

The T2 chip manages the Touch Bar’s Touch ID fingerprint sensor that lets you log in to your MacBook Air or MacBook Pro without entering your password. Even so, the password is required after turning the Mac on or restarting, and the Mac also requires the password if you haven’t unlocked it in 48 hours, if you haven’t provided the password in the last 156 hours and used your fingerprint over the previous 4 hours, or if the fingerprint read fails five times.

Mic Drop

This isn’t exactly related to the T2 chip, but all T2-equipped MacBook Air and MacBook Pro models feature a hardware disconnect that disables the microphone whenever the lid is closed. That prevents any software from turning on the mic and eavesdropping on you. No disconnect is necessary for the FaceTime HD camera when the lid is closed because its field of view is completely obstructed in that position.

So there you have it. The T2 chip significantly increases the security of your Mac, but it comes with tradeoffs that make it harder to boot from external drives or run other operating systems.

(Featured image modified from an original by ahobbit from Pixabay)

Everything You Need to Know about Multitasking in iPadOS 13

With this year’s operating system updates, Apple has formally acknowledged that the iPhone and iPad have different uses and different needs. To that end, Apple has given the iPad version of iOS 13 its own name—iPadOS 13.

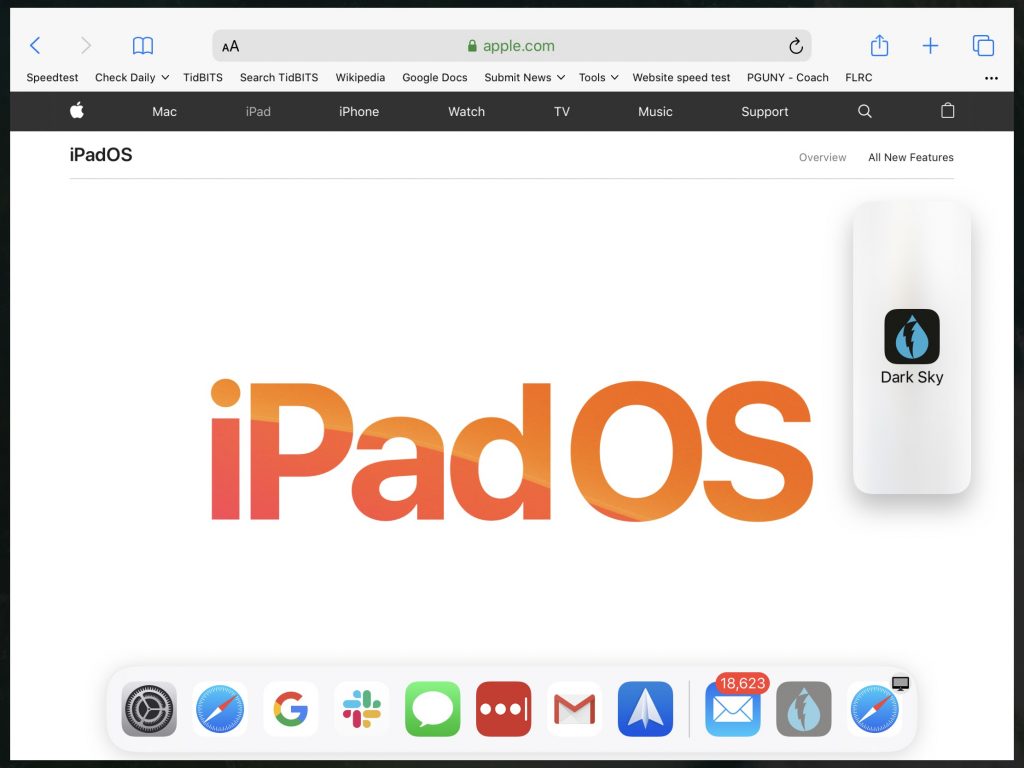
The big changes include a desktop-class version of Safari that works better with complex Web apps, a redesigned Home screen that sports more icons and Today View widgets, a new floating keyboard you can use for thumb-typing or with one hand, Apple Pencil improvements, and the Sidecar feature that lets you use an iPad as a Mac’s second screen or graphics tablet.

Also important are the tweaks Apple made to iPadOS’s multitasking capabilities. Particularly when you pair an iPad with a Smart Keyboard, you can now get real work done on an iPad more fluidly than ever before. The “hard” part is learning how you switch between apps, display a second app in a Slide Over panel that floats on top of another app, or make two apps share the screen in Split View. Here’s what you can do.

Switch Between Apps

Moving between apps is a key aspect of using the iPad. Apple has provided multiple ways to switch so you can pick those that best fit your style:

  • Press the Home button, and on the Home screen, tap another app’s icon.
  • Swipe down on the Home screen to show Siri app suggestions and search for any app.
  • Within an app, swipe left or right with four fingers to switch to the previous or next app.
  • Within an app, swipe up from below the bottom of the screen to reveal the Dock, and then tap an icon on it. The three rightmost icons are your most recently used apps.
  • After revealing the Dock, keep swiping up to reveal the app-switching screen, then tap an app thumbnail to switch to it. Swipe right to see less recently used apps.
  • On a physical keyboard, press Command-Tab to bring up a Mac-like app switcher. Release both keys quickly to switch to the previous app instantly, or keep Command down while you press Tab repeatedly to move sequentially among the shown apps, letting up on Command to switch. While the app switcher is shown, you can also tap an icon in it.

Display an App in Slide Over

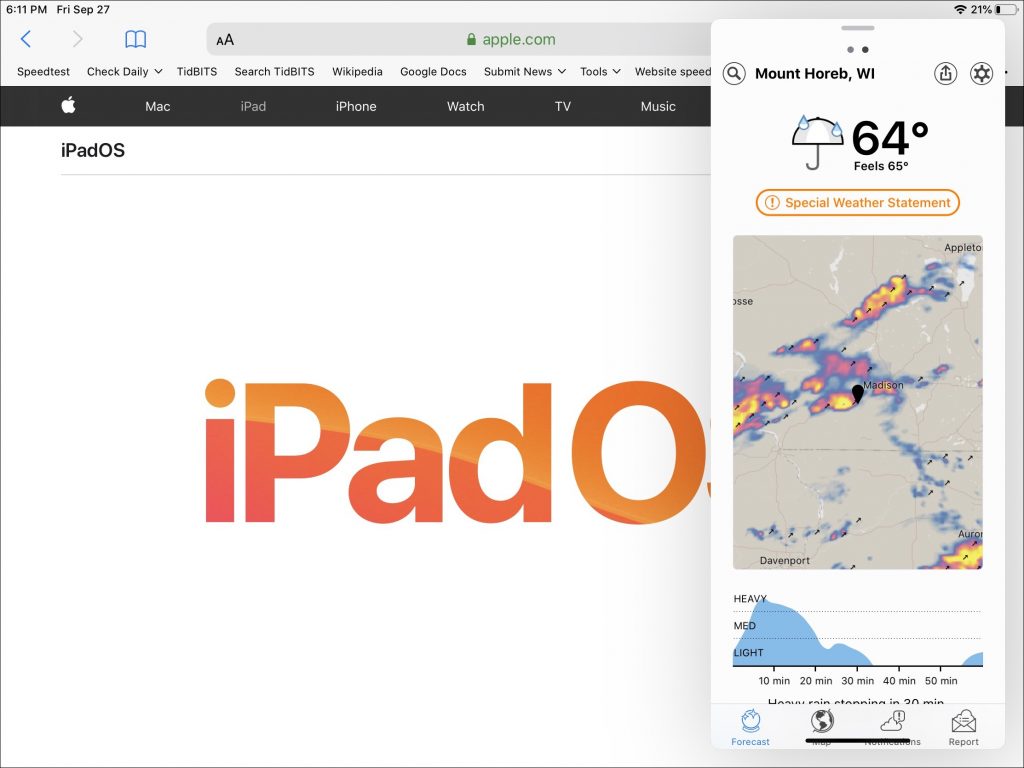
Say you’re working on your iPad, perhaps in Safari, and you want to keep an eye on your favorite weather app (we like Dark Sky) because an upcoming storm might affect your upcoming bike ride. You don’t need to see both apps all the time, but you also don’t want to have to switch back and forth. With Slide Over, you can put Dark Sky in a panel that floats over Safari and then hide and show it.

The easiest way to put an app in a Slide Over panel is to use the Dock, so this technique works best if the app’s icon is already on the Dock. For instance, while you’re in Safari, swipe up from the bottom of the screen to display the Dock. Then touch and hold the Dark Sky app’s icon until it dims slightly. Keeping your finger down, drag the icon over Safari until it becomes a vertical lozenge.

Lift your finger, and Dark Sky appears in Slide Over. (If you get a horizontal rectangle instead of a vertical lozenge, the app won’t work in Slide Over because it needs a larger window.)

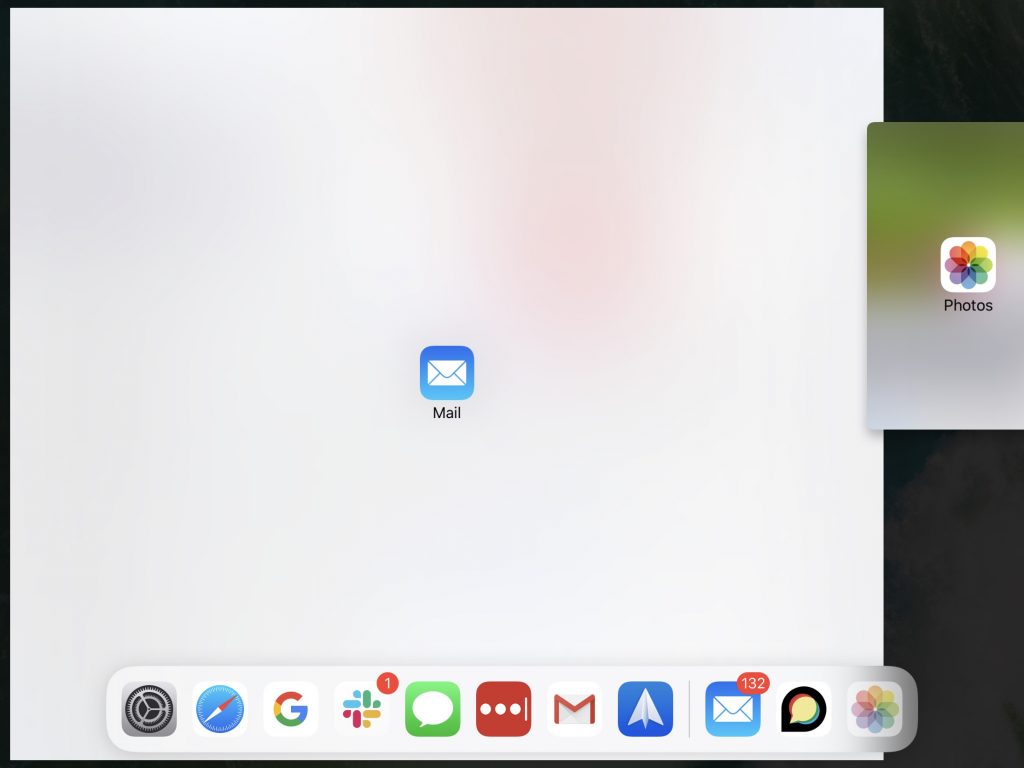
If the app you want to put in Slide Over isn’t on your Dock, you can use a two-handed procedure to get it from another location and drop it onto another app. Working on the Home screen or the Siri search screen, start dragging an app icon (it’s OK if the icons start wiggling). Then use your other hand to switch to the other app (perhaps by swiping right with four fingers or pressing Command-Tab on a physical keyboard) and drop it over the other app. Don’t worry if you have trouble at first—it takes time to become accustomed to two-handed usage.

Once an app is in Slide Over on the right side of the screen, you can swipe right on its left edge or the gray bar at the top to hide it, or swipe left on its right edge or gray bar to move it to the other side of the screen. If Slide Over is hidden, swipe left from the right edge of the screen to display it.

If you think Slide Over looks a bit like an iPhone app on your iPad screen, iPadOS 13’s big enhancement will make sense. You can now open multiple apps in Slide Over—just drag a new app over the main app as you would normally. Once you have two or more apps in Slide Over, you can cycle through them by swiping right or left on the thick black bar at the bottom, just like on a Face ID-equipped iPhone. To see what you’ve got in Slide Over, swipe up slightly on that thick black bar to display a Slide Over app switcher; tap any thumbnail to switch to it.

Open Multiple Apps in Split View

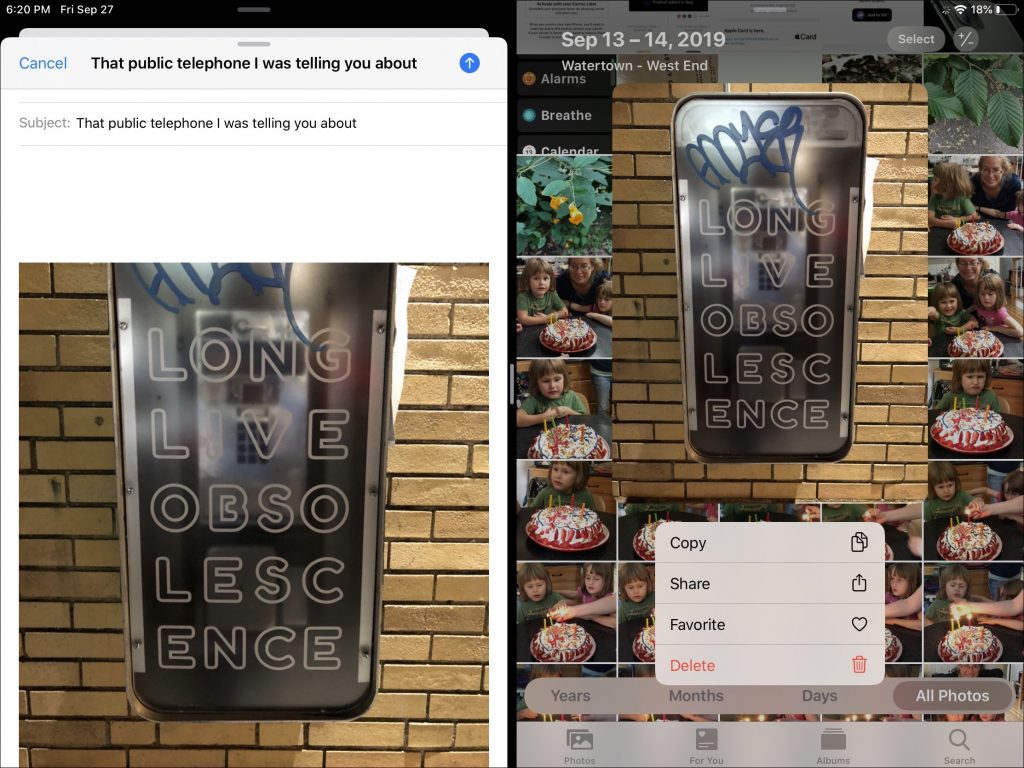
Imagine that you want to email someone a photo you took, so you want Mail and Photos showing at the same time. Displaying two apps side-by-side in Split View is nearly the same action as Slide Over. The difference is that, instead of dropping the app lozenge on top of the current app, you drag it to the far left or right of the screen, and drop it once the screen shows a 90/10 split—after you drop, the split changes to 50/50.

Drag the handle between the apps to switch to a 70/30 or 30/70 split; if you drag the handle all the way to one side of the screen, the app that’s shrinking in size disappears entirely. Both apps in Split View have a handle at the top as well, and dragging one of those down slightly converts that app into a Slide Over panel.

Bonus tip: If you’ve become comfortable with Split View, note that you can also grab an app by that handle and drop it to the left or right of another app—switch apps with your other hand—to move it to another Split View space. (You can also drag a Slide Over app’s handle down slightly to switch it to Split View.)

New in iPadOS is the capability to open multiple windows from the same app. Not all apps support this (or Split View at all), but Safari and Notes are good examples of apps that do. To do this, while in the app, bring up the Dock, tap the app’s icon, and then tap the + button in the upper-right corner of the screen.

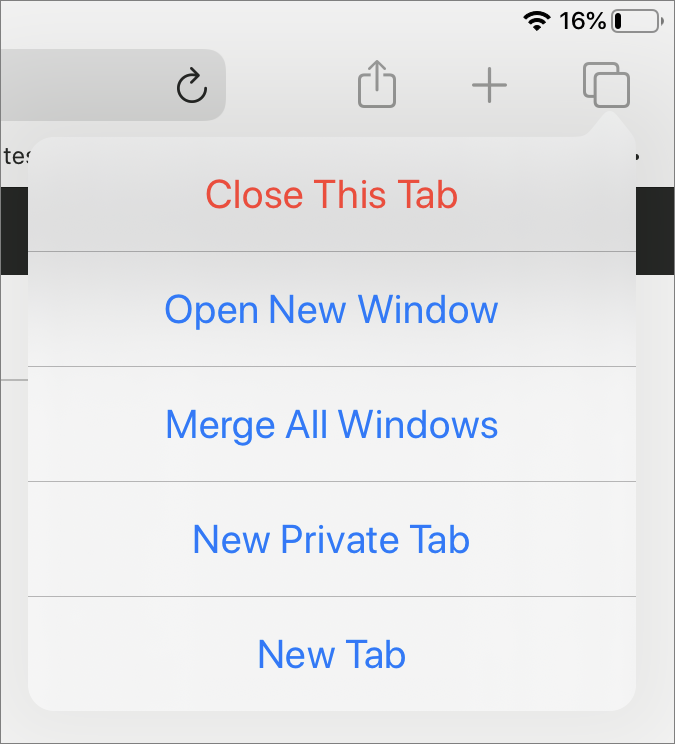
There are more direct ways of opening multiple windows from the same app too. In Safari, tap and hold the Tabs icon (two stacked squares) and then tap Open New Window to get a second Safari window. You can also drag a tab from Safari’s Tab bar to the side of the screen to open it in Split View.

Similarly, you can drag notes from the sidebar in Notes to open them in Split View, either as a second Notes window within the same space, or as an addition to a new Split View space.

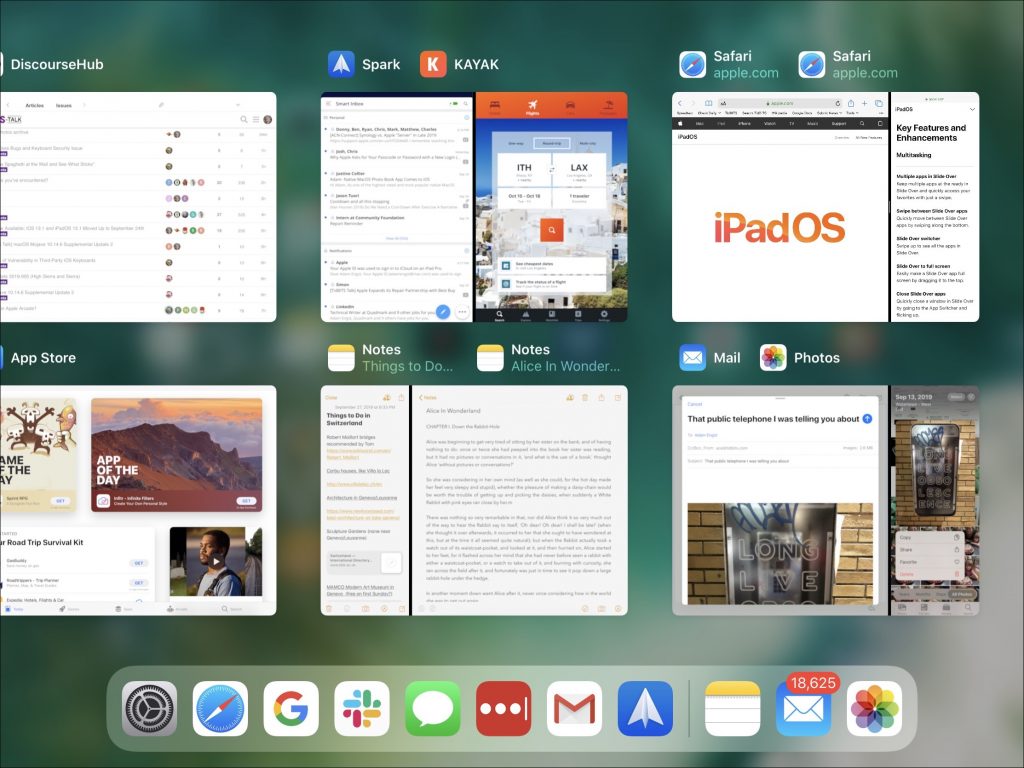
With all these possibilities, it’s easy to get confused about what’s open where. The iPadOS app switcher now displays thumbnails of the Split View spaces so you can switch among them easily.

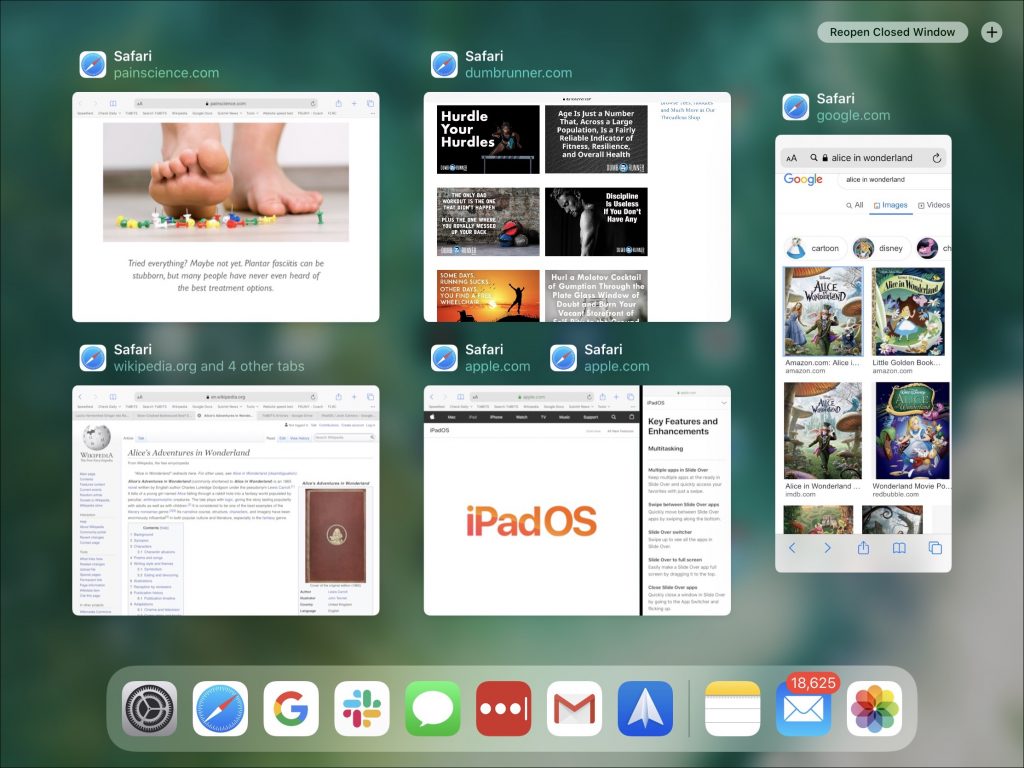
And if you aren’t sure which space has a particular Safari window, for instance, tap and hold the Safari icon in the Dock (or anywhere else) and choose Show All Windows to see all the spaces—including Slide Over—that include Safari windows (Apple calls this App Exposé).

Take a few minutes and try putting apps in Slide Over and Split View in different ways, since some of the actions require practice before they feel natural. Finally, if combining two particular apps doesn’t seem to work, don’t fret. Apps must specifically support both Slide Over and Split View, and not all do.

(Featured image by Adam Engst)