Photos Not Syncing between Devices Properly via iCloud Photos?

iCloud Photos (which Apple previously called iCloud Photo Library) is wonderful when it’s working. Take some photos on your iPhone, and they appear on your Mac and iPad a minute later. Delete unnecessary shots and edit the others on your Mac, and your iPhone and iPad reflect those changes almost immediately. But what if changes aren’t syncing? Photos in iOS and macOS can pause syncing for a variety of reasons, and sometimes it doesn’t restart when it should. To see if this is happening, go to the very bottom of the Photos view in Photos, where it lists the number of photos and videos you have stored. Below that number is the sync status. If it has a reason and a Resume link, click or tap Resume to start it again.

What’s with All These Dialogs Saying, “SomeApp is not optimized for your Mac”?

If you’re running macOS 10.13.4 High Sierra or macOS 10.14 Mojave, you may have seen a dialog that says an app isn’t optimized for your Mac. The message differs slightly between High Sierra and Mojave, with the High Sierra version telling you the developer needs to update the app to improve compatibility whereas Mojave saying bluntly that the app won’t work with future versions of macOS.

What’s going on here, what should you do, and when should you do it?

What’s Going On: 32-bit and 64-bit Apps

Over a decade ago, Apple started to transition all the chips used in Macs, along with macOS itself, from a 32-bit architecture to a 64-bit architecture. Without getting into technical details, 64-bit systems and apps can access dramatically more memory and enjoy significantly faster performance.

Apple knew it would take years before most people were running 64-bit hardware and 64-bit-savvy versions of macOS, so it allowed macOS to continue running older 32-bit apps. However, maintaining that backward compatibility has a cost, in terms of both performance and testing, so at its Worldwide Developer Conference in 2017, Apple warned developers that High Sierra would be the last version of macOS to support 32-bit apps “without compromise.” At the next WWDC in June 2018, Apple announced that macOS 10.14 Mojave would be the last version of macOS to run 32-bit apps.

Happily, the only “compromise” for 32-bit apps in Mojave is the warning dialog, which appears every 30 days when you launch an older app. But the writing is on the wall: 32-bits apps will cease working in macOS 10.15.

How Do You Identify 32-bit Apps?

Apple provides a tool to help you find 32-bit apps. Follow these steps:

  1. From the Apple menu, choose About This Mac and then click the System Report button.
  2. In the System Information utility that opens, scroll down to Software in the sidebar and select Applications. It may take a few minutes to build the list of every app on all mounted drives.
  3. When it finishes, click the 64-bit column header (No means 32-bit; Yes means 64-bit) to sort the list, and select an app to see its details in the bottom pane.

This technique works in both High Sierra and Mojave, but in Mojave, System Information includes a better-formatted section, called Legacy Software, that also provides a list of 32-bit apps. However, this list may be smaller because it includes only those apps that you’ve launched. Since it’s likely that you open old 32-bit apps only occasionally, you can’t trust the Legacy Software list to be complete.

If you find System Information’s Applications list overwhelming, check out the free 32-bitCheck utility from Howard Oakley. It performs exactly the same task but lets you focus on a particular folder and save the results to a text file for later reference.

What’s Your Next Step?

Once you know which apps won’t work in macOS 10.15, you can ponder your options. Luckily, you have some time. We expect Apple to release macOS 10.15 in September 2019, but you don’t need to upgrade right away—in fact, we recommend that you wait a few months after that to allow Apple time to fix bugs.

That said, we do encourage upgrading eventually, and if you buy a new Mac after September 2019, it will come with macOS 10.15. So you need to establish a plan—it’s better to know what you’re going to do than to be forced into action if you have to replace your Mac on short notice. For each 32-bit app on your Mac, you have three options:

  • Delete it: It’s not uncommon to have old apps that you haven’t used in years and won’t miss. There’s no need to waste drive space on them in macOS 10.15.
  • Upgrade it: Apps in active development will likely have a new version available. The main questions are how much the upgrade will cost and if there are compatibility issues associated with upgrading. You can upgrade at any time, although it’s likely worth waiting until you’re ready to move to macOS 10.15 to minimize costs. The apps that cause the most irritation here are things like the Adobe Creative Suite—Photoshop, Illustrator, and InDesign—that require switching to a monthly subscription.
  • Replace it: If no upgrade is available, the cost of upgrading is too high, or upgrading comes with other negatives, it’s time to look for an alternative. This can take some time, so it’s worth starting soon to ensure that the replacement will provide the features you need before macOS 10.15 forces the decision.

Needless to say, if you’d like recommendations about how to proceed with any particular app or workflow, get in touch with us!

Is Your Photos Library Too Big? Here’s How to Move It to an External Hard Drive

SSDs are essential for ensuring optimal performance on a Mac, but because they’re expensive, many people don’t have as much built-in storage space as they would like. If your Photos library has grown to the point where your SSD is nearly full, it might be time to think about offloading it to an external hard drive. (Don’t put it on a drive that you’re using as a Time Machine destination because there could be permissions conflicts, and note that Apple doesn’t recommend storing a Photos library on a drive shared over a network.)

Before we explain how to offload your photos, we want to mention another way of reducing the Photos footprint on your drive. If you’re using iCloud Photos (previously called iCloud Photo Library) to sync photos and videos between your devices, the originals are all stored in iCloud. In Photos > Preferences > iCloud, you can enable Optimize Mac Storage, which swaps the full-resolution images for smaller versions, saving a boatload of space. However, you may find Photos somewhat slower to use, as it has to download full-resolution versions of images you work with, and you won’t have a local backup of the original images. So it’s an option, but it has tradeoffs.

For most people with burgeoning Photos libraries, a better approach is to offload the entire library to an external hard drive. This approach comes with tradeoffs too; accessing images from a hard drive is slower than getting them from an internal SSD, and you have to figure out how you’re going to back up that drive as well. Plus, the drive has to be available, connected, and turned on (so you have to listen to it) for you to use Photos at all, which might be especially annoying if you regularly work remotely on a notebook Mac.

To move your Photos library to an external drive, follow these steps:

  1. If it’s running, quit Photos.
  2. In the Finder, drag Photos Library, which is stored in your Pictures folder by default, to the external drive. A few answers to common questions:
    • Where on the external drive should I put it? It doesn’t matter, but we recommend putting it at the top level so you are less likely to lose track of it in the future.
    • I got an error—what should I do? If you see an error telling you that you don’t have permission to copy to that drive, select the drive’s icon in the Finder and choose File > Get Info to open the Info window. If necessary click the triangle next to Sharing & Permissions, and make sure “Ignore ownership on this volume” is selected. If it’s not, click the lock icon, enter an administrator name and password, and select the checkbox.
    • How long will it take to copy? Quite some time, depending on how many photos you have. It’s best to do overnight or when you don’t need to use Photos.
  3. When it’s done copying, double-click the new Photos Library icon on the external hard drive to launch Photos and set it to open that new copy on future launches.
  4. If you use iCloud Photos, designate this new library as the System Photo Library by choosing Photos > Preferences > General and clicking the “Use as System Photo Library” button.
  5. Scroll through your photo collection and make sure all your photos are present—double-click a few of them to spot check that the actual images open properly.

Obviously, your original Photos library is still taking up space on your SSD, but it’s best to use the new version for a little while before deleting the old one, just in case. When you’re ready to do that, drag it from the Pictures folder to the trash and choose Finder > Empty Trash to reclaim the space.

Easier Ways to Move the Cursor When Editing Text on an iPad or iPhone

In theory, it should be easy to move the cursor in text on an iPad or iPhone—just tap where you want the cursor to go, or press and hold until the magnifying circle appears over the cursor and then slide it around. In reality, it’s often fussy and annoying because our fingers are a lot wider than the cursor itself. Starting in iOS 9, Apple came up with a better solution—trackpad mode—and in iOS 12, the company extended it to devices that lack 3D Touch.

In trackpad mode, you turn the onscreen keyboard into a virtual trackpad. Just as on a Mac laptop, moving your finger around the virtual trackpad moves the cursor in the text above. How you invoke trackpad mode differs slightly between the iPad and iPhone.

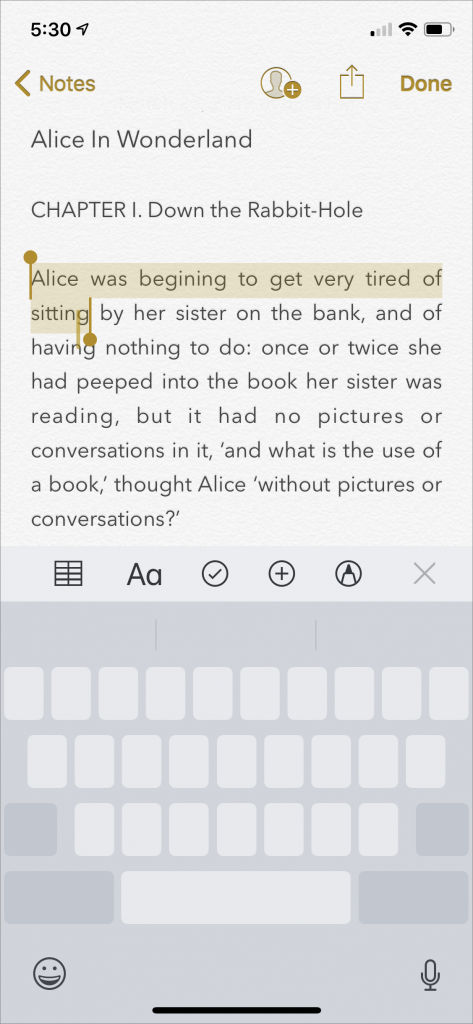
Trackpad Mode on the iPad

On an iPad, open any app that allows text input, like Notes, and bring up the keyboard. Touch the keyboard with two fingers, and you see the letters disappear from the keyboard as it switches to trackpad mode. Immediately swipe your fingers (or just one, you can lift the other up) around to move the cursor within the text. Or, for the new approach, touch the Spacebar and pause briefly to switch to trackpad mode.

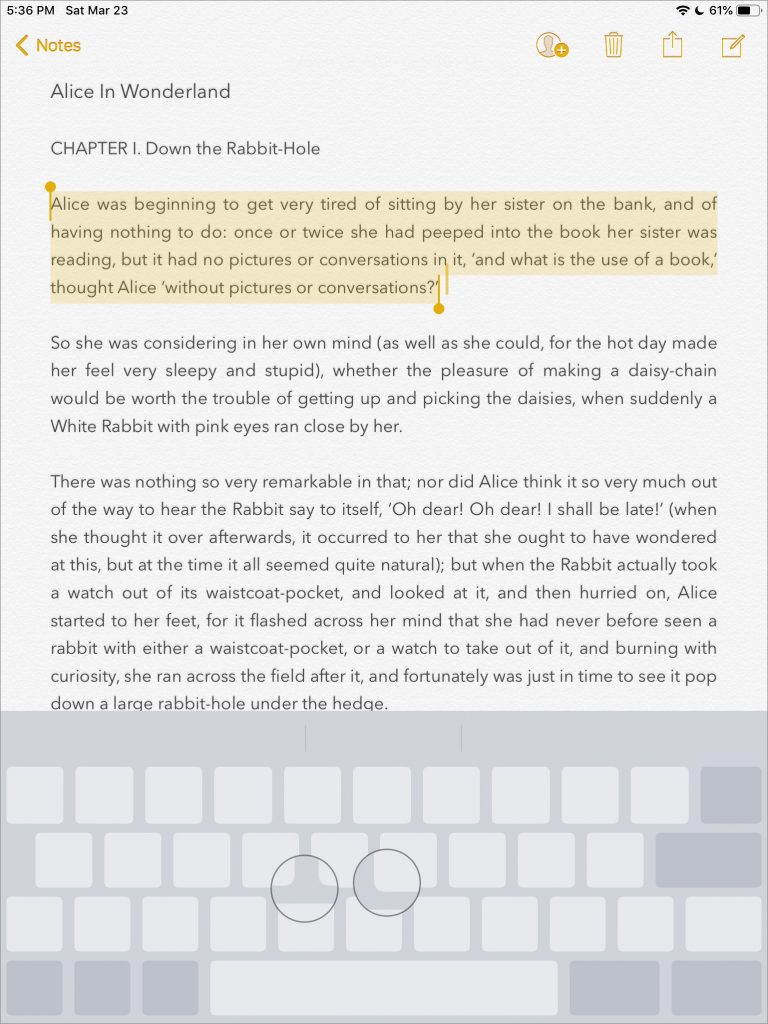
You can also select text in trackpad mode. If you start with two fingers, instead of swiping immediately after entering trackpad mode, pause with your two fingers down briefly, which causes iOS to switch to selecting text. Then move your fingers around to change the colored selection. If you start with one finger on the Spacebar, position the cursor where you want it and then tap anywhere on the grayed-out keyboard to start selecting.

For easier selection of chunks of text, put the cursor in a word, let up, and then tap once with two fingers to select the word around the cursor, twice to select the sentence, and three times to select the entire paragraph. To expand or contract the selection, keep your fingers down and drag the selection cursor. To deselect text, tap once on the keyboard with two fingers.

You can use trackpad mode even if you have an external keyboard attached. Tap in a text input area, place two fingers anywhere in it to engage trackpad mode, and then move your fingers to reposition the cursor (again, you can lift one finger up after you start). To select text, put the cursor inside a word, release your fingers, and tap once to select the word, twice for the sentence, and three times for the paragraph.

Trackpad Mode on the iPhone

Before iOS 12, trackpad mode on the iPhone worked only on models that supported 3D Touch, which eliminated the iPhone 5s and earlier and the iPhone SE. iOS 12 added another approach, which is good because 2018’s iPhone XR also lacks 3D Touch.

To engage trackpad mode on an iPhone that supports 3D Touch, press firmly on the keyboard with one finger—you’ll feel the iPhone’s Taptic Engine simulate the feel of a click. Keep your finger down to move the cursor around. Apple’s new approach to invoking trackpad mode works on all iPhone models—touch the Spacebar and pause briefly to switch to trackpad mode. In either case, if you need more room, you can move your finger off the keyboard image right onto the text.

On 3D Touch iPhones, to select a word, relax your finger pressure slightly without removing it from the screen, and then press again. It’s quite similar to the feel of clicking on a MacBook trackpad. You can even double-press—again, with a slight relaxing of the finger first—to select the current sentence and triple-press to select the entire paragraph. Keep dragging after selecting to select more text by the word, sentence, or paragraph.

When using the Spacebar approach to invoking trackpad mode, you can still select text. As on the iPad, position the cursor where you want it and then tap anywhere on the grayed-out keyboard to start selecting. The two-fingered tapping on the normal keyboard that works on the iPad doesn’t work on the iPhone, unfortunately.

Trackpad mode takes a little getting used to, but it’s so much better than the previous selection methods that it’s worth making yourself practice until it becomes second nature.