iOS 12 Supports Password Managers for Faster Password Filling

For security reasons, we always recommend that you use a password manager like 1Password or LastPass to generate, store, and enter strong passwords in your Web browser. We hope you’ve been doing that because iOS 12 has a fabulous new feature that lets you enter passwords from third-party password managers in addition to iCloud Keychain. It makes logging in to Web sites—and iOS apps!—vastly easier than before.

Set Up AutoFill

To begin, you need to enable the feature. Go to Settings > Passwords & Accounts > AutoFill Passwords. Tap the AutoFill Passwords switch to turn the feature on, and select your password manager in the list below.

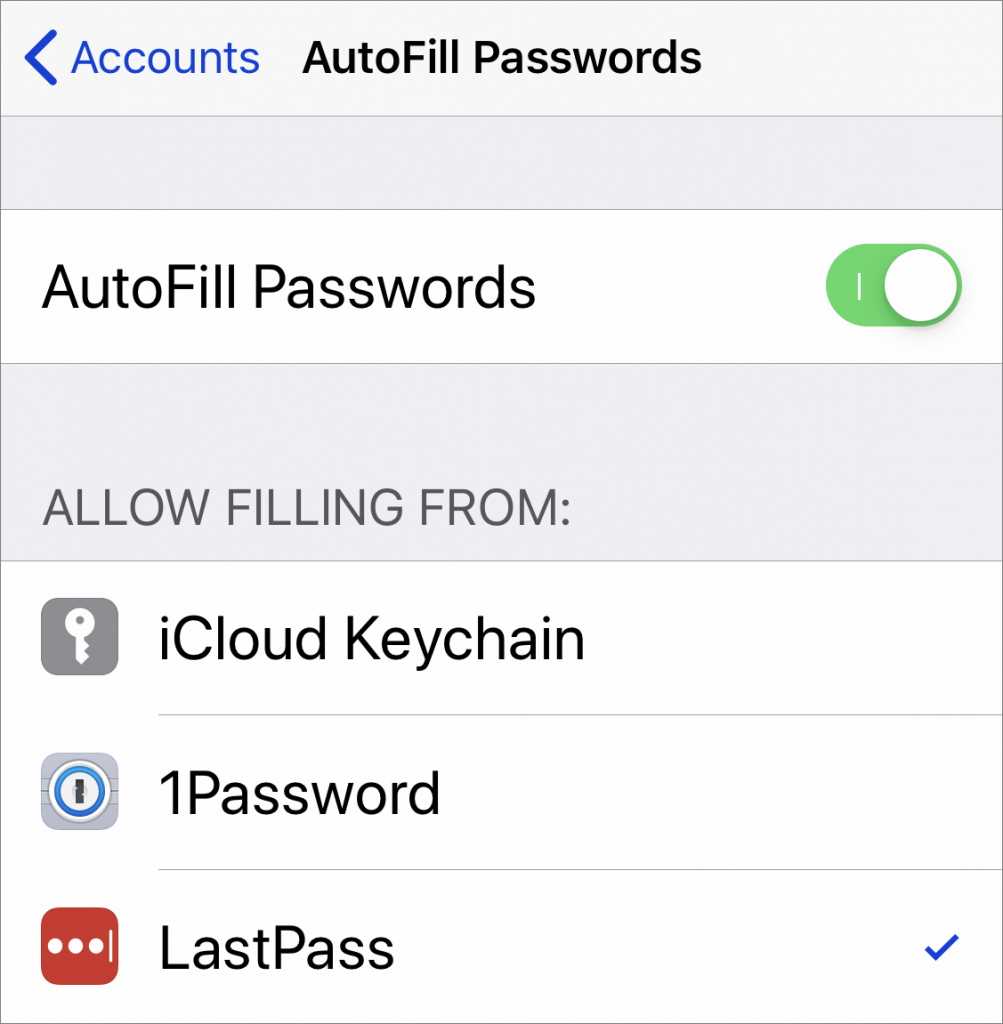
Two notes. First, the iOS app for your password manager must be installed for it to appear in the list. Second, although you can also allow iCloud Keychain to fill passwords, it’s not worth the extra confusion unless you have a lot of passwords stored only in iCloud Keychain.

Log In to a Web Site in Safari

Now it’s time to try the feature. Navigate to a Web site where you need to log in, and for which your password manager has stored your credentials. Then follow these steps:

  1. Tap in the username or password field.
  2. iOS 12 consults your password manager, and if it finds a username/password pair that matches the domain of the site, it displays the username for the site in a blue button or in the QuickType bar above the keyboard. Tap it, and unlock the password manager using your password, Touch ID, or Face ID. iOS fills in your credentials.
  3. Tap to continue the login process.

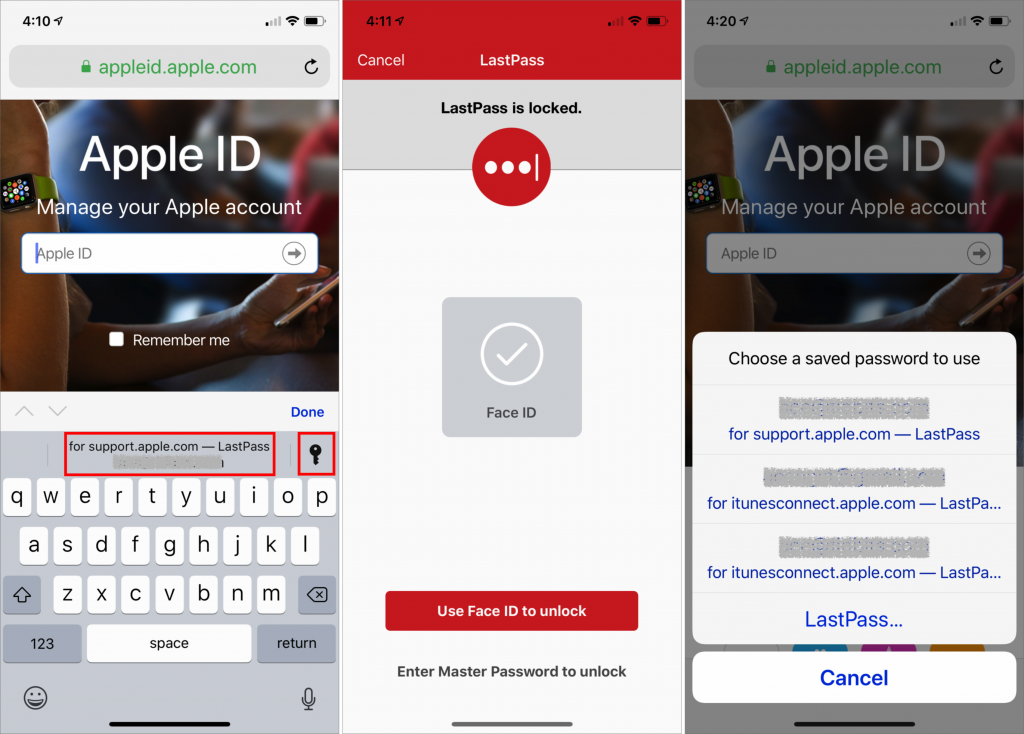
If you have multiple accounts for the same site, you may see several of them in the QuickType bar, but if the one you want doesn’t appear, or if none appear, tap the key icon to see all available passwords. If none are right even still, tap the name of your password manager at the bottom of the list to open and search it manually.
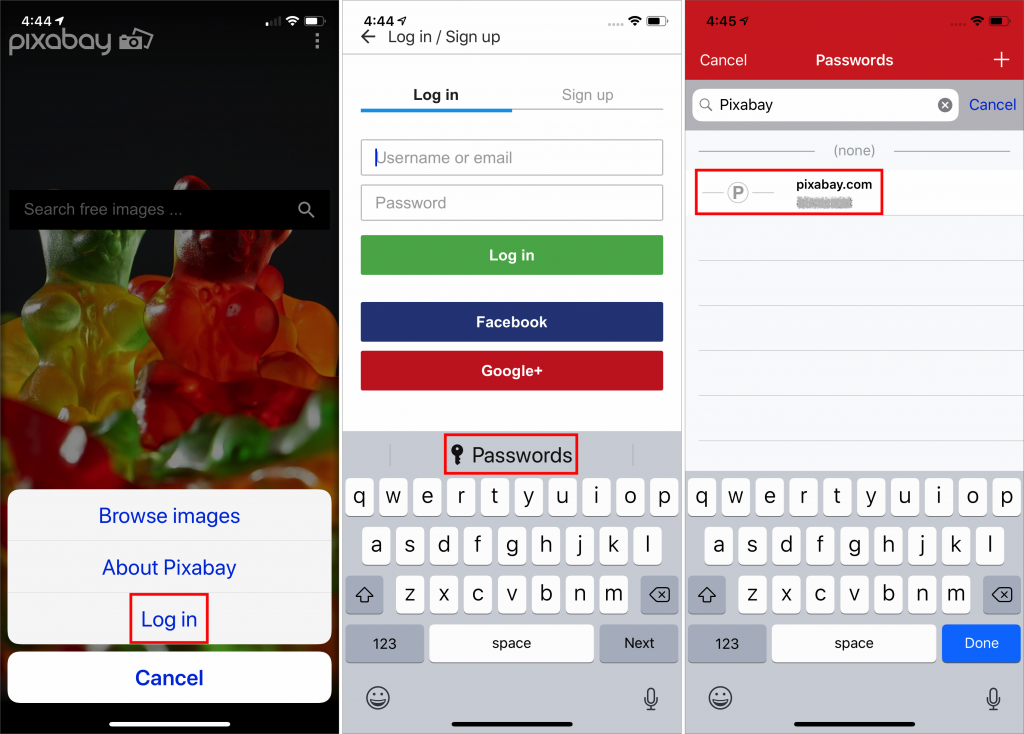
Log In to an App

The process of logging in to an app is often similar to logging in to a Web site, as with the Dropbox and Netflix apps, but iOS 12 doesn’t know how to match every app with an associated account in your password manager. For an app that iOS 12 can’t identify, like the Pixabay app, follow these steps instead:

  1. Tap in the username or password field.
  2. In the QuickType bar, tap the key icon to open your password manager.
  3. If necessary, unlock it with your password, Touch ID, or Face ID.
  4. Search in the password manager for the associated account.
  5. Tap the account to autofill it in the app’s login fields.

Password Manager Limitations

As welcome as iOS 12’s new support for password managers is, it’s lacking in two important ways:

  • The autofill integration is limited to usernames and passwords, so if a site requires an additional field for login, you’ll have to enter that information manually. Similarly, it won’t enter credit card numbers or other information the password manager can autofill when used on a Mac.
  • The password manager can’t automatically create new accounts or generate new passwords, as all password managers can do on the Mac. You can do both manually, but the process is so clumsy that it may be easier to wait and do it on a Mac later, or use an easily typed password temporarily until you can change it to something stronger on your Mac later.

Despite these annoyances, iOS 12’s support for third-party password managers is a huge step forward for anyone who wants quick access to the same login credentials on an iPhone or iPad.

Slow Mac? Here’s How to Figure Out If You Need More RAM

No matter how fast your Mac was when it was new, the time will come when apps launch slowly, the spinning beachball appears more often, and everything responds sluggishly. Such problems won’t happen all the time, and you can often fix them by quitting a piggy app or restarting your Mac. But if these problems are happening more frequently, one possible fix is to install more RAM.  Also known as random-access memory, RAM is the temporary working space where macOS loads apps and documents while you’re using them. Let’s look at how memory is used, how you can determine if you need more, and what to do about it.

(To make sure we’re all on the same page, RAM and memory are two terms for the same thing, and are distinct from disk space or storage, where files are stored permanently even when your Mac is turned off. RAM is faster than a hard disk or SSD, but it’s much more expensive and is wiped clean when you restart or shut down your Mac.)

What Is RAM Used For?

When you launch an app, its code is loaded from disk into RAM for execution. Similarly, when you open a document, the app reads its contents into memory in order to manipulate the data quickly. macOS also uses significant quantities of RAM, and it relies on numerous helper apps.

It’s thus easy for macOS, its helper apps, and the apps you run to request more RAM than is actually installed in your Mac. Luckily, that’s not a show-stopper, thanks to memory compression and virtual memory. As macOS starts to use up free memory, it looks for chunks of data in memory that are inactive, perhaps due to being used by an app that’s running, but only in the background. It then tasks an underutilized processor core to compress that data in memory in much the same way you can compress a file in the Finder with the File > Compress command. When the data is needed again, macOS expands it. This compression and expansion process uses some processor time, but not so much that you’d usually notice unless you’re running other CPU-intensive apps.

When memory compression isn’t enough, macOS resorts to virtual memory, which involves copying chunks of inactive data from RAM to disk-based swap files and back as needed, a process called paging. Virtual memory lets the Mac use more RAM than it has, but at the cost of speed, since copying to and from the drive is slow.

Checking Memory Usage

You’ll notice your Mac getting sluggish if you open too many apps or documents, but Apple has provided a better way to see what’s going on: the Activity Monitor app, which is stored in the Utilities folder in your Applications folder. Open Activity Monitor, and click the Memory button to see a list of apps, how much memory they’re using, and other details. Click the Memory column header to sort by the apps using the most memory. You can use this list to figure out which apps to quit first to recover memory.

The most useful part of Activity Monitor, however, is the Memory Pressure graph at the bottom. It shows green when there is plenty of memory available, yellow when macOS is compressing memory, and red when it has been forced to rely on virtual memory. The Mac shown below is very unhappy.

Whenever your Mac is feeling slow, to see if insufficient RAM is the culprit, look at the Memory Pressure graph. If you see a lot of yellow and any red, macOS’s memory management is hurting overall performance. The quick fix is to close unnecessary documents, Web browser tabs, and apps, but if you regularly see red in the Memory Pressure graph with the apps you need to get your work done, it’s time to think about acquiring more RAM.

Get More RAM… or a New Mac

It used to be relatively easy to add RAM to most Macs, but with today’s Macs, it’s often either difficult or impossible.

In general, you can add memory to the 27-inch iMac, the Mac mini, and the Mac Pro. It’s also possible for Apple Authorized Service Providers to add memory to the iMac Pro and most models of the 21.5-inch iMac. If you have one of these Macs, you can learn more about how much RAM you have and what you can install by choosing Apple > About This Mac > Memory or by consulting a guide on a RAM vendor’s Web site.

Unfortunately, there’s no way to upgrade the memory in a 12-inch MacBook, MacBook Air, or MacBook Pro (since the mid-2012 models). If you have one of these Macs and you need more RAM for reasonable performance, your only option is to buy a new Mac.

Feel free to get in touch with us if you need help choosing and installing RAM, or for advice on how much RAM to get in your next Mac. Generally speaking, 8 GB is now the least RAM you should consider, 16 GB is a reasonable amount for most people, and 32 GB or more may be necessary for resource-intensive tasks.

Getting Rid of an Old Mac? Follow These Steps to Prep It for Its Next Life

If a new Mac has recently arrived in your life, it may be time to hand your old Mac down to a friend or family member, pass it on to a coworker, or send it back to Apple for recycling. Here’s what to do.

Backup

Before anything else, make a backup, just in case. Do this even if you’ve already migrated your data to your new Mac, since it’s possible that data could have been corrupted during the transfer without you realizing. At minimum, update your old Mac’s Time Machine backup by clicking the Time Machine icon in the menu bar, and choosing Back Up Now. For extra safety, consider using an app like Carbon Copy Cloner or SuperDuper to make a bootable duplicate that will be easier to navigate if you need to recover a file.

Deauthorize iTunes and Other Apps

It’s uncommon for apps to have licensing schemes that are tied to your Mac’s hardware these days, but if you have any, such as those from Adobe, be sure to deauthorize or deactivate them.

However, there is one app that most people will need to deauthorize: iTunes. That’s because Apple allows you to play content purchased from iTunes only on up to five computers associated with your Apple ID, so be sure to deauthorize Macs that you won’t use again before passing them on.

To do this, open iTunes and choose Account > Authorizations > Deauthorize This Computer. Enter your Apple ID credentials when prompted.

If you’ve forgotten to do this, you can deauthorize all your computers once per year (and then add back those you still have). To do this in iTunes, choose Account > View My Account, and in the Apple ID Summary next to Computer Authorizations, click Deauthorize All.

Sign Out of iCloud

Next, you should sign out of iCloud to remove any connection between your iCloud account and the old Mac. Doing so disconnects the Mac from synchronization of your iCloud data.

To do this, open System Preferences > iCloud, and click the Sign Out button. If you’ve been syncing via iCloud Drive, Calendar, Contacts, Reminders, and so on, the Mac will ask if you want to keep the data on the Mac or delete it. Don’t bother deleting it since you’ll erase the Mac’s drive in a future step.

Sign Out of iMessage

Much as with iCloud, you should sign out of your iMessage account, at least if your Mac is running OS X 10.8 Mountain Lion or later. To do this, open Messages and choose Messages > Preferences > Accounts. Select your iMessage account and click Sign Out. (In 10.14 Mojave, instead of clicking Accounts in the toolbar, click iMessage.)

Unpair Bluetooth Devices

If you’re giving your Mac to another user along with its Bluetooth devices, such as a wireless keyboard and trackpad, you don’t need to do anything with them. However, if you plan to hang on to your Bluetooth devices and use them with another Mac, you should unpair them. That’s especially true if someone else in your home or office will be using the old Mac, since the device might end up working on multiple Macs, which could cause confusion.

Before you unpair a wireless keyboard and mouse or trackpad, however, make sure you have a wired keyboard and pointing device available, since you won’t be able to erase the drive and reinstall macOS without them. If you lack wired alternatives, don’t unpair your keyboard and pointing device.

To unpair Bluetooth devices, open System Preferences > Bluetooth, and in the list of devices either hover over a device or select it. Then click the X button to the right. When prompted, click Remove.

Erase the Drive and Reinstall macOS

Here’s the most important step—erasing the Mac’s drive. After all, you don’t want the next user to be able to access all your photos, documents, email, and more. Luckily, this is easy to do.

First, start up from macOS Recovery by holding down Command-R while the Mac boots. In the macOS Utilities window that appears, select Disk Utility and click Continue.

In Disk Utility, select the internal drive, click Erase in the toolbar, and in the dialog that appears, enter a new name, choose a format, and choose GUID Partition Map for the scheme. For the format, stick with the default, since the macOS installer will convert it later if necessary. Quit Disk Utility when you’re done.

Once the drive is erased, you’ll be returned to the macOS Utilities window, where you can select Reinstall macOS (or Reinstall OS X, if it’s an older Mac) and click Continue. Obviously, if you’re sending it back to Apple for recycling, there’s no reason to do this.

The installation process takes time, and when it’s done, the Mac will restart into the setup assistant. Press Command-Q at the Welcome screen to shut down. When the new user starts the Mac up again, they’ll be able to continue with the setup process. That’s it—now you’re ready to give the Mac to its next user.

Have You Learned iOS 12’s New Gestures on the iPad?

When Apple released iOS 12 in September 2018, the main change for iPad users was a revamped collection of gestures similar to those used by the iPhone X. As it turned out, these new gestures were in preparation for the release of the new 11-inch and 12.9-inch iPad Pro models that dropped the Home button and Touch ID in favor of Face ID. Just as with the iPhone X, the elimination of the Home button requires new gestures.

Luckily, Apple did a great job on these, so once you learn them, you’ll probably find them even faster to use than before. And if you’re still using an iPad with a Home button, rest assured that it still works as you expect.

Show the Home Screen

Although those whose iPads have a Home button will likely stick with pressing it to return to the Home screen, there’s a new universal gesture that works on all iPads running iOS 12. Just put your finger at the bottom edge of the screen and swipe up with a quick, decisive gesture that goes about a third of the way up.

Show the App Switcher

Again, those with a Home button on their iPads are accustomed to double-clicking it to bring up the app switcher that displays large thumbnails of recently used apps. But if you want to retrain yourself to use iOS 12’s new gesture, swipe up from the bottom to the middle of the screen (more slowly than the gesture for returning to the Home screen) and pause briefly until the thumbnails appear.

Switch Between Apps

iOS 12’s new trick for switching back and forth between apps is slightly different depending on whether you have an older iPad or one of the new 11-inch or 12.9-inch iPad Pro models. On the new iPad Pro, swipe left and right along the bottom edge of the screen to switch between previously used apps. (This is exactly the same gesture you’d use on the iPhone X, XR, XS, and XS Max.)

On an older iPad, however, you need to swipe up from the bottom edge of the screen just slightly—not even enough to display the entire Dock—and then swipe right or left.

Open Control Center

In iOS 11, Apple combined Control Center and the App Switcher, but in iOS 12, Control Center gets its own screen and its own gesture, again mimicking that of the iPhone X series. To open Control Center, swipe down from the top right corner of the screen. You need to start the swipe in the rightmost 10% or so of the screen—if your finger is too far to the left, you’ll open Notification Center instead.

Bonus Tip about the Dock in iOS 12

OK, so this isn’t a gesture, but’s a new feature of iOS 12 that’s available only on the iPad. By default, iOS 12 shows a divider on the right side of the Dock and three icons to its right. What’s the deal with those right-hand icons? Two of them are recent apps that you haven’t already dragged to the left side of the Dock. The third one might also be a recent app, or it might be an app you’ve used recently on your Mac or iPhone, at which point it will have a little badge in the corner indicating which machine it comes from.

If you dislike either of these features, you can turn them off separately. Disable the recent apps in Settings > General > Multitasking & Dock, and turn off the Handoff app in Settings > General > Handoff.

It can be tricky to pick up new ways of working, but if you sit down and play with iOS 12’s new gestures, you should get the hang of them quickly.

Don’t Use Rules in Apple’s Mail to Send “Out of Office” Replies

It’s helpful to unplug occasionally and ignore email while on vacation or otherwise away from your work routine. And it’s a good idea to set up a vacation auto-responder to tell correspondents what to do in your absence. It might be tempting to create such an auto-reply with a rule in Mail on the Mac, but resist the temptation! It’s way too easy to end up sending replies to every message from a mailing list or to addresses that will themselves reply back, causing a mail loop where each message generates another reply, ad infinitum. Instead, always set up such auto-responders in the server settings for your email provider, which are better about avoiding mail loops. Here are instructions for Gmail, iCloud, Outlook.com, Spectrum, Xfinity/Comcast, and Yahoo. If you use a different email provider, the instructions will likely be similar; check with your provider for details.