Get Stacked: Reduce Icon Clutter in Mojave with New Desktop Stacks

There are three types of people in this world: those who keep their Mac Desktop organized, those who don’t and don’t care, and those who don’t but wish they could. If you’re sitting on the Group #3 bench–you have oodles of icons scattered willy-nilly`around your Desktop, and it bugs the bejeebers out of you—macOS 10.14 Mojave might have the solution: Stacks.

Apple has used the term “Stack” before, and still does, in relation to how the icons of folders in the Dock display, either as normal folders or as a stack of icons with the first on top. Mojave’s new Stacks feature brings that visual approach to the Desktop, organizing icon clutter into neat stacks that you can expand and collapse with a click, working with the revealed icons just as you’ve always done.

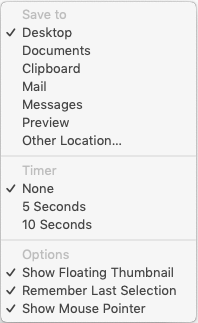
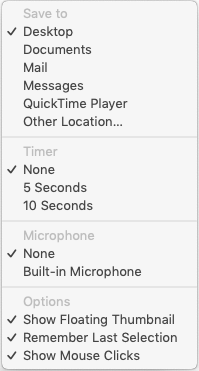
In the Finder, the best way to invoke Stacks is by Control-clicking the Desktop and choosing Use Stacks from the contextual menu (below left). If you first click the Desktop, you can also find the commands for Stacks in the View menu: Use Stacks and Group Stacks By. Lastly, if you open the View Options window by Control-clicking the Desktop and choosing Show View Options, you can work with Stacks by choosing from the Stack By pop-up menu (below right).

Regardless, when you invoke Stacks, the Finder promptly collects all like icons—even new files, as you create them—together into one or more stacks of icons. Click once on a stack to reveal its contents below. Click again to collapse the revealed icons back into the stack. If you open multiple stacks at once, each subsequent stack takes over a spot at the top of the screen and expands down. If you don’t show disks on your Desktop, you can get a nice columnar view of what’s on your Desktop.

How does Stacks figure out which files are alike? You determine that by Control-clicking the Desktop and choosing from the Group Stacks By menu. You can create three basic types of stacks:

  • Kind: These stacks are named for the type of file they contain, such as Documents, PDF Documents, Movies, Images, Screenshots, etc.
  • Date: With date-based collections, each stack’s name and contents depend on what date ranges make sense, such as Today, Previous 7 Days, Previous 30 Days, October, 2017, and so on. The date groupings can key off the date added, last opened, last modified, or created.
  • Finder tags: Tag-based stacks are useful only if you regularly assign tags to all your files.

We expect that grouping stacks by kind will work best for most people, with a few chronologically inclined folks opting for one of the date options.

How can you control the order of the files within a stack? That’s trickier. Control-click the Desktop, choose Show View Options, and in the View Options window, choose from the Sort By pop-up menu. We’re partial to Name (for an alphabetical list) and Last Modified (to put the most recent file you’ve touched on top), but see what works for you.

The main problem with Stacks is that it eliminates any spatial memorization you might have relied on to find icons on your Desktop. You might be able to identify the document you’re looking for by its icon, but exactly where that icon appears when you expand its stack depends on what other stacks are open or closed, what other files are in the stack, and how the stack is sorted. So if your Desktop is a mess, but you know to look in the lower-left corner for the files you’re working with, Stacks may irritate you.

Luckily, you can give Stacks a try without permanently rearranging your Desktop. Just invoke it—the Command-Control-0 (zero) keyboard shortcut can be handy here—and try Stacks. If you don’t like it, another press on Command-Control-0 puts things back the way they were, with no harm done. (The only exception is that if you sort your Desktop, switching in and out of Stacks removes your Sort By setting.)

Stacks may not be ideal for everyone, but many people whose Desktops are obscured by icons will appreciate how it cleans things up instantly and keeps everything neat and tidy.

Recover Drive Space by Deleting Old and Unnecessary iOS Device Backups

If you’ve been good about backing up your iOS devices to iTunes on your Mac or to iCloud, give yourself a gold star! Both backup destinations are fine, but there’s one potential downside to iTunes backups: they can consume a lot of space on your Mac’s drive. In iTunes, go to iTunes > Preferences > Devices, where you’ll see all the iOS device backups that iTunes has stored. If there are multiple older backups or any for devices you no longer own, you can get rid of them. Control-click the offending backup, and choose Delete. Or, if you want to check how large a backup is first, instead choose Show In Finder, and then in the Finder, choose File > Get Info. When you’re ready, move the selected backup folder to the Trash.

Here’s How to Make Screenshots and Screen Recordings with Mojave’s New Interface

You probably fall into one of two camps: people who haven’t the foggiest idea what pressing Command-Shift-3 or Command-Shift-4 do on the Mac, and those who use those keyboard shortcuts regularly to take screenshots. Either way, macOS 10.14 Mojave makes it easier than ever to create a still image of what’s on your Mac’s screen and to record a video of actions you take on the screen. (And don’t worry, the old shortcuts still work just as they always have.)

For those who aren’t screenshot takers, why would you want to? The big reason is to share something you’re looking at, perhaps to send a friend a map to where in a park you want to meet or to tell tech support about the error dialog you keep getting. And a screen recording is a great way to show an employee how to perform a task without having to write it all up.

To start with Mojave’s new tools, press Command-Shift-5 and look at the controls that appear in a floating control bar. (If you open it accidentally, click the X button or press Escape to close it.)

Screenshots

The first three buttons help you take screenshots, with a few welcome enhancements over the Mac’s longstanding screenshot capabilities. The resulting screenshot will always be in PNG format.

  • Capture Entire Screen: Click the first button and then click anywhere to make a screenshot of the entire screen. If you have a second monitor attached to your Mac, you can click anywhere on that screen to capture it instead.
  • Capture Selected Window: To focus on a particular window, click the second button and then click the camera pointer on the desired window. This also works with dialogs and menus; make sure they’re visible before invoking the screenshot controls. A tip: press the Option key when clicking the camera pointer to capture the object without its drop shadow.
  • Capture Selected Portion: What if neither of those is quite right? Click the third button, drag out, position, and resize the selection rectangle over the spot you want, and click Capture on the control bar. Note how the rectangle shows the dimensions of the image it will create as you resize—that can be useful.

There’s also an Options menu on the control bar. Click it to choose which folder or app should receive the screenshot and if you need a 5- or 10-second timer to get the screen looking right first. You can also choose to show a floating thumbnail of the screenshot in the lower-right corner of the screen for quick markup or trashing, remember the size and location of the selection rectangle, and show the pointer in the screenshot.

Screen Recordings

The fourth and fifth buttons are for creating screen recordings, and they’re similar to the screen capture choices. When you select one of them, the contents of the Options menu change, and the Capture button changes to Record. The movie will always be a QuickTime movie using the H.264 codec.

  • Record Entire Screen: Click the fourth button and then Record to start recording actions on the entire screen.
  • Record Selected Portion: The problem with recording the entire screen is that the resulting file can get big. To focus on a small area of the screen, click the fifth button. Then drag out, position, and resize the rectangle in which the recording will take place, and finally, click Record.

However you start a recording, you can stop it in one of two ways. A stop button always appears on the menu bar; click it to finish and save the recording. On a smaller laptop screen, it’s possible for the menu bar button to be obscured, so here’s an alternative method: press Command-Shift-5 again, and the recording controls are replaced by a stop button.

You can record yourself speaking while you make a movie of what’s happening on the screen. To do that, open the Options menu and choose Built-in Microphone. Another special movie recording option is Show Mouse Clicks, which puts a dark circle around the pointer in the recording whenever you click.

That’s it! Mojave’s new screenshot and screen recording controls offer more options and are easier to use than the previous techniques, as long as you remember the Command-Shift-5 keyboard shortcut to bring them up. Practice that a few times, and you’ll be ready the next time you want to capture a funny dialog or strange occurrence on your Mac.

Don’t Freak Out If You Get Blackmail Spam Containing an Old Password

Have you gotten an email message whose Subject line says something like “Change your password immediately! Your account has been hacked.”? If not, it may be only a matter of time before you do. It’s a scary message, especially because it contains one of your passwords, some threats, and a demand for money. Worse, the password is likely one you’ve used in the past—how could the hacker have discovered it? Has your Mac really been taken over?

Relax. There’s nothing to worry about.

This “blackmail spam” has been making the rounds on the Internet recently—we’ve heard from several clients who have received it, and we’ve gotten copies too. The message purports to be from a hacker who has taken over your Mac and installed spyware that has recorded you visiting Web sites that aren’t exactly G-rated. The hacker also claims to have used your Mac’s camera to photograph you while you’re browsing said non-G-rated sites and threatens to share those pictures with your contacts and erase your drive unless you pay a ransom using Bitcoin.

This blackmail spam has raised so many pulses because it backs up its claims by showing a password that you’ve used in the past. Hopefully, it’s not one that you’re still using, because it was extracted from one of the hundreds of password breaches that have occurred over the past decade. Impacted Web sites include big names such as Yahoo, LinkedIn, Adobe, Dropbox, Disqus, and Tumblr—thieves have collectively stolen over 5.5 billion accounts. It’s all too likely that some old password of yours was caught up in one of those thefts.

Concerning as the message sounds, all the details other than your email address and password are completely fabricated. Your Mac has not been hacked. There is no malware spying on your every move. No pictures of you have been uploaded to a remote server. Your hard drive will not be erased. In short, you have nothing to worry about, and you should just mark the message as spam.

However, if you’re still using the password that appeared in the message, that is cause for concern. It means that any automated hacking software could break into the associated account, and it must be a weak password if the bad guys were able to decrypt it from the stolen password files. Go to Have I Been Pwned and search for your email address. If it shows up for any breaches, make sure you’ve changed your password for those accounts.

As always, we recommend that you create a strong, unique password for each of your Web accounts. The easiest way to do this is to rely on a password manager like 1Password or LastPass to generate a random password. Then, when you want to go back to that site, the password manager can log you in automatically. It’s easier and more secure.

If you’re still concerned about your passwords, call us and we can help you get started with stronger security practices.

Why Should You Work with an Apple Professional?

Potential clients sometimes ask why they should work with us instead of solving their own problems or hiring an employee to manage their IT infrastructure. It’s a fair question, and we’re happy to answer it in more detail if you want to chat. But here are a few of the reasons why working with an Apple professional is the right decision. All these revolve around the fact that we’ve been investigating and fixing tech problems for a long time, we’re constantly working to stay up with the latest changes, and we’re good at what we do.

Save Time

The biggest reason to hire an expert to solve your problems is that we can save you time. If you’re an individual, it’s time you can spend on your real job, with your family, or on your hobbies. For companies, it’s time you aren’t taking away from your firm’s line of business.

Aside from the fact that we’ll be doing the work to fix your Mac or get your network operational instead of you or one of your employees doing it, we’ll probably be able to finish more quickly than someone who’s not steeped in the field. Would you prefer to spend hours on something that would take us half the time?

Save Money

As an individual, it might seem counterintuitive that paying us will save you money, but it’s often true. If you buy the wrong hardware or software, that’s a waste of money that could be avoided with our advice ahead of time. For instance, no matter how many ads you see, never get suckered into buying MacKeeper.

For companies, the financial savings are more obvious. Most companies don’t have extra employees just waiting to solve tech problems, and hiring a dedicated IT staff will cost vastly more in salary, benefits, and overhead than outsourcing to us.

Reduce Downtime

It’s easy for businesses to understand the importance of avoiding downtime. If your phone system is down, customers can’t call. If your point-of-sale database gets corrupted, you can’t take orders until the backup has been restored. And so on—the point of working with a top-notch Apple professional is that we can help you avoid problems that would cause downtime, and if catastrophe does strike, get you up and running as soon as possible.

Individuals might say they’re not too worried about downtime, but how long could you go without being able to send or receive email if Mail’s settings get wonky? Or what would your family think about not having Internet access while you back out of a bad firmware upgrade to your router?

Avoid Incorrect Information

Google is a godsend for figuring out weird problems, but it can also lead less experienced people down dead-end paths. If you don’t have years of experience, it’s easy to find a Web page or YouTube video that sounds helpful but makes the problem worse.

For instance, lots of Web articles have advised force-quitting iOS apps to increase battery life, improve performance, and more. Unfortunately, that advice is wrong—force-quitting apps generally hurts battery life and reduces performance. Only force-quit an app when it’s misbehaving badly or not responding at all. Ask us before assuming something you’ve read online is helpful or even correct.

Benefit from the Big Picture View

Because we live and breathe technology, we have a broad and current view of what’s happening both in the industry and with our other clients. We know what new products or services might be the best solution to any given problem, and we can take advantage of our experience with one client to help another.

For example, Apple has officially discontinued its AirPort line of Wi-Fi routers, so we’ve been comparing mesh networking alternatives, including Eero, Plume, Orbi, AmpliFi, Velop, and more. If you’re using an AirPort base station now, ask us which alternative makes the most sense for your installation.

More specifically, because we put the time into understanding your personal or corporate technology footprint, we can use our experience to ensure that everything we recommend will work well together. If you’re buying into HomeKit automation in a big way, for instance, you should stick with Apple’s HomePod smart speaker rather than competing products from Amazon and Google.

We hope we haven’t come off as cocky here—we’re certainly not perfect. But we are good at what we do, and we’re confident that we can help solve any technology problems you may have.