Use Personal Hotspot Tethering to Avoid Dodgy Wi-Fi While Traveling

Finding good Internet access for your Mac or Wi-Fi-only iPad while traveling can be maddening. Look in your Wi-Fi menu while sitting in an airport and you’ll see a bunch of networks, most of which require a password or won’t connect for other reasons. It isn’t any better when you reach your destination, since many hotels charge usurious rates for Wi-Fi. And while you might be able to find a coffee shop with free public Wi-Fi, those networks may not be secure—a hacker on the same network could watch your unencrypted Internet traffic.

If you’re like most Apple users, the solution is in your pocket or purse: your iPhone. For a number of years, turning on iOS’s Personal Hotspot feature involved additional fees from your cellular carrier, which dissuaded many people from using it. Nowadays, however, most mobile phone plans don’t charge extra for tethering, as it’s often called. If you have an “unlimited” plan, your carrier may throttle your bandwidth if you exceed some usage level because the carrier doesn’t want customers to use tethering for their primary Internet connections. Double-check your plan, but if you won’t have to pay more to use tethering, here’s how to use it to solve Wi-Fi problems while on the road.

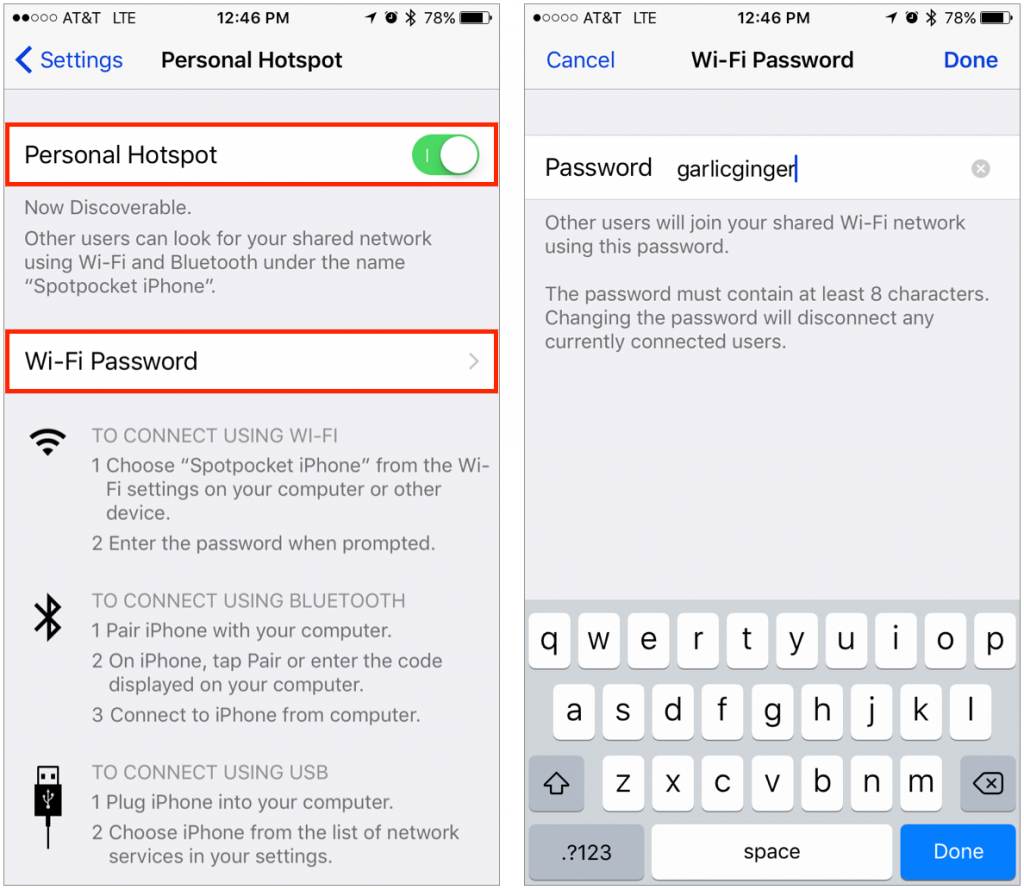
On your iPhone (or cellular-enabled iPad), go to Settings > Personal Hotspot and enable the switch for Personal Hotspot. Then tap Wi-Fi Password, and in the next screen, enter a password. It must be at least 8 characters and can use only ASCII characters (English letters, numbers, and standard punctuation marks). It shouldn’t be trivial (like “password”), but don’t worry about making it super strong, since your iPhone isn’t likely to be in any single location long enough for someone to try to crack it. (You can also share a Personal Hotspot connection via Bluetooth or a USB cable, but both are fussier and may not work as well.)

Then, from your MacBook, click the Wi-Fi  menu in the menu bar and choose the network named for your iPhone—it may appear under a Personal Hotspot heading and will have a Personal Hotspot   icon. From an iPad or another iOS device, go to Settings > Wi-Fi and select the iPhone’s network.

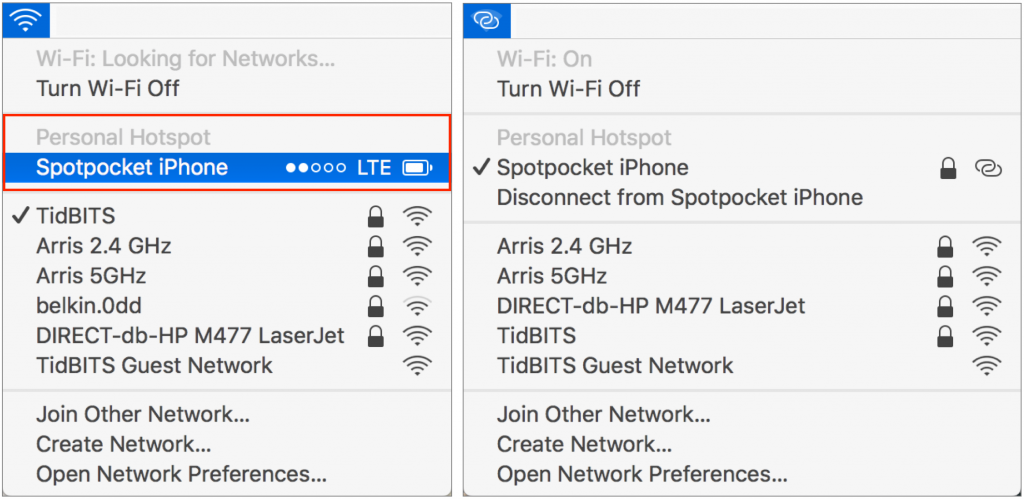
In either case, if both devices are signed in to the same iCloud account and have Bluetooth turned on, Apple’s Instant Hotspot feature should make it so you don’t have to enter the password. It’s no great hardship if you do have to type the password; the Mac or iPad should remember it for future use.

Once you’re connected, everything should work just as though you were using a normal Wi-Fi network. Performance might be a little slow, but since random public Wi-Fi networks are often pokey, it may be better than you’d get otherwise.

If you worry about using too much data and generating overage charges or getting throttled, pay attention to what apps and services use bandwidth on your Mac. Things like Dropbox, Backblaze, and iCloud Photo Library can slurp a lot of data in the background, so you may want to turn them off. Or install TripMode ($7.99), a clever Mac utility that notices when you’re using a new Wi-Fi network and asks which services you want to allow through.

When you finish tethering, turn off the Personal Hotspot switch on your iPhone to make sure it doesn’t use any extra battery life or allow another of your devices to consume cellular data inadvertently.


Learn to Use the Color Picker: Put Some Color in Your Mac

If you’re over 40, you probably remember the point in The Wizard of Oz where the movie switches from black-and-white to Technicolor (and if not, go see it!). It wasn’t the first color film, but the vibrant images of Dorothy’s ruby slippers, the yellow brick road, and the Emerald City helped make the movie an instant classic.

On the Mac, whenever you want to fill a drawing with color, colorize some text, or format spreadsheet cells in color, you need to use the Colors window, more generally called the color picker. Like many long-standing elements of the Mac experience, most people have seen and used it, but don’t realize how much it can do. How you bring it up varies by app but usually entails clicking a color button associated with styles or formats.

The Colors window has three sections: buttons for the color pickers at the top, their individual controls in the middle, and the color wells at the bottom. Click the buttons at the top to switch between these pickers:

  • Color Wheel: This picker is useful for exploring a wide range of colors. Don’t miss the brightness slider at the bottom, which changes the colors in the wheel above.
  • Color Sliders: Use these sliders to replicate specific grayscale brightnesses or RGB, CMYK, or HSB color by number. Or, you can find a color with another picker and then look up its exact values here. Desktop publishers use this feature a lot. When matching colors with outside sources, click the gear button to choose the appropriate industry standard color palette before picking a color.
  • Color Palettes: This picker shows color swatches from different custom palettes. Use the gear button to make, add, rename, and delete palettes. (Find them in ~/Library/Colors.) The utility of these palettes is that you can share your own color collections, enabling coworkers to use identical colors easily, or even download and import palettes for different uses, such as land-use categories for maps.
  • Image Palettes: Click the gear here to load a new image, after which you can select any color in that image by clicking it.
  • Pencils: They used to be crayons, but then Apple got sophisticated. Or stopped licensing the names from Crayola.

Within each color picker, it’s usually obvious how to select different colors. Click the wheel, move the sliders, enter cyan-magenta-yellow-black percentages, and so on. The selected color, which will be applied to your drawing or text, appears in the large square color well at the bottom left.

However, there is one other extremely useful way to select a color: the eyedropper. Find it in the bottom portion of the Color window, and click it to see a circular loupe that magnifies anything under it. Move the loupe until the single pixel in the middle is over the color you want, and then click. If you press the Space bar while the loupe is showing, the loupe displays the RGB values of that pixel.

What are those little squares to the right of the eyedropper? That area is called the swatch drawer, and it’s where you store particular color swatches that you want to use repeatedly. Just drag the color from the color well to the left into a swatch square. You can even pick a color swatch up and move it around, so you can arrange your swatches in a way that you’ll remember. Swatches you store here become available in all Mac apps, so it’s a great way to ensure you’re using the same colors everywhere.

To remove a swatch, drag it to the right of the swatch squares and let go just inside the right edge of the Colors window (if this doesn’t work, expand the window to the right as much as possible before another column of squares appears, then try again).

By default, you see 20 swatch squares in 2 rows, but the swatch drawer has room for 230 swatches! Expand just the drawer vertically by dragging the tiny round dot at the bottom, or expand the entire window vertically or horizontally by dragging any edge or corner.

Now that we’ve looked into the heart of the color picker to provide you more knowledge, we hope you’ll find the courage to use colors more confidently in your everyday Mac work!


Make Sure to Get Sierra before High Sierra Ships

Assuming Apple continues its previous practices, once macOS 10.13 High Sierra comes out, it will become impossible to download 10.12 Sierra for the first time. That could be awkward if you want to upgrade an older Mac to Sierra at any point after High Sierra ships, since you won’t be able to get Sierra then. To ensure that you can snag a copy of Sierra in the future, open the App Store app on your Mac, type Sierra in the Search field, and click the Get button for macOS Sierra (it’s about 5 GB in size). It downloads to your Applications folder, and the installer launches automatically. If you don’t want to install Sierra right away, choose Install macOS > Quit Install macOS to quit the installer. What’s important is that Sierra is now registered to your Mac App Store account, and you can get it again from the App Store’s Purchased screen at any time on any of your Macs.

When Should You Upgrade to macOS 10.13 High Sierra, iOS 11, watchOS 4, and tvOS 11?

To every thing there is a season, and we’re fast approaching the time when Apple harvests the fruit of the last year and releases new versions of macOS, iOS, watchOS, and tvOS. There are no major surprises here, since Apple announced the new versions in June and public betas have been available since that announcement. But once macOS 10.13 High Sierra, iOS 11, watchOS 4, and tvOS 11 become available for free download, you’ll need to decide when you’re going to install them.

(Note that we say when and not if. There’s no harm in delaying major operating system upgrades until Apple has had a chance to squash the initial bugs and you have time to focus on the task. But waiting too long puts you at risk from security vulnerabilities and prevents you from taking advantage of new integrations between Apple’s devices. Plus, should you have to replace an Apple device unexpectedly, you will likely be forced to use the current operating system, which could be awkward if you weren’t ready for the upgrade.)

The hardest decision to make is with macOS 10.13 High Sierra. In keeping with Apple’s cycle of macOS upgrades, High Sierra focuses on under-the-hood enhancements, most notably the switch to the new APFS file system and behind-the-scenes HEVC/HEIF formats for videos and photos. But apart from improved performance and reduced storage needs, neither of those changes will impact your everyday Mac experience. Tweaks to apps like Photos, Safari, and Messages will also be welcome but are far from essential. So our recommendation is to wait until at least version 10.13.1 or even 10.13.2 before upgrading. That gives you time to make sure your key apps are compatible with High Sierra and for Apple to resolve any unanticipated problems.

What about iOS 11? Although iOS 11 has received good reviews from beta testers, if you rely on an app that isn’t compatible, you may want to delay your upgrade. Check the App Store listing for each of your key apps, and if they’ve been updated recently, you’re probably OK to upgrade. If you use an iPad, install iOS 11 only once you’re ready for a major interface change, what with the new Dock, the redesigned Control Center, the new Files app, and improved multitasking and drag-and-drop. It’s all good, but it’s noticeably different. Apart from that, we see no significant reason to hold off on iOS 11—you’ll likely appreciate most of its new features.

The question of when to upgrade gets easier with watchOS 4. Although it has some nice new features, like a Siri watch face, improvements to Activity, more workout features, and better integration with Apple Music, it’s not a sea change. With no notable downsides to upgrading, it’s easy for us to recommend upgrading your Apple Watch as soon as you take your iPhone to iOS 11.

The easiest upgrade decision is moving to tvOS 11. If you have a fourth-generation Apple TV, either let it upgrade itself to tvOS 11 or invoke the upgrade manually from Settings > System > Software Updates. Since tvOS 11 is a minor update and you don’t create work on an Apple TV, upgrading is unlikely to cause any problems. You’ll just enjoy the automatic dark and light mode, support for AirPods, and AirPlay 2.

As much as change can be hard, we’re excited about Apple’s new operating systems. Like you, we probably won’t end up using all the new features, but some will definitely enhance the experience of being an Apple user.