The Fastest Ways to Switch between Virtual Screens on Your Mac

When you click the green zoom button in a window on your Mac, that puts the window into full-screen mode. It’s a great way to maximize screen real estate on a smaller MacBook screen, for instance, but how can you switch between these virtual screens quickly? You could swipe up on the trackpad with four fingers and then click the icon representing the desired screen in Mission Control, but that’s pokey. Instead, swipe left or right with four fingers to hop between screens. Don’t have (or like using) a trackpad? You can keep your fingers on the keyboard by pressing Control-Left arrow or Control-Right arrow.

Reply Quickly to Messages on Your iPhone’s Lock Screen

Want a faster way to reply to a conversation in Messages? If you see a Messages notification on the Lock screen of your iPhone 6s or later, press and hold on it to expand it into an interactive box where you can reply without unlocking your iPhone or navigating into the Messages app. It’s perfect for those sporadic conversations where the iPhone goes back into your pocket or purse after each reply. (On an iPad or older iPhone, you’ll have to slide left on a Lock screen notification and unlock the device to open the Messages app.)

Here’s Your 30-second Crash Course in Dealing with Broken Web Pages

We’ve all hit a Web page at some point that doesn’t load fully, looks wrong, or doesn’t work as it should. It’s not your fault, but here are a few things you can try on your Mac. First, press Command-R to reload the page. Second, quit and relaunch Safari. Third and finally, try a different browser, like Google Chrome, Firefox, Brave, or Opera

Four Ways to Make the iPhone Easier to Read without Glasses


Increase Text Size

Although not every app supports it, Apple has a technology called Dynamic Type that lets you set your preferred text size. In Settings > Display & Brightness > Text Size, you’ll find a text size slider, and you can see how it affects text in the iOS interface by moving around in the Settings app or looking at Mail.

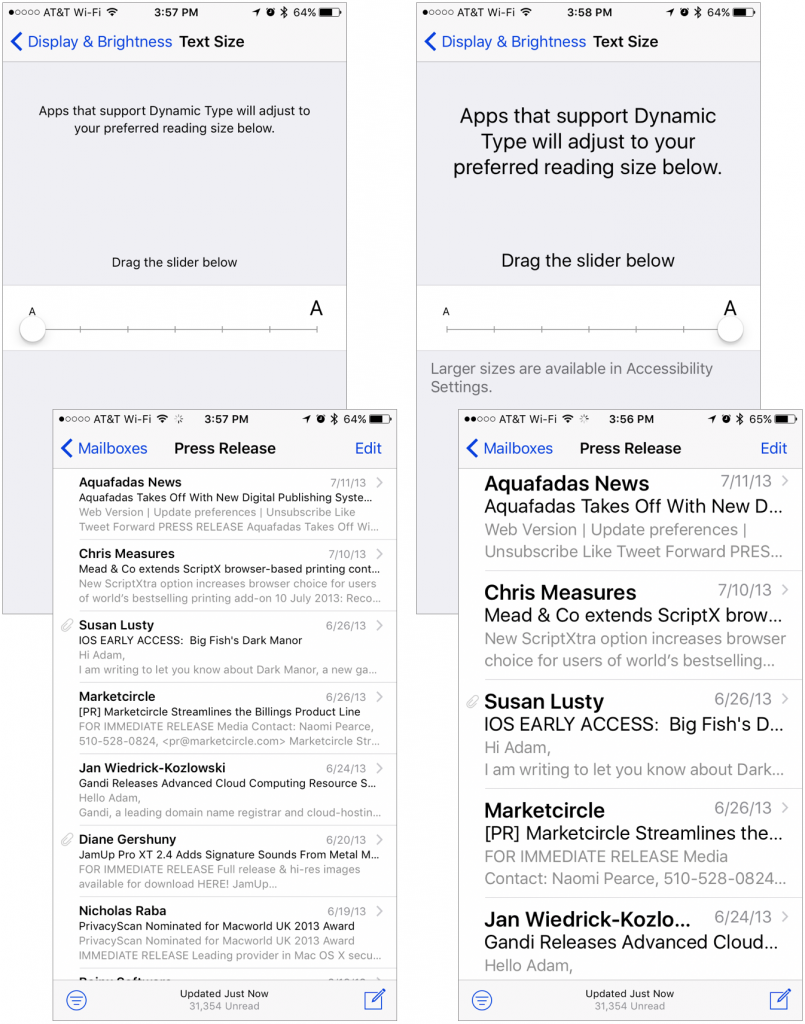
If you want a size even larger than is available from the Text Sizes screen, you can get that in Settings > General > Accessibility > Larger Text. Turn on Larger Accessibility Sizes, and the size slider adds more options.

Bold Text

Sometimes, the problem isn’t so much the size of the text, but how light it can be. In Settings > Display & Brightness, there’s a switch for Bold Text. Turn this on, and all the text on the iPhone will become darker. Oddly, enabling Bold Text requires restarting your device, but there’s no harm in doing that.

Display Zoom

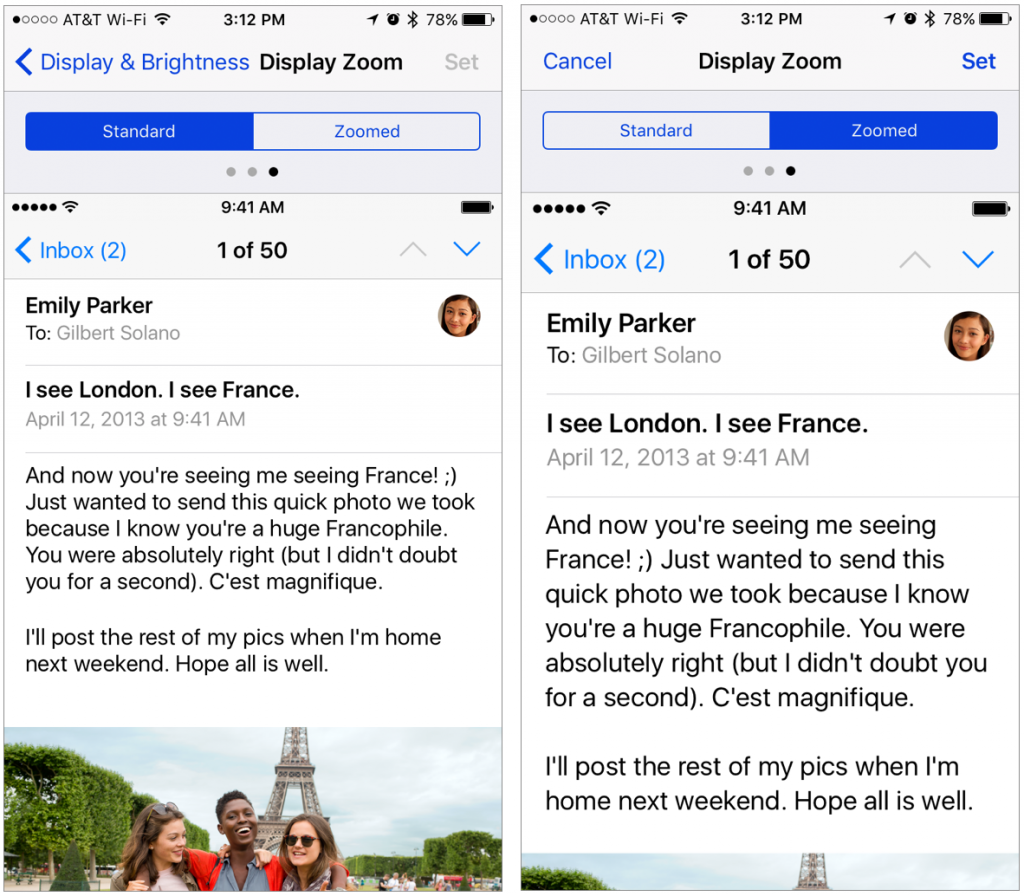
If you have difficulty with aspects of the screen other than text, you can use iOS’s Display Zoom feature to expand everything by a bit. The trade-off is that you’ll see less content on the screen at once, of course, but that’s a small price to pay if it makes your iPhone easier to use.

To enable Display Zoom, go to Settings > Display & Brightness > View. Once there, you can compare the difference between the standard and zoomed views in three sample screens by tapping the Standard and Zoomed buttons at the top—notably, you’ll lose a row of icons on the Home screen. If you think zoomed view might be better, tap Zoomed and then tap Set. Your iPhone has to restart, but it’s quick. Unfortunately, if you decide to switch back to standard view, you’ll need to rearrange your Home screen icons again.

Zoom

The iPhone’s full Zoom feature is particularly useful in two situations. First, it’s easy to invoke and dismiss if you need a quick glance while wearing the wrong pair of glasses. Second, if Display Zoom doesn’t magnify the screen as much as you need, the full zoom may do the job.

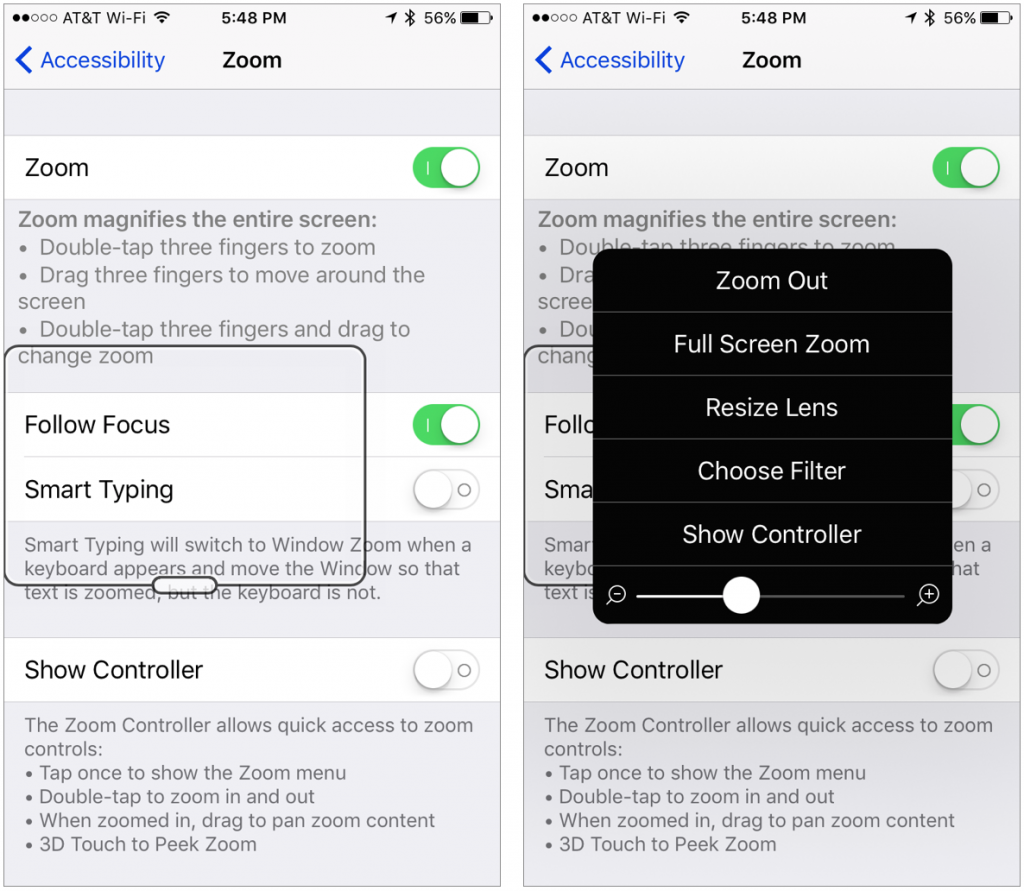
Turn it on in Settings > General > Accessibility > Zoom and zoom in by double-tapping the screen with three fingers. By default, the Zoom Region is set to Window Zoom, which gives you a magnifying lens that you can move around the screen by dragging its handle on the bottom.

Tap the handle to bring up a menu that lets you zoom out, switch to full-screen zoom (which can be harder to navigate), resize the lens, filter what you see in the lens (such as grayscale), display a controller for moving the lens, and change the zoom level. To get back to normal view, just double-tap with three fingers again.

So, if you want to be able to use your iPhone more easily when your reading glasses aren’t handy, try the features described above and find the right mix for your eyes.

Get to Work More Quickly with the Right Mac Login Items

There’s a French culinary phrase—mise en place—that means “everything in its place.” The idea is that, before you start cooking, you organize and arrange all the ingredients for the dish so they’re right at hand when you need them. In essence, mise en place is about being well-prepared for the task at hand.

You can, and we’d suggest, should do exactly the same thing on your Mac. After all, you probably switch back and forth between the same set of apps—perhaps Mail, Safari, and Messages, plus apps like Pages and Numbers—as you work. Most modern Macs have plenty of RAM to keep all those apps running at the same time. But when you restart your Mac or turn it on, do you launch every one of your standard apps by hand? There’s no need.

That’s because macOS has long had the concept of “login items,” apps that you’ve set to launch automatically whenever the Mac starts up.

Meet Your Login Items

You’ll find the login items in System Preferences > Users & Groups > Login Items.


You may already have some login items listed. These can be any apps that you want to have available right after starting up, and some utility apps may have added themselves to the Login Items list automatically because they need to be running at all times. For instance, your list might include iTunesHelper, which launches iTunes whenever you attach an iOS device.

If you’re not sure which app a login item goes with, Control-click the login item and choose Show in Finder. Then in the Finder window that appears, look at the path bar at the bottom (choose View > Show Path Bar if it’s not visible). That will usually give you the necessary clue to find the parent app.

Manage Your Login Items

Every so often, it’s a good idea to look through your login items and make sure they’re doing what you want. You can add new items for apps you’ve starting using regularly and remove items for apps that you no longer need running all the time. And you do want to remove unnecessary login items because they could be slowing your Mac down.

Here’s what you need to know about managing your login items:

  • Add a login item. An easy way to add an app to the Login Items list is to drag its icon from the Finder into the list. But you can also click the + button beneath the Login Items list and choose the app from the Applications folder. Or, make sure the app is running, Control-click its icon on the Dock, and then choose Options > Open at Login from the shortcut menu. Also, some utility apps will ask whether you want to launch them at startup and add themselves to the Login Items list if you agree.
  • Remove a login item. To prevent an app from launching at startup in the future, select it in the Login Items list and click the – button under the Login Items list.
  • Hide a login item’s windows after startup. Some apps, like Adobe Photoshop and InDesign, fill your screen with their windows immediately at launch. If you don’t want to use an app right after restarting your Mac, you can reduce screen clutter by selecting its Hide checkbox in the Login Items list. That’s the equivalent of launching an app and hiding its windows by Option-clicking on another app.

It takes only a minute to put your Mac ingredients in place, and the next time you boot your Mac, everything will be ready to go!