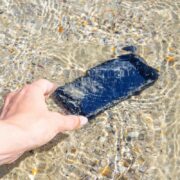
What to Do If Your iPhone Takes a Plunge

No one intends to drop their iPhone in a pool or fall off a boat with their iPhone in a pocket. But accidents happen. Happily, Apple has designed the iPhone with significant levels of splash and water resistance, so brief exposure to rain or even a quick dunk might not cause any problems. If your iPhone does get wet, follow our advice below to dry it out before calling for more help.

How Waterproof Is Your Phone?

First, you’ll want to understand what you should worry about, which boils down to your phone’s IP rating and its age. All iPhones have an IP—Ingress Protection—rating that specifies what they should be able to handle when new. Current and recent iPhone models are rated at IP68, with the older iPhone 7, 8, XR, and second-generation SE models rated at IP67. The first digit specifies the protection against solid objects like dust, and the second against water. A rating of 6 for the first digit means the device is dust-tight—no dust can get in. For the second digit:

  • 7 means the device is protected against the effects of temporary immersion in water under standardized conditions of time and pressure.
  • 8 means the device is protected against the effects of continuous immersion in water. The conditions under which this rating is awarded are specified by the manufacturer but must be more severe than rating 7.

Apple has been improving the water resistance of iPhones. The iPhone 11, XS, and XS Max are designed to withstand immersion at a maximum depth of 2 meters for up to 30 minutes. The iPhone 11 Pro and 11 Pro Max increase the depth to 4 meters, and every newer model can handle the increased pressure of up to 6 meters. In other words, all should be able to survive a brief dip.

Don’t get complacent about that old iPhone XS, though. Water resistance isn’t a permanent condition. It depends on tight seals and gaskets that are weakened by age, drops, disassembly, extreme hot or cold temperatures, and exposure to chemicals (like insect repellent and sunscreen). The older your iPhone is, the less likely it is to meet the criteria of its IP rating.

Dealing with Splashes, Spills, and Submersion

Enough theory! What should you do if your iPhone gets wet? It depends on how wet it got. For instance, if you have to use your iPhone in the rain, it’s difficult to keep raindrops off the screen and case. They shouldn’t pose a problem; just dry the iPhone off with a cloth. However, if you accidentally tip over your coffee on your iPhone, first rinse the affected area with tap water. Then dry it off with a cloth. In both cases, we recommend not plugging in a Lightning cable until it’s had more time to dry out.

More concerning is when your iPhone takes a plunge. Despite the IP rating suggesting it can withstand up to 30 minutes of immersion, try to get it out of the water as quickly as possible. Then there are some dos and don’ts.

Do:

  • Do turn it off immediately with the power slider that appears when you hold the side button and either volume button (Face ID iPhones) or the side button (Touch ID iPhones).
  • Do rinse it under tap water if you dropped it in a muddy puddle (dirt and other contaminants), the ocean (salt water), a swimming pool (chlorinated water), or a toilet (ick)—basically anything other than clean, fresh water.
  • Do dry the exterior with a soft cloth.
  • Do remove excess liquid by tapping it gently against your hand with the Lightning port and speaker facing down.
  • Do open the SIM tray and leave the iPhone in a dry area with airflow. If possible, direct a fan at the openings.
  • Do leave it turned off and let it dry for at least 5 hours and up to 24 hours.

Don’t:

  • Don’t attempt to dry the iPhone with a hair dryer, any heat source, or compressed air.
  • Don’t insert anything like a cotton swab or tissue into the Lightning connector or SIM tray. Let any water inside evaporate.
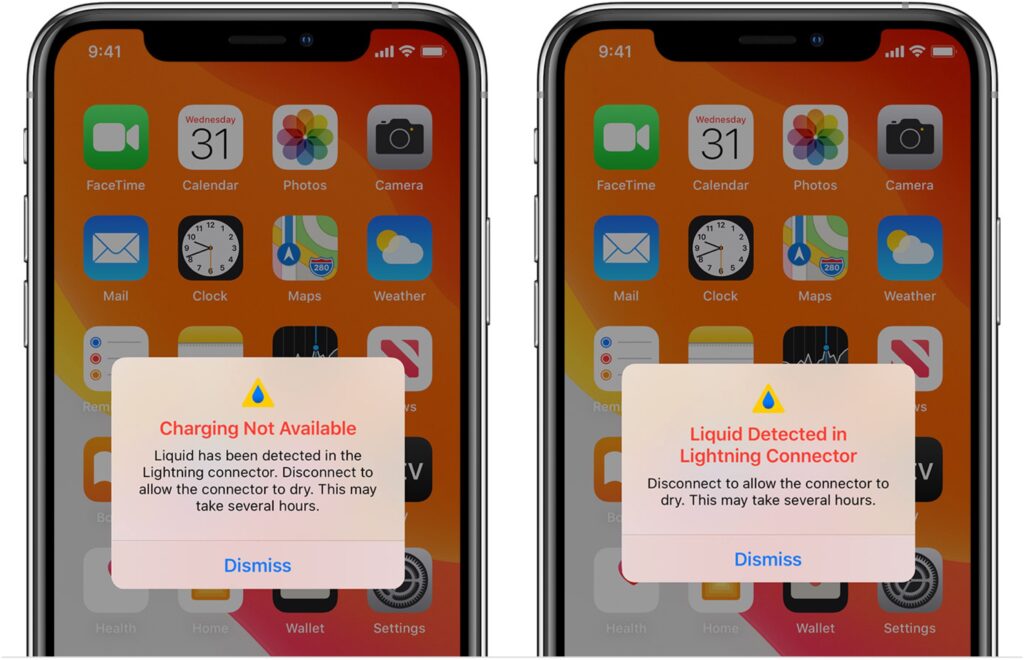
  • Don’t connect a charging cable or any other cable until the iPhone is completely dry. Recent iPhones will warn if they detect water in the Lightning port. If you see that warning, Apple recommends waiting at least 30 minutes and up to 24 hours before trying again. (Wireless charging should be fine, but seriously, just leave the iPhone alone to dry.)

Bonus Techniques

There are two additional techniques you can try, one to remove water in general and another to clear water from the iPhone’s speaker.

First, the classic advice for a water-damaged electronic device is to bury it in a container of uncooked rice for a day or two. The idea is that the rice absorbs the moisture in its vicinity, pulling it out of the iPhone. It can work, but Apple recommends against it because of the likelihood of getting tiny bits of rice in the Lightning port. If you want to use rice, wrap the iPhone loosely in a paper towel first to protect its ports.

A better approach is to use a sealed plastic bag containing silica gel desiccant packets like those in vitamin bottles. They’re inexpensive and readily available, and you can even get ones that you can recharge in a microwave or oven. But of course, you have to have them on hand, or it’s back to the rice.

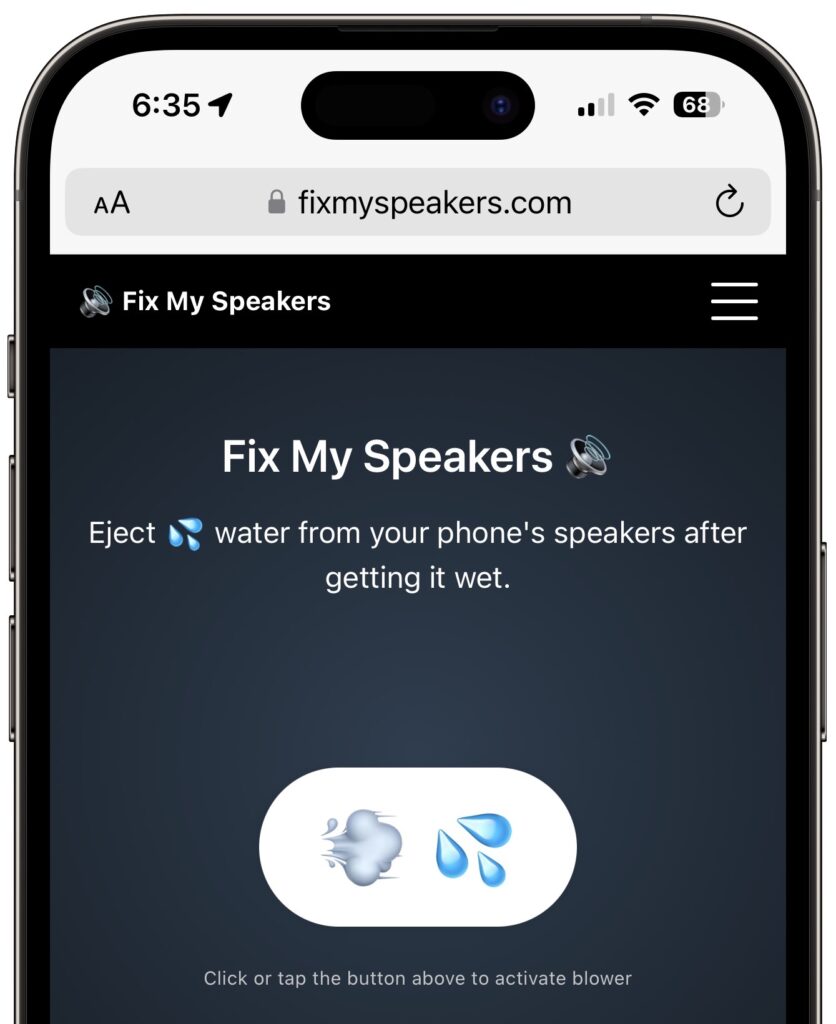
Second, if your iPhone’s speaker sounds muffled, some people suggest using an Apple Watch-like trick of playing a particular sound to eject water. Visit FixMySpeakers and tap the button. This is clever and shouldn’t hurt anything, but if there’s water in the speakers, there’s probably water elsewhere, and it might be safer to turn the iPhone off quickly and let it dry naturally—as I recommend above.

One last piece of advice: Apple doesn’t claim any sort of water resistance for iPads or MacBooks. If one of them gets wet, you can try following the advice above—it shouldn’t hurt anything—but it’s more likely that a repair is in your future.

(Featured image by iStock.com/Evgen_Prozhyrko)

Integrate Your Cloud Storage Service into the Finder

Many businesses, schools, and other organizations have adopted cloud storage services like Box, Dropbox, Google Drive, and Microsoft OneDrive for excellent reasons. Cloud storage provides a centralized spot for shared data without the up-front cost or maintenance issues of a network-attached storage device. It also allows individuals to access the same files on multiple devices and significantly enhances collaboration by allowing multiple people to work on the same file.

All cloud storage services provide a simple Web-based interface that’s the least common denominator. The Web interfaces look and work the same for everyone, regardless of platform. Unfortunately, they’re clumsier—sometimes much more so— than working with the same files in the Mac’s Finder.

Luckily, cloud storage services also provide deep integration with the Finder. If you haven’t already installed your cloud storage service’s Mac app, we strongly encourage you to do so. Here are links for the big four; others will likely provide similar apps.

Once the software is installed, you’ll find an item in the Locations portion of your Finder window sidebar that provides access to everything in your cloud storage, as though it were on an external hard drive connected to your Mac. You can quickly rename files, add folders, move files between folders, and perform other basic Finder tasks. The services also install menu bar items you can click to access settings, activity, and other controls (Dropbox shown below).

Cloud storage is not the same as an external hard drive, of course, so you need to keep certain facts in mind when using cloud-based data in the Finder. Some of this information has changed within the last few months, as cloud storage providers have migrated from Apple-deprecated custom kernel extensions to Apple’s recommended File Provider extension. (The migration is still underway for Dropbox users.) Here are the most important things to know.

Data May or May Not Be Stored on Your Mac’s Drive

When integrating a cloud storage service into the Finder, it’s reasonable to ask where the data is actually stored. The short answer is that it’s always stored online, but it might also be stored on your Mac. All cloud-based files are either online-only, at which point all you see is a placeholder icon on your Mac, or offline, which means a copy of the files exists on your Mac. Online-only files and folders have a little cloud icon next to their names in the Finder; offline files lack that icon.

When you double-click an online-only file, the service’s Mac software downloads it in the background so it can open in the appropriate app. You shouldn’t notice a delay with small files, although it may become more noticeable with very large files or over slow Internet connections. And, of course, if you’re on an airplane or somewhere without connectivity, you can’t open online-only files at all. On the plus side, they don’t take up any space on your Mac’s drive until you open them.

You can control which files and folders are online-only and which are offline. Control-click the file or folder and look for commands like Download Now or Make Available Offline to bring its contents down to your Mac, or use commands like Remove Download or Make Online-Only to remove the download to save space.

All Your Files Live In ~/Library/CloudStorage

So where are the offline copies of cloud-based files stored on your Mac? It may seem like they’re on a drive of their own, but in reality, they’re stored in your home folder’s hidden Library folder, in a folder called CloudStorage. (To see the Library folder, open the Finder’s Go menu and press Option.) You never have to go there directly, but it can be useful to keep in mind when setting up backups, moving data between Macs, and more.

Only OneDrive Supports External Drives

There is an important caveat to the requirement that all cloud-based files live in ~/Library/CloudStorage. That folder lives on your Mac’s internal drive, which may not have sufficient space to store offline copies of all your cloud-based data. Before the switch to Apple’s File Provider extension, the cloud storage services let you store the offline copies of your files on an external hard drive. That’s no longer possible with Box, Dropbox, and Google Drive. Microsoft OneDrive has worked around this limitation, allowing you to specify an external drive as your cache to maintain a copy of offline data separately from the state of the items in the CloudStorage folder. (If you manage terabytes of offline files, particularly for audio or video editing work, check out the completely different LucidLink service.)

Dragging Files Moves Rather than Copies

When you work with an external hard drive or network drive, dragging a file from your Mac’s internal drive to one of those copies it because it’s going to a different volume. Although the cloud storage services seem to be separate volumes (some were in the past), they no longer act that way. That’s because all the data lives in the CloudStorage folder on your internal drive, so dragging a file out of Google Drive, say, moves it, just as though you dragged a file from one folder on your internal drive to another. It’s not a problem—and the services warn you about it—but keep it in mind.

Moved or Trashed Files Remain Available Online, at Least Temporarily

What happens to the online version of a file when you move it from the cloud storage service on your Mac to another location on your Mac’s internal drive? Good question, and the answer is that it ends up in the trash equivalent on the service’s website. Cloud storage services generally retain such files for some time—30 days is common—after which they go away for good.

When you delete a cloud-based file in the Finder, the same thing happens: it ends up in the service’s online trash equivalent. However, what happens on your Mac varies by service, so testing with a sacrificial file is worthwhile. For example, if you delete an offline file in Dropbox, it moves to the Mac’s Trash. However, if you delete an online-only file, Dropbox warns you that it will be deleted immediately, and it disappears instantly from the Mac rather than moving to the Trash. You can still find it in Dropbox’s Deleted Files folder on the Dropbox website. In contrast, deleting either type of file from Google Drive moves it to the Mac’s Trash (and puts it in Google Drive’s online Trash folder).

Sharing Files and Paths with Colleagues

All the cloud storage services let you Control-click a file and copy a link. When a co-worker clicks that link, it will open in the cloud storage service’s Web interface or possibly in an online version of the app that created it. That may be fine, but our experience is that they won’t be able to find the file again in the future.

To help colleagues learn where files are in a shared cloud-based folder structure, send them the path to the file—the full list of folders containing the file. The trick for getting it is to select the file in the Finder, Option-click the Edit menu, and choose Copy “MyFile” as Pathname.

The start of the path is specific to your Mac, so delete that and leave the rest. For instance, when you paste the path, if you get this:

/Users/foobar/Library/CloudStorage/[email protected]/My Drive/GroupShared/Buzz/Posts/Buzz-0004.pdf

Trim it as follows to clarify that the file is in the Posts folder, which is in the Buzz folder, and that’s in  a top-level folder called GroupShared:

/GroupShared/Buzz/Posts/Buzz-0004.pdf

Searches May Work Poorly for Online-Only Content

The split between online-only and offline files also affects how Spotlight and other content-based searches work. As you would imagine, if a file is online-only, there’s no way Spotlight can index its content, so Spotlight won’t be able to find such files based on content searches. Some of the cloud storage services offer content-based searches, so with Google Drive, for instance, if you initiate a search from its Web interface, it will find all files containing the search terms even when they’re set to online-only on your Mac.

Filename searches in Finder windows should work regardless of online-only/offline state, although we’ve experienced problems when trying to limit the scope within the service’s Mac folder—search the This Mac scope for the best results. (Click the This Mac button after starting the search if necessary.) You may also have good luck with third-party search utilities like EasyFind and Find Any File.

Backups Work Only for Offline Content

Finally, remember that Mac backup systems like Time Machine and Backblaze cannot back up online-only files because they don’t actually exist on your drive. At best, such backup apps will show the placeholder for the file but won’t back up its content. They work fine for offline files, of course, but if you have to find a particular file or folder when restoring, remember that backup apps other than Time Machine will probably see it as stored in ~/Library/CloudStorage.

Should you care if your cloud-based files are backed up locally? Cloud storage systems automatically protect data against drive failure or other problems in the cloud. Plus, any shared data that one of your collaborators deletes from their Mac—inadvertently or maliciously—should be maintained in that person’s online trash, even if it seems to disappear.

However, we’d argue that it’s all too easy to lose or corrupt cloud-based data such that you want a local backup. We’ve seen too many situations where cloud-based files went missing or had problems. In those cases, a local backup provided an essential fallback or welcome peace of mind.

To ensure that your cloud-based files are backed up alongside your other files, you must make sure they’re stored offline long enough to get into your backups. Select top-level folders, make them offline, and wait until everything has downloaded and been backed up. If you need the space back, you can return some folders to being online-only. Pay attention to new files added by other devices or people since they may be online-only by default and thus fail to be included in your backups.

For backup of an organizational cloud storage account, it might make more sense to use a service like Backupify, CloudAlly, or CubeBackup, or to rely on something like a Synology NAS device with Cloud Sync. But that’s a topic for another day or another discussion—get in touch to learn more.

(Featured image by iStock.com/Galeanu Mihai)

Quickly Put Lots of Files in a Folder with One Command

Imagine that you’re working with a bunch of files, and you want to put a set of them in a new folder. You could stop what you’re doing, make a new folder, select all the files, and drag them into the folder, like an animal. Or you could take advantage of a slick Finder command that Apple added in macOS 11 Big Sur. Simply select the files you want to put in a folder, Control-click one of them, and choose New Folder with Selection (X Items) from the top of the contextual menu. A folder called “New Folder With Items” appears, with your selected files inside. This feature may not be life-changing, but some people use it often.

(Featured image by iStock.com/ArLawKa AungTun)

Find Devices and People from Your HomePod

This feature evokes one of those “living in the future” moments for us. The recently released HomePod Software 16.3 now supports Find My, which means you can ask Siri to locate one of your devices or a friend or family member who shares their location with you. If you have a HomePod, ask Siri, “Where is my iPhone?” Assuming your HomePod has updated (and if not, update it manually in the Home app), Siri will respond by causing your iPhone to play a sound. Or ask where someone is—Siri will respond with more details for nearby people and city locations for those far away.

(Featured image based on an original by Apple)

Is Your Wi-Fi Network a Security Risk?

With Wi-Fi security, it’s easy to fall into the “out of sight, out of mind” trap. Your Wi-Fi router probably lives in a corner or closet, and of course, Wi-Fi’s radio waves are invisible. But the ease of connecting your devices to your Wi-Fi network means it’s equally as easy for a hacker to connect to your network and eavesdrop on your traffic. Or rather, it’s easy unless you take advantage of the security options available in every Wi-Fi router.

Before looking at those options, let’s discuss the importance of securing your wireless network. The fact is, we all send sensitive data over Wi-Fi and onto the Internet. That data includes passwords, financial information, and personal details, all of which could be used for identity or outright theft. For those who work at home, it may also include important corporate credentials and information. In addition, if your Wi-Fi network is open for everyone and has a bandwidth cap, you could be throttled or incur additional charges due to extra usage from someone using your network without your knowledge. Worse, someone could engage in illegal activity from your network, potentially putting you at legal risk.

Here are six ways you should secure your Wi-Fi network, plus another that’s usually not worth the effort. Exactly how you go about these tasks varies depending on your Wi-Fi router, but they should all be easy to accomplish.

1. Change Your Wi-Fi Router’s Default Password

Every Wi-Fi router has an app- or Web-based administrative interface where you can adjust settings, including security options. The first thing you should do when setting up a new Wi-Fi router is change the password for accessing that admin interface. (And if you didn’t do that when you set up your current Wi-Fi router, go do it now. Immediately. We’ll wait.) The default passwords are well known to hackers, who can use them to take over routers and turn off all the other security settings.

2. Change the Default Network Name (SSID)

Every Wi-Fi network has a name—technically an SSID, or Service Set Identifier. There’s no security benefit in changing it to anything in particular, but you should change it from the default name. That’s because default names often identify the router’s manufacturer, such as “Netgear” or “Linksys,” and some routers have known vulnerabilities or password styles that make it easier to break in. Of course, the main advantage of changing the network name is that it makes it easier to pick out from any other nearby networks.

3. Update Your Wi-Fi Router’s Firmware

Wi-Fi router manufacturers frequently fix security vulnerabilities and release new firmware versions. Check to make sure your Wi-Fi router has the latest firmware available, and if there’s an option for it to update its firmware automatically, turn that on.

4. Disable WPS (Wi-Fi Protected Setup) If Possible

When you connect a new device to your Wi-Fi network, you need to enter your Wi-Fi password. That’s entirely reasonable, and Apple devices automatically offer to share that password with your other Apple devices and other people in your Contacts. More generally, a technology called Wi-Fi Protected Setup (WPS) was designed to enable connecting without typing the Wi-Fi password, either by entering an 8-digit PIN or pressing a button on the router. The button is fine—no one can connect without physical access to the router. But the PIN is horribly insecure and can be brute forced with readily available cracking software. If your router supports WPS—not all do, happily—turn it off entirely.

5. Create a Guest Network

You’ll probably want to give visitors access to your Wi-Fi network so they can get to the Internet. The best way to do that is to create a guest network—a feature in nearly all Wi-Fi routers—separate from your main Wi-Fi network. It has a different name and password, and its traffic is isolated from yours, ensuring that even if a hacker were to access it, they wouldn’t be able to eavesdrop on your communications. It can have a simpler password since all it’s protecting is your bandwidth. One additional tip—put “Internet of Things” devices like smart appliances, video game consoles, and the like on your guest network to ensure they don’t provide access to your main network’s traffic if they’re hacked. You probably won’t want to do that with HomeKit devices, which will work better on the same network as your Apple devices.

6. Use Strong WPA2 or WPA3 Encryption

After changing the default admin password, this is the second-most important piece of Wi-Fi security advice. All traffic on a Wi-Fi network can (and should) be encrypted so hackers can’t eavesdrop with impunity. The first wireless security protocol was WEP (Wired Equivalent Privacy), which was commonly used from the late 1990s through 2004. Unfortunately, WEP is so easily broken today that it’s no longer considered secure. If you still use WEP, immediately switch to WPA2 (Wi-Fi Protected Access). There’s also WPA3, which is even more secure but is available only in hardware sold in the last few years.

Don’t Bother Hiding Your SSID

Finally, you may see suggestions that you should hide your Wi-Fi SSID, which prevents nearby devices from displaying it when they list available networks. That might seem like it would improve security, but all it does is prevent the sort of people who aren’t a threat anyway from seeing it. Anyone with the necessary software and skills to break into an unprotected or weakly protected Wi-Fi network can still detect and access a hidden network. They might even be more interested in what’s there, given that the network owner took the trouble to hide it. As long as you follow all the other advice in this article, there’s no benefit in hiding the SSID as well.

Bonus Advice: Use a VPN When on Public Wi-Fi Networks

Ensuring the security of your Wi-Fi network is essential, but what about public Wi-Fi networks in coffee shops, hotels, and airports? Because they’re open to anyone within range, they’re insecure by definition, and anyone on the network could theoretically see any other user’s traffic. Don’t panic. Most Web connections now use HTTPS, which encrypts traffic between you and the destination site (look for https at the start of URLs or a lock icon in the address bar of your Web browser). To ensure that all traffic is protected from prying eyes, use a VPN (Virtual Private Network), which creates an encrypted pipe from your computer to a VPN server elsewhere. Many organizations provide or even require VPN use so that traveling or remote employees can’t inadvertently use unencrypted connections. If your organization doesn’t have a VPN now but would like to set one up, contact us.

(Featured image by iStock.com/CASEZY)