Use Continuity Camera to Scan Documents and Take Photos Right into Mac Documents

Have you found yourself composing an email message on your Mac while staring glumly at the receipt or document you need to scan and attach to the message? Adding that scan to the message isn’t impossible, but until macOS 10.14 Mojave, it hasn’t necessarily been easy.

It’s super simple now, thanks to a new Mojave feature called Continuity Camera. It lets you take pictures or scan documents with an iPhone or iPad running iOS 12 and have those images show up immediately on the Mac, either in a document or on the Desktop.

Continuity Camera Basics

Apart from Mojave and iOS 12, Continuity Camera requires that the devices be on the same Wi-Fi network, have Bluetooth turned on, and be logged in to the same Apple ID, which must use two-factor authentication. Continuity Camera also requires explicit support in apps, which means for the moment that it works only in Apple’s apps, including the Finder, Mail, Messages, Notes, TextEdit, Pages, Keynote, and Numbers. We aren’t aware of any third-party apps that support it yet.

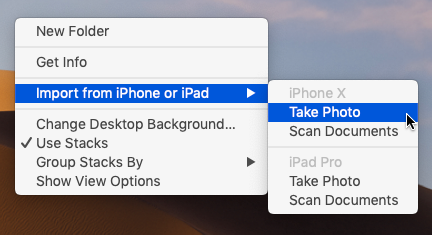
How you access Continuity Camera can vary by app, but the most common approach is to Control- or right-click where you want the scan or photo to go. Look either for commands for Take Photo and Scan Documents, or for an Import from iPhone or iPad submenu, under which those commands will be replicated for each device.

The Take Photo and Scan Documents commands may also appear in the File menu or in an Insert menu. Plus, Mail composition windows have a drop-down menu on the right side of the toolbar that includes those commands.

Should you import directly into an app, or onto the Desktop? It’s up to you, of course, but adding a file to the Desktop that you can then drag to its eventual destination gives you more options for reuse or modification, along with backup. That could be important since the photos and scans aren’t stored on the iPhone or iPad.

Using Continuity Camera

Follow these steps to use Continuity Camera to take a photo or scan a document to your Mac. Because it’s the most likely scenario, we’ll describe importing to the Desktop from an iPhone, but the steps are the same for importing into any supported app or from an iPad.

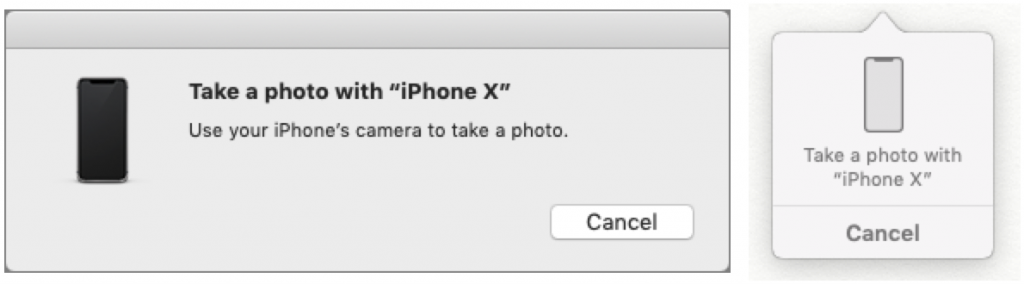
First, Control-click the Desktop and choose either Import from iPhone > Take Photo or Import from iPhone > Scan Documents. A dialog appears on the Mac screen, telling you to use the iPhone to take the photo or scan the document. The iPhone displays a variant of the Camera app automatically.

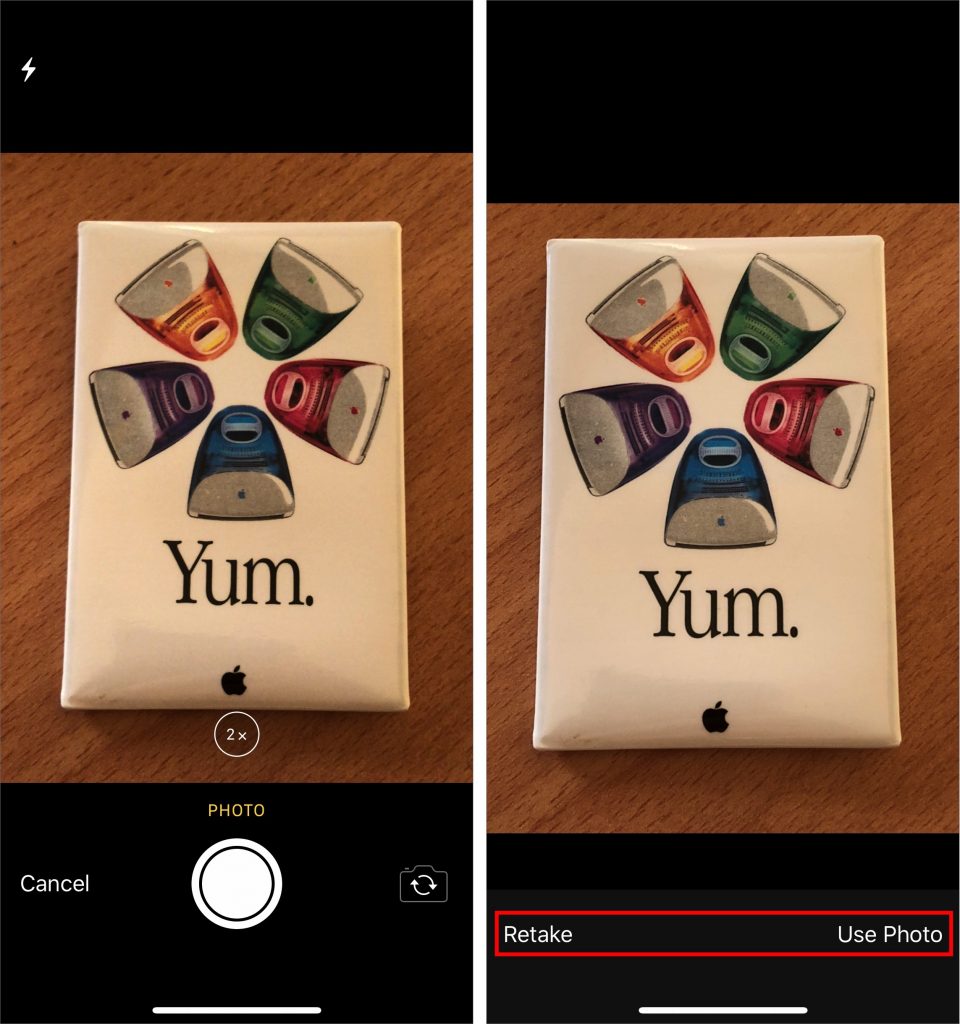
If you’re taking a photo, you can switch between the rear- and front-facing cameras, pinch out to zoom, or enable the flash with the flash button. All you need to do is tap the shutter button. If the photo is blurry or otherwise unusable, tape Retake to try again, but if you like it, tap Use Photo. The picture shows up immediately on your Mac as a JPEG file.

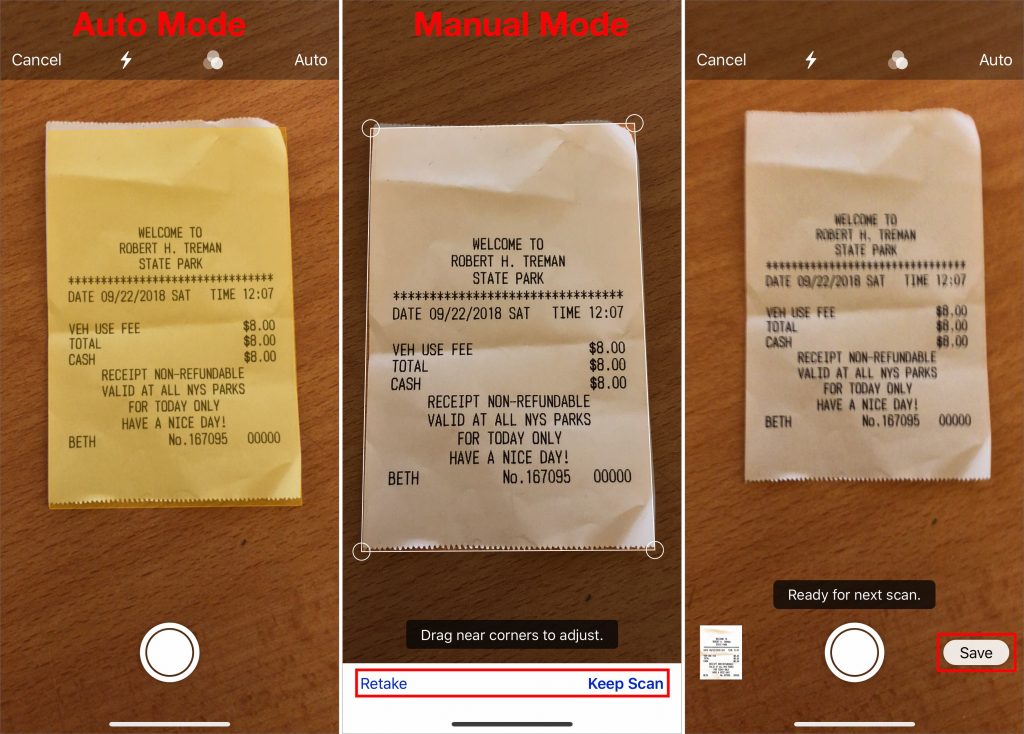
If you’re instead scanning a document, you also get a Filters button that lets you set the scan type: color (the default), grayscale, black-and-white, or photo. By default, the scanning interface takes a picture automatically when it detects a document. If it moves too fast for you, tap Auto (at the upper right) to switch to Manual. Then tap the shutter button to capture the image, after which you may drag the circles to identify the document corners better. Then tap Retake or Keep Scan. If it’s a multi-page document, flip the page and continue scanning to add more pages. When you’re done, tap Save to send the document to your Mac as a PDF.

That’s it! The first time or two might seem a little awkward, but once you get the hang of Continuity Camera, it’s a wonderfully quick way to get a scan or photo onto your Mac.

In iOS 12, Do Not Disturb Can Turn Itself Off—No More Missed Alerts!

We love the Do Not Disturb feature in iOS—it’s essential for keeping notifications from waking us up at night or causing embarrassing light and noise in dark movie theater. But it’s long had a problem. When you invoked Do Not Disturb manually for a movie or doctor’s appointment, you had to remember to turn it off manually when you were done, or risk missing important notifications. No more!

In iOS 12, Apple enhanced Do Not Disturb in two ways: enabling it to disable itself automatically after a certain amount of time or when your location changes and adding a Bedtime mode that holds all notifications until you wake up.

An Automatic End to Do Not Disturb Sessions

In previous versions of iOS, you invoked Do Not Disturb manually by tapping its button in Control Center. However, if you forgot to turn it off after your meeting, say, it would stay on forever unless you had a Do Not Disturb schedule set, and even then, not until the end of that schedule. So if you forgot to turn Do Not Disturb off after a 10 AM meeting, it could stay on until the next morning or until you realized you weren’t getting any calls or messages.

If you start Do Not Disturb sessions in the same way in iOS 12, they’ll act the same way. But if you force-touch or press and hold the Do Not Disturb button in Control Center, that brings up the Do Not Disturb card with five options:

  • For 1 hour: This first choice tells Do Not Disturb to hold all your calls for an hour, after which it will turn off automatically.
  • Until this evening/Until tomorrow morning: If you invoke this option during the day, it will silence calls and notifications until 7 PM. Select it at night, however, and it will quiet your iPhone until 7 AM.
  • Until I leave this location: Use this choice when you’re invoking Do Not Disturb in conjunction with being in a particular spot that you’ll leave as soon as you’re done.
  • Until the end of the next event: When you enable Do Not Disturb during an event on your calendar, this choice appears, giving you the option of turning off Do Not Disturb at the end of the event.
  • Schedule: Tap this button to open Settings > Do Not Disturb.

While Do Not Disturb is on, iOS 12 puts a notification on the Lock screen telling you when it will turn itself off. At any time before then, you can tap the Lock screen notification to allow calls and notifications again.

Do Not Disturb During Bedtime

In Settings > Do Not Disturb, you’ll find a new Bedtime switch. When enabled during the times for which you’ve scheduled Do Not Disturb, it dims and blacks out the Lock screen, silences calls, and sends all notifications to Notification Center instead of showing them on the Lock screen.

The idea behind the Bedtime switch is that it reduces the chances that glancing at your iPhone in the middle of the night to see what time it is will shock your eyes or engage your brain. Sleep is good! But if you get up early and want to allow notifications through again, tap the Do Not Disturb notification on the Lock screen to turn it off.

That’s not all you can do with Do Not Disturb During Bedtime. You might know that there’s a Bedtime screen in the Clock app that’s designed to help you go to bed and wake up at the same time every day. If you use it to set your desired sleep schedule and enable the Do Not Disturb During Bedtime switch in Clock > Bedtime > Options, you get another Do Not Disturb schedule.

That could be extremely welcome if, for instance, you want Do Not Disturb on automatically both at night when you’re sleeping and also during a regularly scheduled class or meeting.

Give these new Do Not Disturb options a try! They go a long way toward ensuring that our iPhones fit into our lives better, rather than forcing us to pay attention to every last alert or message.