Understanding the Relationship between Thunderbolt 3 and USB-C

by Adam Engst

Apple’s new MacBook Pro with Touch Bar models rely on a new kind of connection port: Thunderbolt 3. Unfortunately, while this switch is great from a technical standpoint, it has caused confusion in the Mac world. Let’s sort it all out.

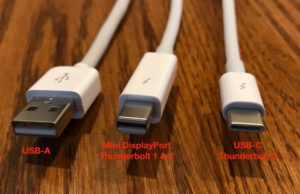
The root of the confusion is the fact that Thunderbolt 3 uses a different physical connector than Thunderbolt 1 and 2. They relied on the physical Mini DisplayPort connector, which made sense since they are commonly used to connect monitors. Thunderbolt 3 instead relies on the reversible USB-C connector that has previously appeared in the Mac world only on the 12-inch MacBook, where it replaces USB-A.

Here’s the key fact to remember: all USB-C devices, cables, adapters, and chargers should work when plugged into a Thunderbolt 3 port, but Thunderbolt 3-specific peripherals will not work when plugged into the USB-C port of a 12-inch MacBook. In short, Thunderbolt 3 is a superset of USB-C.

The only visible difference between a Thunderbolt 3 cable and a USB-C cable is that a Thunderbolt 3 cable is labeled with the same lightning logo used on previous Thunderbolt cables. USB-C-only cables may be labeled with SS+ for SuperSpeed+.

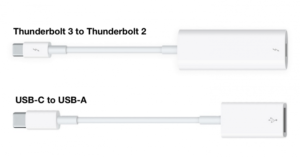
If you buy a new MacBook Pro and want to connect it to older devices that lack Thunderbolt 3 or USB-C ports, you’ll need a special cable, adapter, or dock. Apple makes a number of these, and more are available from numerous independent manufacturers. The two most important adapters to get are Apple’s Thunderbolt 3 to Thunderbolt 2 adapter and a USB-C to USB-A adapter.

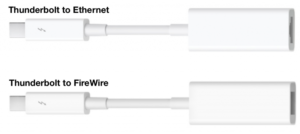
With those handy, you can connect to any Thunderbolt device (including many older Macs and Apple’s Thunderbolt Display) and any USB device. You can also add Apple’s older Thunderbolt to Gigabit Ethernet Adapter and Thunderbolt to FireWire Adapter to connect to Ethernet networks and FireWire hard drives.

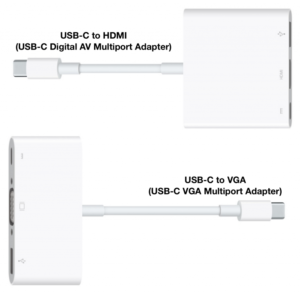
Connecting to other displays requires additional adapters, which are specific to the different video standards. Apple makes adapters for USB-C to HDMI and VGA, but not for USB-C to DisplayPort, Mini DisplayPort, and DVI, so you’ll have to turn to another manufacturer for displays that rely on those last three standards.

The practical upshot of all this is that if you have a new MacBook Pro with Thunderbolt 3, you may need to get a couple of adapters to be able to migrate data from an older Mac, connect to your existing accessories, and drive external displays and projectors. (Macworld has a nice guide to all the possibilities.) That’s an unfortunate fact of life right now, but in a few years, once most peripherals support USB-C and new Macs come with Thunderbolt 3, there will be one cable to rule them all.

Taking Screenshots: Three Tricks for the Mac and One for iOS

Did you ever want to capture what’s on your screen, or at least a part of it? Screenshots aren’t just for technical writers trying to document app behavior—you might also use them to provide feedback on a photo, to document an error message for someone who helps you with your Mac, or to record a particularly funny auto-correct fail in Messages on your iPhone.

OS X and iOS have both long included built-in screenshot features that make it easy to take a high-resolution picture of what you see onscreen. (You can, of course, use a camera to take a photo of your screen, but that will never look as good.)

Taking a screenshot in iOS is super simple, and it works the same on an iPad, iPhone, or iPod touch. Just press the Home and Sleep/Wake buttons simultaneously. You’ll see the screen flash, and iOS saves the screenshot to your Photos app—look at the bottom of the Camera Roll or, if you’ve turned on iCloud Photo Library, the All Photos album. The same technique works on the Apple Watch, where you press both the digital crown and the side button simultaneously. (Accidental presses of those buttons explains why random Apple Watch screenshots might appear in Photos.)

On the Mac, you can take your pick from three built-in methods of taking screenshots:

If you take a lot of screenshots, consider memorizing OS X’s keyboard shortcuts. For a full-screen screenshot, press Command-Shift-3. For a screenshot of an arbitrary size, press Command-Shift-4 and drag out a rectangle. To capture just an object like a window, press Command-Shift-4, hover the pointer over the window, press the Space bar to show the camera cursor over the highlighted object, and then click to take the screenshot. The Command-Shift-4 shortcut is the only way to capture a menu. All screenshots are saved as PNG files on your Desktop and automatically named with the date.
If that sounds geeky and hard to remember, try Apple’s Grab app, which is hidden away in the Utilities folder inside your Applications folder. It’s a simple app, but it can take full-screen, window, and selection screenshots, and it walks you through the process. You can also use Grab to capture a full-screen screenshot with a timer, which is handy if what you want to record appears only while you’re dragging an icon or other object, for instance. Captured screenshots appear in Grab as Untitled TIFF documents that you can close, copy, save, or print.
Want to mark up a screenshot with circles and arrows and a paragraph of text, just like the photos in Arlo Guthrie’s Alice’s Restaurant song? For that, use Apple’s surprisingly powerful Preview app, which can take screenshots and opens them as graphic documents that you can edit. Choose File > Take Screenshot > From Selection, From Window, or From Entire Screen. That last option is automatically a timed screenshot so you can set up any temporary conditions while the timer counts down. To access the tools you need to  add shapes or text to your screenshot, choose View > Show Markup Toolbar. When you’re done, you can save the screenshot in a variety of formats.

You can also take screenshots using a cornucopia of third-party screenshot utilities. In general, they don’t offer much more than Apple’s options when it comes to capturing screenshots. Where they stand out is providing better tools for marking up and manipulating screenshots, and in offering an interface for managing and sharing screenshots. Choosing among them is largely a matter of personal preference, but check out Evernote’s free Skitch, Global Delight’s $29.99 Capto, and Aged & Distilled’s $39.99 Napkin.

Whatever method you choose, remember that a picture is worth a thousand words, and the right screenshot can be even more valuable.

Enhance Copy & Paste with Clipboard Utilities

One of the most important technologies of the computer age is Copy & Paste. You may not think about the humble clipboard much, but Copy & Paste has saved you incalculable amounts of work by letting you copy something you’ve done previously to the clipboard, paste it into another document or app, and make any necessary changes. Whether you’re updating a monthly report, tweaking graphics for an annual party, or entering sales numbers in a custom database, Copy & Paste ensures that you don’t have to retype data or start from scratch.

What if you could make Copy & Paste even more powerful? With the right clipboard utility installed on your Mac, you gain two major new features:

  • Use clipboard history to access previously copied data. By default, every time you copy something to the clipboard, it replaces whatever was there before. With a clipboard utility, though, you can see a list of items you’ve previously copied to the clipboard and paste any one of them, which is way easier than finding and copying the data again. Clipboard utilities even preserve your clipboard history across restarts!
  • Edit or filter the data on the clipboard before pasting. This is useful, for instance, if there’s a mistake in the contents of the clipboard, if you copied styled text but want to paste plain text, or if you want to replace all double spaces in the copied text with single spaces.

Which clipboard utility is right for you depends on what else you might want it to do, or you might even have one installed already without realizing. That’s because clipboard enhancements are a bit like blades in a Swiss Army knife: they tend to be bundled into other utilities. You won’t go wrong with any of these clipboard boosters: the macro utility Keyboard Maestro, the launcher LaunchBar, and the dedicated clipboard helper Copy’em Paste.


Keyboard Maestro ($36) is a macro utility, which means that it lets you string together a series of actions—copy this, switch apps, click here, paste, switch back, for instance—and then invoke that series with a trigger such as a hotkey, menu command, timer, or system activity. Keyboard Maestro offers hundreds of actions and numerous triggers, but from the clipboard perspective, it provides a persistent clipboard history, multiple named clipboards, filtering of clipboard contents when pasting, removal of styles from pasted text, and a user-specified hotkey for anything you want to do. You cannot, however, edit clipboard text manually.


LaunchBar ($29) is a launcher, so its primary feature is opening or switching to an application or file by typing a hotkey followed by a few letters from the name of the app or file. That’s hugely useful in its own right, but LaunchBar also maintains a filterable clipboard history across restarts, lets you paste a clipping as plain text, and can merge copied text with whatever is already on the clipboard. Other apps in this category include Alfred (with the optional £17 Powerpack), Butler ($20), and QuickSilver(donationware).


Copy’em Paste ($14.99) focuses on clipboard enhancements, wrapping nearly every clipboard-related feature you could want in an attractive interface. It offers a full clipboard history, makes it easy to paste multiple items quickly or even in a batch, can transform pasted text in a variety of ways, and lets you organize clippings into groups. It also enables you to edit text clippings, search for text in your clippings, and ignore apps whose clipboard changes just clutter your clipboard history. Competitors include CopyPaste Pro ($30) and iClipboard ($9.99).

Regardless of which of these utilities you choose, you’ll soon be juggling the contents of your clipboard like a pro…and wasting a lot less time!

Rearrange Menu Bar Icons in Sierra

Have you ever wanted to rearrange the menu bar icons that breed like bunnies at the top of your screen? Some of that has been possible in the past, but macOS 10.12 Sierra finally lets you configure your menu bar the way you want it. To move a menu bar icon, hold down the Command key and drag the icon to a new position. This works with every icon except the Notification Center icon in the rightmost spot; it has to stay in that location.