Did You Know That You Can Run iPhone and iPad Apps on an M1-based Mac?

Much has been written about the performance benefits of Apple’s M1 family of chips, but you may not have realized that M1-based Macs can also run many iPhone and iPad apps. It makes sense, given that the M1 chip grew out of the work Apple did for the A-series processors in the iPhone and iPad, and the latest iPad Pro models also rely on the M1.

Why Run iOS Apps?

Depending on how you use your iPhone and iPad, you’re thinking either, “Hey, this is great, because I want to run my favorite apps on my new Mac!” or “What could I possibly gain from putting a little iOS app on my Mac?”

If you’re in the latter camp, think about the apps you regularly use on your iPhone and iPad. Some undoubtedly have Mac versions, and others may offer Web apps that you can run in Safari on your Mac. But a few probably exist only on the iPhone or iPad, or their Web apps are limited. That might be especially true of games, one-trick-pony apps (like the Mandelpad app shown below), and smart home device apps.

What iOS Apps Are Available for the Mac?

In theory, any iPhone or iPad app should run on an M1-based Mac. However, Apple allows developers to set a switch that prevents an iOS app from installing on Macs. Developers may want to prevent that if they already make a Mac-specific app or don’t want to be on the hook for supporting customers using their iOS app on Mac. Sadly, many popular apps like Netflix, Kayak, and Libby won’t run on the Mac.

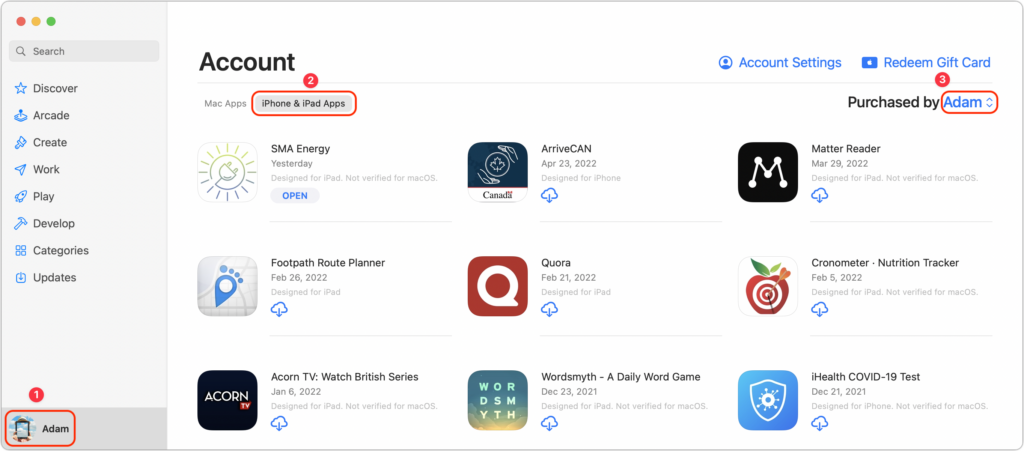
Luckily, there’s an easy way to determine which of your iPhone and iPad apps will run on your M1-based Mac. Using the Mac App Store app:

  1. Click your avatar in the lower-left corner to view your account.
  2. Under Account, click iPhone & iPad Apps to view the iOS apps you’ve purchased.
  3. If desired, use the Purchased By pop-up menu to the right to see apps that other people in your Family Sharing group have purchased.
  4. Scan the listing, which is sorted by the date you acquired the app.

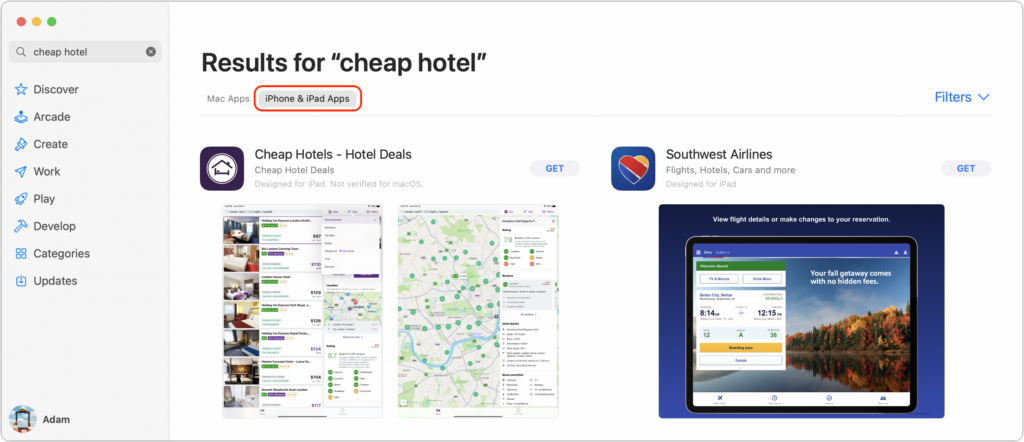
What about new apps? Whenever you’re searching for an app in the Mac App Store using an M1-based Mac, you’ll see the same two tabs: Mac Apps and iPhone & iPad Apps. Click the latter to see all the apps that match your search and will run on your Mac. Because of developer-set limitations, you may not find what you’re looking for with a search.

How Do You Install iOS Apps?

When viewing the list of your purchased iPhone and iPad apps in the Mac App Store as described above, simply click the download button to install the app in your Applications folder.

If you’ve found a new app that you want to download, click the Get or price button, just as though it were a Mac app.

How Do You Use Multi-Touch Apps on a Mac?

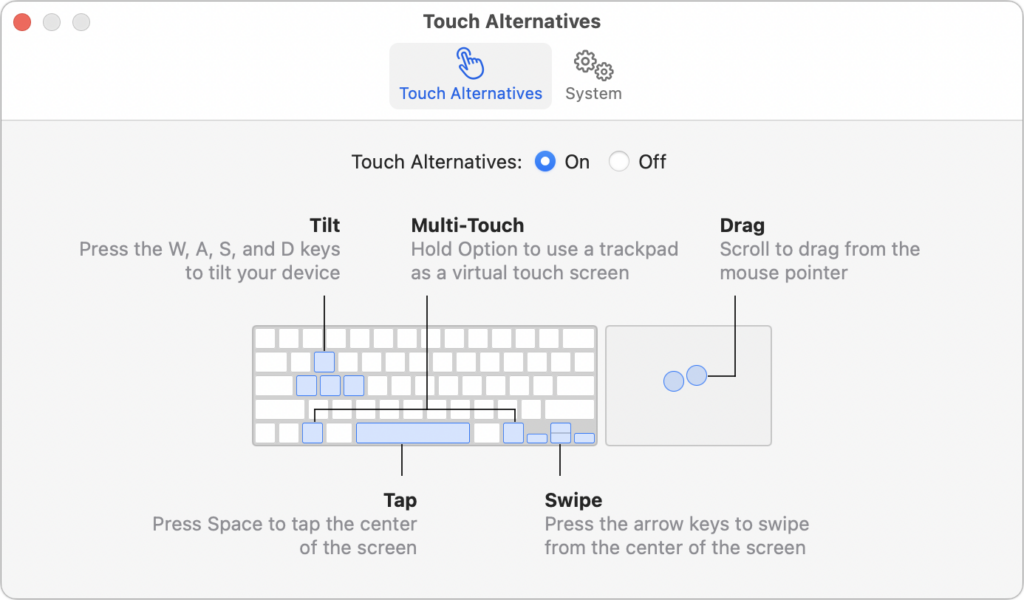
Needless to say, trying to tap and swipe on your Mac’s screen with a finger won’t have any effect. You’ll need to use your Mac’s keyboard and pointing device—preferably a trackpad—to control your iPhone and iPad apps. For the most part, such actions should map in an intuitive manner: you click instead of tapping, and trackpad gestures like pinching work the same.

If that doesn’t work, or if the app in question requires tilting the iPhone or iPad, choose Preferences from the app’s menu and turn on Touch Alternatives to map keys on the keyboard to device actions like tilting, tapping, and swiping. How well the Mac’s input devices will work for controlling an iOS app will undoubtedly vary.

We’re not going to pretend that being able to run iPhone and iPad apps on your M1-based Mac is world-changing. It’s all too easy to whip out your iPhone and use such an app in the environment for which it was designed. But there are likely situations where it would be convenient to have an iOS app running alongside the rest of your Mac apps, and that’s now possible.

(Featured image by iStock.com/Apple)

Block Malicious and Adult Web Sites with DNS Filtering

One of the best ways to keep malware from infecting your computers is to avoid visiting websites designed to do just that. No one intentionally visits loadmetogetinfected.com, but malware authors employ all sorts of tricks to lure unsuspecting users into viewing malicious sites. Various tools can help, but the easiest free technique is called DNS filtering.

DNS, which is short for Domain Name System, is the Internet technology that maps human-readable computer names like www.apple.com to the numeric IP address of Apple’s server, 17.254.0.91. Every time you click a link to visit a new Web page, your Mac queries a DNS server to learn the IP address associated with the domain name embedded in the link—it all happens seamlessly and instantaneously in the background.

Typically, your Mac will automatically use the DNS servers specified by your Internet service provider. However, you can change your DNS servers manually, and one good reason to do so is to take advantage of DNS servers that look at your Mac’s DNS requests and refuse to resolve names associated with malicious sites. Such DNS filtering is great since it protects you from malicious sites without you having to do anything special. Such sites simply won’t load at all.

One more thing. DNS filtering can also block porn sites. That’s helpful if you want to avoid accidentally loading adult content or to ensure that those in your office don’t, in order to reduce the chances of a sexual harassment complaint. As with malicious sites, filtered adult sites just won’t load.

Setting up DNS filtering is easy. All you have to do is replace your current DNS server addresses with the IP address of a particular public DNS service—the steps are later in this article. The two providers we recommend are Quad9 and Cloudflare, both of which are free and run by reputable companies. Of the two, Quad9 is more focused on user privacy, but Cloudflare offers additional DNS filtering capabilities that may be useful.

The options are:

  • Quad9 malware blocking: 9.9.9.9 with a secondary of 149.112.112.112
  • Cloudflare malware-only blocking: 1.1.1.2 with a secondary of 1.0.0.2
  • Cloudflare malware and adult content blocking: 1.1.1.3 with a secondary of 1.0.0.3

You should always enter the secondary DNS server in case the primary server goes down. Otherwise, you wouldn’t be able to connect to any sites at all.

However, don’t mix in other DNS servers. If you use Cloudflare’s adult content filter as your primary DNS server with your ISP’s DNS server as a secondary, when Cloudflare refuses to resolve an adult site, macOS will drop down to the secondary ISP server, which will resolve it happily, thus eliminating the utility of the Cloudflare’s filtering.

One final note before you get started. Apple’s iCloud Private Relay service (in beta in macOS 12 Monterey, iOS 15, and iPadOS 15) sends all your traffic through two proxy servers, which prevents DNS filters like Quad9 and Cloudflare from working. That’s unfortunate since iCloud Private Relay is a useful way to hide your IP address and browsing activity from your network provider and the websites you visit. Apple is clear about this limitation, noting in its various DNS server interfaces:

DNS requests are being routed by iCloud Private Relay for this network. Turn off Private Relay to manually configure DNS settings.

If you need to turn off iCloud Private Relay on the Mac, open System Preferences > Apple ID and deselect the checkbox next to Private Relay. On an iPhone or iPad, open Settings > Your Name > iCloud > Private Relay and flip the switch to Off.

Set Up DNS Filtering in macOS

To use DNS filtering on the Mac, follow these steps, which should work in any version of macOS. We’re using Quad9 as the example here, but replace the primary and secondary IP addresses as desired if you want to use one of the Cloudflare filters.

  1. Open System Preferences > Network, and select the adapter you use (likely Wi-Fi or Ethernet) in the sidebar.
  2. Click the Advanced button, and in the sheet that appears, click DNS.
  3. Click the button under the DNS Servers list and enter 9.9.9.9.
  4. Click the button again and enter 149.112.112.112.
  5. Click OK to dismiss the Advanced preferences, and click Apply.
  6. Close the Network preference pane.

It’s difficult to perform a real-world test to tell if Quad9 or Cloudflare’s malware blockers are active since there’s no way to know which sites they block. However, Quad9 provides a test page at on.quad9.net that should help. If you use Cloudflare’s adult content filter, you can tell if it’s working because your Web browser will refuse to load adult sites.

Set Up DNS Filtering in iOS and iPadOS

The steps for setting up DNS filtering in iOS and iPadOS are a bit different. For this example, we’ll use the Cloudflare malware filter, but again, you should replace the IP addresses below with the filter you want to use.

  1. Open Settings > Wi-Fi and tap the button next to your current Wi-Fi network.
  2. Scroll down and tap Configure DNS, which is probably set to Automatic.
  3. On the Configure DNS screen, tap Manual.
  4. In the list of DNS servers, tap the red delete buttons next to any entries there.
  5. Tap the green Add Server button and enter 1.1.1.2.
  6. Tap the green Add Server button again and enter 1.0.0.2.
  7. Tap Save in the upper-right corner.

That’s it! You should have no trouble using either Quad9 or Cloudflare, but if you need to revert to your previous DNS servers, it’s easy to do. On the Mac, just delete the manual entries you created—macOS will automatically use the DNS servers provided by your ISP. On an iPhone or iPad, select Automatic in the Configure DNS screen to replace the manually entered DNS servers with those from your ISP. In either case, if you’re not going to use DNS filters, it’s worth turning on iCloud Private Relay. We hope that Apple adds DNS filtering options to iCloud Private Relay so you could additionally choose to filter out malicious sites and adult content.

(Featured image by iStock.com/Funtap)

Use Face ID While Wearing a Mask in iOS 15.4

Shortly after the start of the COVID-19 pandemic, Apple made it so your Apple Watch could unlock your Face ID-enabled iPhone when you were wearing a mask. Starting in iOS 15.4, the company has taken the next step and enabled Face ID on the iPhone 12 and later to work even when you’re wearing a mask. If you didn’t already set up Face ID with a mask after updating to iOS 15.4, go to Settings > Face ID & Passcode and enable Face ID with a Mask. You’ll have to run through the Face ID training sequence again, and more than once if you sometimes wear glasses, but it’s quick and easy. Face ID may not work quite as well when you’re wearing a mask, and it doesn’t support sunglasses, but it’s way better than having to enter your passcode whenever you’re masked.

(Featured image by iStock.com/Prostock-Studio)

Reduce iPhone and iPad Data Usage with Low Data Mode

Do you need to be careful about how much data you use with your iPhone or iPad, either via cellular or Wi-Fi? That could be true for those with Internet data caps, people using an international plan while traveling, and anyone in an area with slow data speeds. To reduce your data usage, turn on Low Data Mode, which you can do separately for cellular and Wi-Fi. For cellular, look in Settings > Cellular > Cellular Data Options, where you can either enable Low Data Mode for LTE/4G or take one more step into Data Mode for 5G. If you’re using two plans with a dual SIM iPhone, you can set each one separately. For Wi-Fi, go to Settings > Wi-Fi and tap the i button next to the desired Wi-Fi network and then tap Low Data Mode. Apple lists what you can expect to change in Low Data Mode. If you need a similar capability for the Mac, check out TripMode.

(Featured image by iStock.com/Created_by_light)

Export Passwords from Safari to Ease the Move to a Password Manager

Although Apple has improved the built-in password management features in macOS and iOS (you can now add notes to password entries!), third-party password managers like 1Password and LastPass are still more capable. For those still getting started using a password manager, another new capability will ease the transition: Safari password export. To export a CSV file of your Safari passwords, choose Safari > Preferences > Passwords, and enter your password when prompted. From the bottom of the left-hand sidebar, click the ••• button, choose Export All Passwords, and save the Passwords.csv file to the Desktop. After you import the file into 1Password (instructions), LastPass (instructions), or another password manager, be sure to delete the exported file and empty the trash.

(Featured image by iStock.com/metamorworks)