Share Airline Boarding Passes Using Wallet and AirDrop

It’s common for one person in a family to handle booking airline tickets and thus to be in charge of checking in for the flight online and downloading boarding passes. If that’s you, what’s the best way to send each iPhone-wielding person in your family their own boarding pass? Rather than tussle with sharing the check-in confirmation email, add all the family boarding passes to Wallet on your iPhone. Then, for each person’s boarding pass, tap the ••• button , tap Pass Details , tap the share icon in the upper-right corner , and share the pass via AirDrop or any other standard method. When the person receives it, they’ll be prompted to add the pass to their Wallet app.

(Featured image by iStock.com/IPGGutenbergUKLtd)

View and Copy Saved Wi-Fi Passwords in iOS 16

The iPhone and iPad have long allowed you to share Wi-Fi passwords with other nearby devices and people as long as they were in your Contacts list. But you couldn’t see those passwords, which is handy for sharing with non-Apple users and devices. In iOS 16 and iPadOS 16, you can now view and copy the stored Wi-Fi password for either the current network or any remembered network. In Settings > Wi-Fi, next to a network’s name (tap Edit at the top right to view stored networks), tap the blue information icon, tap Password, and authenticate to reveal the password. If desired, tap Copy to copy to the clipboard for pasting in another app, such as Mail or Messages.

(Featured image by iStock.com/denizbayram)

Apple Is Driving the iPhone to eSIM: Here’s What You Need to Know

Perhaps the most surprising change in the iPhone 14 line, at least in the United States, was the shift from using removable SIM cards to eSIM.

SIM cards—SIM stands for Subscriber Identity Module—have been a fixture in the mobile phone world for many years because they provide the unique identification necessary to connect a subscriber and a plan with a phone. Because SIM cards are removable, you can use them to transfer an existing plan to a new phone, switch carriers, or enable temporary service while traveling—all by inserting the appropriate SIM card.

But SIM cards are small, fussy, and require physical interaction, so the industry came up with eSIM, or embedded SIM, where a programmable SIM is integrated into the circuitry of the phone. With eSIM, you can also activate a plan, transfer a plan to a new phone, or change carriers, typically without interacting with customer service. You also don’t have to acquire a physical SIM, figure out how to open your phone’s SIM tray, or insert the tiny SIM card in the correct orientation without dropping or damaging it. Plus, without a SIM slot and tray, iPhones have one less spot where water could get in and one less moving part that could break, and Apple doesn’t have to provide a SIM tool that you’ll likely lose (and replace with a paperclip).

Apple’s eSIM Transition

eSIM support is widespread among US carriers but less so internationally, which is why models of the iPhone 14 sold outside the US retain the SIM tray. The main place where lack of eSIM support is likely to be an issue—at least for the near future—is international travel. Historically, it was easy to purchase a pre-paid SIM card for a local carrier in the airport upon arriving, but that will no longer work for a US iPhone 14. The iPhone is sufficiently popular that international carriers are adding eSIM support, but it’s still possible to travel to a country where you can’t get local service with an iPhone 14 due to the lack of a SIM tray. Apple maintains a list of international carriers that support eSIM in various ways, including with pre-paid plans for travelers, and offers advice on how to use eSIM when traveling. (eSIM isn’t available at all in mainland China, but Apple’s list includes worldwide service providers that sell pre-paid data plans you can use when traveling in China and other countries without eSIM support.)

Apple has been moving toward eSIM for several years, starting with the iPhone XS, iPhone XS Max, and iPhone XR in 2018. Those iPhones—and every model up to the iPhone 14—had both a SIM tray and eSIM, which enabled the use of two separate cellular plans, each with its own phone number. With the iPhone 13, Apple enabled Dual SIM support with eSIM alone, and some carriers started giving customers the option to activate their primary service with eSIM, leaving the SIM tray or the second eSIM available for a second plan. Apple says you can store and switch among up to eight or more eSIMs, two of which can be active at any time, but it’s unclear how that works—an update to iOS might be necessary.

Cellular-capable iPads have had eSIM support since the seventh-generation iPad, fifth-generation iPad mini, third-generation iPad Air, first-generation 11-inch iPad Pro, and third-generation 12.9-inch iPad Pro.

How to Activate an eSIM

Precisely how you activate an account with eSIM varies by carrier and your situation, but Apple describes three basic options:

  • eSIM Carrier Activation: Some carriers can assign a new eSIM to your iPhone, making it easy to switch to a new iPhone or enable an eSIM-based plan after setup. eSIM Carrier Activation involves following a few simple onscreen instructions where you basically acknowledge that activation is happening. Make sure you can place a phone call afterward, and if you’re switching from a SIM card, remove it and restart your iPhone.
  • eSIM Quick Transfer: If you’re transferring a SIM or eSIM from an old iPhone to a new one and you have both at hand, you may be able to use eSIM Quick Transfer. It will provide instructions during setup, or you can initiate it after setup with Settings > Cellular > Add Cellular Plan and either selecting a plan from a list or tapping Transfer From Another Device. You can also convert a physical SIM to an eSIM on the same phone if your carrier supports eSIM Quick Transfer; check to see if Settings > Cellular has a Convert to eSIM option. If so, tap it and follow the instructions.
  • Scan a QR code or use a carrier app: Carriers that don’t support eSIM Carrier Activation or eSIM Quick Transfer initiate setup by providing either a QR code you can scan—during setup or afterward—or a custom app. Either way, follow the iPhone’s instructions to complete the setup.

Although we’ve become accustomed to swapping SIM cards in and out of our iPhones such that eSIM feels new and confusing, it should be a better overall solution that’s easier to set up, less error-prone, and more secure. There may be some short-term annoyance for US iPhone 14 owners who travel internationally, but we anticipate that will dissipate over time as international carriers start supporting eSIM.

(Featured image by iStock.com/fz750)

Mail Gains Welcome Features in iOS 16, iPadOS 16, and macOS 13 Ventura

Email may not be as sexy a way to communicate as modern-day darlings like Messages, Slack, or Microsoft Teams, but it remains the workhorse of business and personal communications. While Apple’s Mail is a mature app that has long provided the necessary basics, there has been room for improvement. In iOS 16, iPadOS 16, and macOS 13 Ventura, Apple has given us some welcome enhancements, many of which have existed in other email systems for some time.

These features are extremely similar across all of Apple’s platforms, but they may differ in small ways. Don’t worry if you haven’t updated all your devices yet—you can still take advantage of these features on your iPhone or iPad even if you’re cautiously (and appropriately, for now) sticking to macOS 12 Monterey on your Mac.

Undo Send

If you’re like us, it’s all too common to send an email and then immediately remember you wanted to add something or Cc someone. Mail now gives you a grace period during which you can unsend a message—10 seconds by default, but configurable to 20 or 30 seconds on the iPhone or iPad in Settings > Mail > Undo Send Delay, or on the Mac in Mail > Settings > Composing.

To unsend a message, tap Undo Send at the bottom of the screen (look in the sidebar on the Mac and iPad). On the Mac, it’s easier to press Command-Z immediately to undo the action. Either way, the message opens for editing again so you can make the desired changes and resend.

Send Later

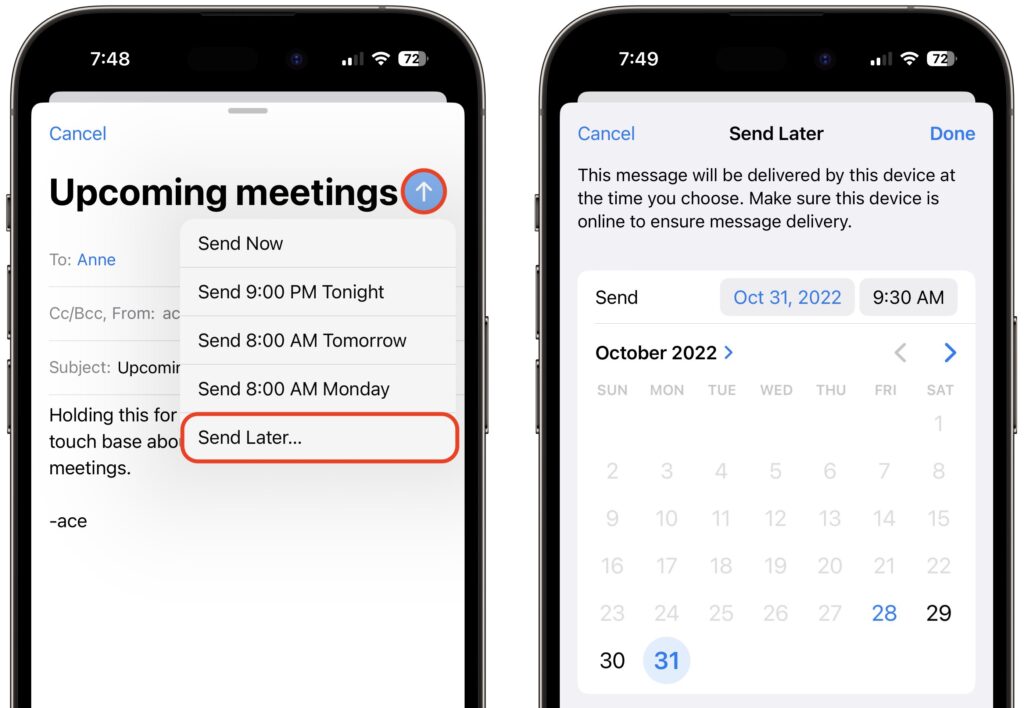
It’s not always appropriate to send email messages as soon as you finish writing them. Some organizations have policies against sending email significantly outside of business hours to discourage unhealthy work schedules, and you may want to compose a message—a last-minute reminder for event participants, say—well in advance and then schedule it to arrive at an appropriate time. Mail now makes that possible.

To schedule a message for sending later, touch and hold the Send button on the iPhone or iPad, or click the menu next to the Send button on the Mac. It suggests an appropriate time later in the day or the next day, or you can use Send Later to set a specific date and time. Note that the device on which you’re scheduling the message must be online for the message to be sent, but the scheduled send works fine if the device is asleep.

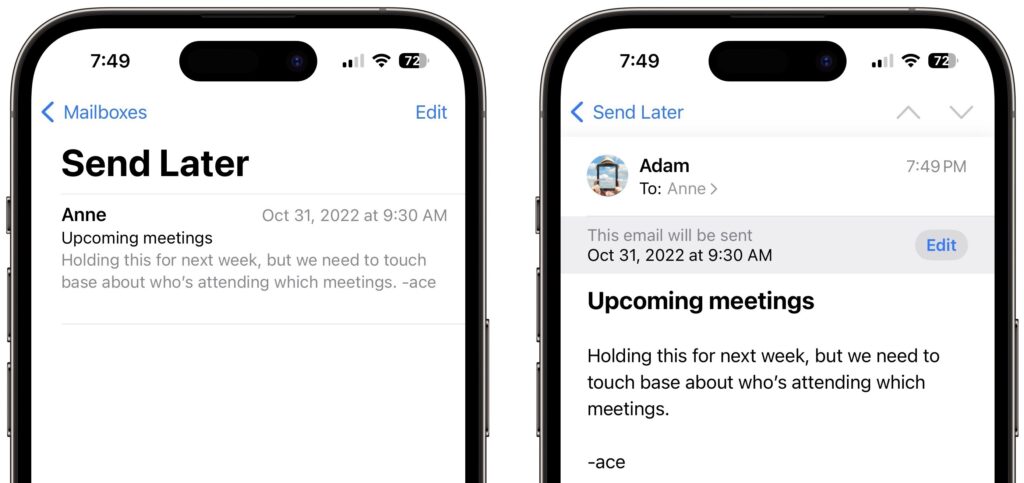
Scheduled messages live in a Send Later mailbox until they’re sent, so if you need to reschedule them, open the message and tap the Edit button in the scheduling banner at the top.

Get Reminders

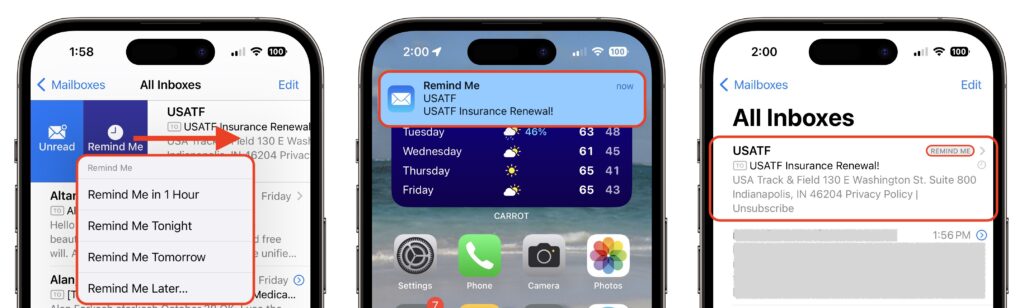
Some people like to “snooze” email messages so they reappear at the top of the inbox at a later time that may be better. Mail can do this now with its built-in reminder feature, which also temporarily shows the message in a Remind Me mailbox and pops up a notification when the specified time arrives.

To set a reminder, swipe right on it (use two fingers on the Mac) and tap or click Remind Me to choose a reminder schedule of 1 hour, tonight, or tomorrow. You can also specify a precise time and date. If you can’t swipe on a Mac, you can instead Control-click the message and choose a reminder schedule; on an iPhone or iPad, you can also tap the Reply button and then Remind Me.

Note that this feature only repositions the message in the inbox, so if you’ve read it, for instance, but you have your inbox filtered to show only unread messages, you won’t see the moved message. It does get a little Remind Me tag in the message list.

Follow-ups

It’s bad enough when you ask someone a question in email, don’t get a response, and have to send a reminder. Worse is when you lose track of the question entirely until it becomes a problem. A new feature in Mail could help. When the app detects that you’ve asked a question, it starts a timer, and if you don’t get a response within 3 days, Mail brings your message back to the top of your inbox with a reminder to follow up. Tap that reminder to send another message to the original recipient.

You don’t have to do anything for the follow-up feature to work, other than compose messages that the feature determines are asking questions. However, there’s no guarantee it will work correctly on every appropriate message, and the feature has no way of knowing if your recipient replied in a completely new conversation or outside of email. If you find it annoying, you can turn it off on the Mac. Go to Mail > Settings > General and deselect “Enable message follow up suggestions.”

Focus Filters

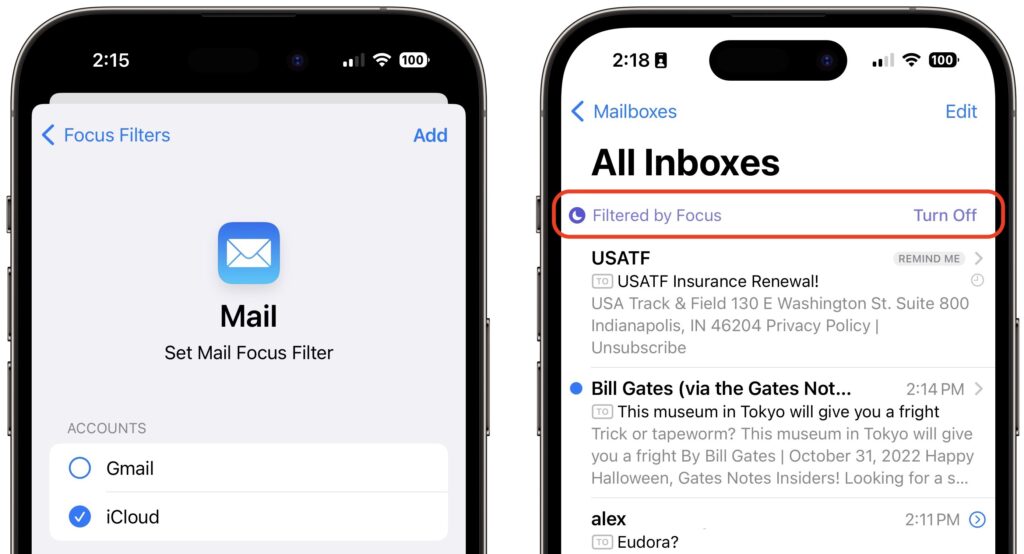
Finally, Mail supports the new Focus Filters, which lets you hide content in specified apps when a certain Focus is active. For instance, if you have a Focus for Personal and another for Work, you might want to specify that your work email account appears only when the Work Focus is active and your personal email account appears only when the Personal Focus is active. It’s logically sensible—you don’t get distracted with personal email at work or work email at home—but it likely isn’t worth the effort unless you have trouble exercising self-control.

To add a Mail account to a Focus Filter, open Focus in Settings or System Settings, select a Focus, tap Add Filter, select Mail, and choose the desired account. After that, when you open Mail, you’ll see only messages from that account, with a Focus Filter banner explaining why and letting you turn it off temporarily.

(Featured image based on an original by iStock.com/Motortion)

The Best Apple Gifts for 2022

It may seem early to think about holiday shopping, but even as the global supply chain recovers from pandemic-related slowdowns, ship dates remain unpredictable. If you want to make sure you have an Apple something for that special someone, we recommend buying it soon. Here are our recommendations.

AirTag

Do you know someone who’s always misplacing their keys, purse, or backpack, or who’s planning a big trip? They might appreciate Apple’s AirTag tracker this holiday season. Attach one to a keyring (with a separate $29 AirTag Loop, $35 AirTag Leather Key Ring, or $39 AirTag Leather Loop) or drop it in a bag, and from then on, they can use the iPhone’s Find My app to see where they left their stuff. AirTag uses the Find My network, so even if the item is far away, passing Apple devices that detect it can securely share its location with you. That makes it especially helpful for tracking down checked luggage that hasn’t arrived at its proper destination. One AirTag costs $29, or you can get a pack of four for $99. You can even have Apple personalize each AirTag with custom text and emoji.

AirPods and AirPods Pro

Apple’s wireless earbuds keep getting better. In September, the company released the second-generation AirPods Pro, replacing the original model and supplementing the second-generation AirPods and third-generation AirPods. All three make excellent gifts. The second-generation AirPods cost $129, have a relatively long stalk, and boast up to 5 hours of listening on one charge. The $179 third-generation AirPods shrink the stalk, switch to a force sensor for controls, add support for spatial audio with dynamic head tracking, feature sweat and water resistance, have a MagSafe wireless charging case, and last up to 6 hours on a single charge. For $249, the second-generation AirPods Pro offer major upgrades to Active Noise Cancellation and Transparency mode, provide touch control for media playback and volume adjustments from the stem, and increase battery life to 6 hours. The AirPods Pro now come with a new charging case that’s sweat- and water-resistant, includes a lanyard loop, and can charge from a Lightning cable, MagSafe charger, Qi wireless charger, or Apple Watch charger. All three models support Hey Siri commands and automatically switch between Apple devices. See all the similarities and differences in Apple’s comparison tool.

HomePod mini

Although the original HomePod didn’t set the world on fire, the $99 HomePod mini has been significantly more popular. The grapefruit-sized HomePod mini may be small, but it produces great sound for its size and can do pretty much everything the larger HomePod could do. You can control it entirely via Siri, pair two for stereo sound, use it as a hub for your HomeKit home automation accessories, and even have it play the sound from your Apple TV. Put a HomePod mini in different rooms in the house, and you can use Intercom to communicate with family members with your voice. If you’re giving it as a gift, remember that it’s best when paired with an Apple Music subscription.

Apple TV 4K

The Apple TV hasn’t changed much over recent years, but this year’s new models are enough better and cheaper to warrant inclusion in this article. If someone on your list would benefit from a streaming media player, consider the new third-generation Apple TV 4K, which has a lot going for it. It now boasts a fast A15 Bionic chip, and the Siri Remote charges via USB-C. For someone who mostly wants to watch TV, the $129 Apple TV 4K (Wi-Fi) model is all they’ll ever need, with 64 GB of storage. For $149, the Apple TV 4K (Wi-Fi + Ethernet) has 128 GB of storage for those who want to load a lot of apps and games, and it includes a Gigabit Ethernet port and support for the Thread home automation protocol.

iPad, iPad mini, and iPad Air

If you’re looking to give an iPad as a gift, Apple has numerous options, with starting prices ranging from $329 to $599.

  • Ninth-generation iPad: The budget choice for a kid or an adult with basic needs is last year’s ninth-generation iPad, which remains an astonishing bargain at $329. It works with the first-generation Apple Pencil ($99), and those who need to write can add the $159 Smart Keyboard.
  • Tenth-generation iPad: This year’s redesigned tenth-generation iPad starts at $449, moving Touch ID to the top button, increasing the display size to 10.9 inches, and positioning the front-facing camera on the landscape edge. It pairs with the new $249 Magic Keyboard Folio and the first-generation Apple Pencil.
  • iPad mini: If you’re looking for something small, the diminutive sixth-generation iPad mini fits the bill at just $499. It’s compatible with the second-generation Apple Pencil ($129), but if you need a keyboard, you’ll have to look to a third-party manufacturer or use a standard Bluetooth wireless keyboard.
  • iPad Air: For the most power short of the pricey iPad Pro models, consider the fourth-generation iPad Air. It starts at $599 and can handle even the most intensive tasks, especially when coupled with a second-generation Apple Pencil and either a Magic Keyboard ($299) or Smart Keyboard Folio ($179).

Apple Watch Gift Certificate

We love the Apple Watch, but be careful when considering it as a gift. There are three rather different models, and Apple provides a dizzying number of options for case size, material, and color, plus the band and color, making it difficult to know what would be most appreciated. Instead of guessing what your recipient would like, we encourage giving a certificate that’s good for a conversation about what to purchase. Then sit down with the recipient to run through all the decisions on the Apple Watch site.

There are three options this year: the updated Apple Watch SE (starting at $249), the new Apple Watch Series 8 (starting at $399), and the big, beefy, adventure-focused Apple Watch Ultra (starting at $799).

Thanks to a larger screen, faster chip, and Apple’s new iPhone and Apple Watch crash detection feature, the Apple Watch SE is more compelling than ever and all that most people need. Consider the Series 8 if you also want a larger Always-On display, blood oxygen sensor, and ECG capabilities, along with a new temperature sensor for cycle tracking. The Apple Watch Ultra puts all those features and more into a 49mm titanium case that features a new Action button that gives you quick access to app-specific commands. Its buttons are larger and easier to press, the Always-On display is brighter, the GPS works better in challenging conditions, and it has a depth gauge and water temperature sensor so it can serve as a dive computer. The Apple Watch Ultra boasts up to 36 hours of battery life in normal usage and up to 60 hours in a forthcoming extended battery optimization mode. It’s an impressive watch, but make sure you like how it looks on your wrist, given how much larger it is than other models. Apple has a helpful comparison tool.

Even though they are worthy gifts, we didn’t include any Macs in this article because they’re quite a bit more expensive and difficult to select without extensive discussion of the recipient’s needs. Let us know if you need help choosing the right Mac for someone on your list, but we’re partial to the M1- and M2-based MacBook Air and 24-inch iMac for many users.

(Featured image by Adam Engst)