Six Ways of Making It Easier to Browse Your Favorite Websites

Everyone—or at least everyone reading this article—knows how to use a Web browser. But just because you can click links, search for websites, and type URLs doesn’t mean that you’re surfing the Web as smoothly and effectively as you could. We all have sites that we visit regularly—a local newspaper, perhaps, or a social media service that’s the only place to connect with far-flung family members. Plus, the rise of Web apps like Google Docs means that we may spend hours every day in a Web browser at a particular site.

Here then are six ways that you can make it easier to use the same sites every day. This list is far from comprehensive, but we hope it gets you thinking about how you can spend less time typing URLs and searching for sites. We’ll focus on Safari here, but similar features are available in most Web browsers.

Bookmarks

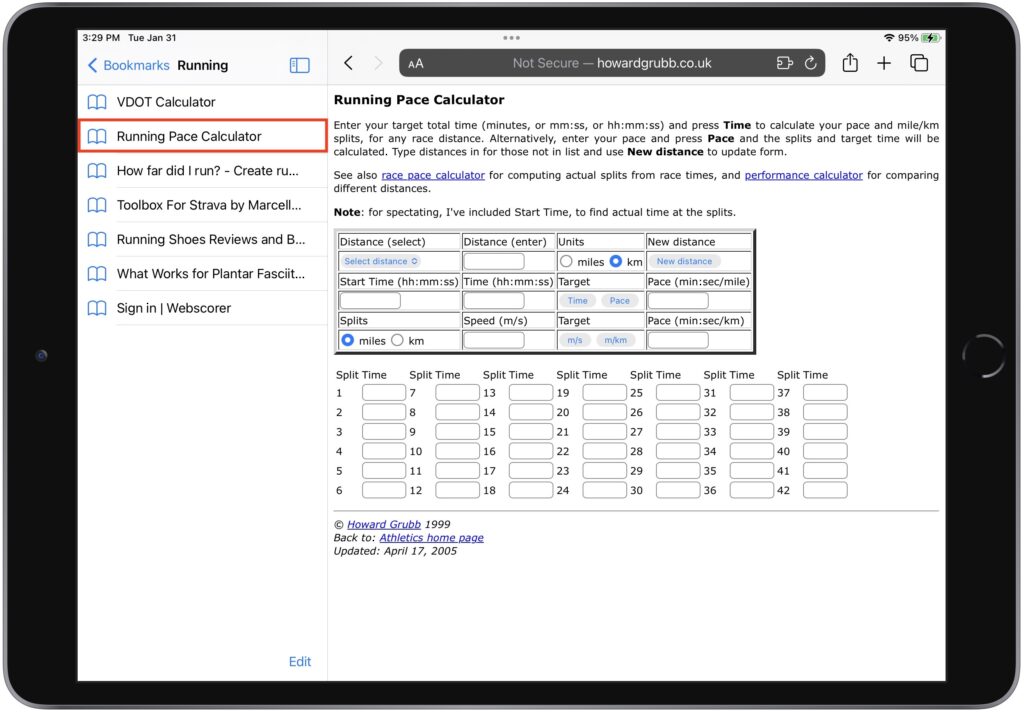
Many of you probably know about bookmarks, so let this serve as a nudge to remember how useful they can be. Dating from the earliest days of the Web browser, bookmarks are the original way to simplify revisiting a site.

In Safari on the Mac, save a bookmark by navigating to a page and then choosing Bookmarks > Add Bookmark. See your full list in the sidebar by choosing Bookmarks > Show Bookmarks. Click one in the list to load it. On an iPhone or iPad, tap the share icon and tap Add Bookmark; on the iPad, you can also drag a tab to the sidebar when it’s displaying bookmarks. You can see and visit your bookmarks by tapping the Bookmark icon in the toolbar (iPhone ) or the sidebar (iPad ).

Favorites

To make a particular bookmark even easier to access, add it to your Favorites. On the Mac, you can display the Favorites bar underneath the Location bar (View > Show Favorites Bar) and then click bookmarks for quick loading. Create a new favorite by putting a bookmark in the Favorites folder when you create it or by dragging it in later.

On the iPhone and iPad, favorites appear when you tap the Location bar, and adding a favorite is as simple as choosing Add Favorite instead of Add Bookmark in the share sheet.

As long as you have Safari enabled in your iCloud settings, your bookmarks and favorites sync among all your Apple devices.

Home Screen Icons

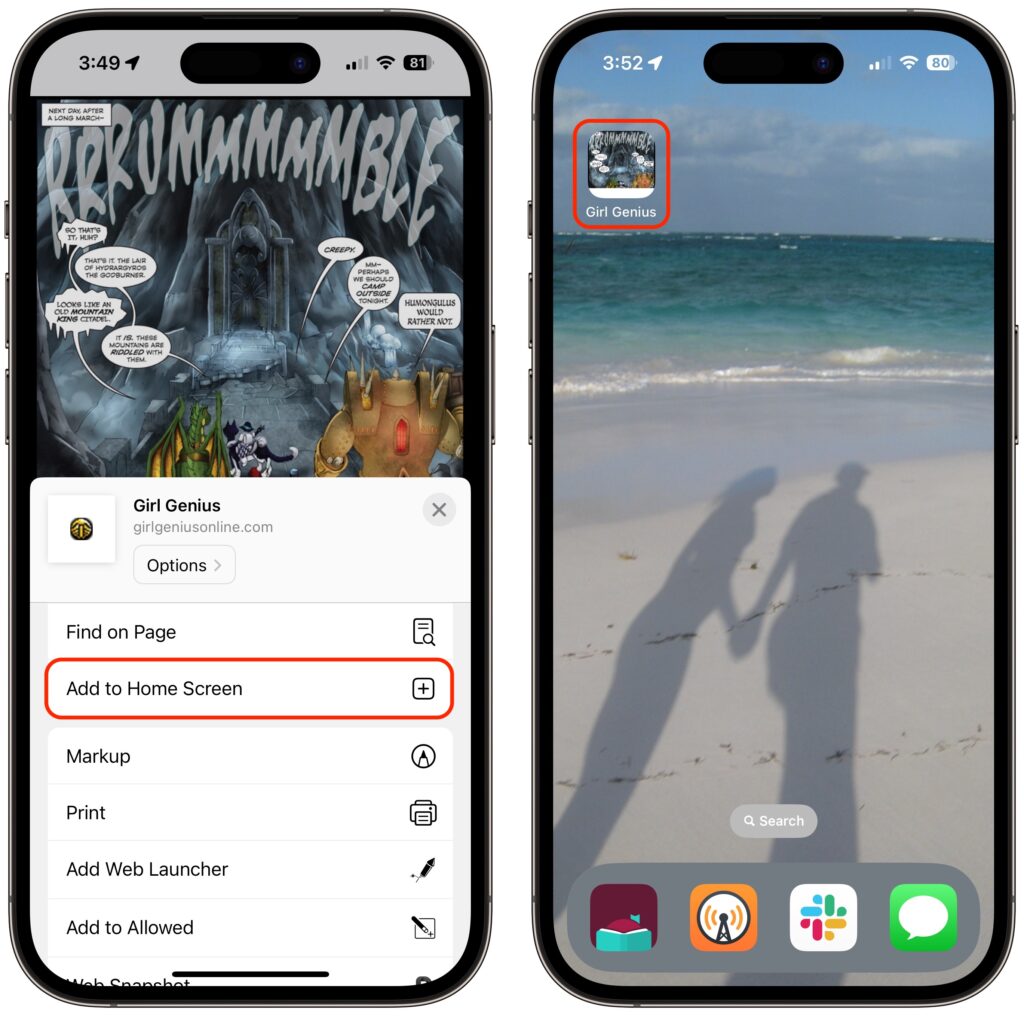
Want to go one step further? You can turn a Web page into a Home Screen icon on the iPhone or iPad. To set this up, just as with a bookmark, you navigate to the page and tap the share icon. Then select Add to Home Screen.

The Mac doesn’t have the same concept of Home Screen icons, but if you drag the URL for a Web page from the Location bar to your Mac’s Desktop, it will turn into a Web Internet Location file with a .webloc extension. It’s a normal file that you could put in the Dock, a Finder window’s toolbar, or anywhere else you want. Open it to load its page.

Bookmark Folders

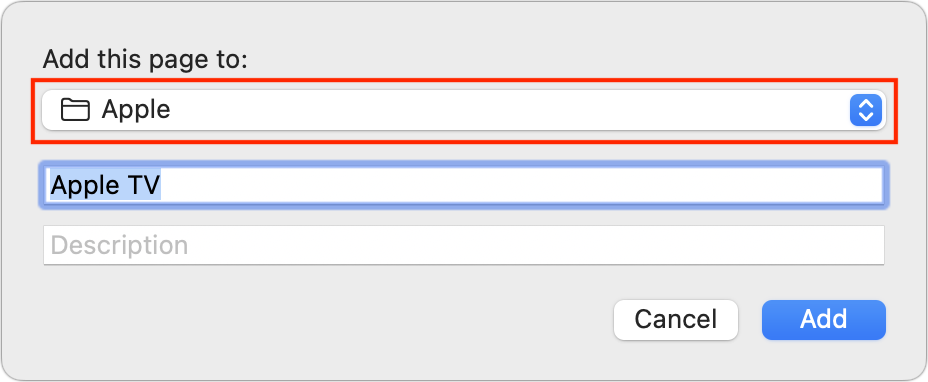
Bookmarks and favorites are great for a site or two, but what if you want to open the same handful of sites every morning to get your daily dose of news and comics? Put all those sites in the same folder in the Favorites folder, either by adding them to the folder when you create them or by dragging them in afterward.

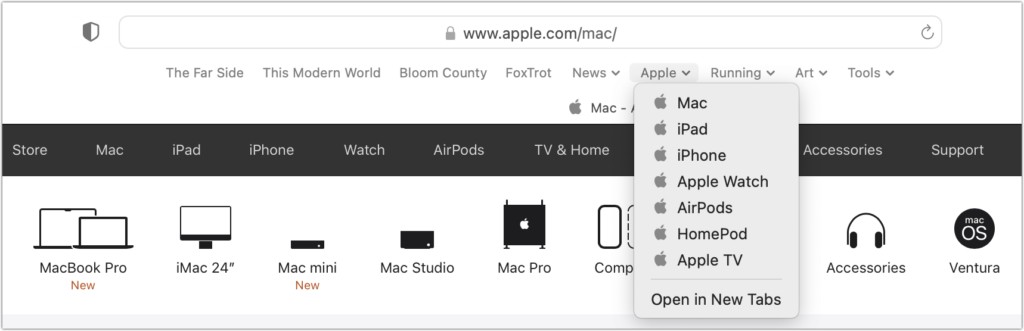
Once you have collected the desired bookmarks, you can open them all in new tabs by clicking the folder on the Favorites bar and choosing Open in New Tabs (or just Command-click it). If you don’t want it on your Favorites bar, the folder can live anywhere in your bookmarks—just Control-click it and choose Open in New Tabs.

This feature is available on the iPhone and iPad as well. Once the folder is in your Favorites, tap the Location bar and then touch and hold the folder. Choose Open in New Tabs from the menu that appears.

Tab Groups

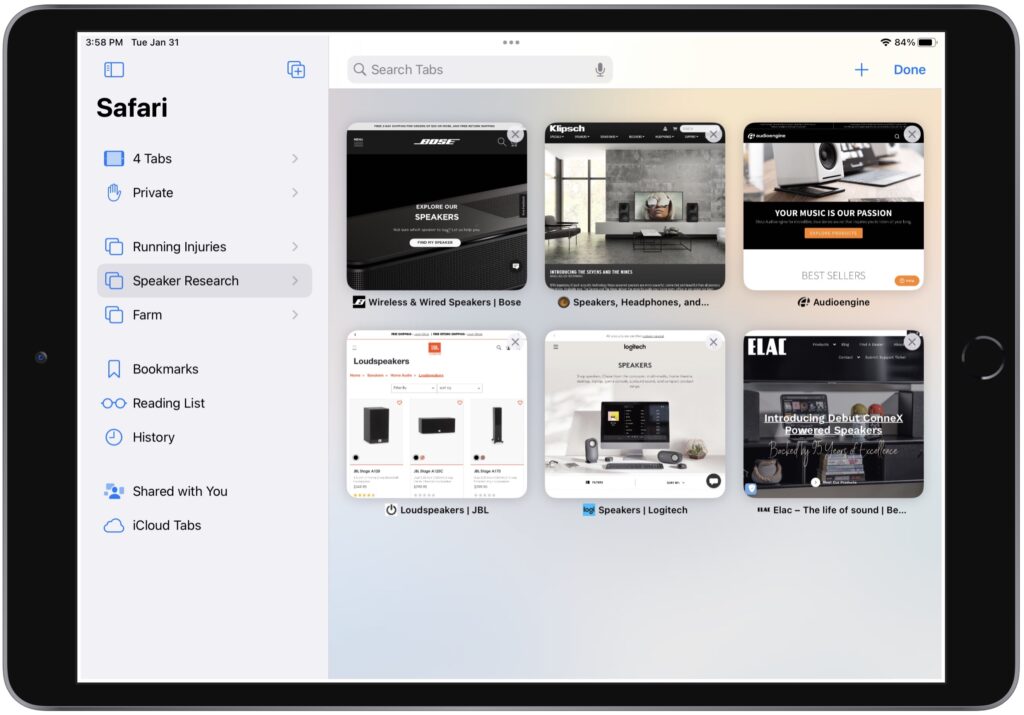
Web browser makers were apparently unsatisfied with letting users open all the bookmarks in a folder in new tabs because they have come up with a similar feature called tab groups. Let’s say you’re researching new speakers to buy, and you want to compare options from different companies. Once you have open tabs for all the sites, you can open the sidebar in Safari on the Mac or iPad and use the Add Tab Group icon at the top to create and name a new tab group.

From then on, it appears in the sidebar, and when you select it, those tabs load automatically, replacing the ones that were there before (which are stored as another group). The feature is also available on the iPhone, where you must tap the tab icon in the toolbar first. Unlike a folder of bookmarks, when you close a tab in a tab group, it disappears, and if you want it back, you have to open it again manually.

Pinned Tabs

Perhaps you have several sites that are so important to you that you want them open at all times. For such situations, you can pin tabs to those sites. The utility of pinned tabs is that they stay in place even when you open a new window or quit and reopen Safari. Plus, if you click a link to a different website in a pinned tab, it opens in a new tab—pinned tabs always show the website you pinned. On the iPhone, where there’s no tab bar, pinned tabs live at the top of the tab screen. Each tab group can have its own pinned tabs.

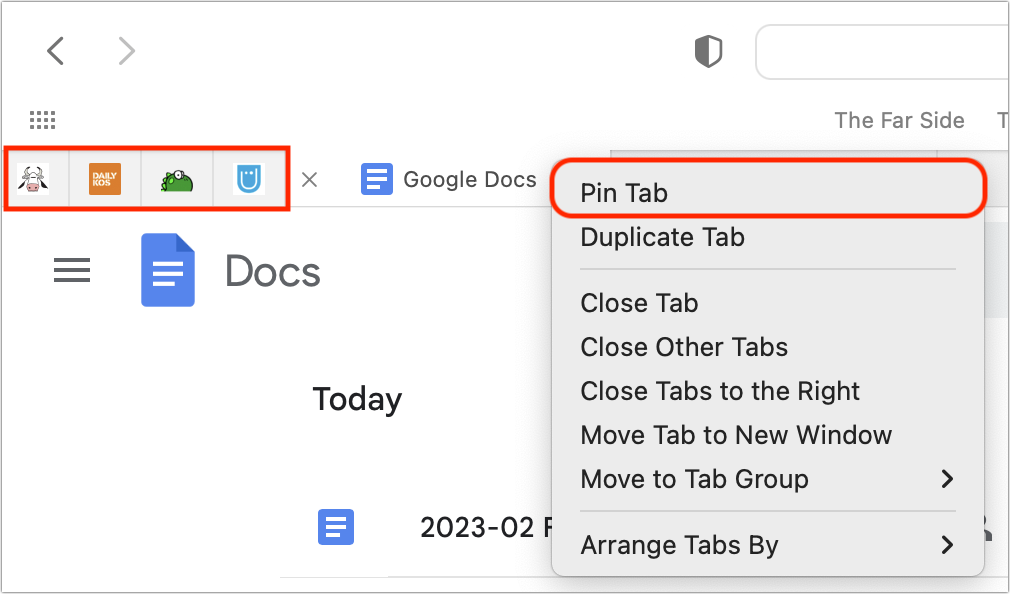
To pin a tab in Safari on the Mac or iPad, drag an open tab all the way to the left in the tab bar until it shrinks into a tiny box showing only the site’s favicon. Or, on the Mac, Control-click the tab and choose Pin Tab (shown below). On the iPad, touch and hold the tab and select Pin Tab. To pin a tab on the iPhone, tap the tab icon first and then touch and hold a tab and select Pin Tab.

So there you have it! None of these features are particularly new, but they’re easily overlooked, and from what we’ve seen while watching people browse the Web, lots of people could benefit from them.

(Featured image by Adam Engst)

Apple Powers Mac mini and MacBook Pro with New M2 Chips, Releases New HomePod

With a handful of press releases buttressed by a 19-minute video, Apple pulled back the curtains on its new M2 Pro and M2 Max chips and announced updated Mac mini and MacBook Pro models that rely on the new chips. There are no significant design or feature changes with these updated models, just faster performance, enhanced external display support, and support for the latest wireless connectivity standards. The new Mac mini and MacBook Pro models are available to order now, with units in stores and orders starting to arrive on January 24th.

Then, in another surprise announcement, Apple announced the second-generation HomePod, which updates the full-size smart speaker with a few new features and likely makes it more cost-effective to produce.

New M2 Mac mini and M2 Pro Mac Broaden the Appeal

For many years, the Mac mini has been popular for its small size, low price, and decent performance, bolstered in 2020 by a move from Intel CPUs to Apple’s M1 chip. Apple has now increased the Mac mini’s power even more by letting users choose between the M2 and the new M2 Pro. How much more? It depends greatly on what you’re doing, and Apple offers some comparisons. The improvements will likely be noticeable with the M2 and obvious with the M2 Pro.

The M2 Mac mini starts at $599—$100 less than the starting price for the M1 Mac mini—and provides an 8-core CPU and 10-core GPU with unified memory configurations of 8 GB, 16 GB (add $200), or 24 GB ($400). In terms of storage, the base level is 256 GB, but you can increase that to 512 GB ($200), 1 TB ($400), or 2 TB ($800). It provides only two Thunderbolt 4 ports.

The M2 Pro Mac mini starts at $1299 for a 10-core CPU and 16-core GPU, but you can bump that up to an M2 Pro with a 12-core CPU and 19-core GPU for $300. You also get 16 GB of unified memory and 512 GB of storage for that base price. 32 GB of memory costs $400 more, and storage upgrades are 1 TB ($200), 2 TB ($600), 4 TB ($1200), and 8 TB ($2400). It offers more connectivity with four Thunderbolt 4 ports. Note that as you configure a powerful M2 Mac mini, you’ll be straying into Mac Studio territory in terms of both price and performance.

Both Mac mini models boast enhanced external display support. Read the tech specs for full details, but in essence, along with multiple monitor support over Thunderbolt, the HDMI port on an M2 Pro Mac mini supports either an 8K display or a 4K display running at a faster refresh rate, which might be a boon in video-focused fields. Other improvements that may be welcome in specific setups include the option to add 10 Gigabit Ethernet for $100, support for Wi-Fi 6E (which can improve throughput over short distances with a new router), and Bluetooth 5.3.

The updated Mac mini replaces both the M1 Mac mini and the Intel-based Mac mini that Apple had left in the lineup until now.

It probably won’t be long before Apple releases an M2 24-inch iMac, too. We know that some are pining for a 27-inch iMac with Apple silicon, and we’ll just have to wait to see if Apple returns to that form factor with either an iMac or iMac Pro. We can also expect M2 versions of the Mac Studio at some point, but we’ll have to wait for Apple to come out with an M2 Ultra chip if it’s to maintain the same lineup as today’s M1 family.

M2 Pro and M2 Max Speed Up 14-inch and 16-inch MacBook Pro

Since their October 2021 release, Apple’s professional laptops, the 14-inch MacBook Pro and 16-inch MacBook Pro, have provided impressive processing power thanks to their M1 Pro and M1 Max chips. Apple has now switched to the new M2 Pro and M2 Max chips, and the company says that both offer 20% more CPU performance, 30% more GPU performance, and 40% more Neural Engine performance than their predecessors. As with the Mac mini, the updated MacBook Pro models also feature enhanced external display support (see the tech specs for full details), Wi-Fi 6E, and Bluetooth 5.3. Finally, Apple estimates they’ll have an hour more battery life.

The 14-inch MacBook Pro starts at $1999 for an M2 Pro with a 10-core CPU and 16-core GPU, 16 GB of memory, and 512 GB of storage. Chip upgrades include the 12/19-core (CPU/GPU) M2 Pro ($300), the 12/30 M2 Max ($500), and the 12/38 M2 Max ($700). With memory, the M2 Pro configurations can upgrade to 32 GB ($400), whereas the M2 Max configurations start at 32 GB and let you go to 64 GB ($400) or 96 GB ($800, with the 12/38 M2 Max only).

The 16-inch MacBook Pro costs $2499 for an M2 Pro with a 12-core CPU and 19-core GPU, 16 GB of memory, and 512 GB of storage. Chip upgrades include the 12/30 M2 Max ($200) and the 12/38 M2 Max ($400). Memory is the same as with the 14-inch MacBook Pro, so the M2 Pro configuration can upgrade to 32 GB ($400), and the M2 Max configurations start at 32 GB and let you go to 64 GB ($400) or 96 GB ($800, with the 12/38 M2 Max only).

Given that these new MacBook Pro models provide more performance and battery life for the same prices as before, their release is entirely positive. If you were waiting for an M2 Pro or M2 Max laptop, now’s the time to place an order.

Apple Brings Back the Full-Size HomePod

Apple released the original HomePod in 2018, but even after dropping the price from $349 to $299, sales weren’t strong enough thanks to competition from much cheaper smart speakers from Amazon and Google. Apple discontinued the HomePod in 2021 and focused on the $99 HomePod mini. Now Apple has brought the full-size HomePod back, introducing a second-generation HomePod with a few extra features and the same $299 price. You can order it now in white or midnight, which replaces space gray, and it ships on February 3rd.

The new HomePod supports spatial audio with Dolby Atmos for music and video, which should enhance the listening experience. For those getting into home automation, it includes a sensor for temperature and humidity, and you’ll be able to use the Home app to create automations to control blinds, fans, and thermostats. It also supports the new Matter home automation standard. Finally, Apple says that a software update in a few months will add Sound Recognition, which will let the HomePod alert you if it hears smoke or carbon monoxide alarms. Wouldn’t you like to know if an alarm is going off while you’re away from home?

One note. You can use two HomePods to create a stereo pair, but both HomePods must be the same model. So you can’t pair an original HomePod with a second-generation HomePod or mix an HomePod mini with either one.

The main question, which we won’t be able to answer until the second-generation HomePod ships, is if it sounds as good as the original HomePod and hears Siri commands as well. That’s a question because Apple redesigned the HomePod’s audio hardware to use fewer tweeters and microphones. Plus, it relies on the S7 chip that powers the Apple Watch Series 7, as opposed to the A8 that first appeared in the iPhone 6. In short, it seems that Apple has worked to cut costs to enable the necessary profit margins. Given that Amazon’s hardware division reportedly lost $10 billion in 2022 by selling Echo smart speakers at cost, Apple’s move seems sensible, at least as long as it doesn’t hurt the HomePod user experience.

(Featured image by Apple)

Upgrade Past macOS 10.15 Catalina to Keep Getting Microsoft Office Updates

We aren’t quite ready to recommend that everyone upgrade to macOS 13 Ventura, but if you use Microsoft Office with macOS 10.15 Catalina, you should start planning for an upgrade. Microsoft has announced that current versions of its productivity suite—Office for Mac 2019, Office for Mac 2021, and Microsoft 365—will receive updates only if your Mac is running macOS 11 Big Sur, macOS 12 Monterey, or macOS 13 Ventura. If you keep using Catalina, your Office apps will continue to work, but they won’t receive enhancements, bug fixes, or security updates past October’s 16.66 updates. Contact us if you have questions about appropriate upgrade paths.

(Featured image based on an original by iStock.com/jewhyte)

AutoFill in Safari Not Working? Set “My Card” in Contacts

We heard from a client that AutoFill in Safari suddenly stopped entering her name and address in Web forms when she chose Edit > AutoFill Form or pressed Command-Shift-A, forcing her to enter her contact information manually, like an animal. (And yes, the “Using information from my contacts” checkbox was selected in Safari’s AutoFill preferences.) Although we have no idea what caused the problem, the solution turned out to be simple. She went into Contacts, found her personal contact card, and chose Card > Make This My Card. Give this a try if you’re having trouble with AutoFill or haven’t yet started using it in Safari.

(Featured image by Adam Engst)

Protect Your Hidden and Recently Deleted Albums in Photos

Photos has long provided a hidden album you could use to hold images you wanted to keep a little more private. Until this year, however, it was security through obscurity: anyone who knew to reveal the album in Settings > Photos on an iPhone or iPad or by choosing View > Show Hidden Album on the Mac could see its contents. Now you can protect it—and the Recently Deleted album—with Face ID or Touch ID on an iPhone or iPad, or Touch ID or your password on a Mac. You can enable this feature in iOS 16 or iPadOS 16 using Settings > Photos > Use Face ID/Touch ID; in macOS 13 Ventura, choose Photos > Settings > General and select “Use Touch ID or password.” From then on, opening those albums will require authentication.

(Featured image by iStock.com/Kenishirotie)