Two Ways to Manage Your Email So You Can Find It Later

We recently wrote about different ways to organize your files, which prompted some people to ask us about the best ways to manage email. Email may have competition from messaging services like Slack and Microsoft Teams, but for many people, it’s still where the most important communications take place. That’s especially true for anyone who has to work with numerous people outside their organization—there’s a reason why business cards nearly always contain an email address.

As with file organization, how you manage and organize your email is all about making it easier to find a specific message or conversation later. The big difference between files and email is that you usually care about how other people will be able to find and work with your files. With email, however, you’re the only person who has to sort through your messages. Imagine you run an ad agency that has the Belvedere Hotel as a client—your organizational structure for files needs to work for all your colleagues, but no one but you needs to find your email message about what should change in the next print ad campaign.

When managing email so you can find what you want later, most people gravitate to filing messages in mailboxes (sometimes called folders) or searching, though we find that a combination is usually best.

Find Email in Mailboxes

Many people have traditionally used a hierarchical filing structure to organize their email, creating a mailbox for each project. (There’s generally little benefit in creating mailboxes for people or date ranges because it’s easy to search for messages from specific people or between certain dates.)

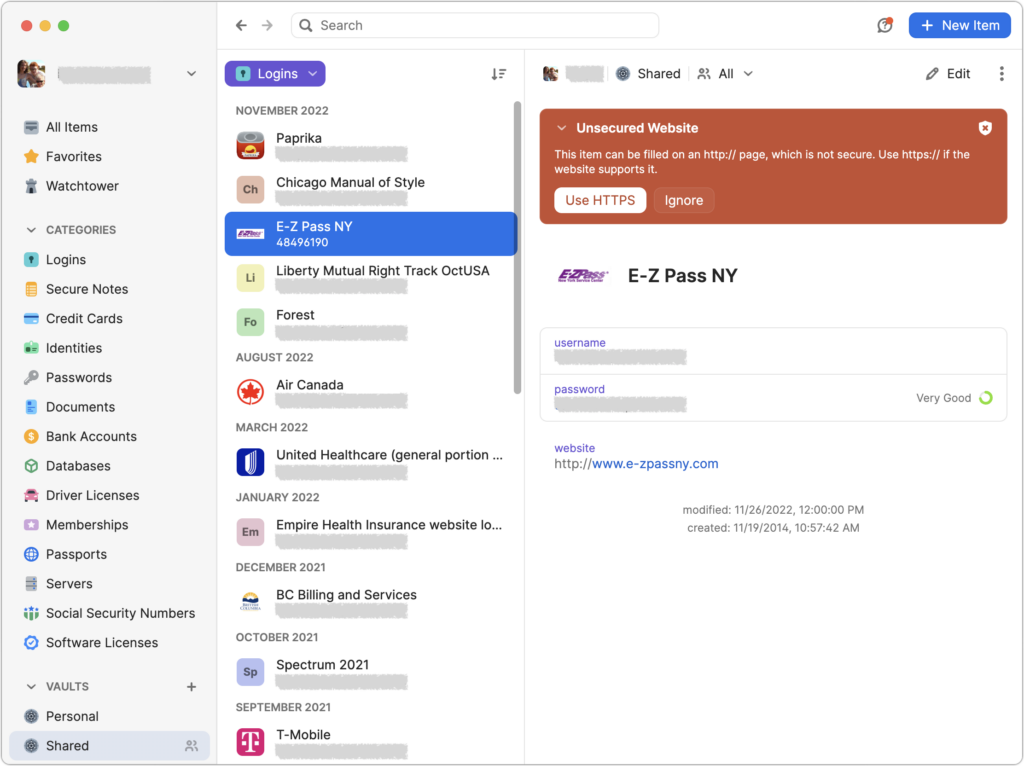
So, much as with files, you might have a top-level mailbox for Clients and a sub-mailbox for each client, including the Belvedere Hotel. You could make additional sub-mailboxes for different Belvedere Hotel projects, but unless you expect to receive a lot of email for each of those projects, increasing the depth of the hierarchy is often unnecessary and extra work.

It’s unnecessary because date sorting options usually make it easy to home in on the message you want even when the mailbox contains hundreds of messages. Plus, the more granular your filing approach, the more manual filing you’ll have to do to ensure that every message ends up in the right place. Worse, many messages will likely cross projects, as could happen in a discussion of a print ad when your contact mentions that they want to reuse the text and graphics in the next email blast too. Should it go in a Print Ads mailbox or an Email Blasts mailbox? Don’t waste time deciding—just leave it in a general Belvedere Hotel mailbox.

How do messages end up in these mailboxes? You can always file messages manually, and you’ll spend some time doing that, no matter what. However, whenever possible, you want to create rules (also known as filters) that file messages automatically. Rules look through every incoming message and take actions—including moving to a mailbox—on messages that match the criteria you specify. For sanity’s sake, you want to make your rules as general as possible.

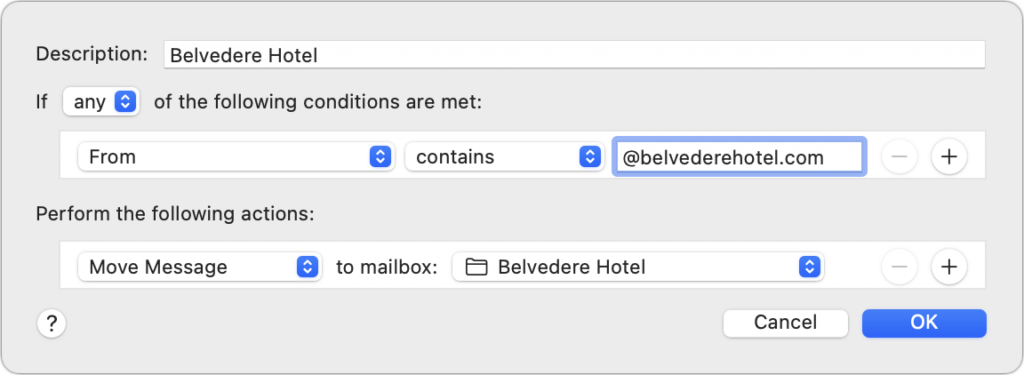
For instance, you could make a rule that moved messages from your contact at the Belvedere Hotel to your associated mailbox. That would work initially, but it would fail if you regularly work with multiple people there or if someone else fills in while your contact is on vacation. So instead of creating a rule that looks for a specific email address or even a set of email addresses, set your rule to look for all messages from the belvederehotel.com domain.

Let’s assume a colleague asks you for details on the latest Belvedere Hotel print ad. How do you find that information? Here’s how we’d go about it:

  • Open the Belvedere Hotel mailbox, sort by date if necessary, and scroll through the list of recent messages. Most of the time, the message you need to find has arrived recently, and you’ll remember the sender and subject well enough to pick it out.
  • If you can’t identify the message quickly by scanning, search for it based on the sender or recipient, date, and keywords. Look first within the mailbox where you think the message is located, but if that fails, broaden the search to all your mailboxes.

The reason to start with a scan of the mailbox is that it’s usually the most efficient. However, if you know a message is old or can’t remember the sender, you may be better off starting with a search.

If you can’t easily build rules to move most of your email into the appropriate mailboxes, that’s a hint that a search-first approach might work better for you. You shouldn’t be spending a lot of your time filing email—that’s what computers are for!

Search for Email

When Google launched Gmail in 2004, the company introduced a new way of managing email that leveraged the company’s strength in search. The subsequent popularity of Gmail—which now has over 1.8 billion active users worldwide—means that a great number of people now default to searching when they want to find particular email messages, regardless of which email service they use.

A search-first approach can be fast and effective and doesn’t require that you file messages into mailboxes. For instance, if you always get email about Belvedere Hotel ad campaign details from the same person, it may be faster to search for email from that person first, rather than looking through a mailbox.

Searching rather than browsing for email works best for people whose work doesn’t break down neatly into categories or regularly cuts across multiple projects. But it’s not for everyone. For a search-first approach to be effective:

  • You must have the sort of brain that remembers details to use as search terms. If you’re more in the “I know it when I see it” camp, you may find searching less effective.
  • Your email must contain sufficiently unusual keywords that searching for a person and a keyword or two is likely to find the message you want.
  • You have to keep most messages. That may seem obvious, but if you delete a lot of incoming messages, you’ll likely remember messages you won’t be able to find.
  • Your email app must search quickly and accurately. Gmail is the gold standard, but other email apps have decent search capabilities.

Although we’re all familiar with searching in Google—and if you like searching the Web, you’ll probably like searching your email—a few tricks will make your email searches more likely to succeed:

  • Start with a focused search term—usually a person or unique keyword—that’s the most likely to give you the smallest number of results to scan for the message you want.
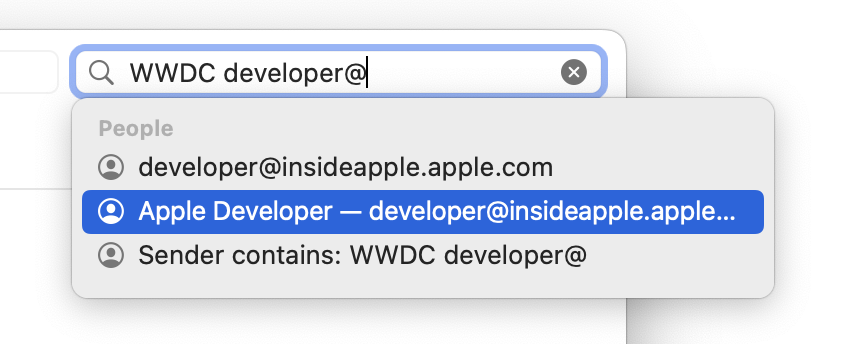
  • When searching for a person’s name, if your email app offers to autocomplete to that person’s email address, let it. This is because searching for “smith” is much less likely to work well than “[email protected].”
  • You can specify whether the person for whom you’re searching was the sender or the recipient, which helps reduce the number of results for people who appear regularly in your email.
  • If you’re looking for an attached file, you can usually specify that your search should return only messages that contain attachments, perhaps even just specific file types.
  • When you can’t remember much about the contents of the desired message, try to remember surrounding details, such as when the message might have been sent or who else might have received it, and add those terms to your search.

Precisely how you formulate these searches will vary by email app, but check these pages for details on using Mail, Outlook, and Gmail.

Choose the Best of Both Worlds

In reality, neither solely browsing through mailboxes nor relying entirely on search is likely to be satisfying. Those who file everything will find themselves needing to search within mailboxes at times, and those who prefer searching may find that using rules to store easily identified messages in associated mailboxes (mailing lists, for instance, or all email from your organization’s domain) makes searching easier.

(Featured image by iStock.com/anyaberkut)

Merge Duplicate Photos and Videos in iOS 16, iPadOS 16, and Ventura

It’s all too easy to end up with duplicate photos and videos in your Photos library. The most common way is to use the Duplicate command, but we’ve seen duplicates appear due to accidentally repeated actions in other apps, repeated screenshots, multiple imports that include the same image (much as Photos tries to prevent this now), and buggy behavior in iCloud Photos.

Identifying duplicate photos and videos is difficult to do manually. Although the human eye is good at noticing when things aren’t the same, it’s much harder to determine if two images are identical. And which of two identical images you want to keep can require that you compare file formats, sizes, and other metadata, which is fussy, tedious work.

Apple has come to the rescue with a new duplicate identification and merging capability in Photos in iOS 16, iPadOS 16, and macOS 13 Ventura. It may not be perfect, but it’s a good start and extremely easy to use.

To get started on the iPhone, tap Albums in the toolbar, scroll down to the Utilities section, and tap Duplicates (left). On the iPad, Duplicates appears in the sidebar under Utilities (middle), and on the Mac, it’s in the sidebar under the top-level Photos section (right).

Even if you use iCloud Photos, which syncs your photos and videos between all your devices, you may not see the same number of duplicates on each device. We’re not sure why this is the case—perhaps Apple’s code isn’t identical between platforms—but it may be necessary to run through the merging process on multiple devices to catch everything. Plus, it seems as though Photos identifies new duplicates slowly in the background, so the Duplicates album may not include new duplicates right away.

Regardless, once you’re in the Duplicates album, you’ll see a scrolling list of all duplicate photos and videos. Photos automatically displays the file size on each item so you can see that some are smaller than others. Tap the ••• button at the top right on the iPhone or iPad, or use the Filter By menu on the Mac to show all items, just photos, or just videos. You can also switch between a square grid and one that preserves the aspect ratio of the images—the control is in the ••• menu on the iPhone, the Aspect/Square button on the iPad, and the thumbnail toggle button next to the size slider on the Mac.

Note that Photos explains at the bottom of the screen what counts as a duplicate. Exact duplicates do, of course, but Photos also matches images that differ in size or other metadata. It may also identify images that are very nearly the same.

You can tap or click each image in a set to view it at full size, and if you were a glutton for punishment, you could delete one of the images in the set manually with the trash button. But there’s no reason to do that because Photos provides a Merge button (or link, on the Mac) next to each set. Tap or click that, and Photos will keep one version that combines the highest quality and relevant metadata, moving the rest to Recently Deleted. Note that Photos tells you when duplicates are exact (left) or very similar (right).

When you have lots of duplicates, using the Merge button for each set will be time-consuming. Instead, tap the Select button at the top on the iPhone and iPad. Then you can tap to select individual photos (which you could then trash manually; left), tap the Select button next to duplicates to select them (right), or tap the Select All button to select everything. Once you select one or more duplicate sets, a Merge link appears at the bottom. Tap that to merge the selected duplicates.

If you don’t want to verify each of the duplicates Photos has found, the process becomes as simple as this:

  1. Open the Duplicates album.
  2. Tap Select.
  3. Tap Select All.
  4. Tap Merge (###).

Boom, you’re done, regardless of how many hundreds or thousands of duplicates you had.

In our testing, Photos does a pretty good job, but for another approach, check out PowerPhotos, which uses a different visual comparison engine and may identify more images that are sufficiently similar to qualify as duplicates in your mind. It costs $29.95, but you can use its free trial to see if it will help your duplicate problem.

(Featured image by Adam Engst)

These New Year’s Resolutions Will Improve Your Digital Security in 2023

Happy New Year! For many of us, starting a new year means reflecting on fresh habits we’d like to adopt. Although we certainly support any resolutions you may have made to get enough sleep, eat better, reduce social media usage, and exercise more, could we suggest a few that will improve your digital security and reduce the chances that bad things will happen to you online?

Keep Your Devices Updated

One important thing you can do to protect your security is to install new operating system updates and security updates soon after Apple releases them. Although the details seldom make the news because they’re both highly specific and highly technical, you can get a sense of how important security updates are by the fact that a typical update addresses 20–40 vulnerabilities that Apple or outside researchers have identified. Some are even zero-day vulnerabilities that are already being exploited in the wild.

It’s usually a good idea to wait a week or so after an update appears before installing it, on the off chance that it has undesirable side effects. Although such problems are uncommon, when they do happen, Apple pulls the update quickly, fixes it, and releases it again, usually within a few days.

Use a Password Manager

We’ll keep banging the password manager drum until the replacement for passwords, passkeys, have become ubiquitous, and that will take years. Until then, if you’re still typing passwords in by hand or copying and pasting from a list you keep in a file, please switch to a password manager like 1Password or LastPass. Even Apple’s built-in password manager and iCloud Keychain are fine, if not as fully featured as the others. A password manager offers five huge benefits:

  • It generates strong passwords for you. Mypassword1 can be hacked in seconds.
  • It stores your passwords securely. An Excel file on your Desktop is a recipe for disaster.
  • It enters passwords for you. Wouldn’t that be easier than typing them in manually?
  • It audits existing accounts. How many of your accounts use the same password?
  • It lets you access passwords on all your devices. Finally, easy logins on your iPhone!

A bonus benefit for families is password sharing. It allows, for example, a married couple to share essential passwords or parents and teens to share specific passwords.

In short, using a password manager is faster, easier, more secure, and just all-around better. If you need help getting started, get in touch.

Beware of Phishing Email

Individuals and businesses alike frequently suffer from security lapses caused by phishing, forged email that fools someone into revealing login credentials, credit card numbers, or other sensitive information. Although spam filters catch many phishing attempts, you must always be on your guard. Here’s what to watch for:

  • Any email that tries to get you to reveal information, follow a link, or sign a document
  • Messages from people you don’t know, asking you to take an unusual action
  • Direct email from a large company for whom you’re an anonymous customer
  • Forged email from a trusted source asking for sensitive information
  • All messages that contain numerous spelling and grammar mistakes

When in doubt, don’t follow the link or reply to the email. Instead, contact the sender another way to see if the message is legit.

Avoid Sketchy Websites

We won’t belabor this one, but suffice it to say that you’re much more likely to pick up malware from sites on the fringes of the Web or that cater to the vices of society. The more you can avoid sites that provide pirated software, “adult” content, gambling opportunities, or sales of illicit substances, the safer you’ll be. That’s not to say that reputable sites haven’t been hacked and used to distribute malware, but it’s far less common.

If you are concerned after spending time in the darker corners of the Web, download a free copy of Malwarebytes or VirusBarrier Scanner and scan for malware manually.

Never Respond to Unsolicited Calls or Texts

Although phishing happens mostly via email, scammers have also taken to using texts and phone calls. Thanks to weaknesses in the telephone system, such texts and calls can appear to come from well-known companies, including Apple and Amazon. Even worse, with so much online ordering, fake text messages pretending to help you track packages are becoming more common.

For texts, avoid following links unless you recognize the sender and it makes sense that you’d be receiving such a link. (For instance, Apple can text delivery details related to your orders.) Regardless, never enter login information at a site you’ve reached by following a link because there’s no way to know if it’s real. Instead, if you want to learn more, navigate the company’s site manually by entering its URL, then log in.

For phone calls from companies, unless you’re expecting a call back from a support ticket you opened, don’t answer. Let the call go to voicemail, and if you feel it’s important to respond, look up the company’s phone number elsewhere and talk with someone at that number rather than the one provided by the voicemail.

Let’s raise a glass to staying safe online in 2023!

(Featured image by iStock.com/Bet_Noire)

Text Flight Numbers to People You’re Visiting So They Can Track Your Flight

Next time you’re flying to visit your Apple-using family or friends, send them your flight number using Messages when you leave. Then they can easily track your flight in the air and see when you’re arriving. Just text them the flight number prefixed with the airline’s abbreviation, like AA for American Airlines, AC for Air Canada, BA for British Air, DL for Delta, or UA for United Airlines. If Messages recognizes the flight number, it will underline it to indicate that tapping or clicking will bring up the current flight information. This feature also helps you extract more information from a texted flight status update that an airline sends to you. If you know a flight number but don’t have it in Messages, you can get the same information on the Mac using Spotlight (press Command-Space). On an iPhone or iPad, use the  Search feature (pull down on the Home screen).

(Featured image by iStock.com/SamAntonioPhotography)

Check the Weather on Your Mac and iPad, Finally!

At long last, Apple has plugged one of the most inexplicable holes in its app library—the lack of a Weather app for the iPad and Mac. In iPadOS 16 and macOS 13 Ventura, you’ll now find a large-screen version of the iPhone’s iOS 16 Weather app. Locations you enter on one device automatically sync to your other devices, and the feature set is identical across the different platforms. That’s especially welcome now that Apple has integrated all the features of the acquired Dark Sky service, including hyperlocal notifications of incoming weather, next-hour and 12-hour animated forecast maps (tap the map), and time-based graphs of temperature, UV index, wind, precipitation, “feels like” temperature, humidity, visibility, and pressure. Plus, you’ll find cards for air quality and sunrise/sunset times. You no longer need to look elsewhere on the iPad and Mac for a basic weather app!

(Featured image by iStock.com/DNHanlon)