It’s no exaggeration to say that videoconferencing went mainstream during the pandemic. However, Apple’s FaceTime didn’t stack up well against Zoom and others due to its emulation of the telephone call experience, questionable interface decisions, and lack of cross-platform compatibility. However, with iOS 15, iPadOS 15, and macOS 12 Monterey, Apple has nearly brought FaceTime into feature parity with Zoom and others and it has even added a few features that break new ground.
FaceTime Links
One of the smallest new features in FaceTime may be the most important. No longer do you have to call others via FaceTime, an awkward approach left over from the days of landlines. That’s still possible, but it’s easier and more considerate to make and share a FaceTime link instead, which lets others join your call when they’re ready. FaceTime links make it effortless to rejoin a call if you have to drop off or if something goes wrong, and they simplify switching from one device to another. You can share FaceTime links like any other Web link, through Messages, email, discussion systems like Slack, or posting on a Web page.
To create a FaceTime link, launch the FaceTime app and use the Create Link button in the upper left. If you’re creating it in iOS 15 or iPadOS 15, you can add a name before copying or sharing the link in the share sheet. In Monterey, clicking the button presents a sharing menu with similar appropriate options.
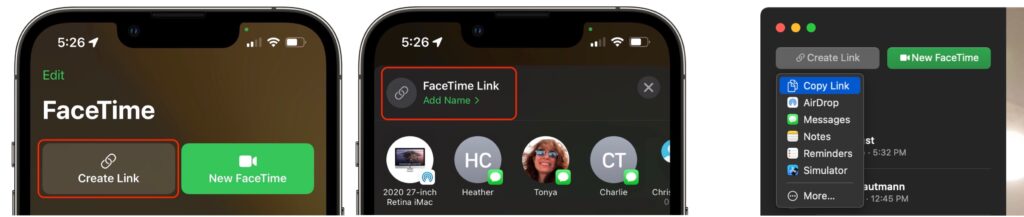
To join a call, all a recipient of the link has to do is tap or click the link. If they’re running one of Apple’s latest operating systems, the call will also appear in the FaceTime app, under Upcoming.

Either way, people joining the call get a preview window in which they can adjust their video and mic settings. After they hit the Join button, the organizer is notified that they’re waiting and can add them to the call. (That may seem like an unnecessary extra step, but it ensures random trolls can’t join FaceTime calls whose links have been shared publicly.)
If you’re scheduling a call, you can create a FaceTime link within an event in Calendar. That’s handy to make sure you have the link available at the right time, to make it available on all your devices, and to let others access it via a shared calendar. Use the Location or Video Call field, and select FaceTime when it’s offered. The event then gets a Join button that makes it easy to access the call. (If you’re sharing the calendar with someone who isn’t using one of Apple’s latest operating systems, they’ll just see a link they can click.)
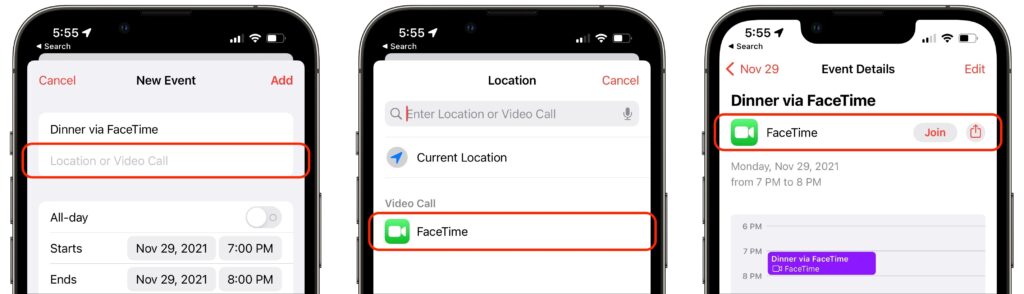
Despite being associated with an event, such FaceTime links aren’t time-specific. You can start the call any time you want, and anyone else can attempt to join it at any time, but they’ll be able to get in only if you as the organizer let them in. So it won’t do them any good to join before or after the scheduled time.
FaceTime Web App
FaceTime links are also essential for allowing FaceTime calls to include those who aren’t running Apple’s latest operating systems. If you’re still on macOS 11 Big Sur or iOS 14, opening a FaceTime link switches to Safari and opens the FaceTime Web app. That also works for those using Android, Windows, or Linux, as long as they have a compatible Web browser, which means Google Chrome or another Chrome-based browser like Brave or Microsoft Edge. Firefox won’t work.
For the most part, the FaceTime Web app works just like the native FaceTime app, with the ability to change basic camera and microphone settings and support for grid view. There are two notable limitations:
- FaceTime Web app users can only join calls, not initiate them.
- Advanced options like the mic modes and video effects aren’t available.
Mic Modes and Video Effects
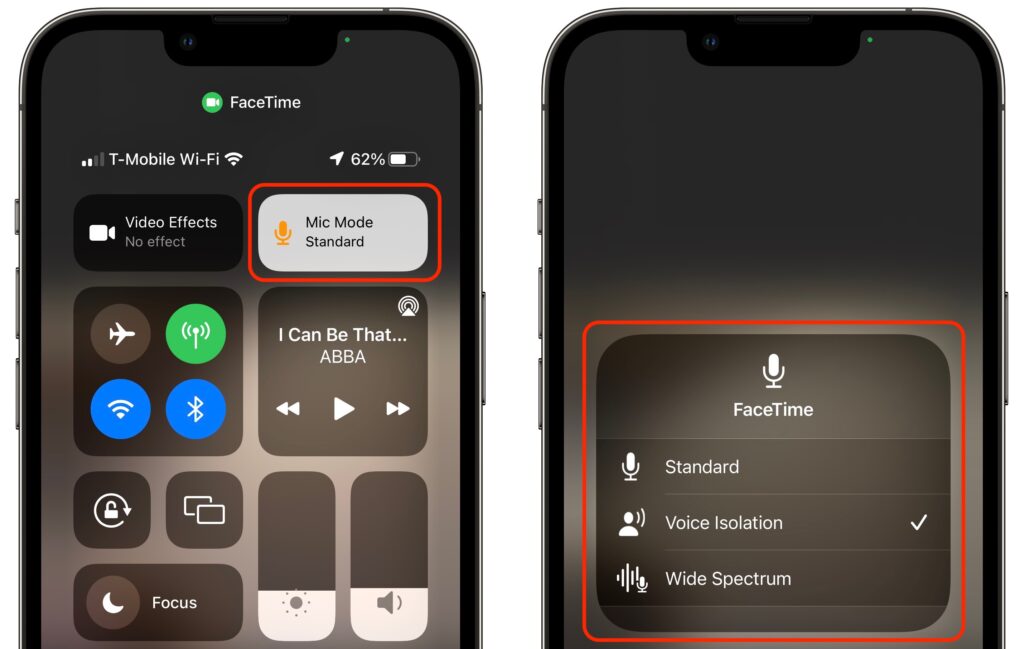
In an effort to catch up with the likes of Zoom, Apple added several audio and video features to FaceTime. There are now three mic modes that you can enable in Control Center during a call:
- Standard: FaceTime does nothing special to the audio.
- Voice Isolation: FaceTime focuses on your voice, working to eliminate non-vocal sounds and other background noise.
- Wide Spectrum: FaceTime expands its attention to all the sounds in the room, which is essential for things like music lessons.
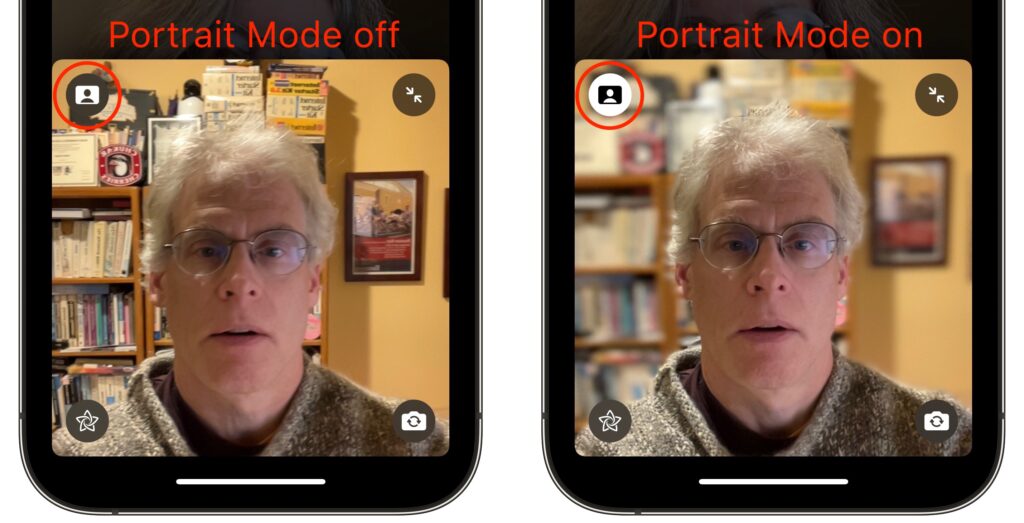
Although the equivalent Control Center button is labeled Video Effects, there’s only one at the moment: Portrait mode. It works exactly as it does in the Camera app for photos, keeping you in focus and blurring the background. Perhaps Apple will add other video effects in the future, much like Zoom’s virtual backgrounds and immersive sets. You can also toggle Portrait mode by tapping the Video Effects button in your FaceTime tile.
The Voice Isolation and Wide Spectrum mic modes, and the Portrait mode video effect, are available only on iPhones and iPads that have an A12 Bionic chip or later, or an M1 chip. Similarly, they work only on M1-based Macs, not older Intel-based Macs.
Grid View
When Apple first introduced FaceTime group calls, participants’ tiles would swim around on the screen, moving and expanding to indicate who was speaking. It was dizzying. Happily, Apple finally listened to annoyed users and has now introduced a simple grid view like every other videoconferencing app on the planet.
Once there are four or more participants in a call on an iPhone or iPad, a Grid button appears when you tap the screen to reveal the FaceTime controls. Tap it to switch into or out of grid view. In Monterey, there’s an always-visible Grid button in the upper-right corner.
Screen Sharing for iPhones and iPads
As helpful as FaceTime links are, our favorite new feature of FaceTime is screen sharing for those using an iPhone or iPad. (Macs can’t currently participate in FaceTime screen sharing but have their own screen sharing capabilities, accessed through the Conversations menu in Messages.) With a couple of taps, you can share your screen with someone else, or they can share their screen with you, all while maintaining the video call. For many remote workers, this feature is essential, whether you are collaborating on a project or showing your work to your boss. Another obvious use is remote tech support. If someone is having trouble accomplishing something on their iPhone or iPad, you can see what’s going wrong live on a FaceTime call. And kids, no doubt, will find many fun things to do together.
To share your screen during a FaceTime call, tap anywhere on the screen to reveal the FaceTime controls, tap the screen sharing button on the right, and tap the Share My Screen confirmation prompt. After a 3-second countdown, others on the call can see your screen, even as you switch away from the FaceTime app and use your iPhone or iPad however you want.
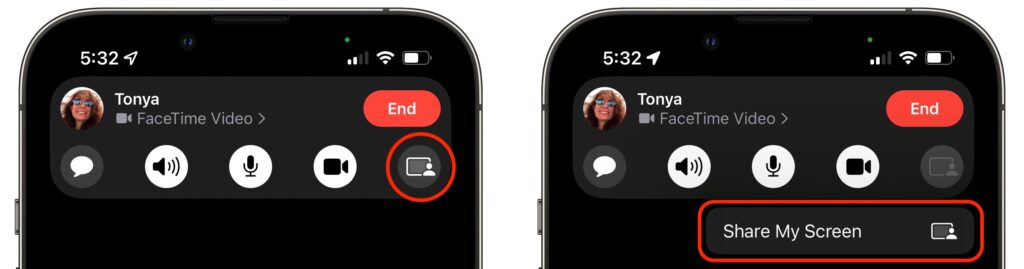
While you’re sharing your screen, a purple status icon reminds you that others can see what you’re doing. To stop sharing your screen, tap someone’s video tile to switch back to the FaceTime app and tap the screen sharing button again.
When someone shares their screen with you, a Picture-in-Picture (PiP) window of their screen appears. Tap it to expand it to the entire screen, moving the FaceTime call video to its own PiP window. Tap that FaceTime PiP window to return to the call. If you switch to another app, as shown below, the shared screen returns to being a PiP window. If any PiP window is in your way, you can drag it to another corner or swipe it off the screen to the left or right to hide it entirely. A tab appears to indicate the hidden PiP window; tap it to bring the window back.
SharePlay
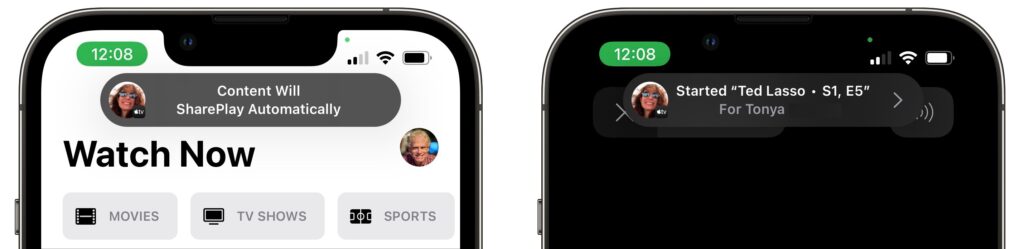
People will either love SharePlay or ignore it entirely. It enables everyone on a FaceTime call to watch the same video or listen to the same audio while continuing the conversation. The big caveat is that everyone must have legal access to the content, which generally means a subscription to whatever service is being used, whether that’s Apple Music, Apple TV+, Disney+, HBO MAX, or Paramount+. Currently, SharePlay works only in iOS 15 and iPadOS 15 and on the Apple TV running tvOS 15. It’s slated to appear in a future version of Monterey, perhaps 12.1.
Initiating a SharePlay session is easy: simply navigate to Apple’s TV or Music app, or another app that supports SharePlay, and start playing something. You may be asked if you want to play it for everyone or just for yourself, or you may be told the content will play automatically. Assuming everyone on the call has the necessary subscription, the audio or video starts playing instantly.
What’s a little freaky about SharePlay is that, with one minor exception, everyone is an equal participant. If you start playing something, someone else can pause it or rewind it, say, and the video will pause or rewind for everyone. The exception is that only the person who started playing a video can stop it (tap the screen to reveal the controls), although anyone can start playing something else to replace it.
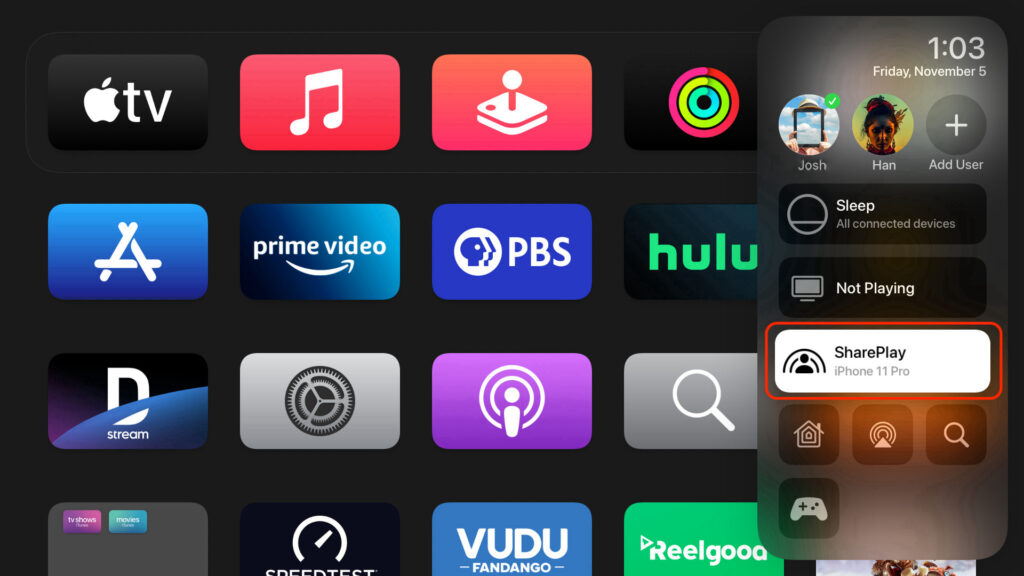
If you have an Apple TV, you can initiate video playback from the Apple TV or move something that’s already playing to the Apple TV. While you’re on a FaceTime call on your iPhone or iPad, press and hold the TV button on the Apple TV’s remote to open Control Center, and then select the SharePlay button that appears there to get started.
With all these new features, it’s time to rethink how you use FaceTime, and that’s especially true if you haven’t been using FaceTime because it lacked the features in some other videoconferencing app.
(Featured image by iStock.com/jacoblund)