How to Unlock Your Mac with a Wave of Your Hand (well, Apple Watch)

It’s magic. You walk up to your Mac, touch a key to wake it up, and upon noticing that you’re wearing your Apple Watch, it unlocks without making you enter a password. Brilliant! For some of us, it’s almost a reason alone to get an Apple Watch.

Auto Unlock, as Apple calls this feature, lets you protect your Mac with a strong password—recommended for international spies and teenage girls alike—without forcing you to type your password repeatedly. (You will have to type it the first time after you turn on, restart, or log out of your Mac.)

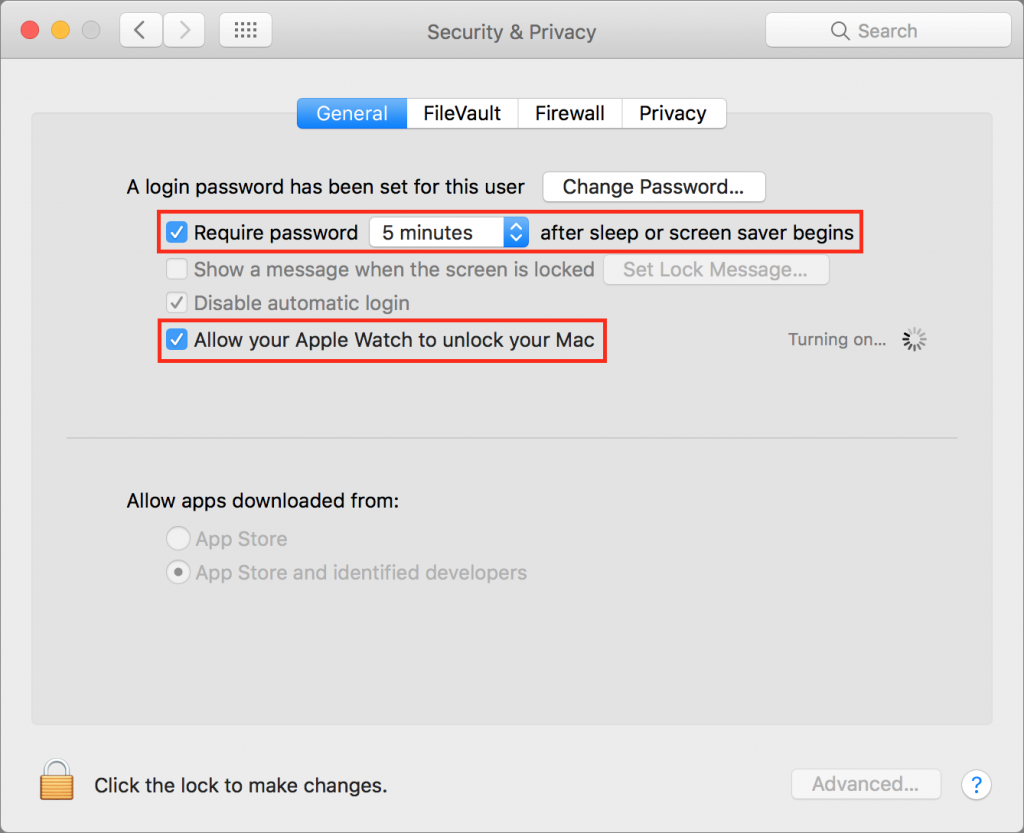
To enable this protection and keep people out of your Mac when you’re away, go to System Preferences > Security & Privacy > General and select “Require password after sleep or screen saver begins.” Since your Apple Watch will be doing all the heavy lifting, feel free to set a short time span. Then select “Allow your Apple Watch to unlock your Mac.” If the stars are smiling on you, that’s all you’ll need to do.

However, it’s likely that something won’t be quite right for Auto Unlock to function properly, since it has a bunch of requirements.

First, make sure your hardware is new enough and sufficiently up-to-date. Your Mac must be from mid-2013 or later, and it must be running macOS 10.12 Sierra or later. (If you aren’t sure about your Mac, see if that checkbox labeled “Allow your Apple Watch to unlock your Mac” is present. If not, your Mac is too old.) Any model of Apple Watch will work, but it needs to be using at least watchOS 3.

Next, you need to turn on two-factor authentication. If you were using Apple’s previous two-step verification, you must switch to two-factor authentication. It adds an extra layer of security to your Apple devices and accounts, including iCloud, and is well worth doing in this day and age of password thefts. Plus, it ensures you don’t have to remember those inscrutable security questions about your favorite elementary school teacher! The links earlier in this paragraph have more details, but you enable two-factor authentication in System Preferences > iCloud > Account Details > Security.

Now for the checklist. For Auto Unlock to work:

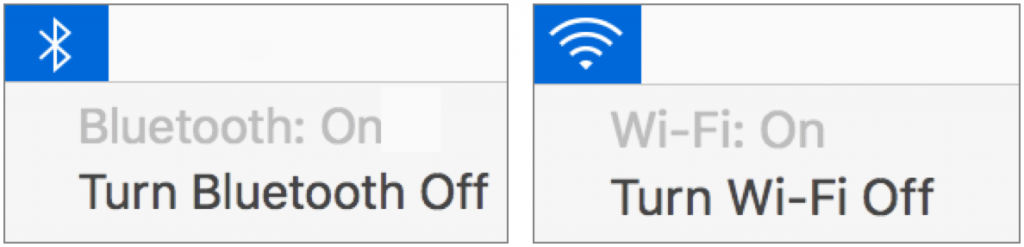
  • Your Mac must have Bluetooth turned on. Click the Bluetooth icon in the menu bar or look in System Preferences > Bluetooth.
  • Your Mac must have Wi-Fi turned on, even if you’re using Ethernet. Click the Wi-Fi icon in the menu bar and choose Turn Wi-Fi On if necessary.
  • Your Mac and your Apple Watch must be signed in to iCloud using the same Apple ID. Verify that in System Preferences > iCloud on the Mac, and on your iPhone in the Apple Watch app, in General > Apple ID.
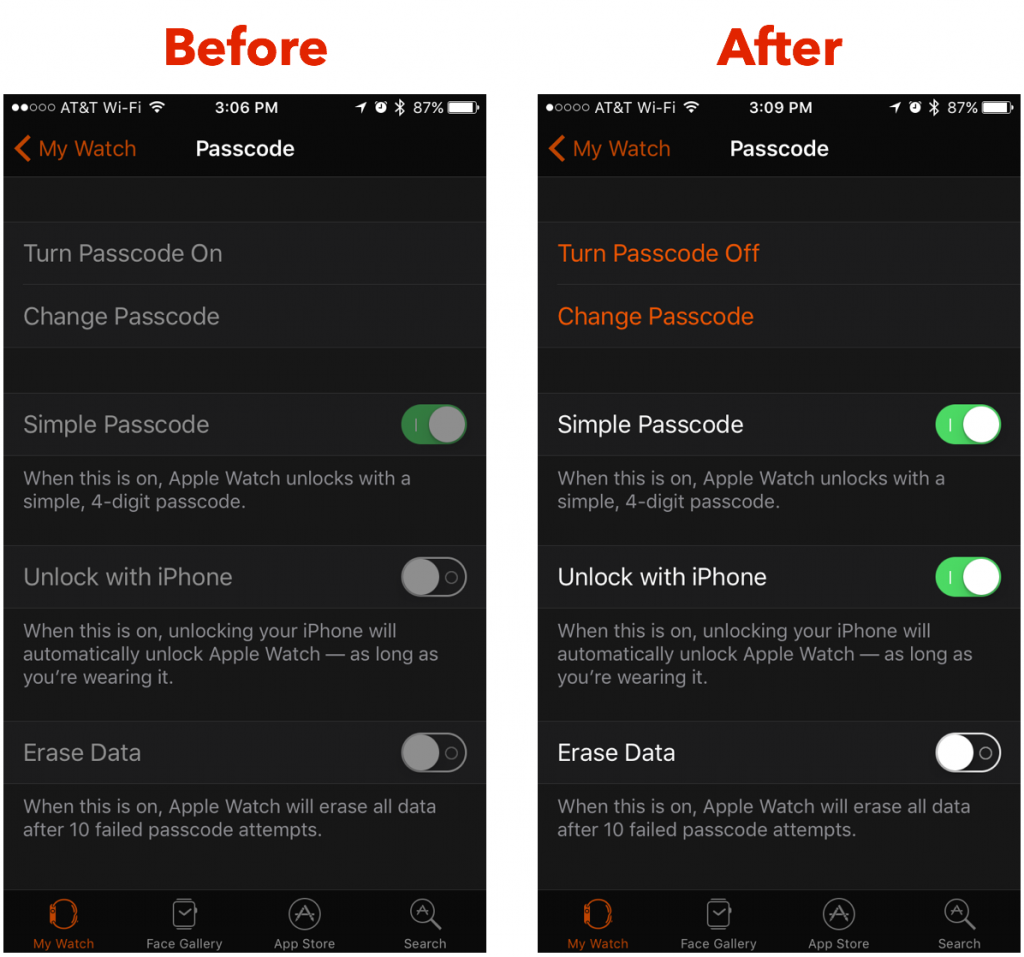
  • Your Apple Watch must have a passcode enabled. On your iPhone, in the Apple Watch app, tap Passcode and then Turn Passcode On. So you don’t have to enter your passcode, enable Unlock with iPhone.
     
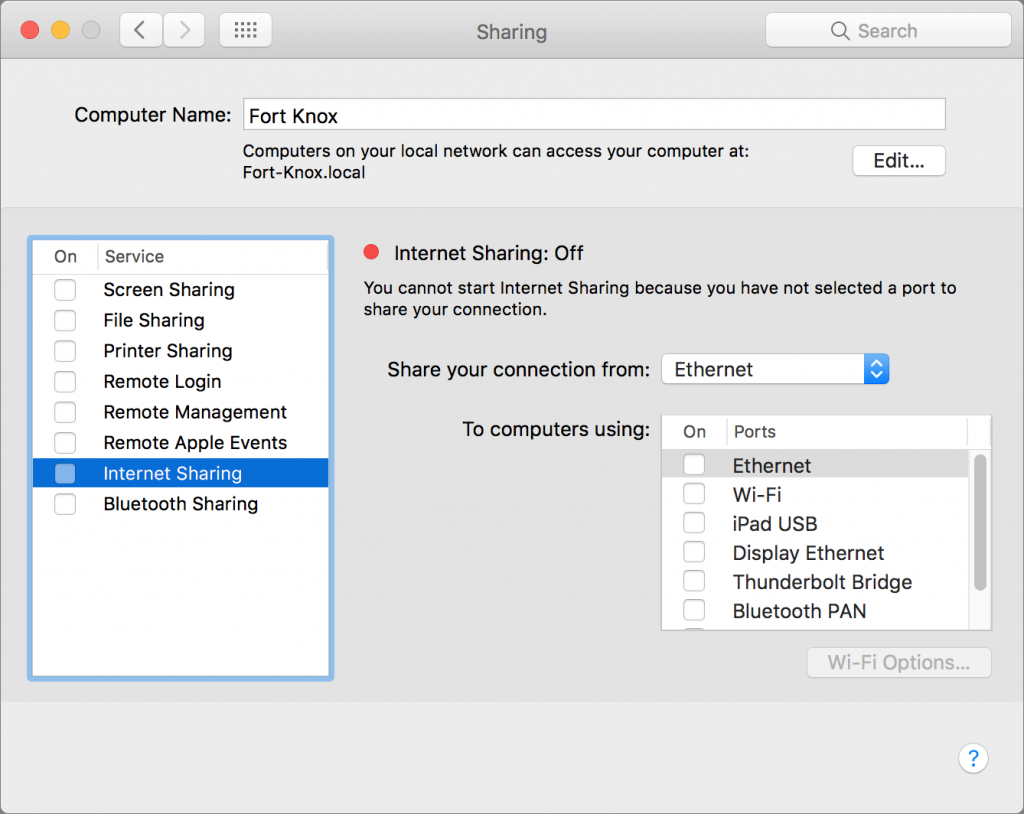
  • Your Mac must not be using Internet Sharing. Verify that in System Preferences > Sharing.


It’s a lot to check, we know, but you only have to do it once. After that, go back to System Preferences > Security & Privacy > General and select “Allow your Apple Watch to unlock your Mac.” It may prompt for your password, and Bob’s your uncle. (Unless he’s not. We’ve never understood that expression.)

After that, every time you wake your Mac or stop the screensaver, it will unlock automatically with your Apple Watch. If you’re not wearing the Apple Watch, or if your watch is locked (hence our recommendation of Unlock with iPhone), you can still type your password at the Mac’s login screen.

There is one small gotcha. Every time you install a macOS update, Apple disables that checkbox, presumably for some security reason. Just go back into the Security & Privacy preference pane and turn it back on. Happily, that’s nothing for the win of not having to unlock your Mac with your password multiple times per day.

Capture Perfect Photos of Kids, Pets, Sports, and Wildlife with the iPhone’s Burst Mode

Snapping the perfect photo is tough. Children, especially babies and teenagers, can be difficult to pose. Cats relish looking cute and then turning away just as you grab your camera. Action shots in sporting events are impossible to predict. And you never know when that unusual bird will choose to fly away. Miss the moment, and you’ve got a picture with closed eyes, funny expressions, blurry action, or nothing in the frame.

Professional news, sports, and wildlife photographers have long solved these problems with burst mode, which takes multiple photos in quick succession. Film cameras required a motor drive to advance the film quickly enough, but now that nearly every camera is digital, burst mode simply needs enough processing power and storage space to record frame after frame. And, unsurprisingly, the iPhone (and iPad) has more than enough of both, plus a tremendously easy way to engage burst mode.

The secret hidden trick to using burst mode in the iPhone’s Camera app? Instead of pressing the shutter button once, press and hold it as long as you want to keep taking shots, releasing it when you’re done. That’s it!

You’ll hear the shutter sound continuously as long as you hold the button down, and a count indicator appears just above the shutter button to show how many images you’ve taken. The iPhone’s burst mode captures at 10 frames per second, so if you shoot for 2.5 seconds, you’ll end up with 25 photos. Burst mode appears to be limited only by storage space; an iPhone 7 didn’t hesitate when using burst mode for 20 seconds—200 photos!

The hardest part of using burst mode is picking which images to keep, which you do in Photos in either iOS or macOS. Images captured in burst mode appear as “stacks” in both the main Photos view and the automatically created Bursts album.

First, tap a burst stack, tap Select (on the Mac, double-click the stack and then click the Make a Selection button), and swipe left and right to compare all the photos. Tap anywhere on each photo you want to keep so it gets a blue checkmark at the bottom. When you’re finished, tap Done.

Photos then asks if you want to keep everything or just the favorites—unless you hadn’t finished selecting the best shots, tap Keep Only X Favorites (on the Mac, click Keep Selection).

One warning. If you use iCloud Photo Library or My Photo Stream to sync photos between devices, it might take quite some time for all the burst shots to move from the iPhone to the Mac. Photos on both platforms reports on the number of pictures in the burst, so if you’re selecting photos shortly after shooting, make sure the number of shots matches before proceeding. Photos on the Mac puts a circular progress indicator in the lower-right corner to indicate that photos are still loading.

OK, two warnings. If you’re using My Photo Stream to transfer photos to your Mac, only those burst photos that you’ve marked as favorites will transfer. To set it so entire bursts transfer automatically, open Settings > Photos & Camera and enable Upload Burst Photos.

Along with the obvious uses with kids, pets, sports, and wildlife, you might also find burst mode useful when:

  • Framing a shot before a moving person or object enters it
  • Capturing splashing water
  • Shooting groups of people who can’t keep their eyes open at the same time
  • Photographing someone walking in full stride
  • Getting the perfect picture of an object blowing in the wind.

So give burst mode a try today!

Sleep (Your Mac) More to Save Time and Power

What’s your desktop Mac doing when you’re not using it? Depending on your settings and usage habits, you could be wasting both power and your own time. We’ve found that some people have out-of-date beliefs about their Macs’ different idle-time states. Let’s set the record straight.

First off, every Mac has three basic states: active, sleeping, and shut down. Desktop Macs use the most power when active, of course, and although details vary by model, a 27-inch iMac idles at about 60 watts and maxes out at 240 watts, averaging about 100 watts in regular usage. The Mac Pro is a bit less, since it doesn’t have a screen, and the Mac mini idles at a measly 6 watts and tops out at 85 watts. If you think back to the incandescent light bulb days, you can see that a modern Mac uses roughly the same power as an old-style light bulb. Not bad!

However, that 100 watts is huge compared to the trickle of juice that a Mac requires when sleeping—just about 1 watt for most models (the Mac Pro is the most restless sleeper at 2.8 watts). So you can reduce your Mac’s power usage a hundred-fold or more by allowing it to sleep automatically in System Preferences > Energy Saver.

The key here is to make sure the first checkbox—“Prevent computer from sleeping automatically when the display is off”—is not selected. It’s also good to set a relatively short time for the “Turn display off after” slider unless you spend a lot of time watching your screensaver or want to make sure the screen doesn’t go black when you’re giving a presentation.

Of course, you can always choose Sleep from the Apple menu, press the Power button for 1.5 seconds, or press Control-Shift-Eject (or Power, if your keyboard has that key) to put your Mac to sleep right away, but, it’s easier to let Energy Saver do it for you.

Some people have avoided letting their Macs sleep because of the amount of time it takes for the Mac to wake up and be usable again. That may have been a more significant issue in the distant past, but modern Macs are usually ready for action within a few seconds at most.

What about shutting your Mac down? Surely that doesn’t use any power at all. Actually, no. Every Mac uses about .25 watts of power when it’s turned off but still plugged into an outlet. And while it might seem worthwhile to save that .75 watts for when you’re not using your Mac overnight, you have to factor in the extra power that’s wasted while shutting down and starting back up, both of which are power-intensive activities. In fact, depending on how many apps have to quit and reload, shutting your Mac down every night may not result in any power savings over sleep. Plus, you’re wasting time while waiting for it to boot up again—especially if you’ve asked macOS to reopen windows on startup—so it’s a double whammy.

That said, since an occasional restart can prevent or eliminate funky behavior, consider shutting your Mac down if you’re not planning to use it for a few days, perhaps on weekends. You’ll use a tiny bit less power over the weekend, and the Mac will be fresh and ready to go on Monday morning. That will get you the best combination of reliability, instant access, and power savings.

How to Stay on Top of Your To-Dos in Apple’s Reminders App

Apple designed the built-in Reminders app as a list-keeping assistant for both macOS and iOS. You can add reminders of any sort to the default Reminders list, or you can create custom lists, like Groceries or Movies to Watch. Plus, if you’ve set up Family Sharing, you also have a shared Family list that everyone in your family can access.

Making reminders is easy enough, but they can be easy to lose track of, and you may have to hunt through a number of lists to find any given one. How can you be certain that you won’t forget a particular to-do item? One technique that works well is to add a time trigger to the reminder. Time triggers cause your Apple devices to alert you to the reminder, and as an added benefit, they make it easier to find associated reminders.

Say you want to remind yourself to buy concert tickets. To include a trigger in your reminder, you can recruit Siri’s assistance by mentioning a time in your request: “Remind me to get tickets at 10 AM tomorrow.” Or, when you add the reminder manually, pick a day and time. After creating the reminder, hover over it or tap it, tap the i button that appears, and the option to be reminded on a day Then, on a Mac, click the preset day and time to adjust them. In iOS, tap Alarm and set a day and time. Unless the specific time matters, pick a general time that’s early in the day, like 10 AM.

Because your reminder includes a time, it appears not only in the list where you added it but also in the special Scheduled list. That’s key!

Now imagine that it’s first thing tomorrow morning and you’re trying to plan your day. You can either check the Scheduled list in Reminders or ask Siri: “Show me my reminders for today.” Once you see your day’s reminders, you can just do the easy ones, plan them into your day, or reschedule them for another day.

Of course, since you’ve assigned a time-based trigger to these reminders, Apple’s Notifications feature comes into play. At the appropriate time, your Apple devices can display an alert that you must dismiss, show a banner that disappears quickly, or play a sound.

Reminders can make it easy to remember important tasks, but try these tips if you need help:

  • For reminders created on one device to trigger notifications on another, set up your iCloud account on both devices must have Reminders on. Do this on the Mac in System Preferences > iCloud. In iOS, tap Settings > Your Apple ID Name > iCloud (if your copy of iOS isn’t up-to-date, tap Settings > iCloud). Plus, the reminders must be on a list that’s stored in iCloud.
  • If you use Siri to make reminders, specify the list where those reminders will be added if you don’t speak its name. On the Mac, choose Reminders > Default List. In iOS, go to Settings > Reminders > Default List.
  • Configure Mac notifications in System Preferences > Notifications. At the left, select Reminders and then make your choices at the right. The Alerts alert style is the easiest to notice. Set up iOS notifications in Settings > Notifications > Reminders. Turn on the Allow Notifications switch. For best results, turn on Show on Lock Screen and select Alerts under “Alert Style When Unlocked.”

  • On your iPhone, to see a different Reminders list, tap the “stack” of lists at the bottom of the screen.

So, go ahead and dive in. Set up a few tasks with time triggers, and enjoy letting your Apple devices keep track of it all.